Tag Archives: diy

DIY Back to School Teacher Gift 
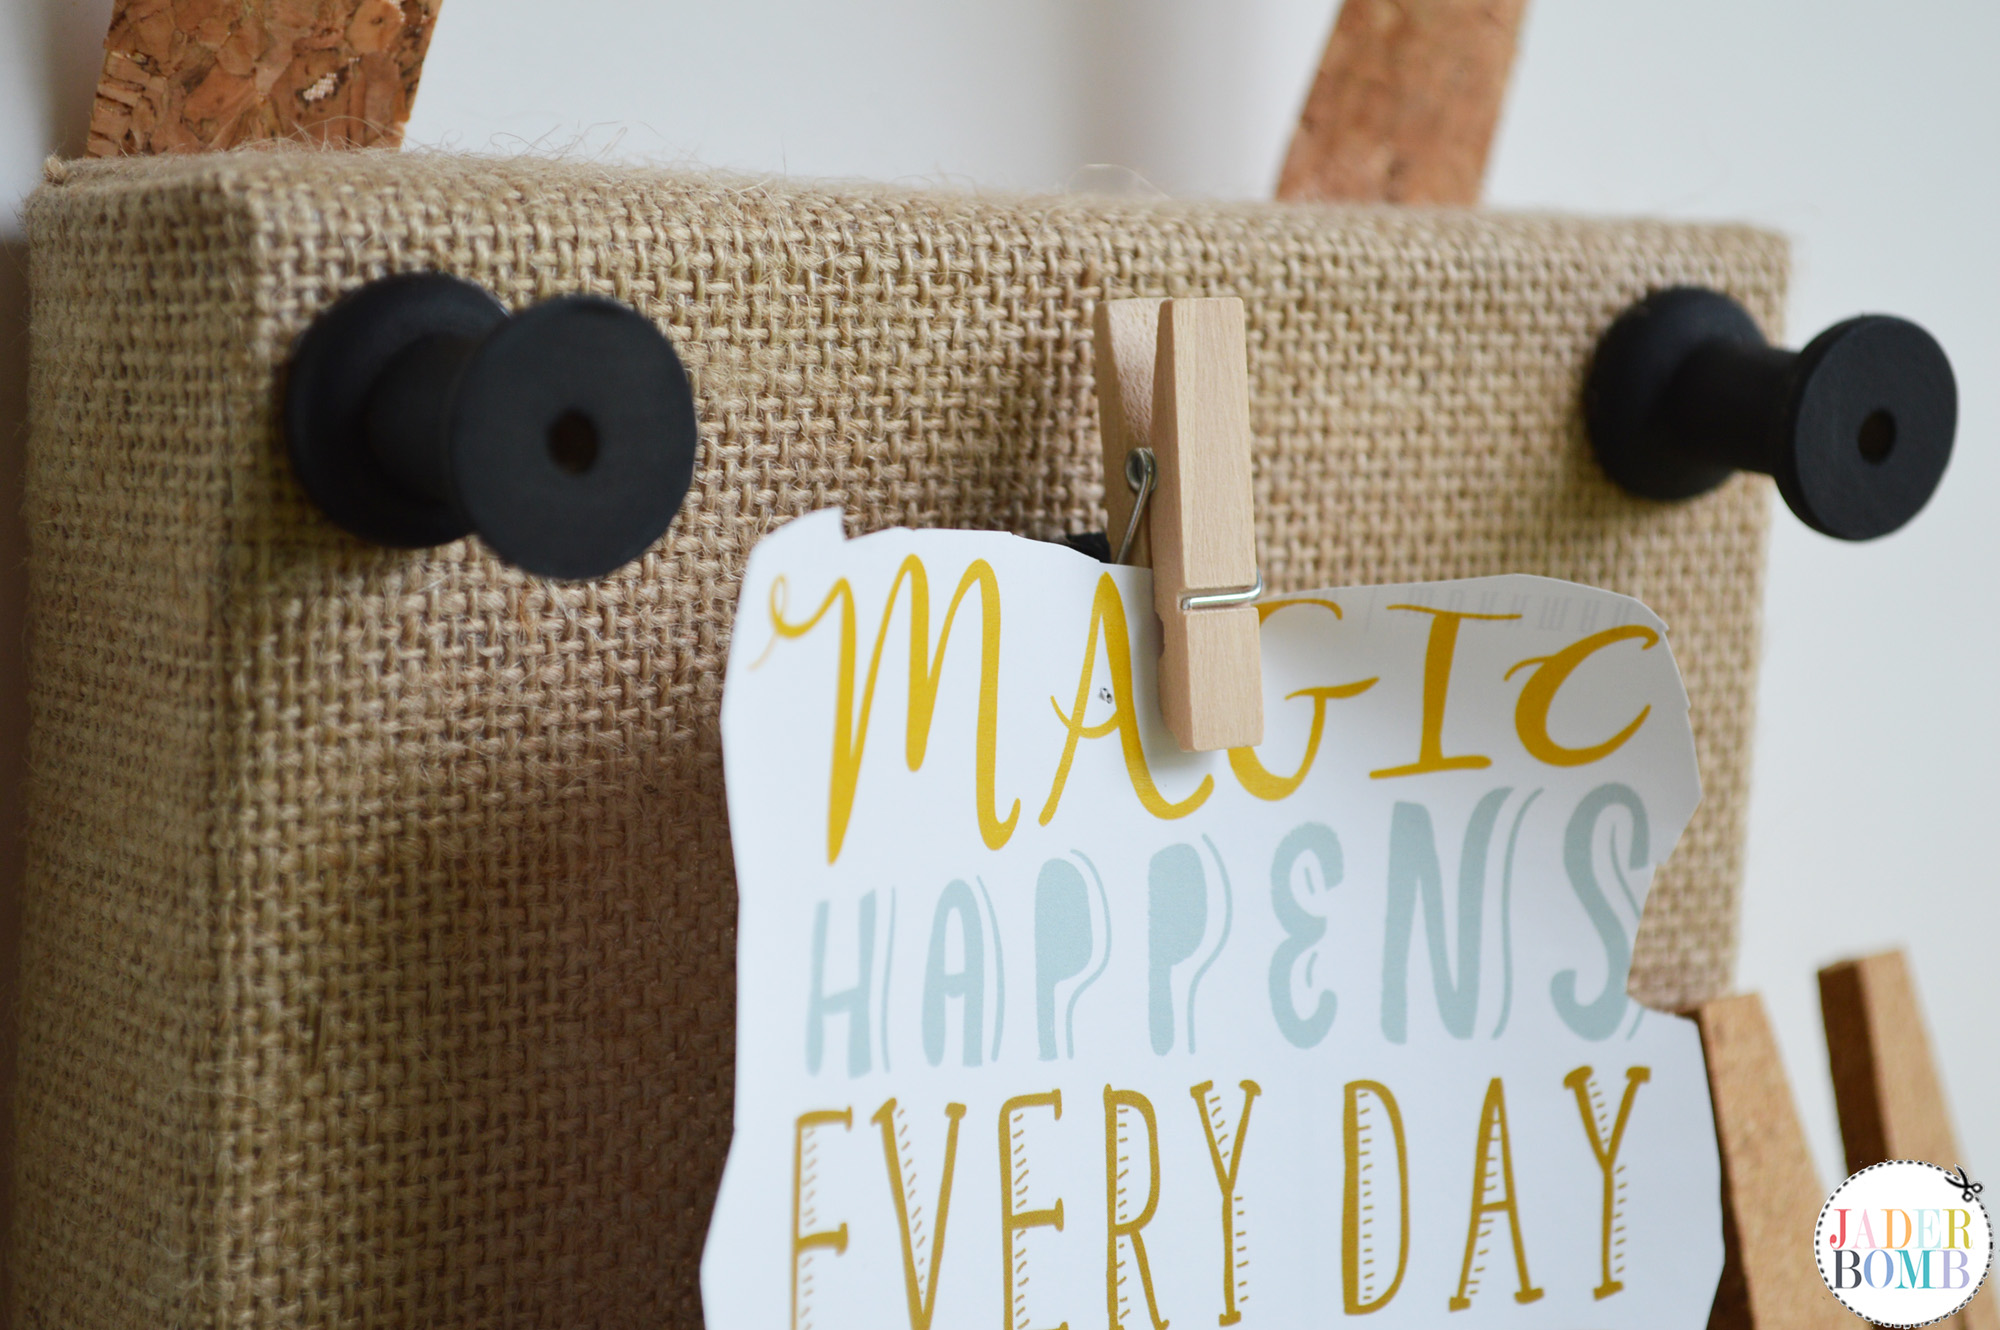
Howdy Hoo Jaderbugs! I am super stoked to bring to you another fun Michaels Makers project today – this easy DIY Back to School Teacher Gift! This is officially my third project but check out my other two. I am still in love with these Antique Chalk Mason Jars  and this shabby chic Burlap Canvas Display. I also created a fun back to school bag for Michaels that I think every kid should wear!

This month the theme is “Back to School” and I love this time of the year. It’s always fun to get re-organized. Kids love nothing more than going to school and giving their teachers a gift which is why I wanted to make something that would stand out all year long! Come check out the other Back to School projects that the other Michaels Makers created!

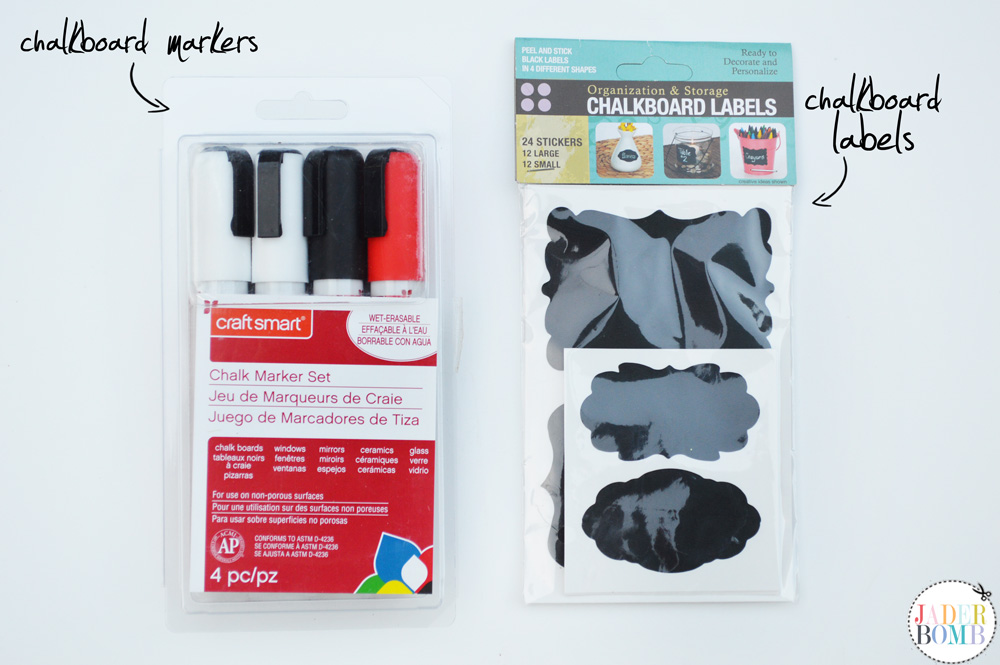
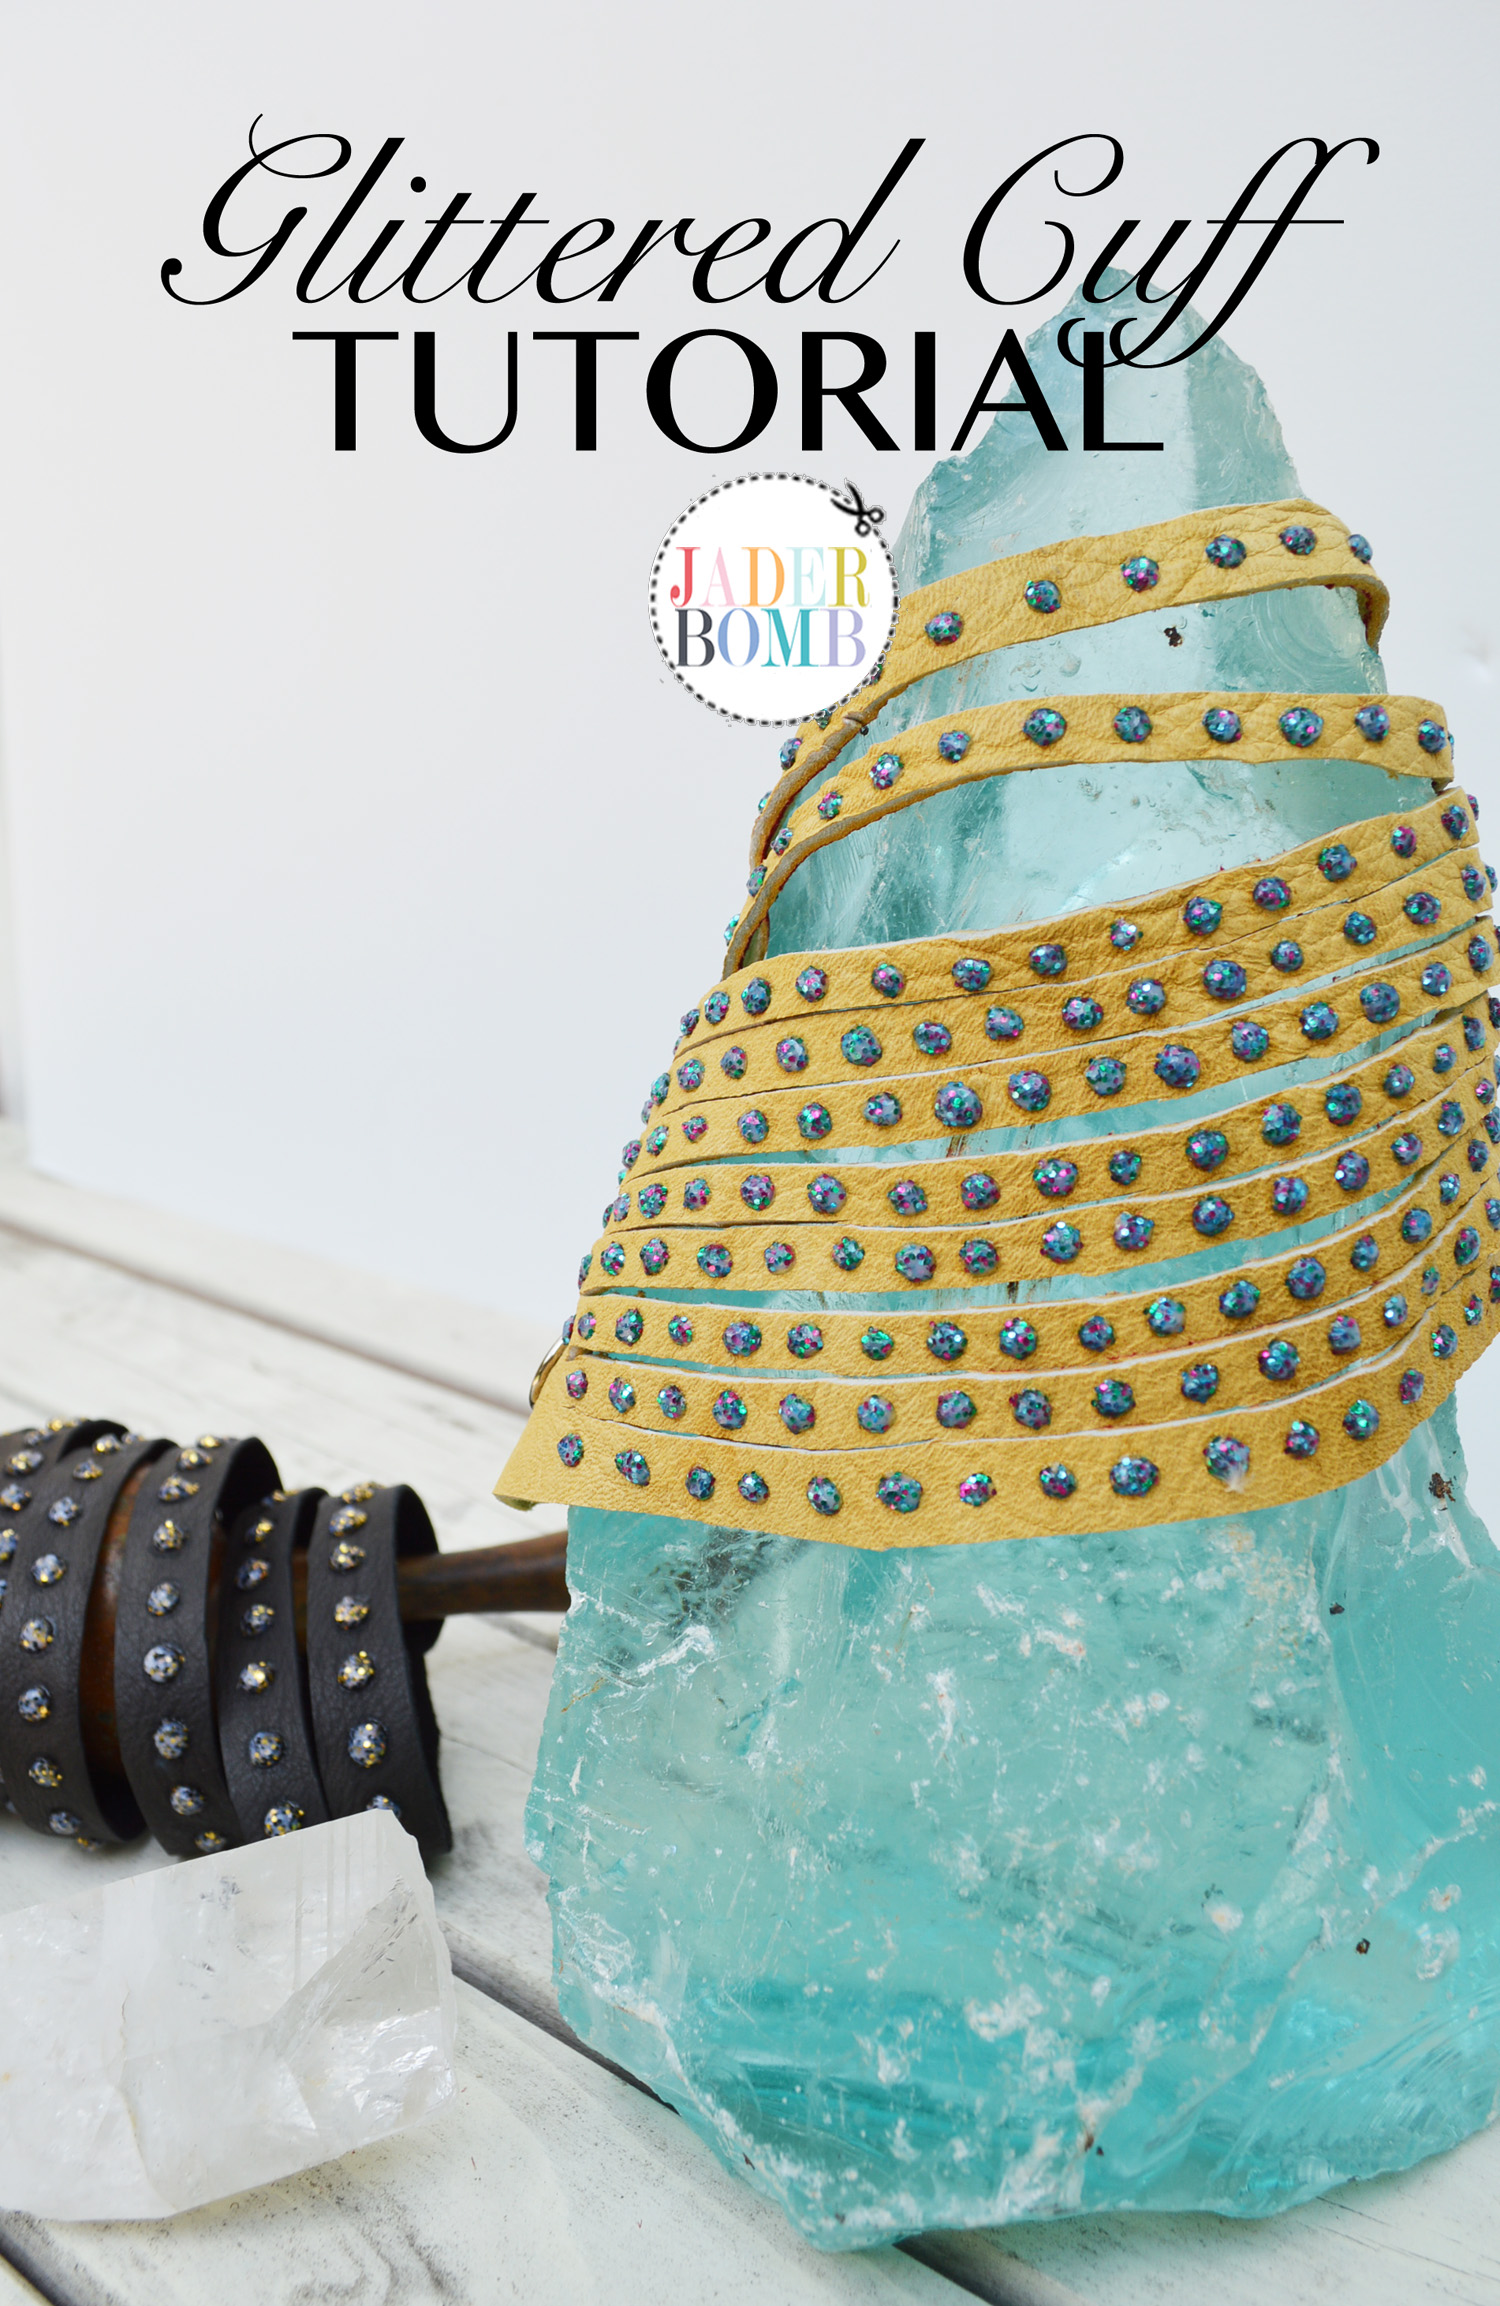
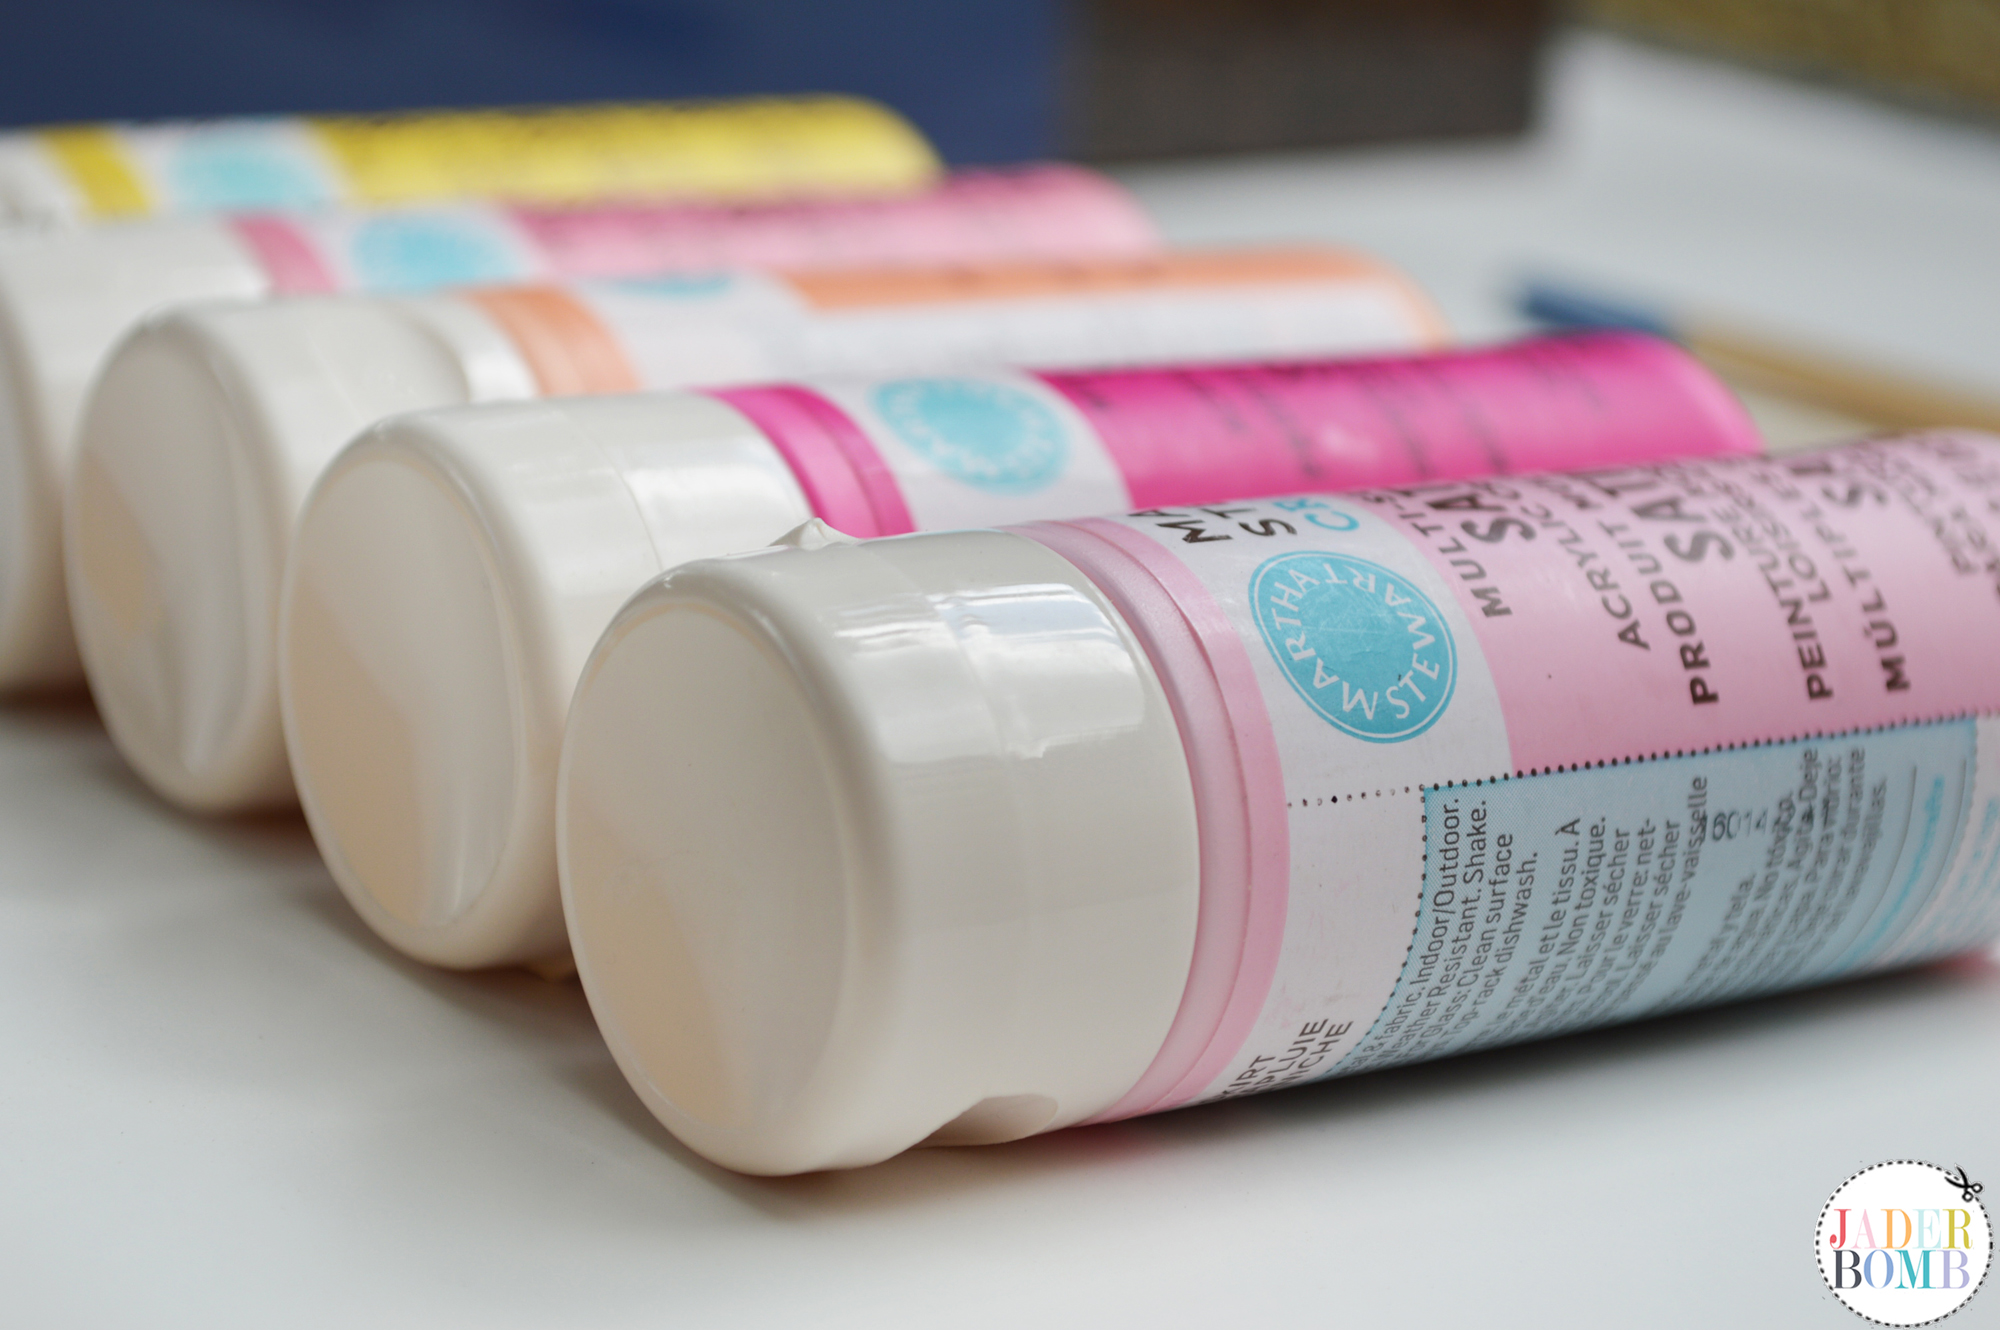
YOU WILL NEED: GLASS JARS | MOD PODGE | ADHESIVE RHINESTONES | BRUSH | TISSUE PAPER | CHALKBOARD MARKERS | CHALKBOARD LABELS DSC_0283
DSC_0294DSC_0288 
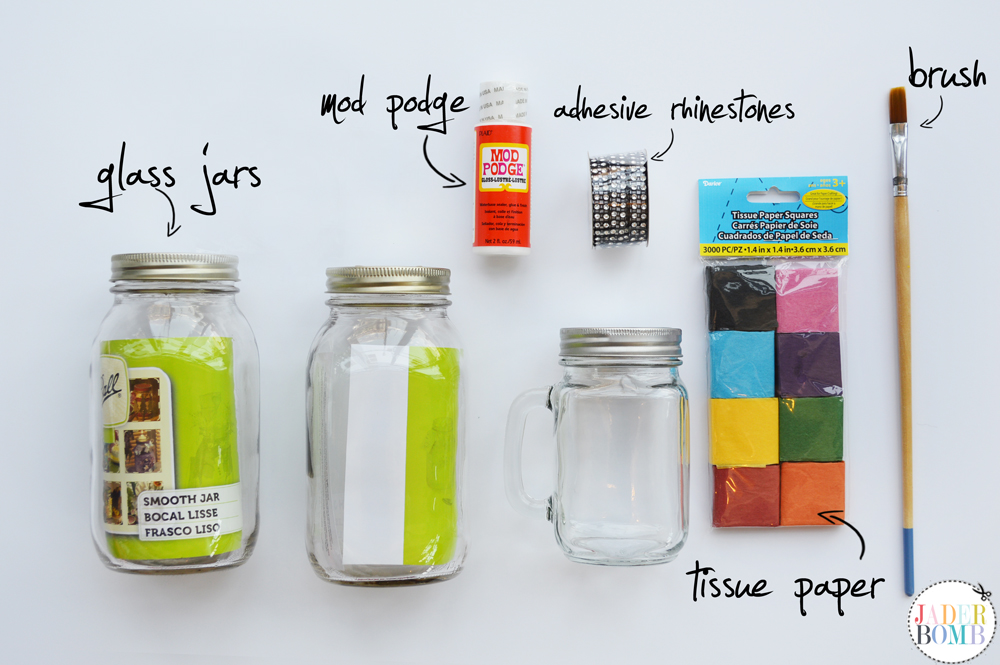
Step 1: Apply Mod Podge directly onto glass. DSC_0289
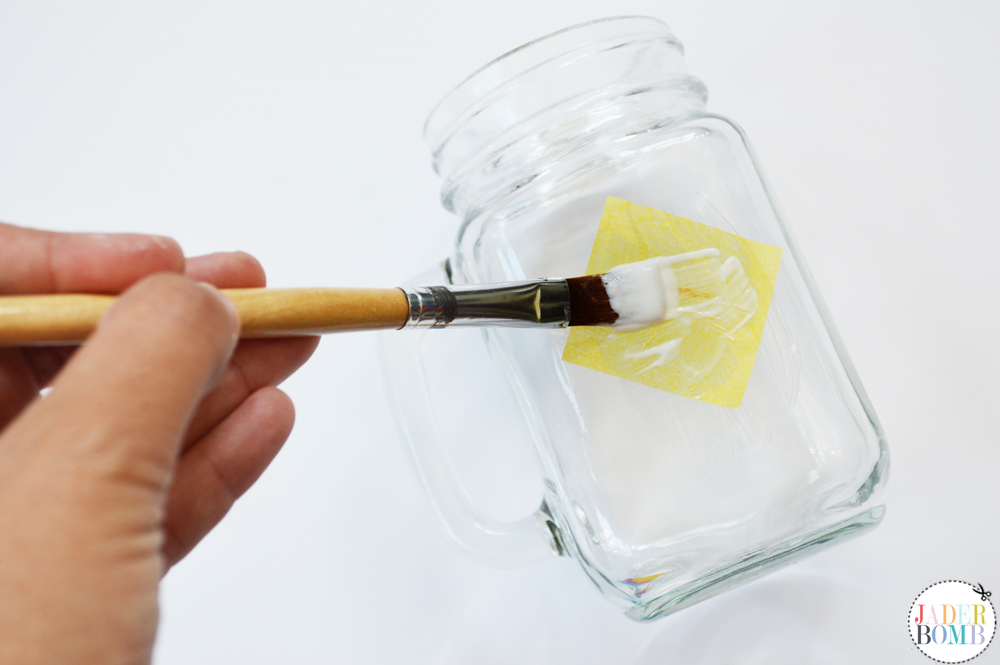
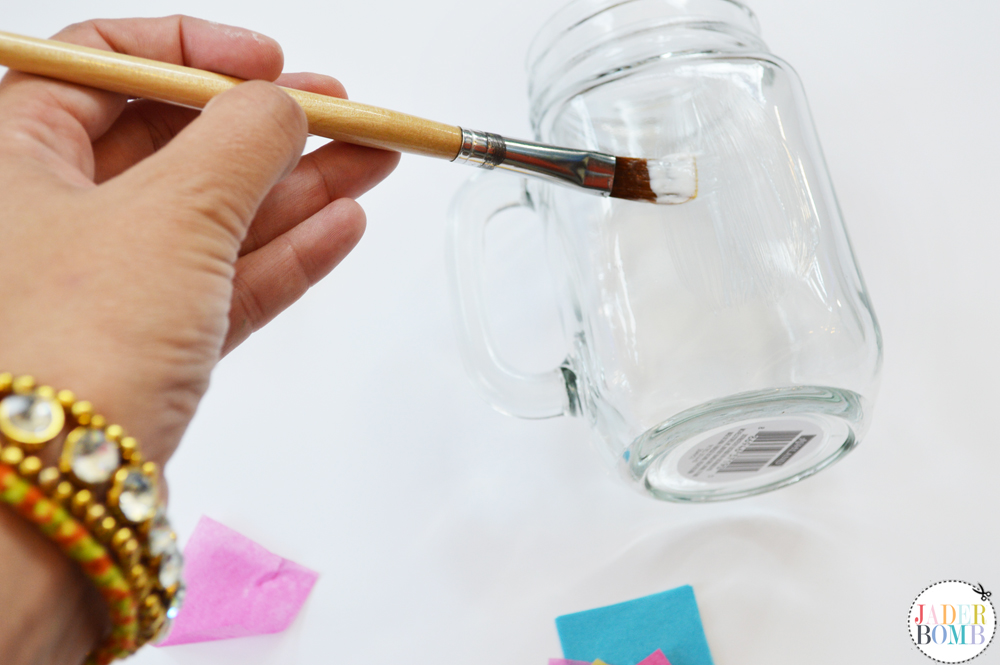
Step 2: Place a piece of tissue paper on top of the Mod Podge then add another layer directly on top of tissue paper.

DSC_0290
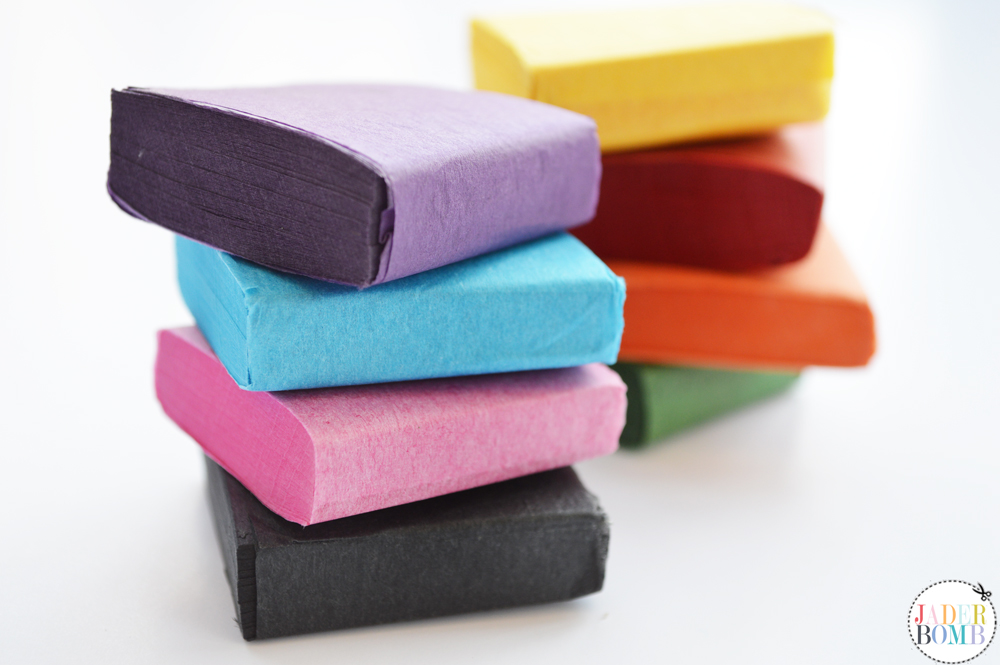
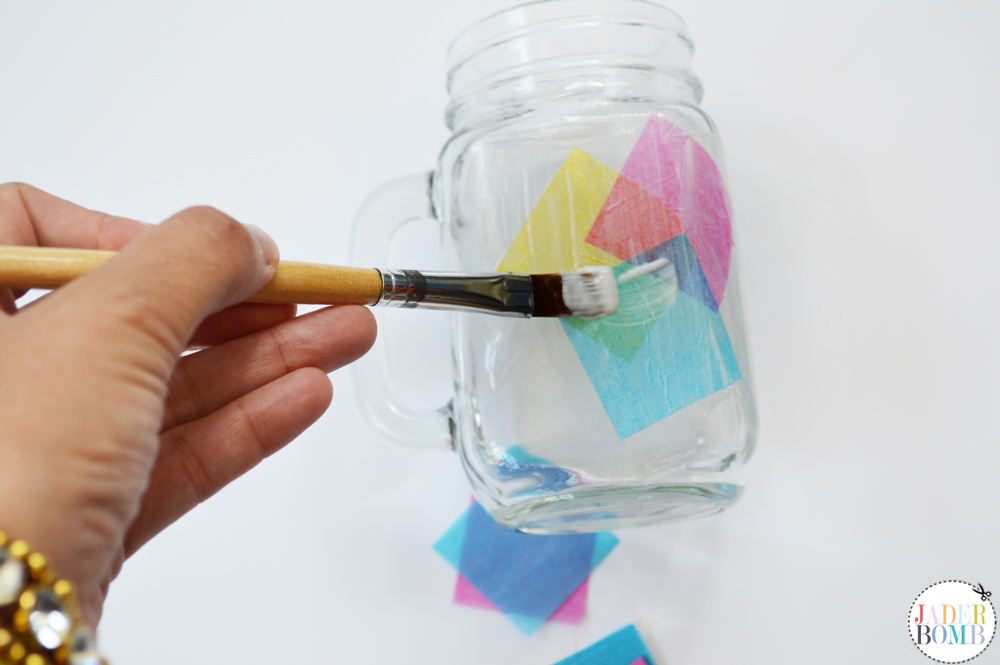
Step 3: Start overlapping other colors on top of each other repeating the same process with Mod Podge. If you notice layering certain colors will create a brand new color. This is my favorite part!
DSC_0291 Step 4: Grab your adhesive rhinestones and peel off the back layer of paper. DSC_0292
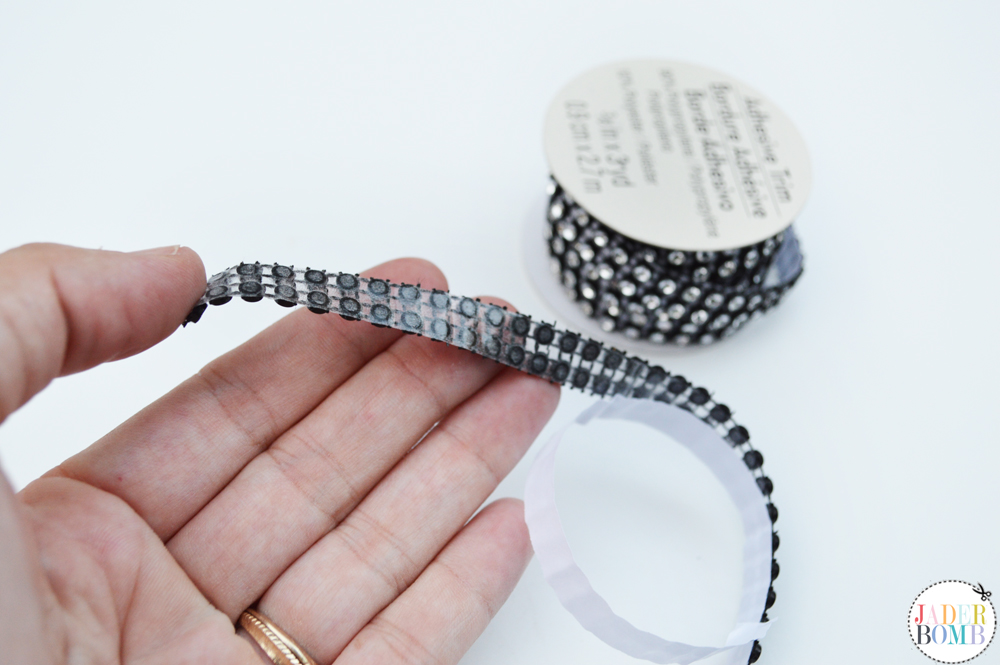
Step 5: Wrap your rhinestones around the top of glass jar.DSC_0303 
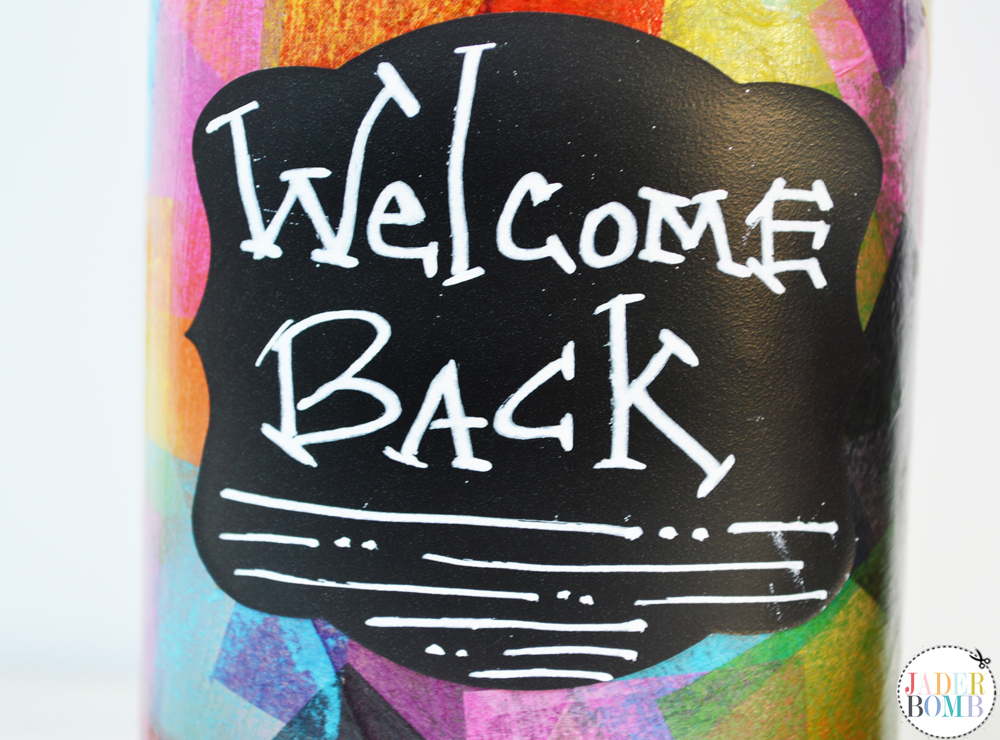
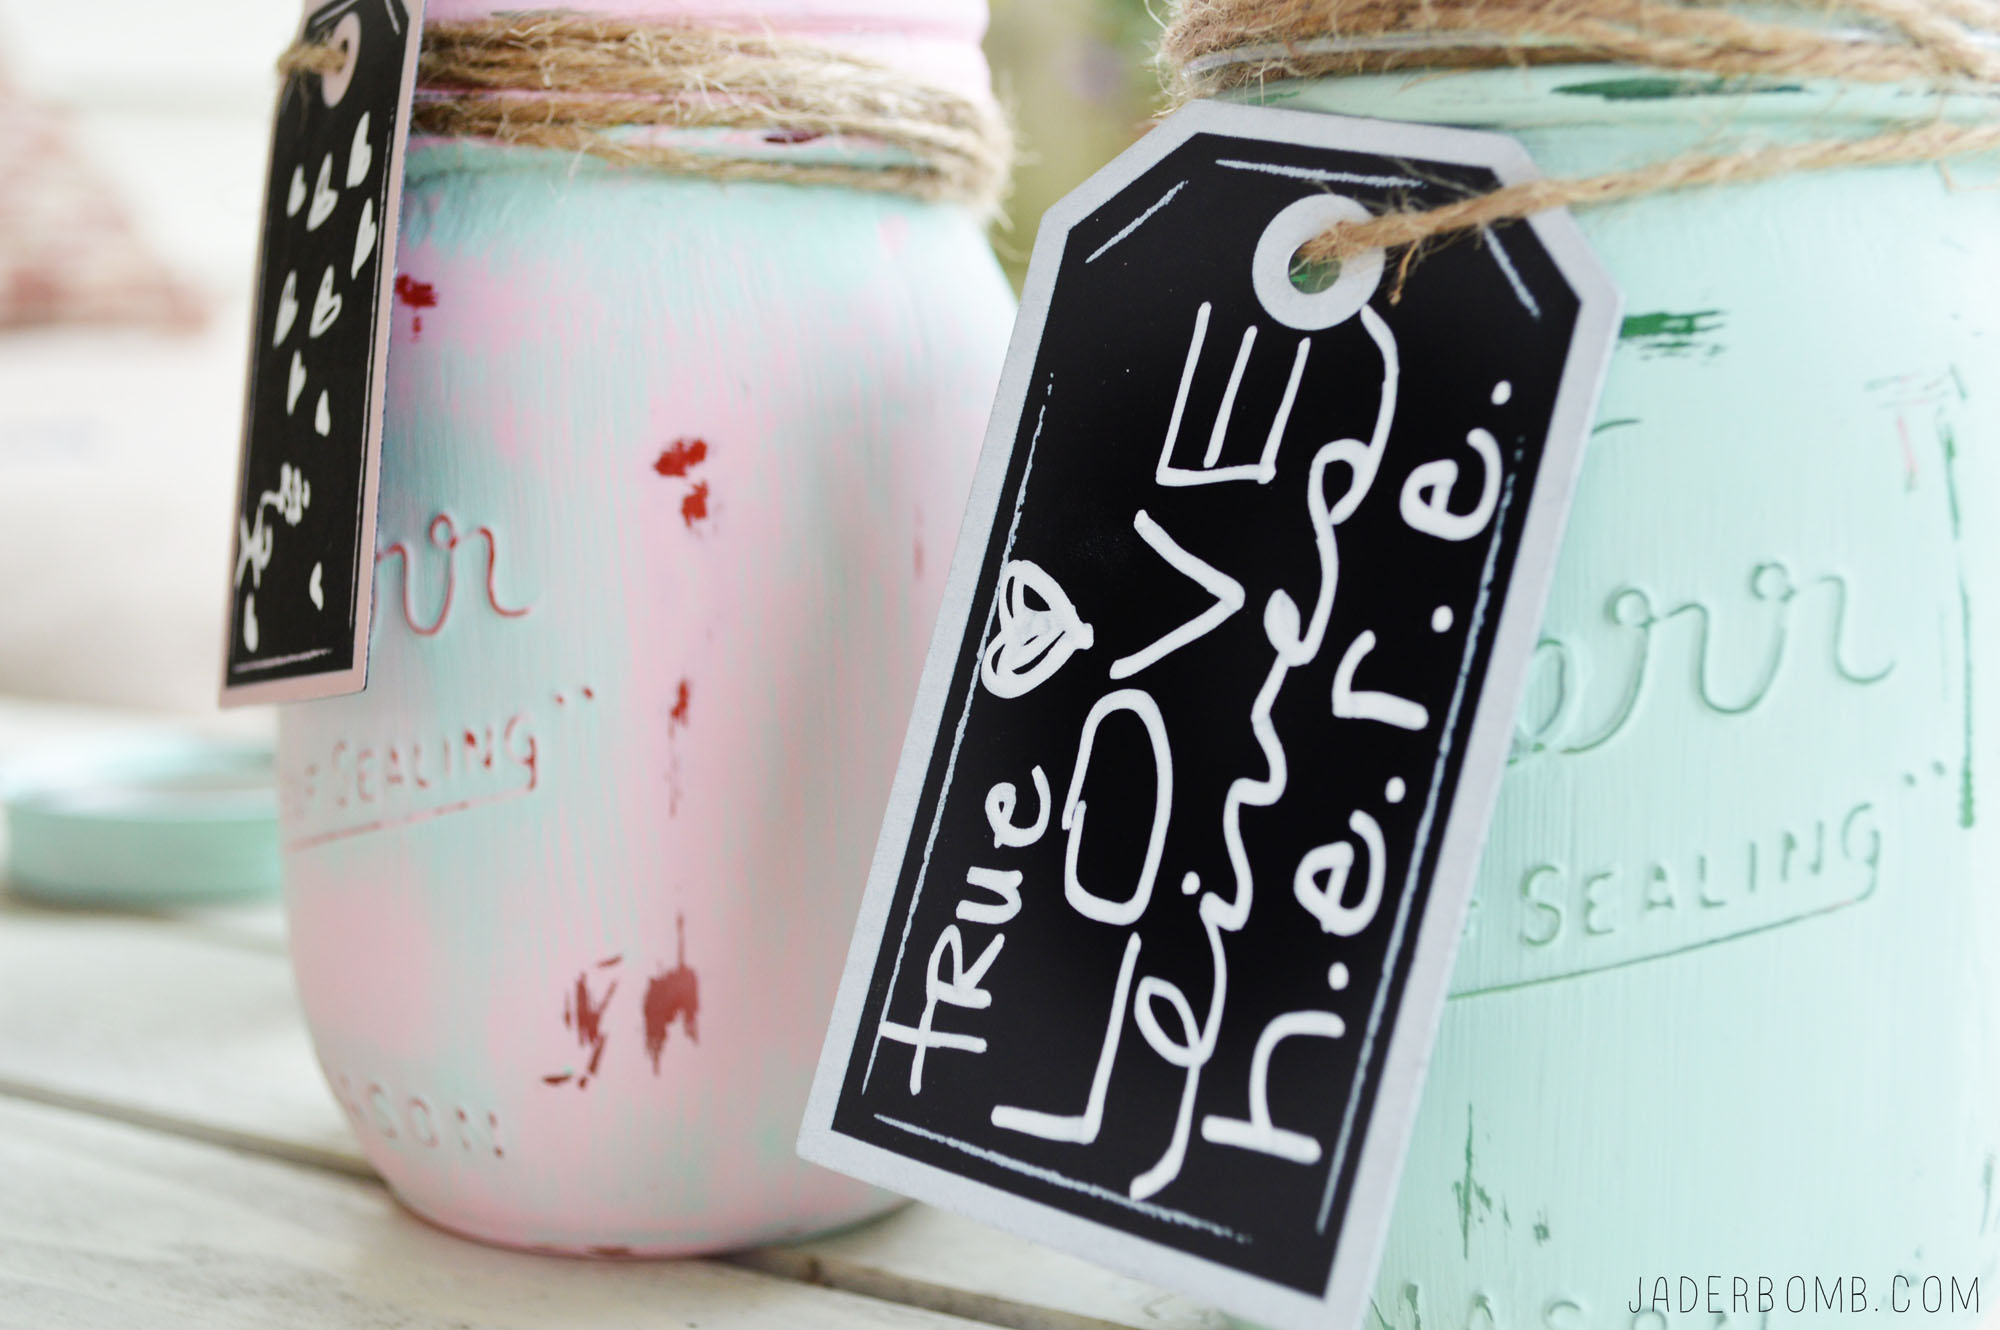
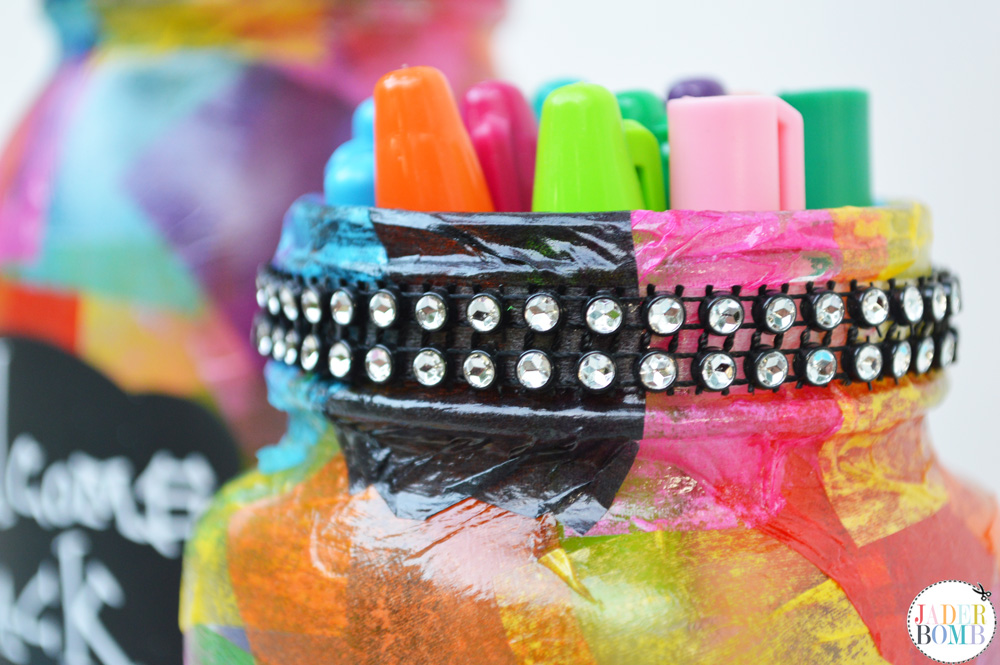
Step 6: Grab a adhesive chalkboard label and place it on your jar.
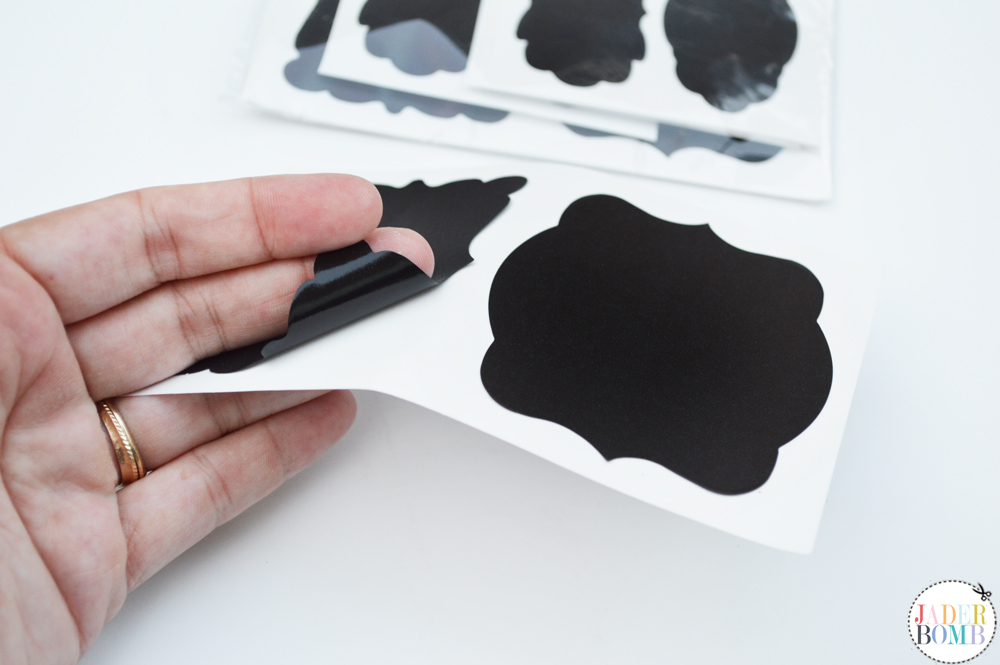
 DSC_0295 Step 7: ENJOY!
DSC_0300 DSC_0304 DSC_0305 MICHAELS MAKER DESK DECOR
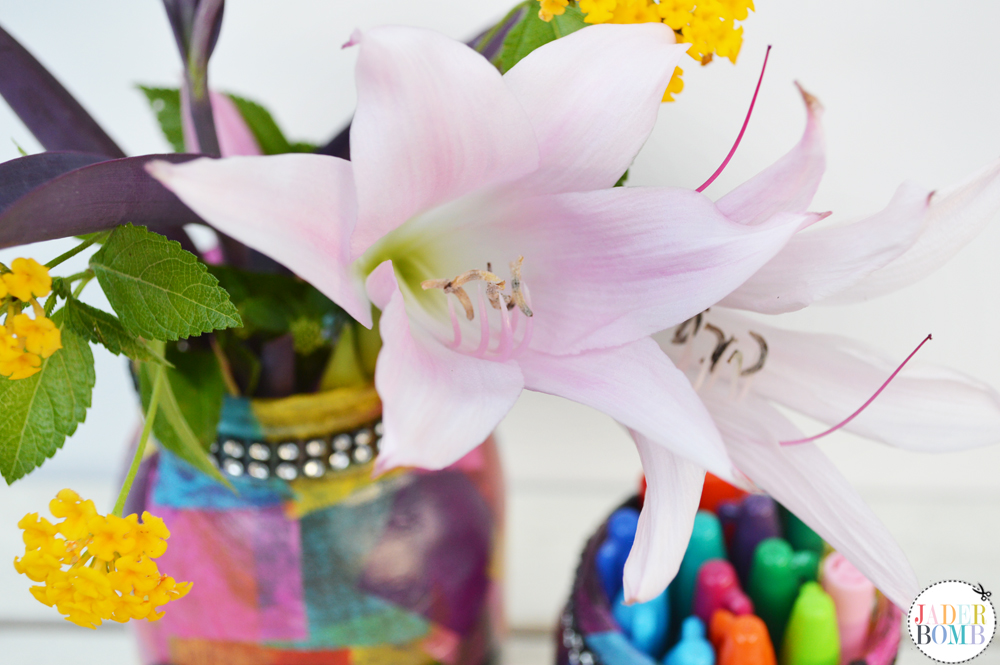
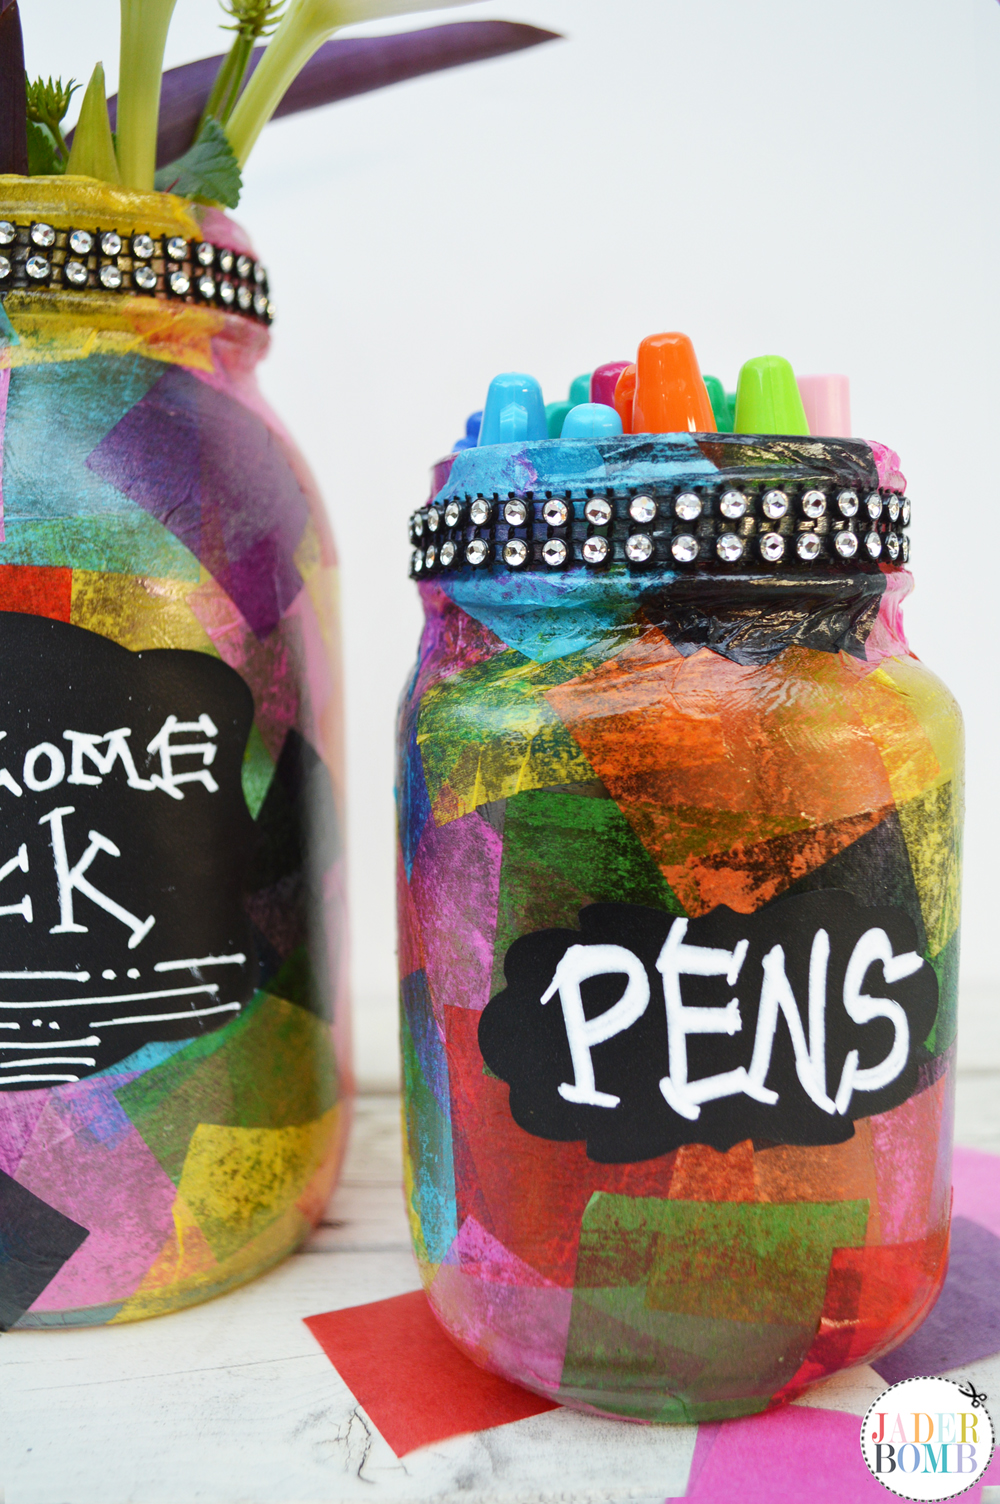
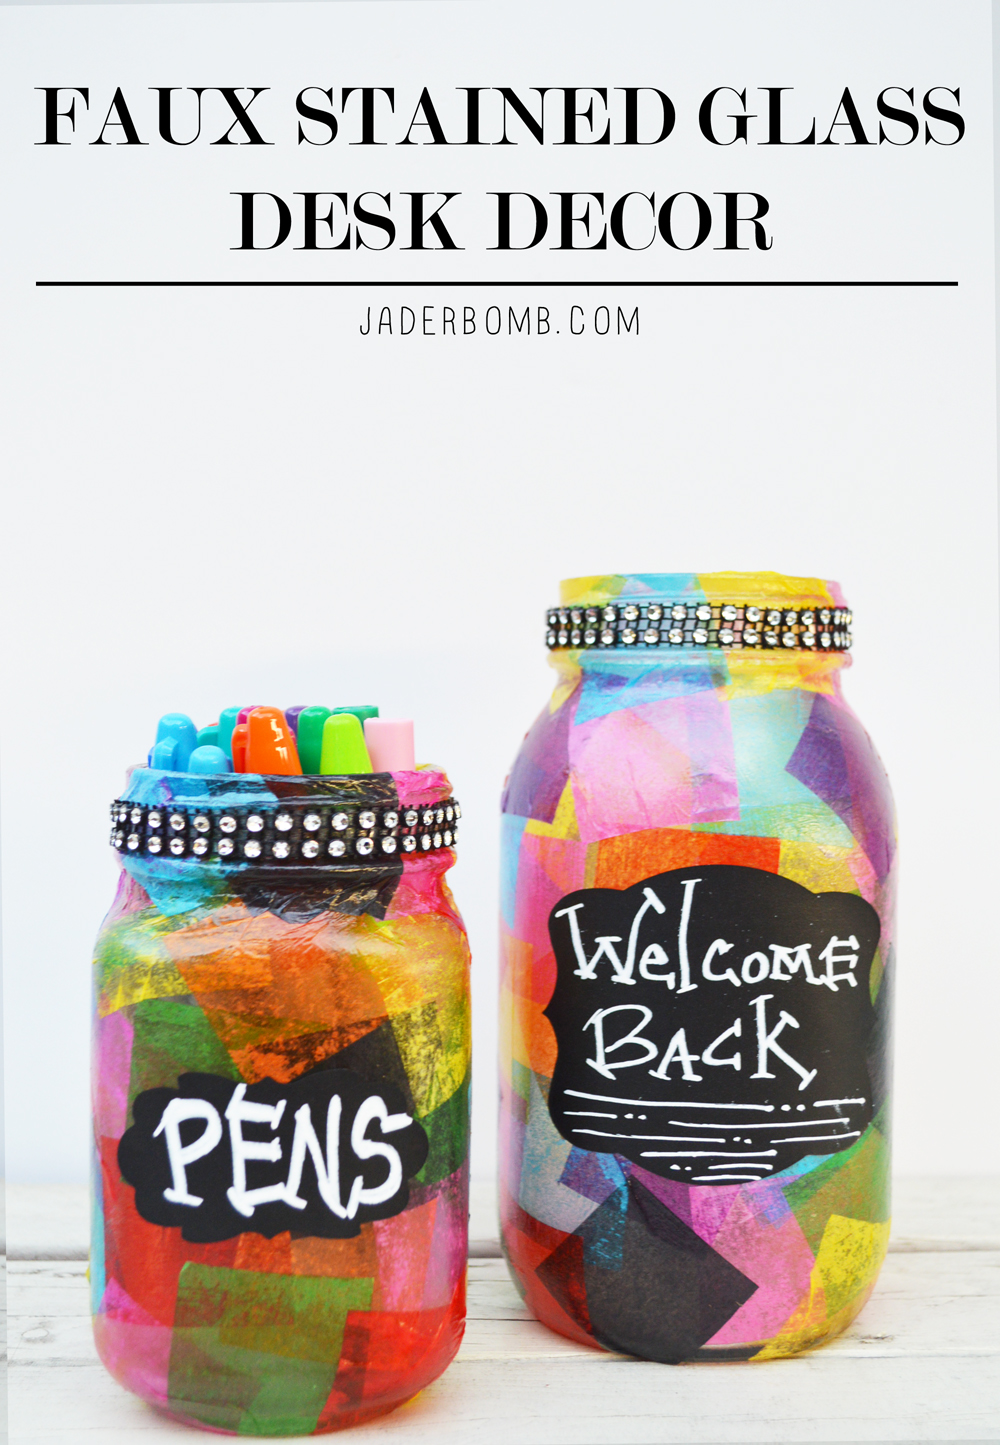
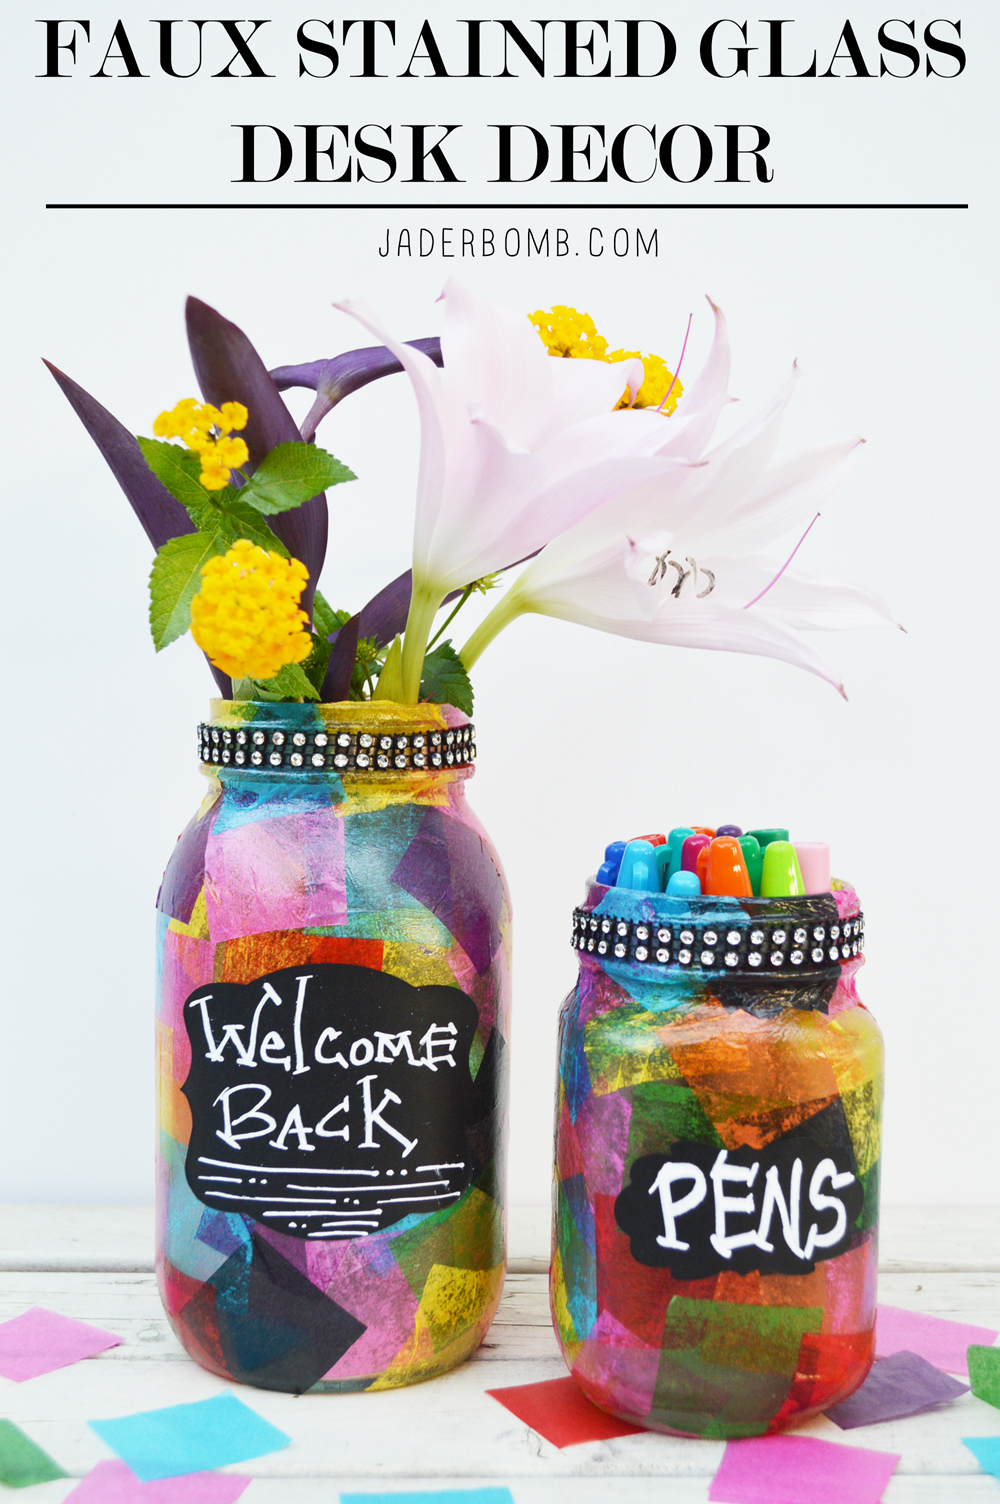
This DIY Back to School Teacher Gift is the perfect gift for any teacher. Not only will they feel special but it will add joy to their face every time they look at them. You can put flowers, markers, pencils or rulers in them. They are so practical for any teacher.

Don’t forget, Michaels has everything you need for Back to School! Create one of a kind projects for your classroom and get 15% off all your purchases. All of your creative ideas come alive when you walk into Michaels and if you are stuck, pop on over to the Michaels Back to School Pinterest Board!

jaderbomb

HASHTAG LOGO

Don’t forget to connect on social media! Make sure to use use the hashtag #JADERBOMB on Instagram or Twitter or Facebook so I can keep track of all your awesome creations! HAVE A GLITTERY DAY! ♥, Jade

P.S. If you LOVE printables then check out my sitewhere you can download hundreds of FREE printables!

Check out my other Michaels Maker’s projects!
MICHAELS BACK TO SCHOOL CREATE2EDUCATEDSC_0510antique mason jars


Today I am giving you a small glimpse into my latest project that I created for the ILoveToCreateBlog! This DIY Glittered Leather Cuff is a simple and fun craft that anyone can do. I love that you can choose any material to make it, however I prefer leather.

Hold up wait a minute, I said “ugh ahhh uhh ahh ahhh”… Remember that song? It’s pretty much stuck in my brain right now and will not leave. I have played a million other songs but this sucker is stuck! I guess I will just keep singing it so it does not drive me insane.

Don’t forget to check out my Tea Stained Bleached Blue Jeans!

Wanna check out all of my tutorials I have created for ILoveToCreate? Check them out here!

Check how Martha Stewarts visit to Louisiana! ALSO!

DIY Glittered Leather Cuff

You can still enter the Michael’s sweepstakes to win MOOLAH!

12495_10152598188149165_1175403598004922578_n

If you are looking for some last minute summer crafts check out my roundup I just posted! You will LOVE all of these crafts!

HASHTAG LOGO

Don’t forget to connect on social media! Make sure to use use the hashtag #JADERBOMB on Instagram or Twitteror Facebook so I can keep track of all your awesome creations! HAVE A GLITTERY DAY! ♥, Jade

P.S. If you LOVE printables then check out my site where you can download hundreds of FREE printables!

Happy #ThursDIY Jaderbugs! I have my craftabulous crew sharing a great “Summer DIY Roundup“! Even though school is pretty much in our grill we can still bust out some great crafts while the little or big ones are in school! Don’t worry if you have a day job I give you permission to bring your craft supplies and do them at your desk! If your boss has a problem tell him to call JADERBOMB… Sounds threatening huh! Don’t forget to share your ideas or crafts photos with us so our clan can see what you are creating! After all it’s all about spreading love here.

Summer DIY Roundup

It’s all about patches this summer! Mark Montano shows us how to make some web savvy DIY emoji patches in his latest YouTube video! It’s always good to show off our patchy personalities everywhere we go! #backtoschool

Margot Potter has a hand. Literally. Her hand created the most amazing DIY Metal Stamped Hashtag Pins AND she has a BIG hopping giveaway going on where you can win a set of ImpressArt’s new font Juniper! #giveaway

I don’t know about you but Shark week is my favorite holiday. What? It’s not a holiday! That’s ok because Morena Hockley for Dollar Store Crafts created the best  DIY Shark Week Shocks to protect my “pete and joe’s” from the all the sharks in my life! #sharkweek

Who needs a Caboodle when you can make this glamorous DIY Golden Organizer from the only chica out there, THE Crafty Chica! I think this would be great for traveling. It might make me look “important”…  #gold

Looking for a way to impress your guests at your next get together? Mark Montano shows us 9 Place Card Ideas that will leave you “card-less”. If you are not hosting a party shoots, print them out and put your name on all fo them! It’s what I would do. #printable

Debi Beard is so cute I want to put her in this DIY Tiny Book Pendant that she just created using her magical mind. Seriously. The best part is she was inspired by Anthropologie and it’s not the “ANTHRO” price! #deal

Cathy Attix will make you look epic with this DIY Jeweled Headband. Now I don’t know about you but anytime I can make my head look fancier than it already is (not) I am game! Hey, Mardi Gras is coming up…

I know I am an adult but Cathie Filian just made me want to start collecting dolls and make this DIY Book Shelf Dollhouse. RIGHT! I think this would be cute to put all of my rocks in also, or your favorite collectibles. SO CUTE!

Come check out my DIY Leather Cuff that I just created for ILoveToCreate! Why buy when you can DIY, plus you won’t believe what product I used to embellish it!

HASHTAG LOGO

Don’t forget to connect on social media! Make sure to use use the hashtag #JADERBOMB on Instagram or Twitter\or Facebook\ so I can keep track of all your awesome creations! HAVE A GLITTERY DAY! ♥, Jade

P.S. If you LOVE printables then check out my site where you can download hundreds of FREE printables!

ST_12_months_of_Martha_Logo-1Hand Painted Cork Board
Today’s 12 months of Martha posts is super easy and I know anyone can do it with a little bit of love, joy and patience. I always find joy taking something and adding my own personal touch to it. Whether it’s a design I like or my favorite colors. Yes, it might take a little more effort but in the end it’s worth it. You will be surprised how good you will feel to make your own Hand Painted Cork Board!

Holy cow! It’s almost time for all the lil ones and big ones to go back to school. Are you as excited as me? Insert a crooked smile here.

I think I am excited to get a routine back because let’s face it the summer knocks everything out of whack and things tend to get a little nuts. I went school shopping with my lil one (14, don’t tell him I said lil one) and I realized at the register that most of the “supplies” in the basket were for me. I think I get more excited about “back to school” supplies than him!

Supplies:
*Ruler
*Craft Paint
*Craft Brush
*Cork BoardsDSC_0287

It’s time to kick off going back to school and what better way to do that than with some awesome home / office decor. I know what you are thinking, ” I can totally go buy some from the store, yo”… but why go buy something when you can DIY!

I am in love with the colors I am using in today’s project! They are soft pastel colors that will create a nice feeling in any room.

PicMonkey Collage.jpg

The colors I used: Poodle Skirt | Camellia Pink | Party Streamer | Wild Salmon | Yellow Jacket. DSC_0282
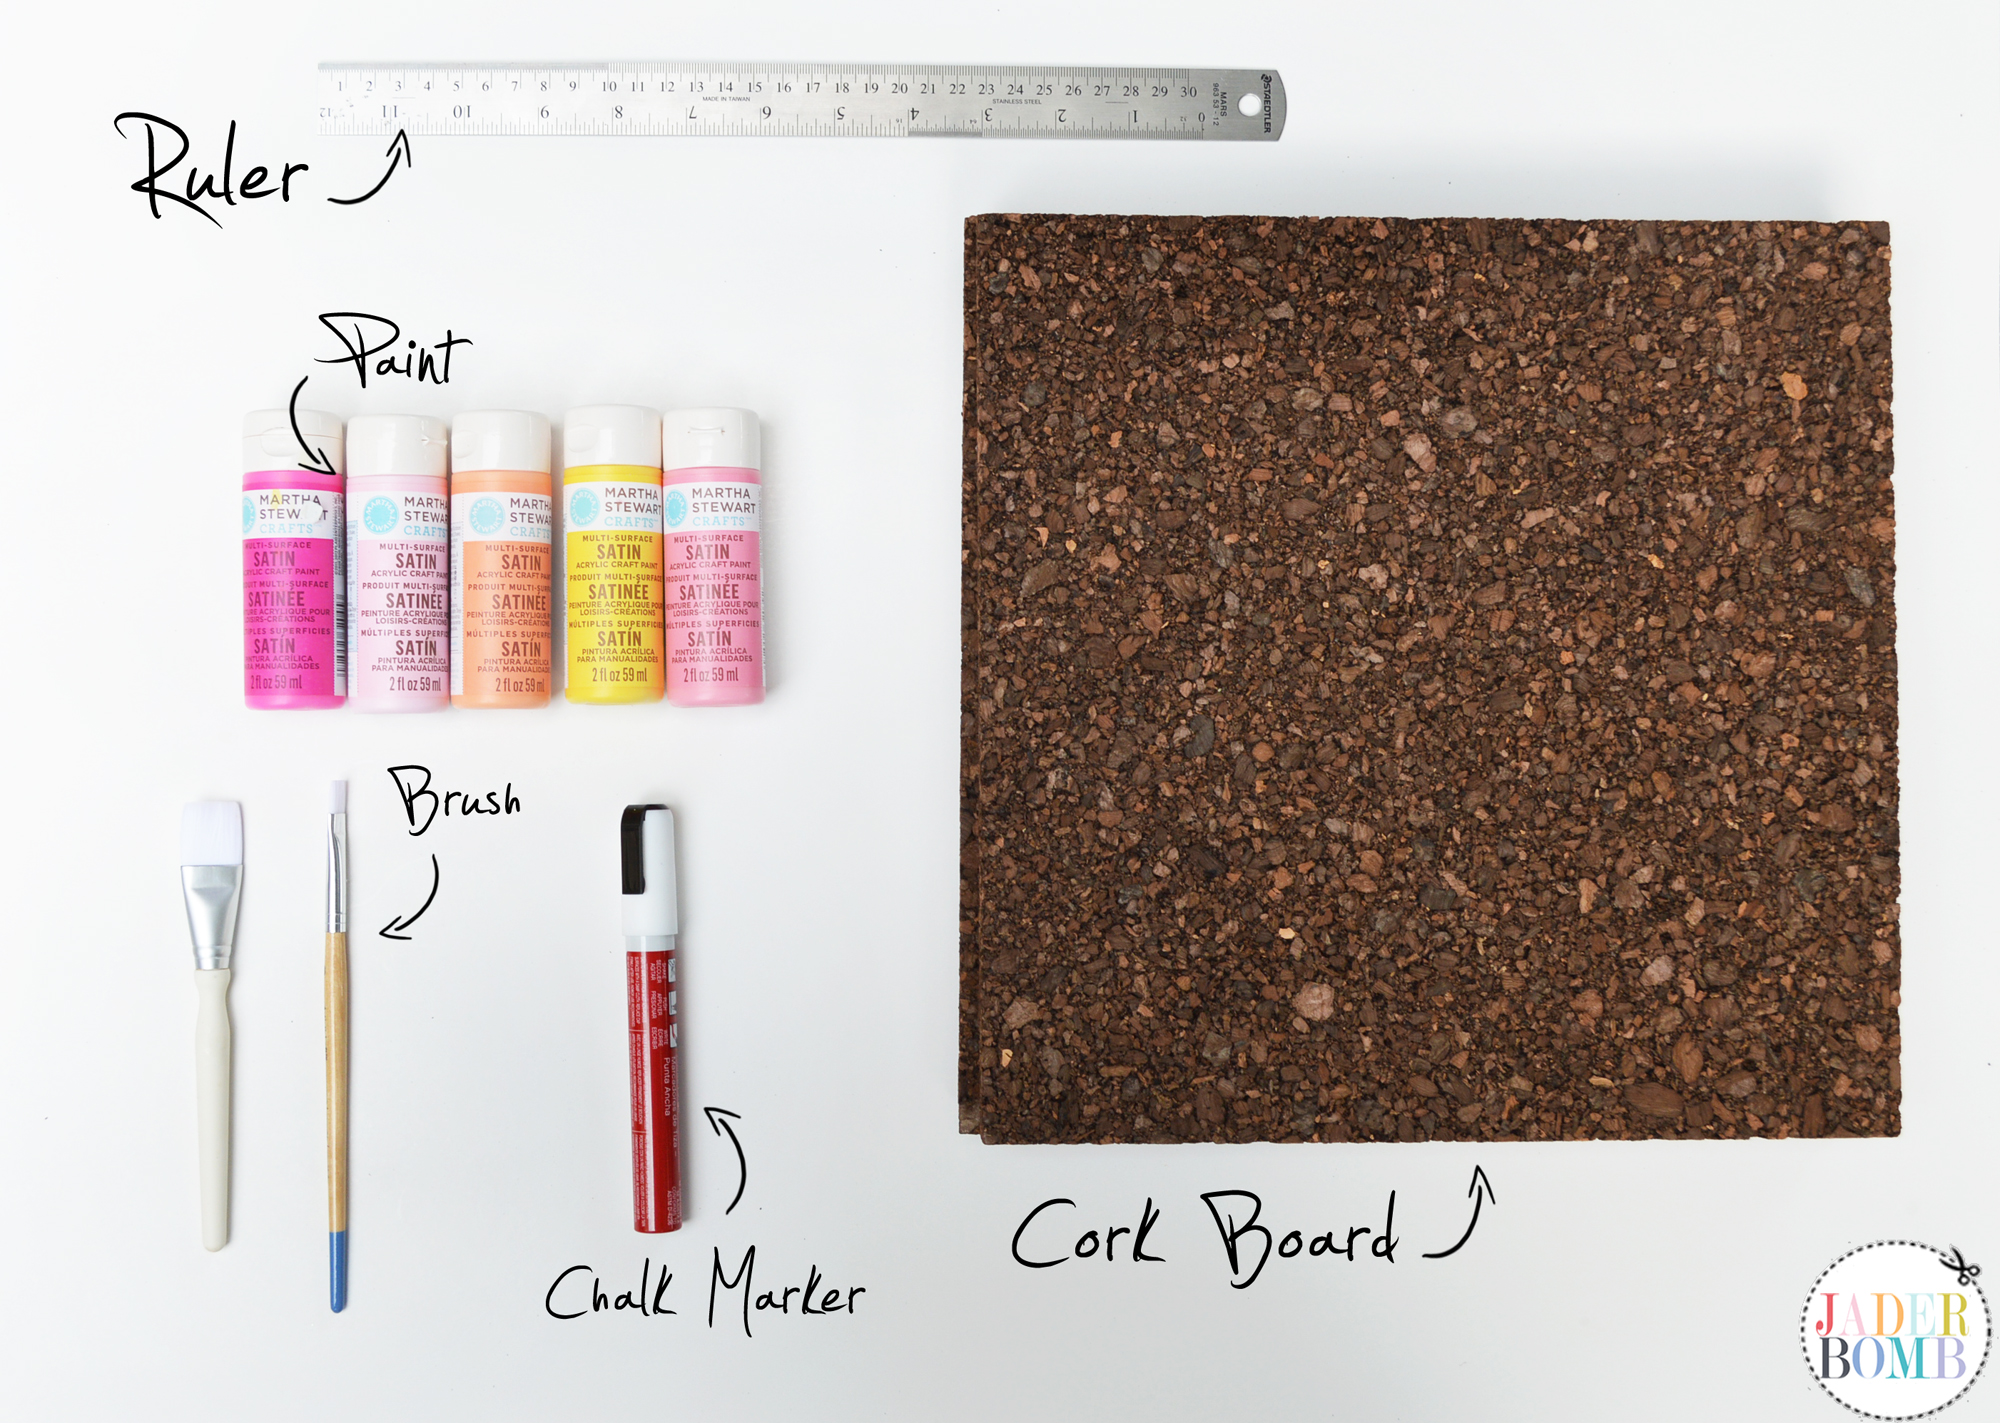
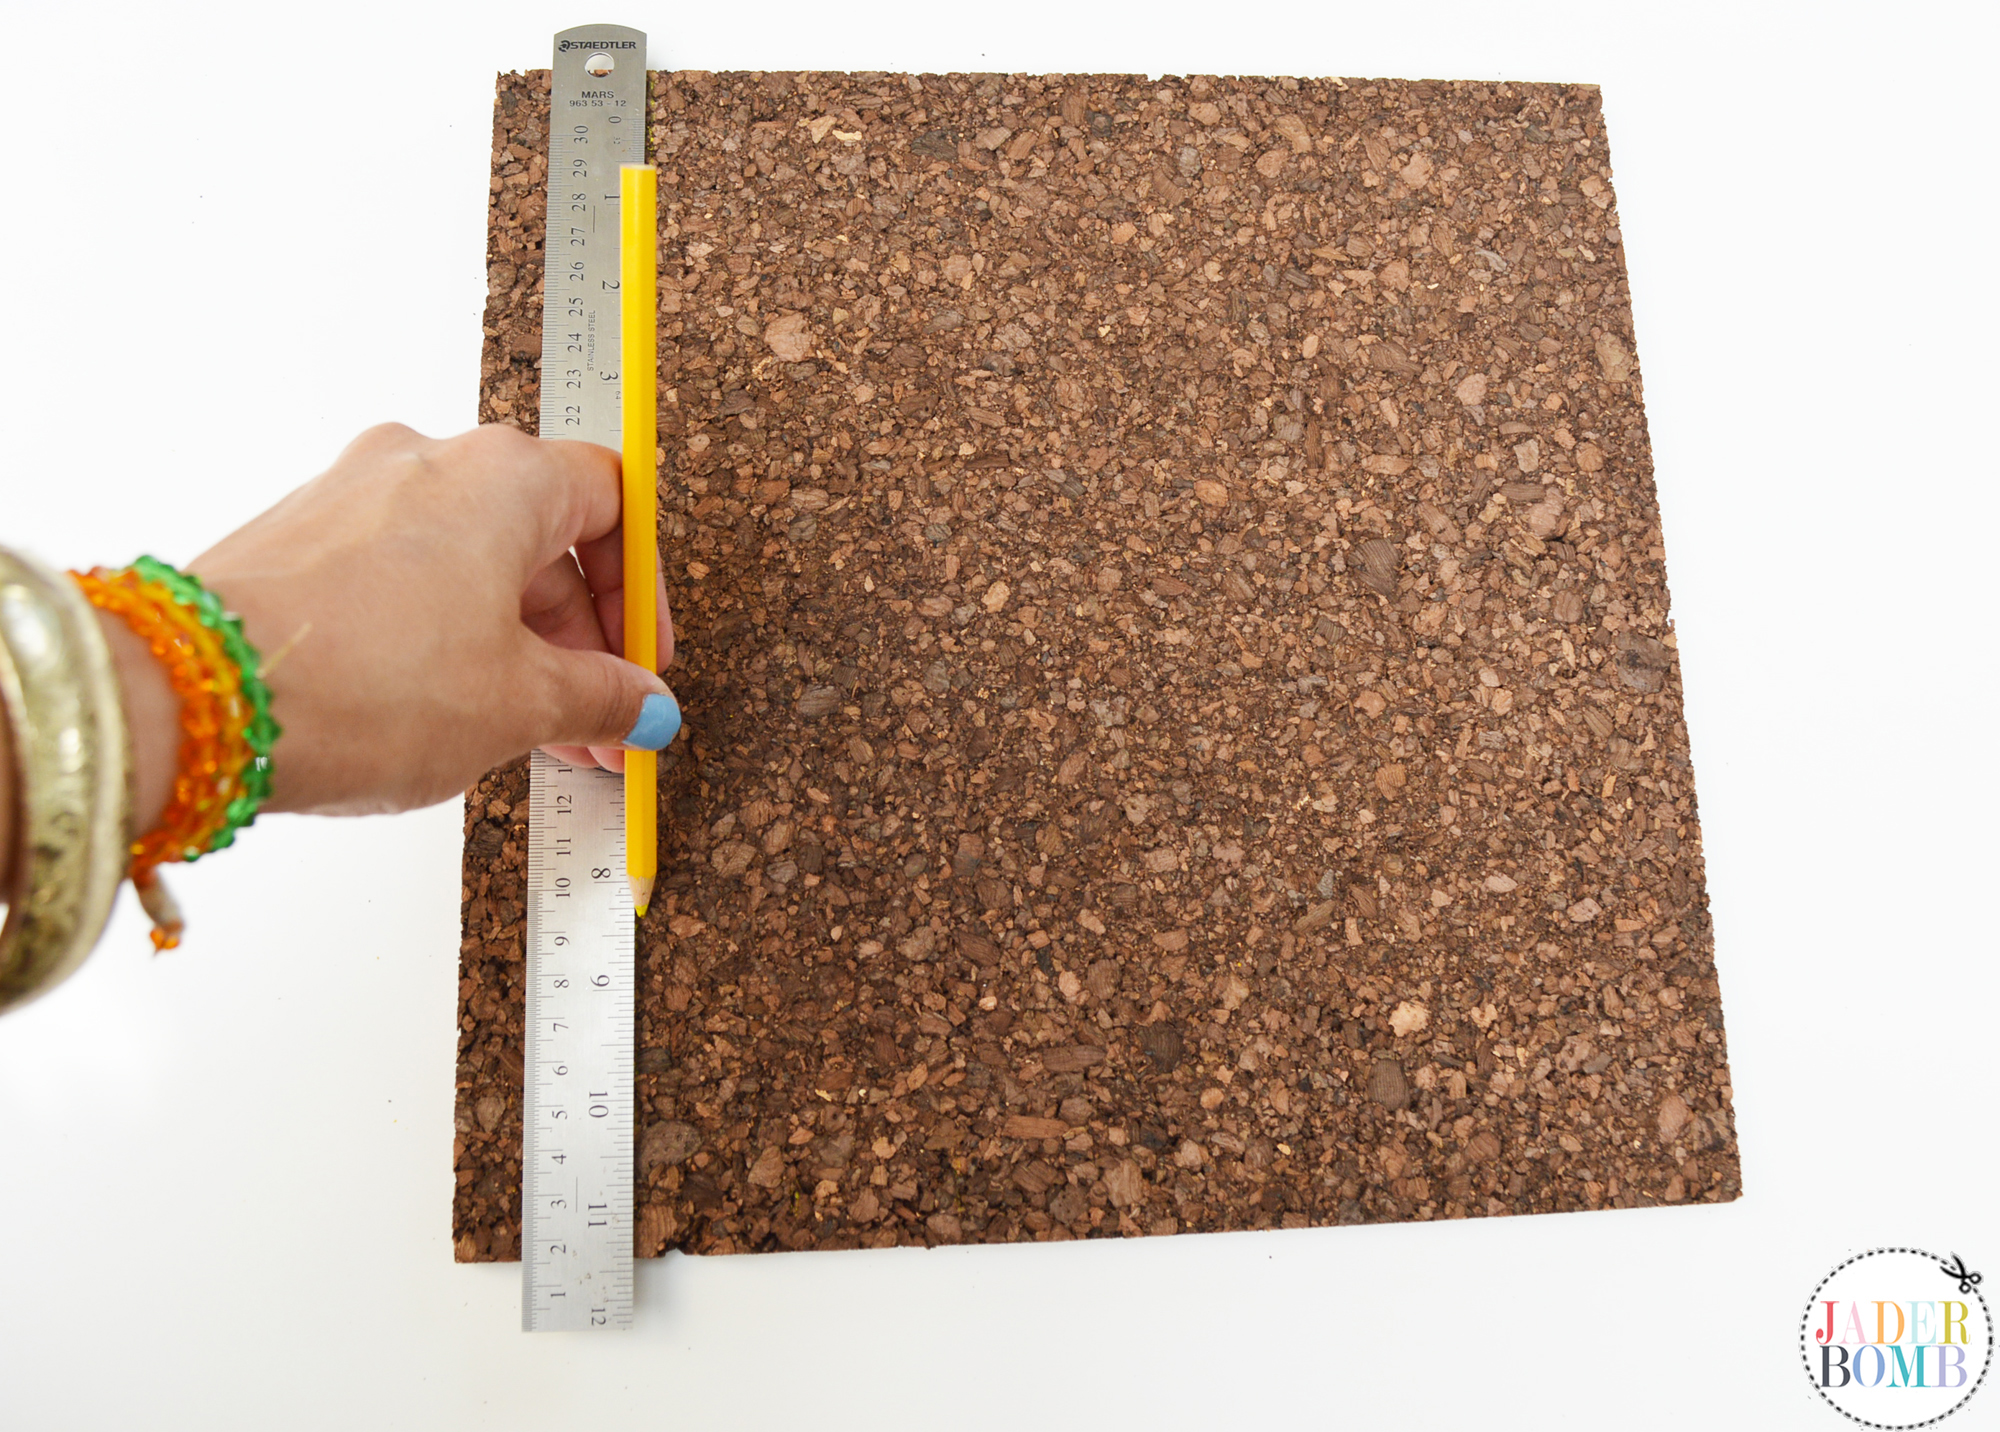
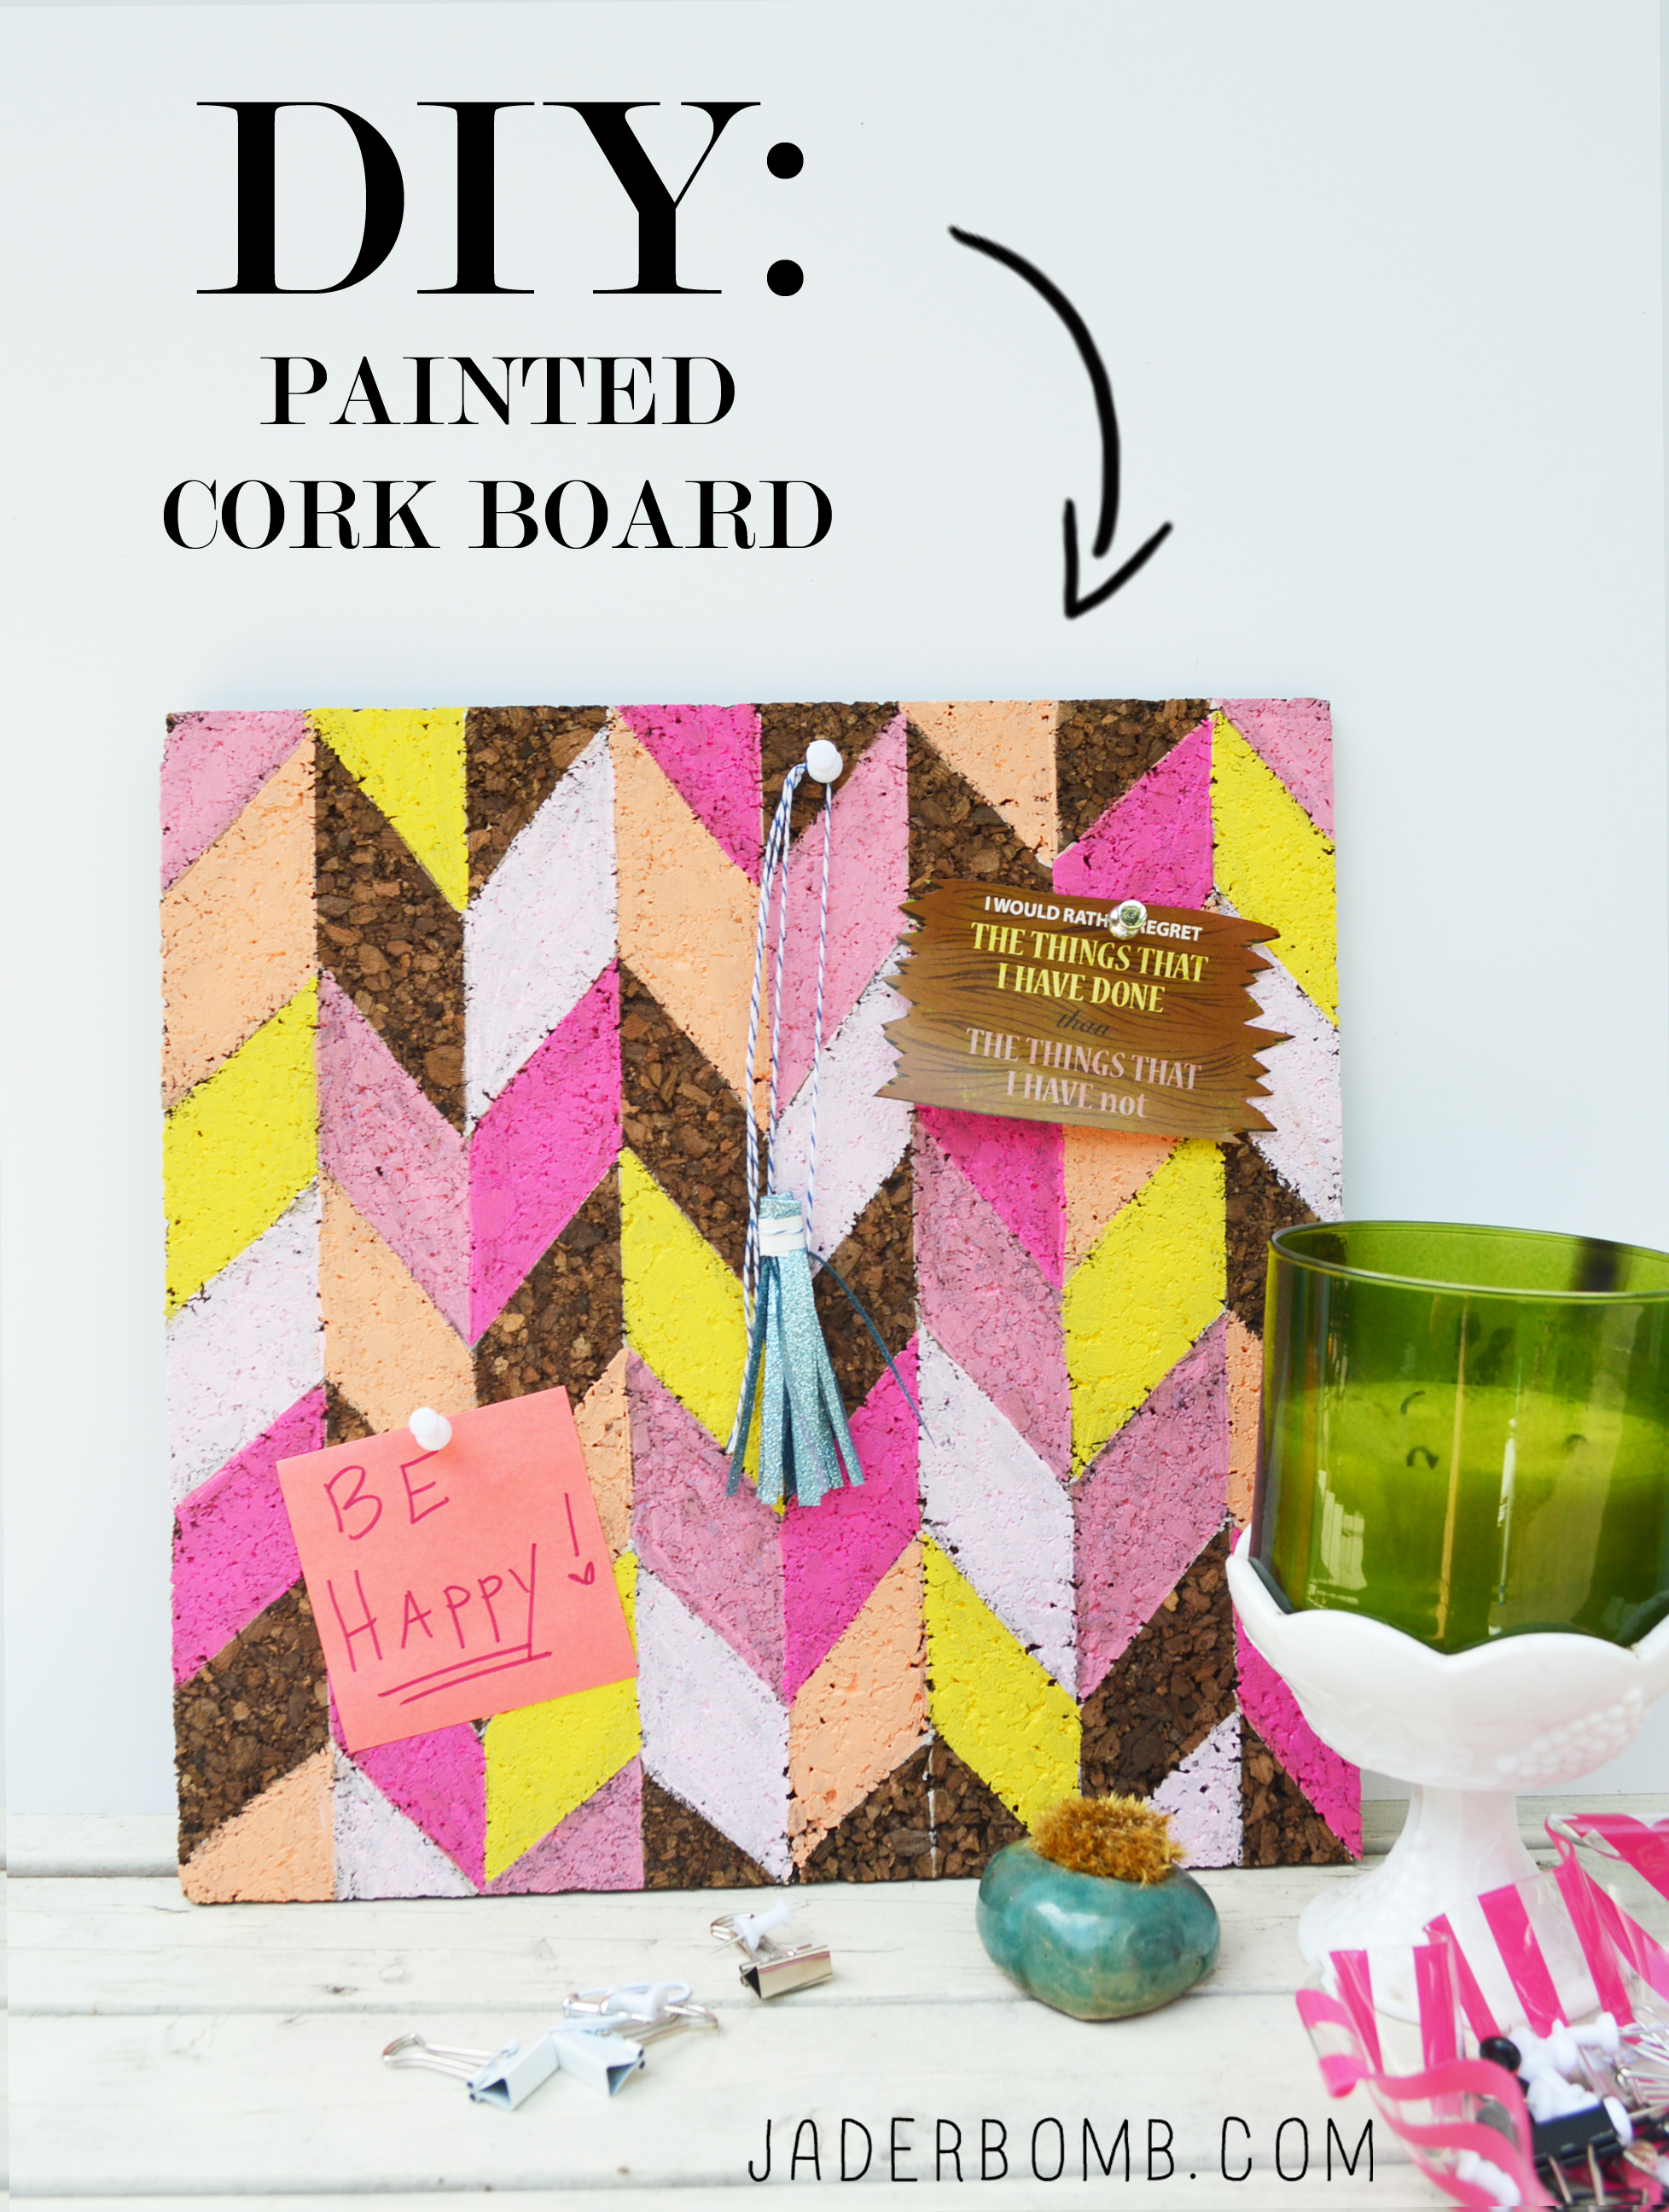
Step ONE: Get out your cork board and lay it on a flat surface.
DSC_0297

Step TWO: Get your ruler and mark 1.5″ dot’s with your chalk board marker or a light colored pencil. Do this all the way across the bottom of your cork board, on both sides. DSC_0285

Step THREE: When you are done with your dots connect them from one end to the other. You are creating lines on your cork board.

DSC_0286
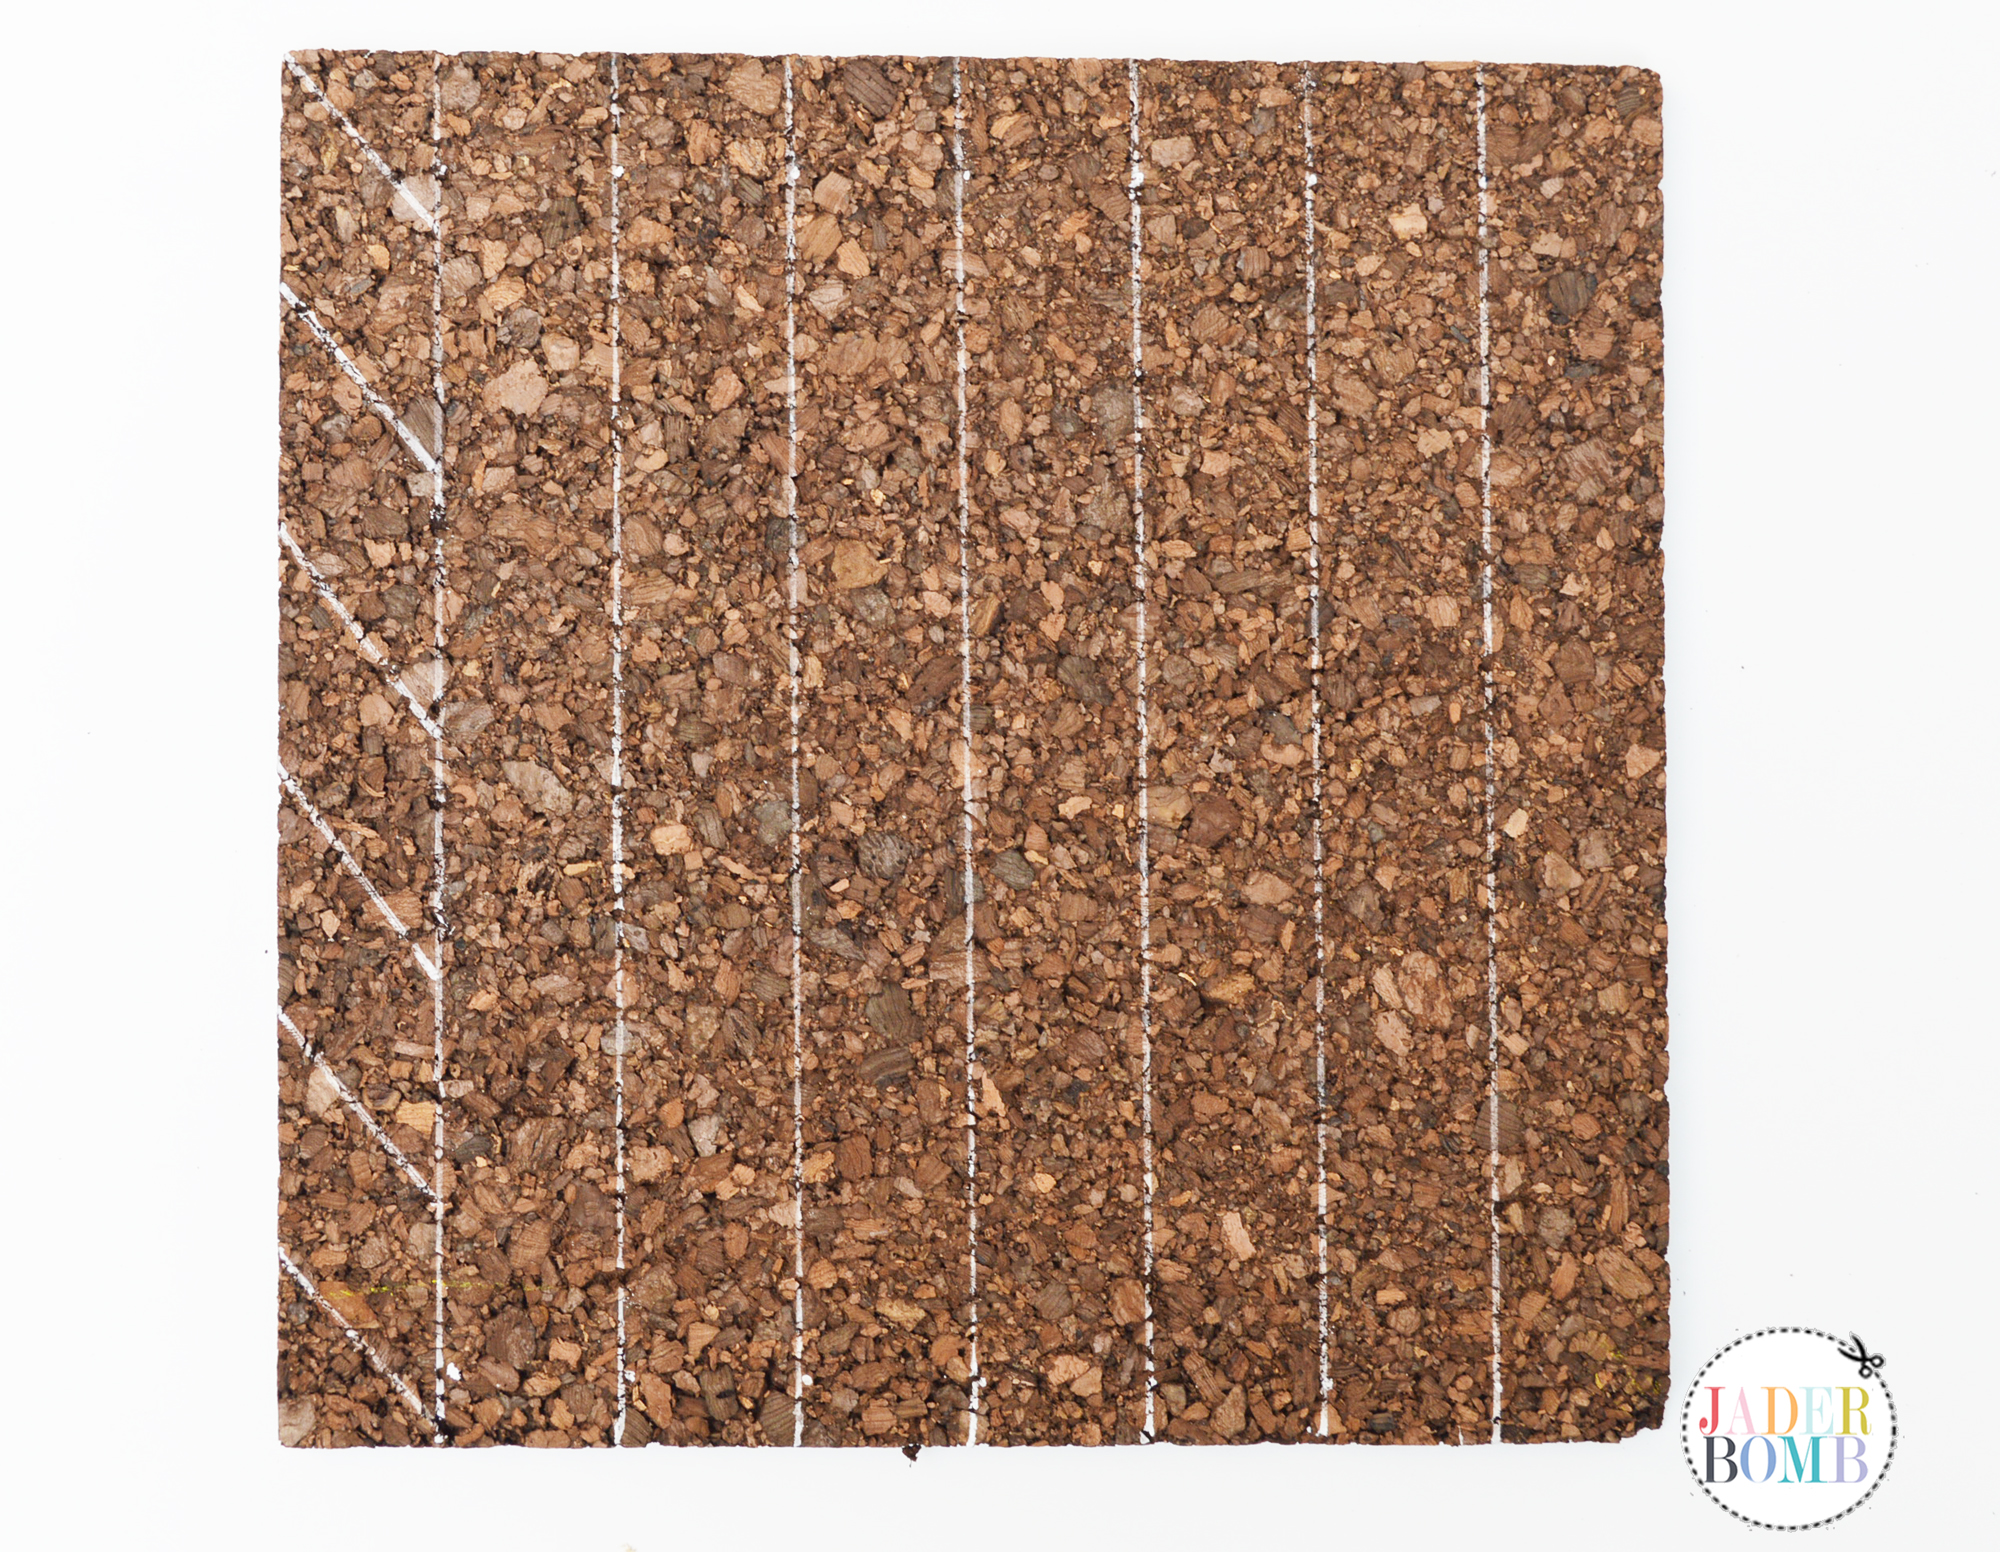
Step FOUR: This is what it should look like when you are done.
DSC_0298
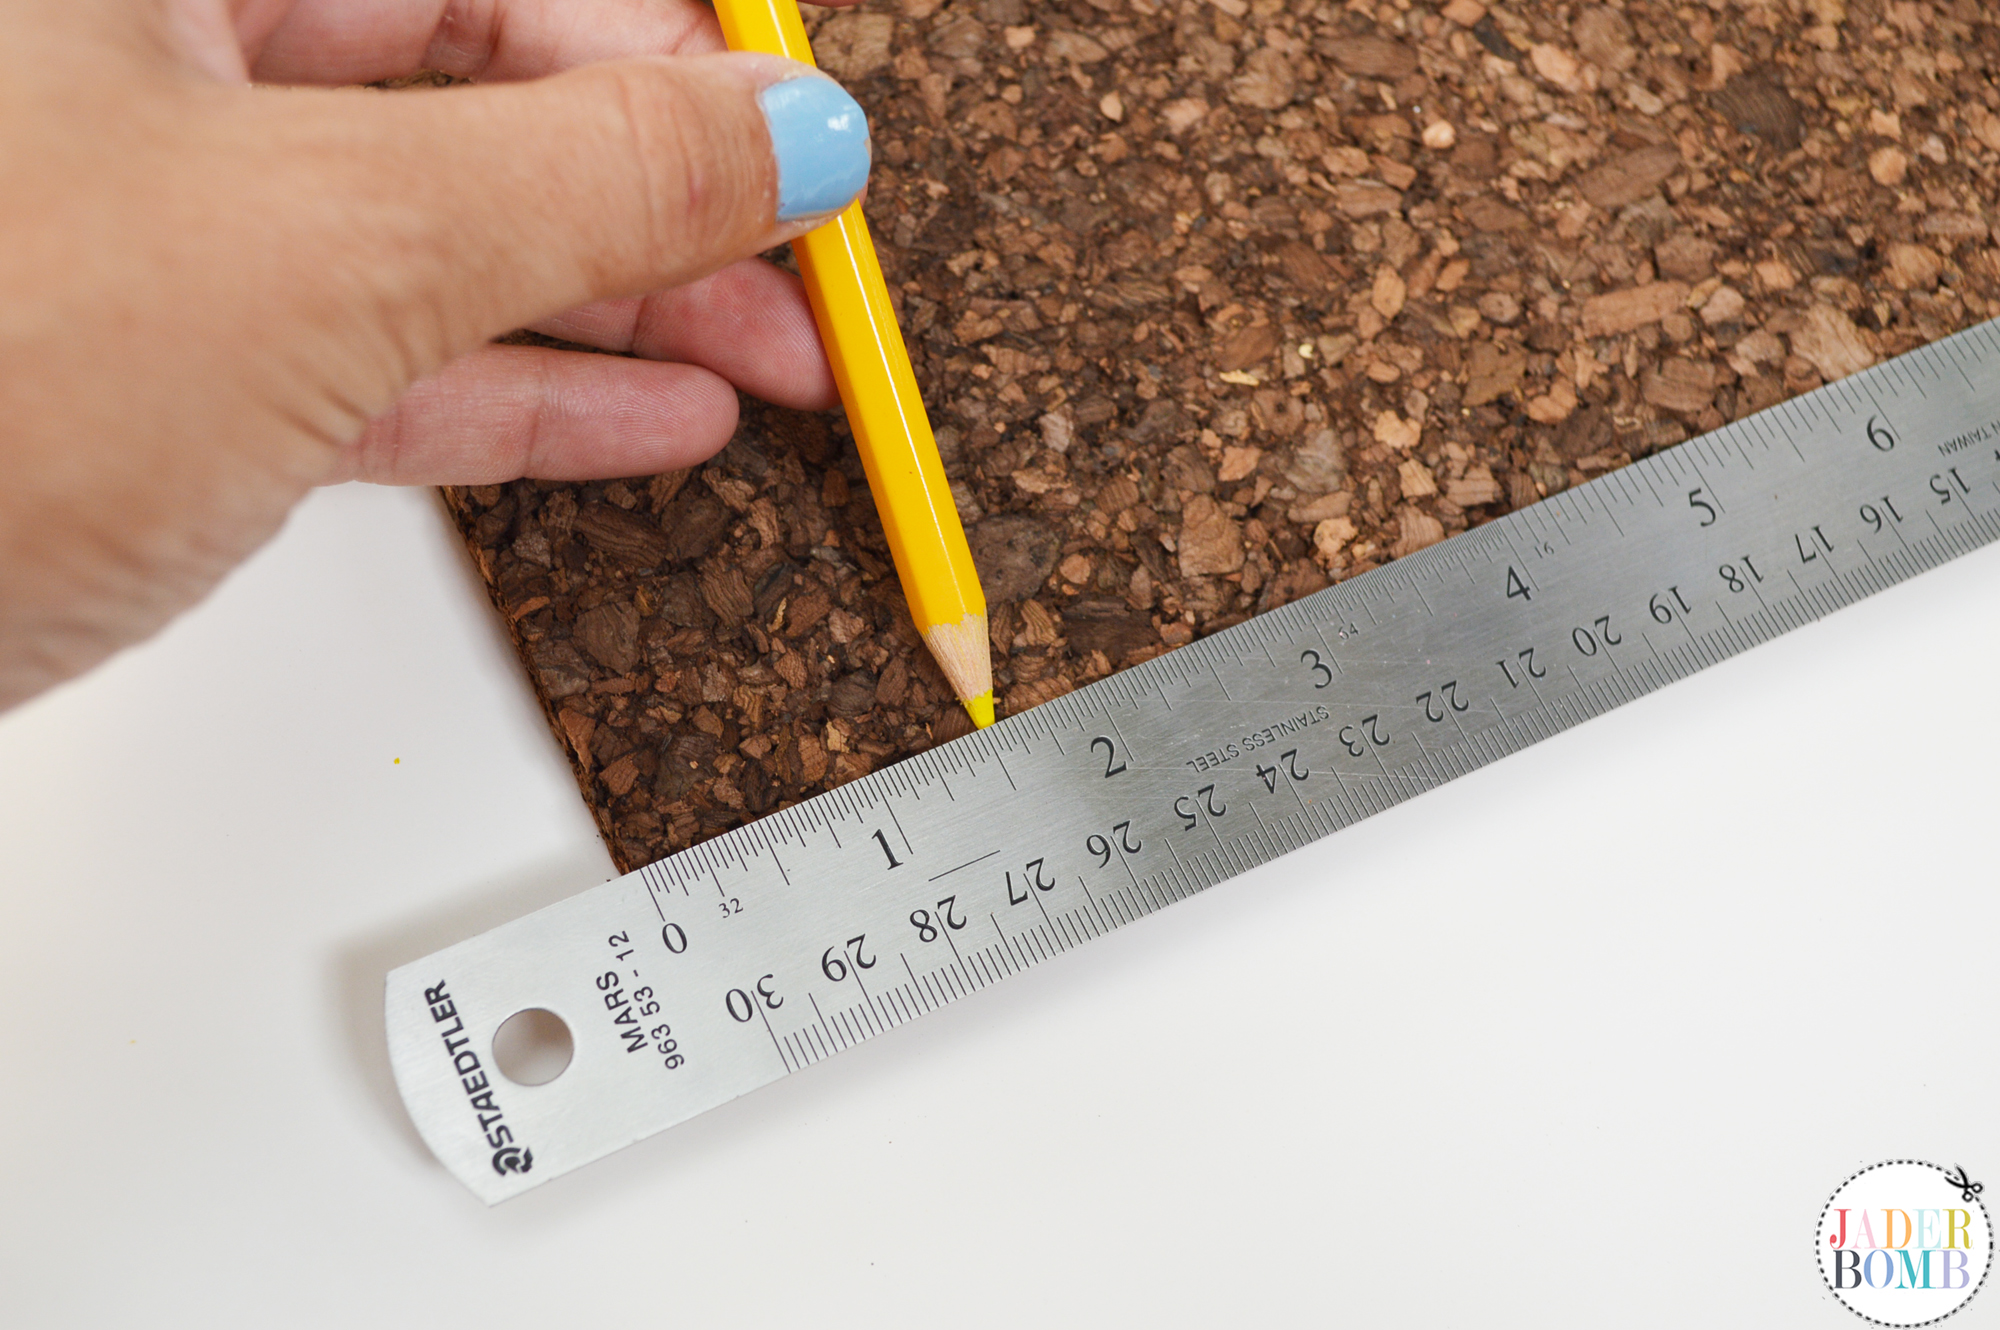
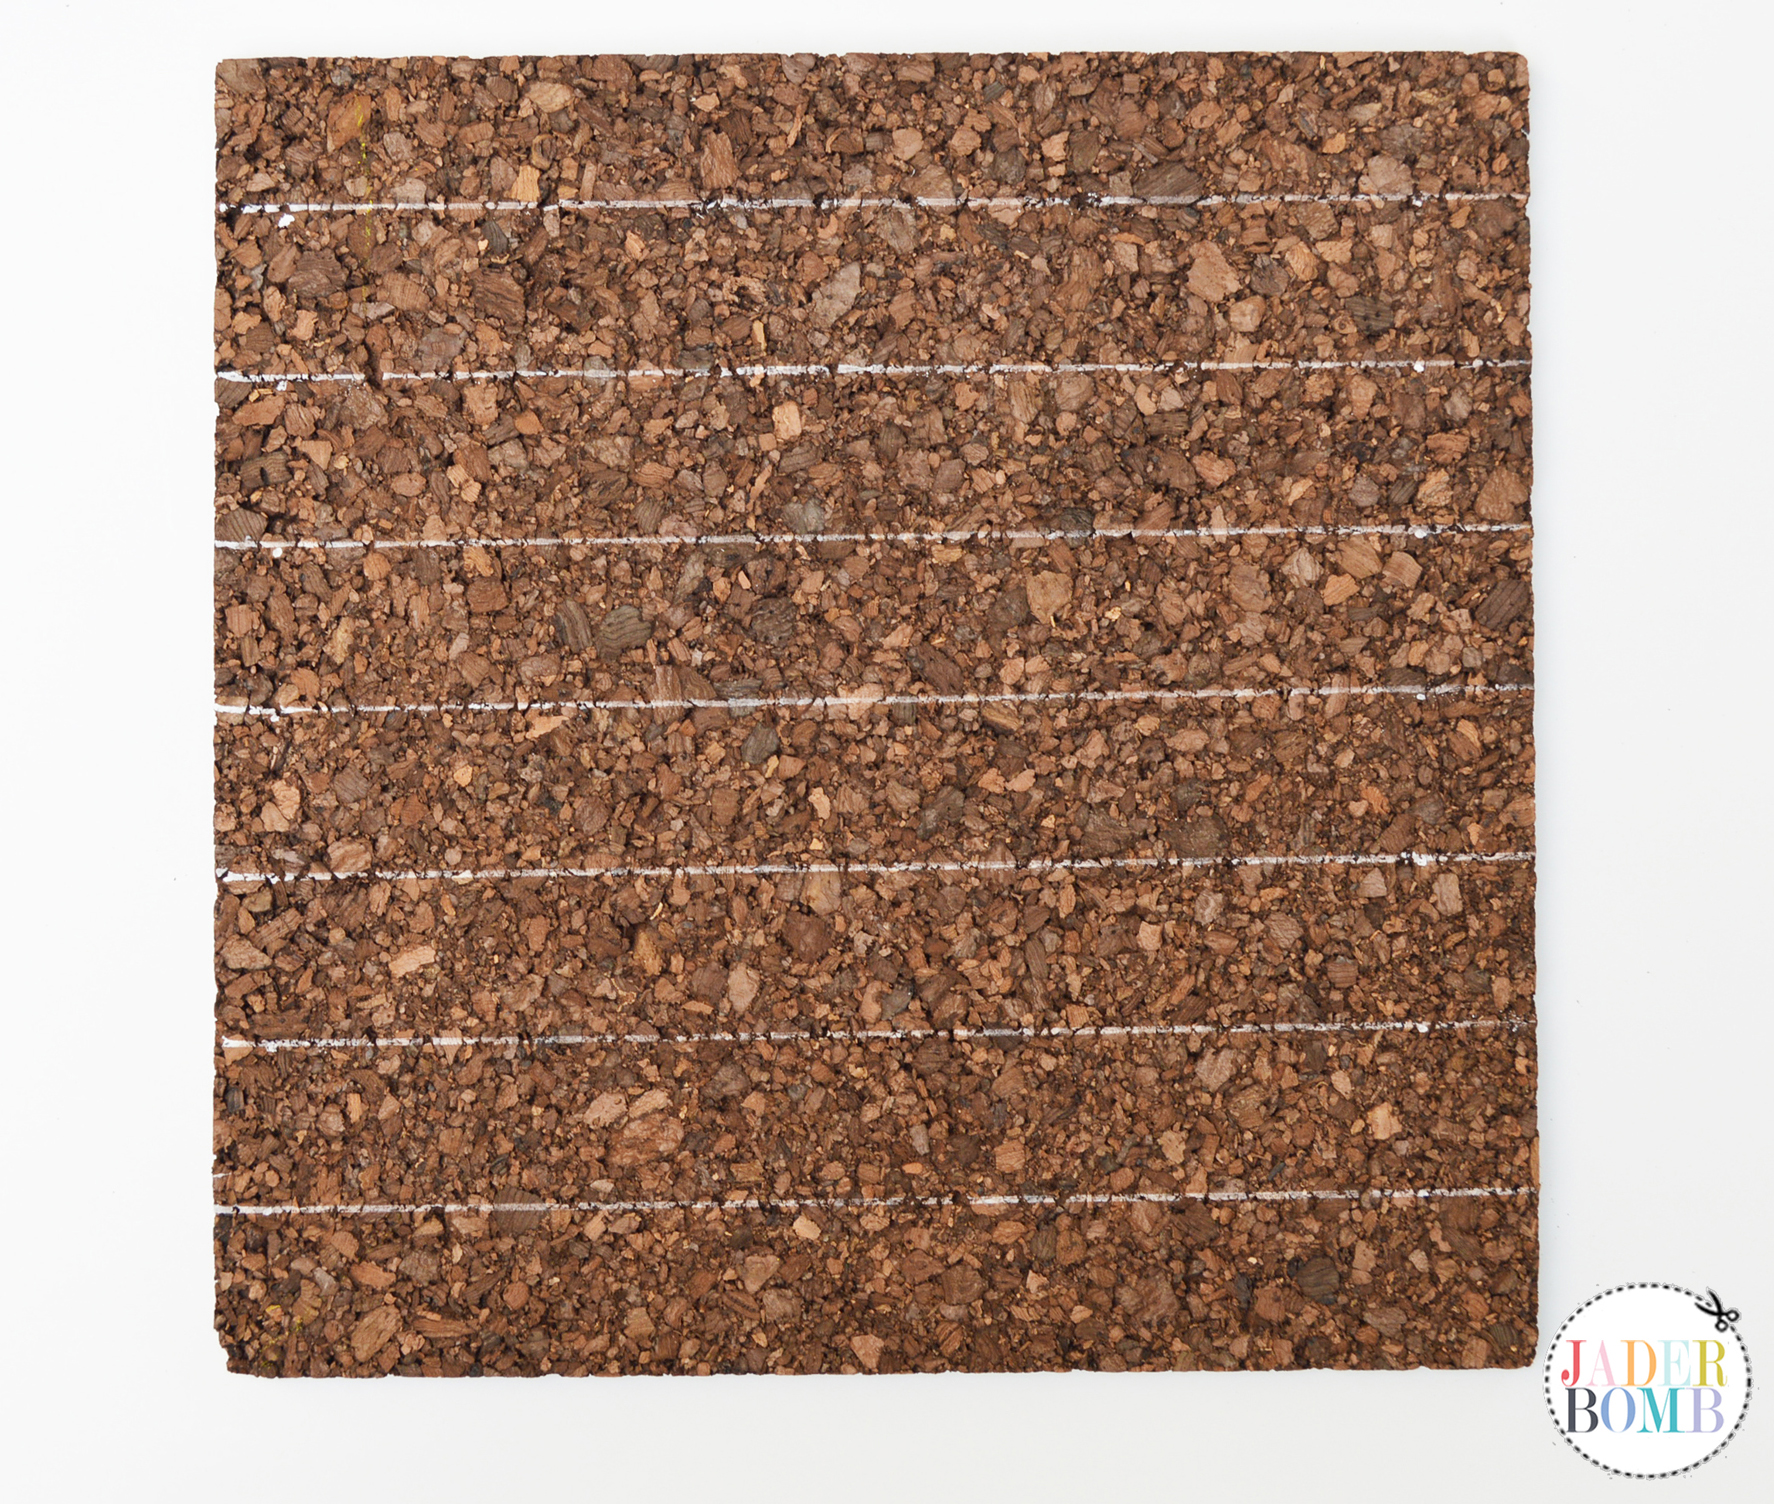
Step FIVE: Take your ruler and create angled lines in each section starting at the top and working your way to the bottom.

DSC_0299

Step SIX: The first section your lines will go downward then the next section you will make your lines go in the opposite direction. You will be creating a “chevron” appearance. DSC_0300 DSC_0302

DSC_0303
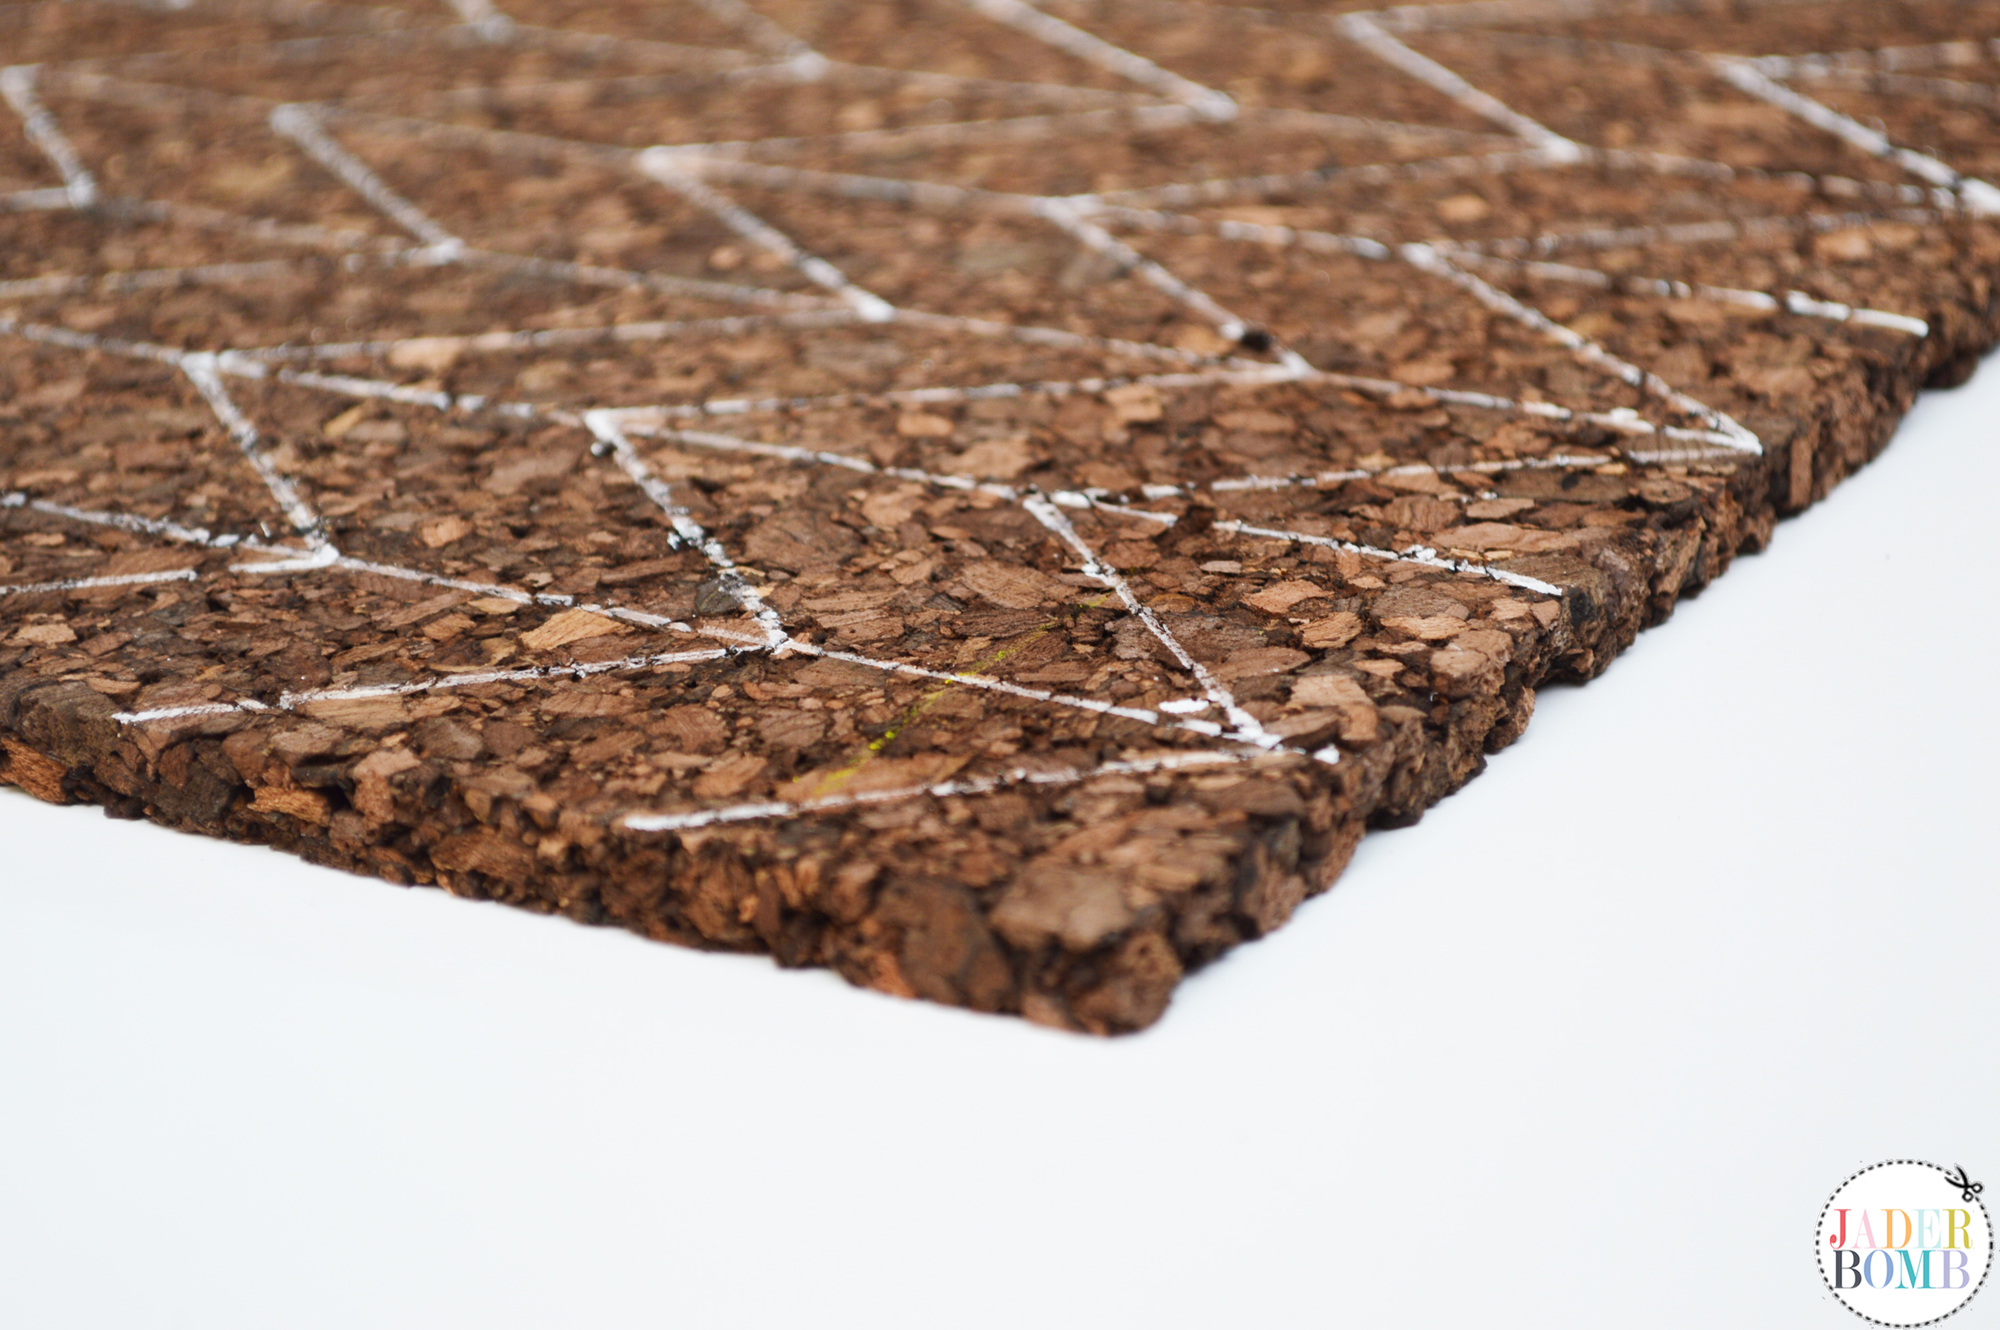
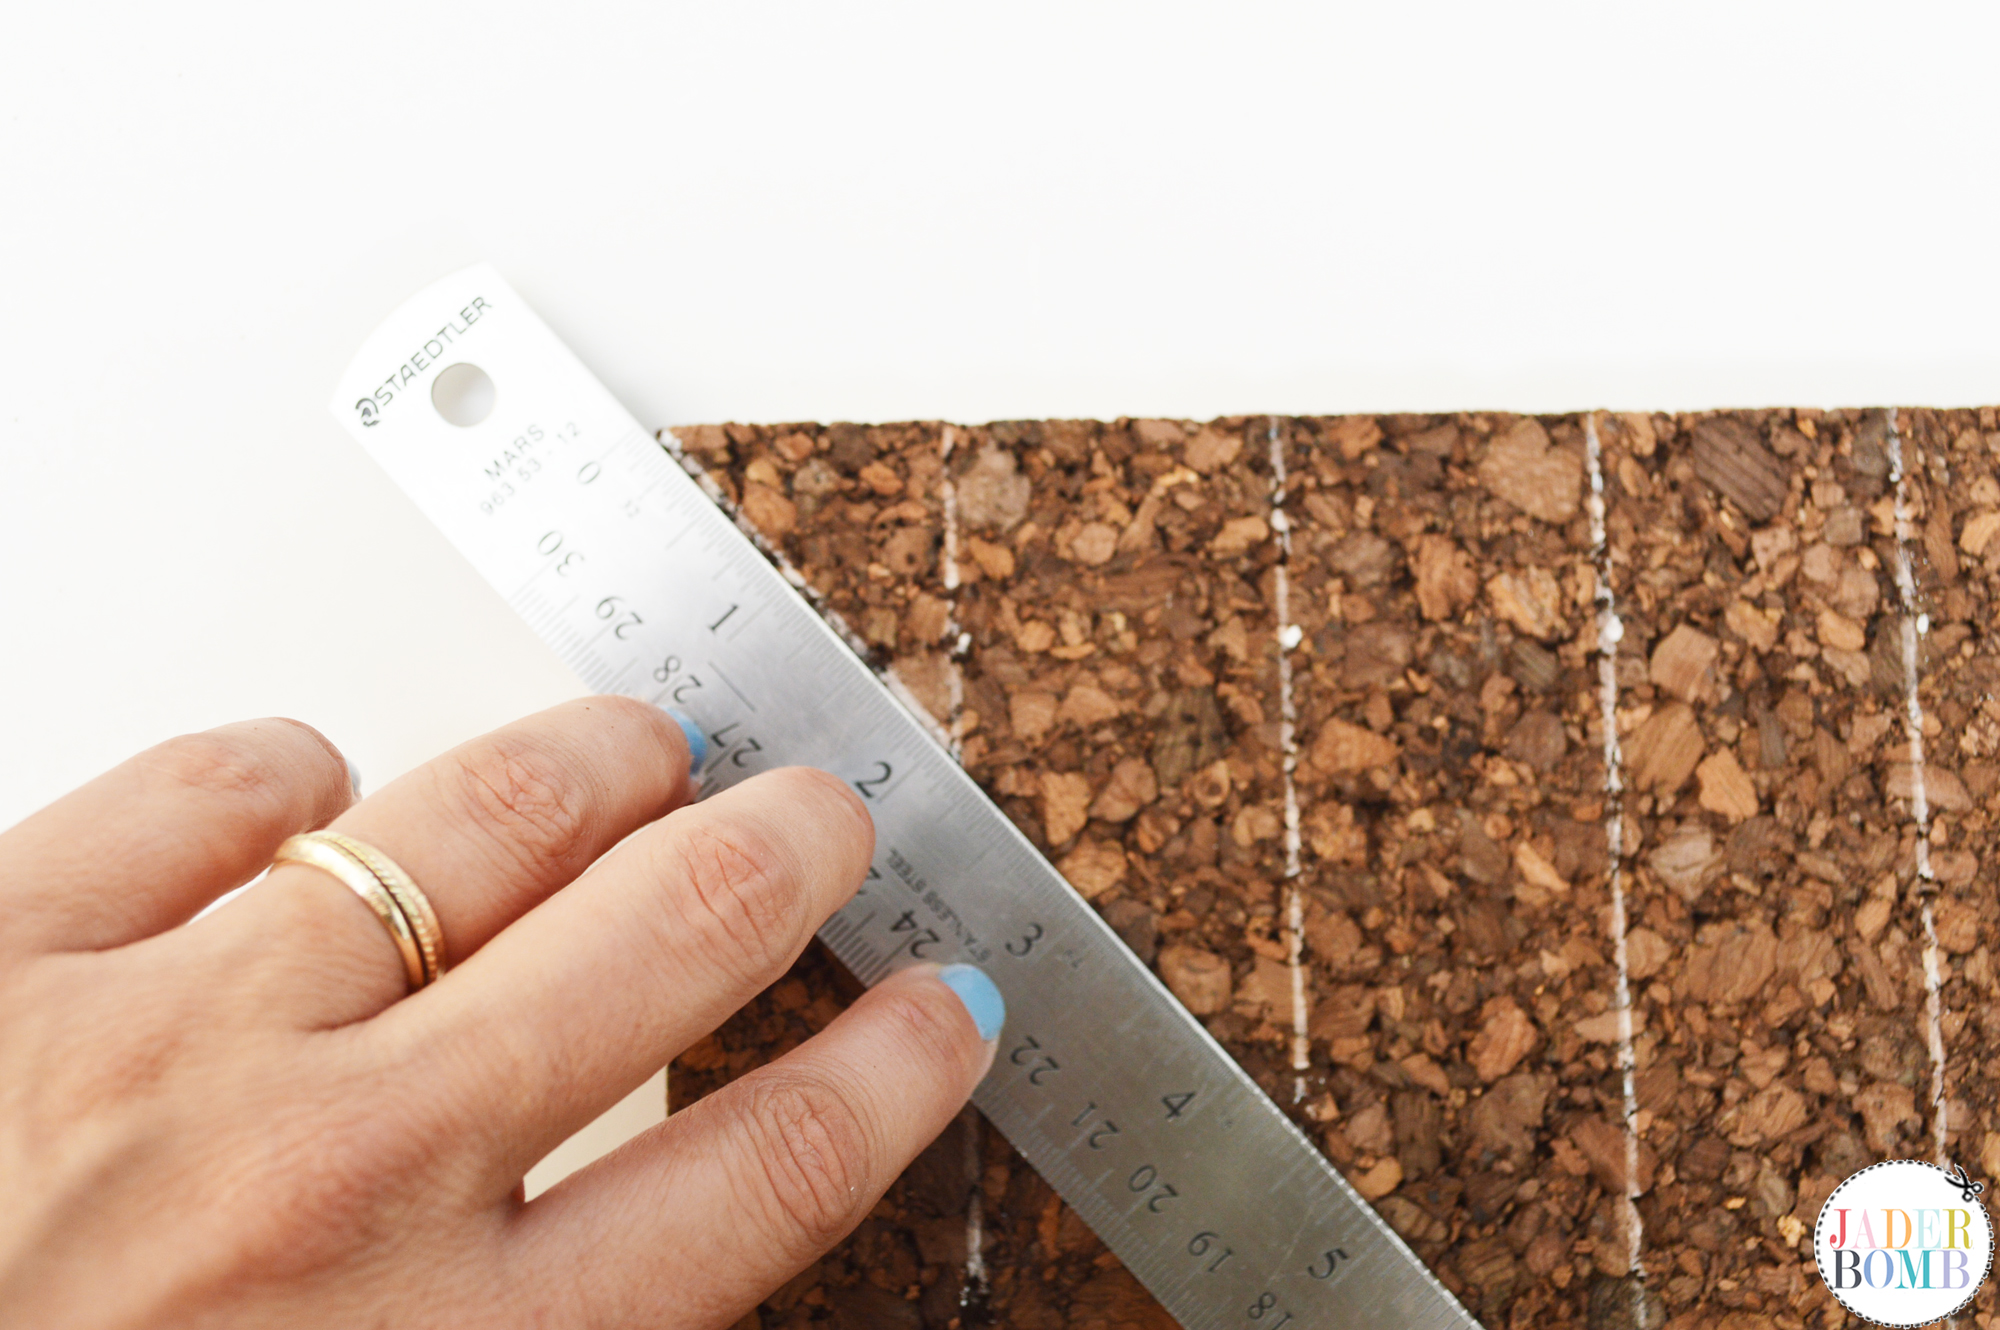
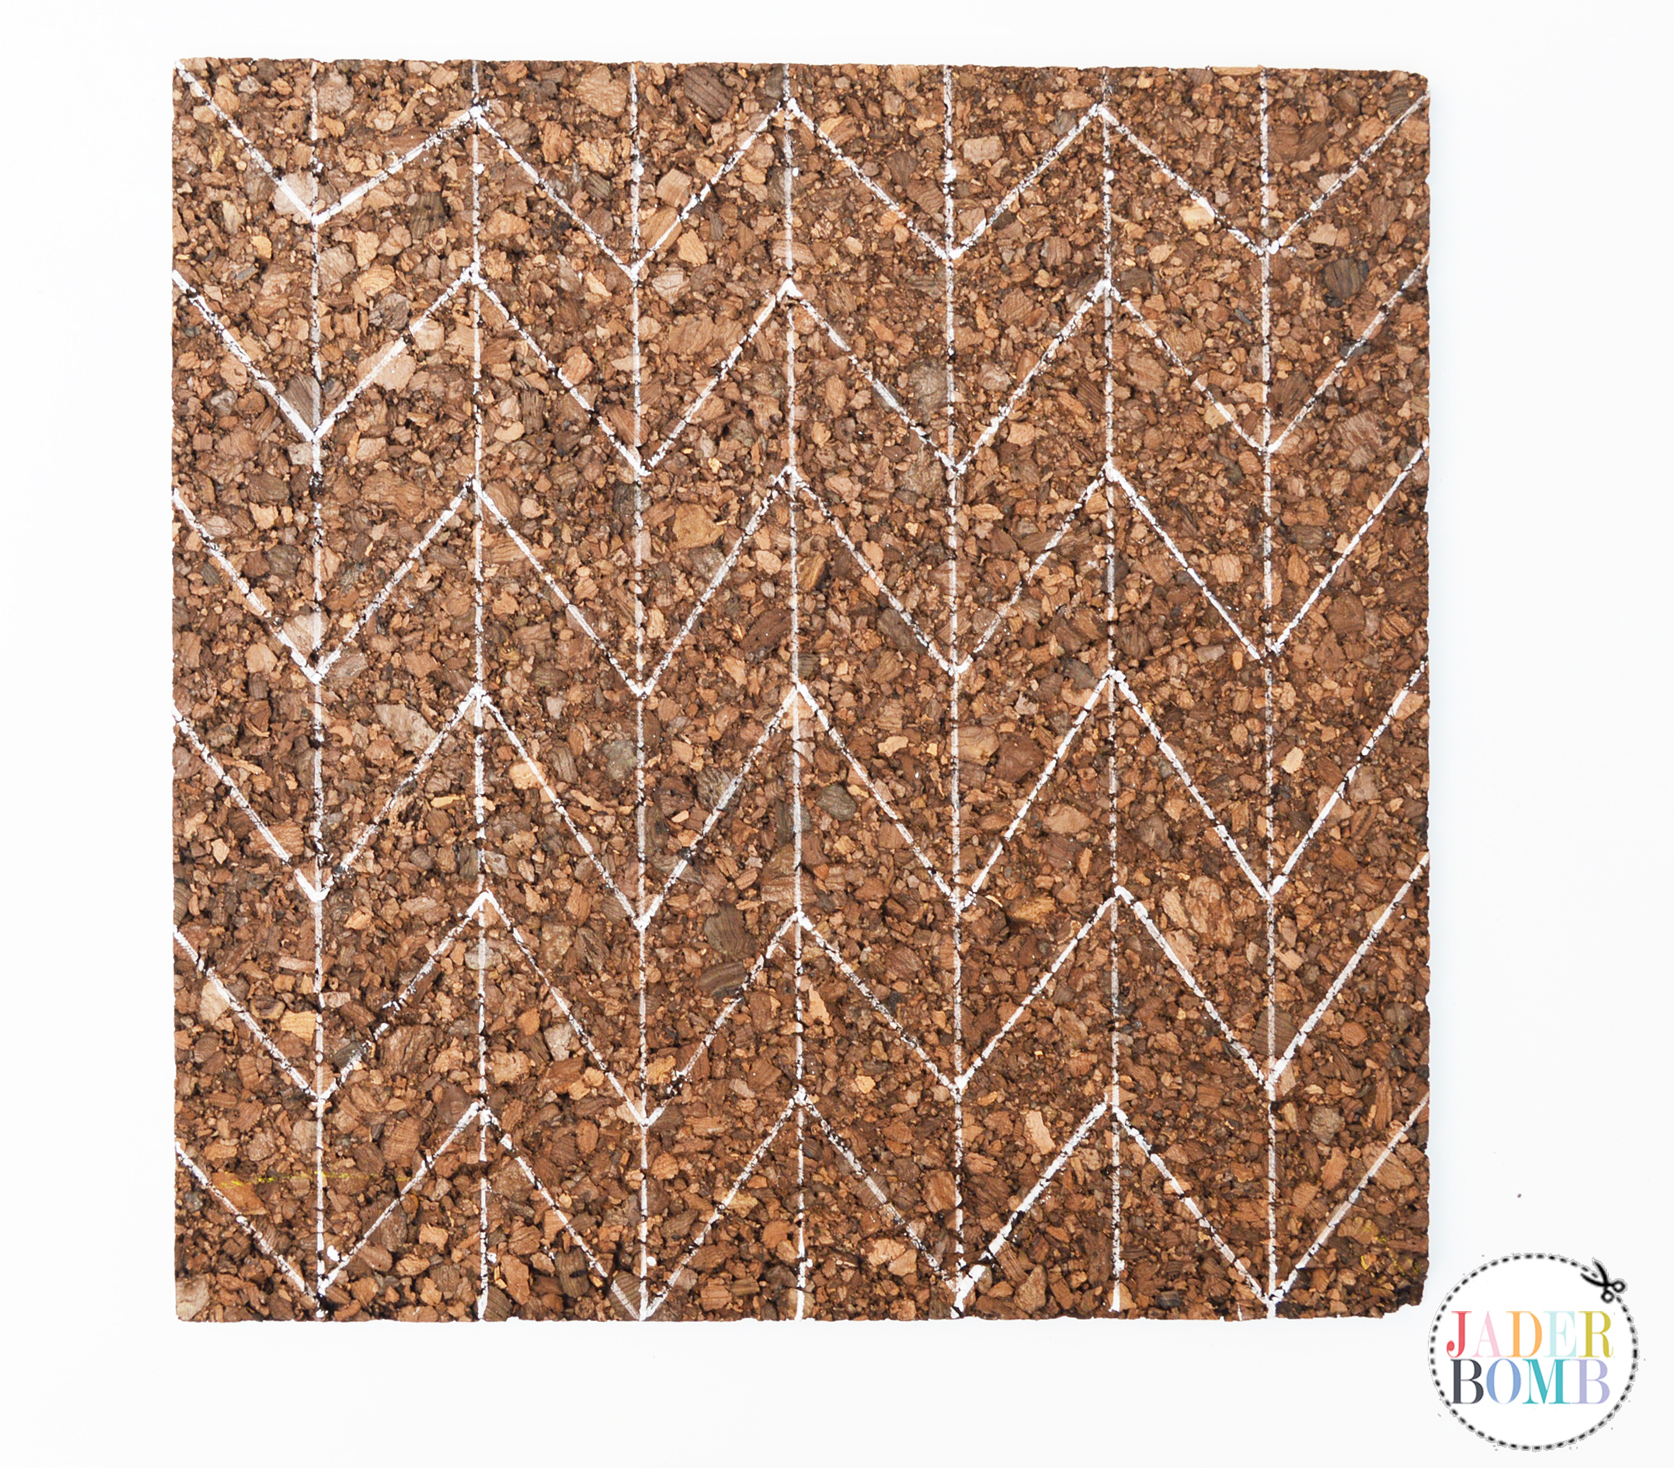
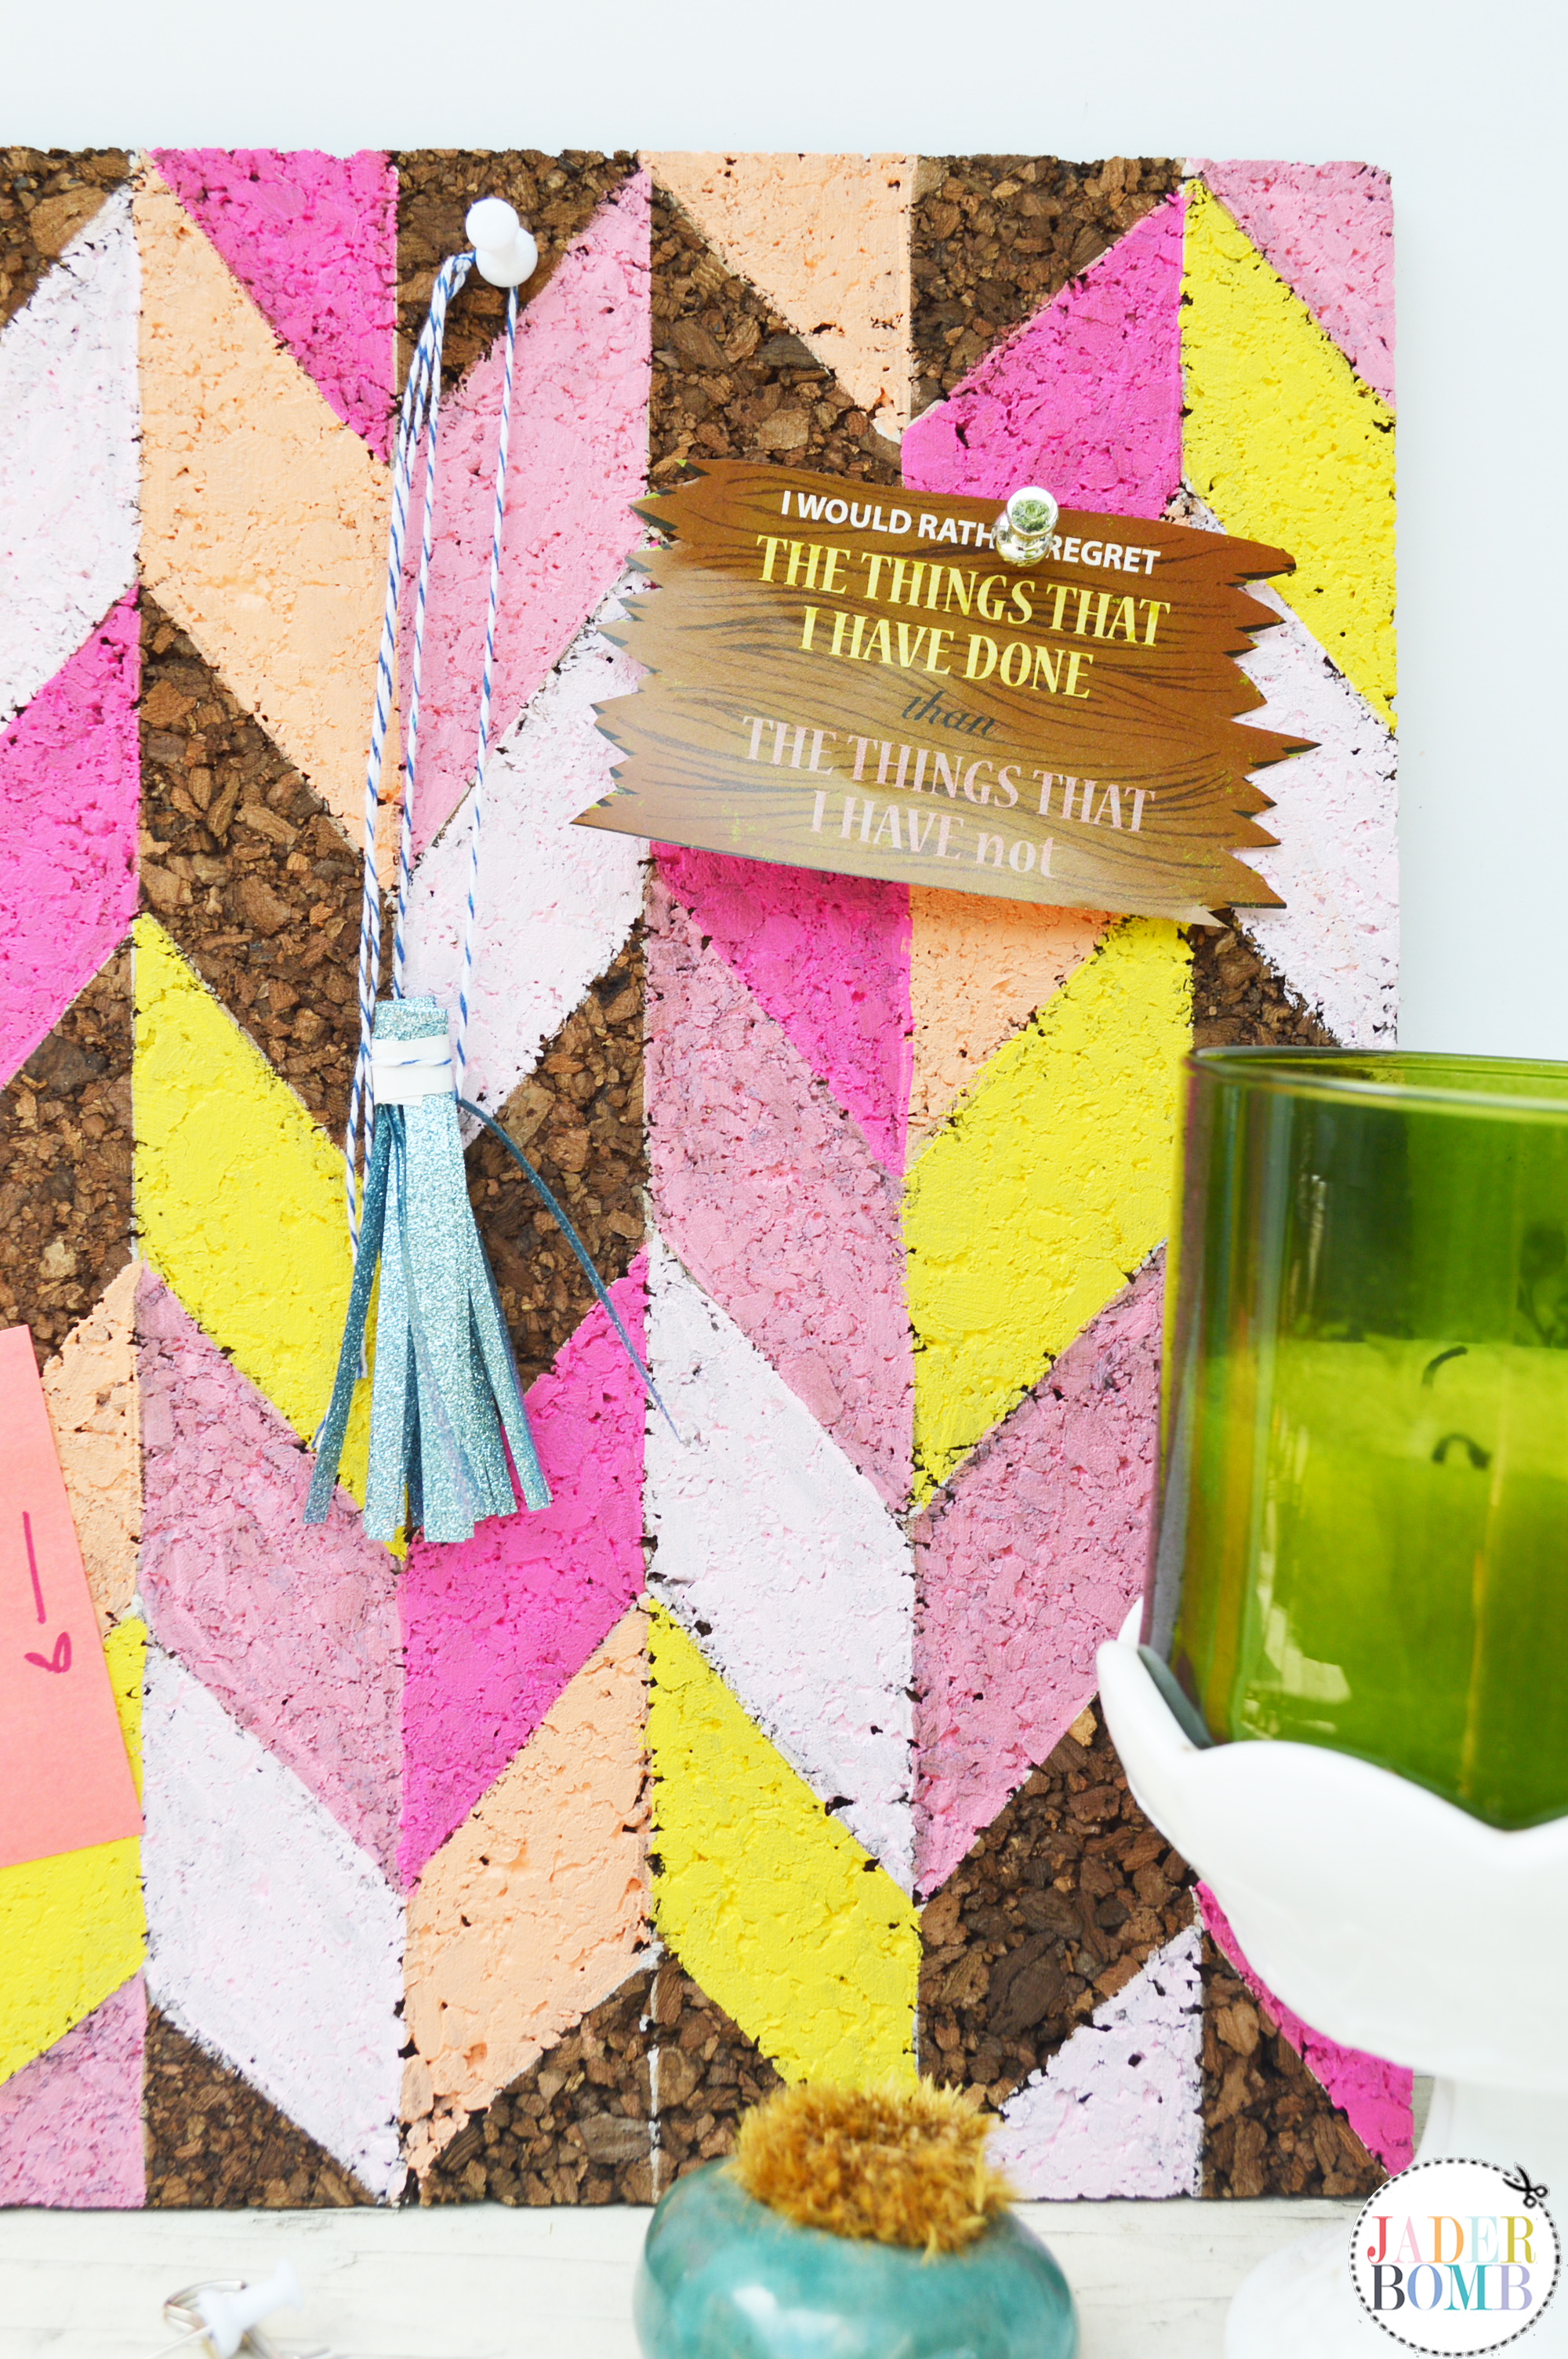
I am loving these colors! This alone is ART!DSC_0308
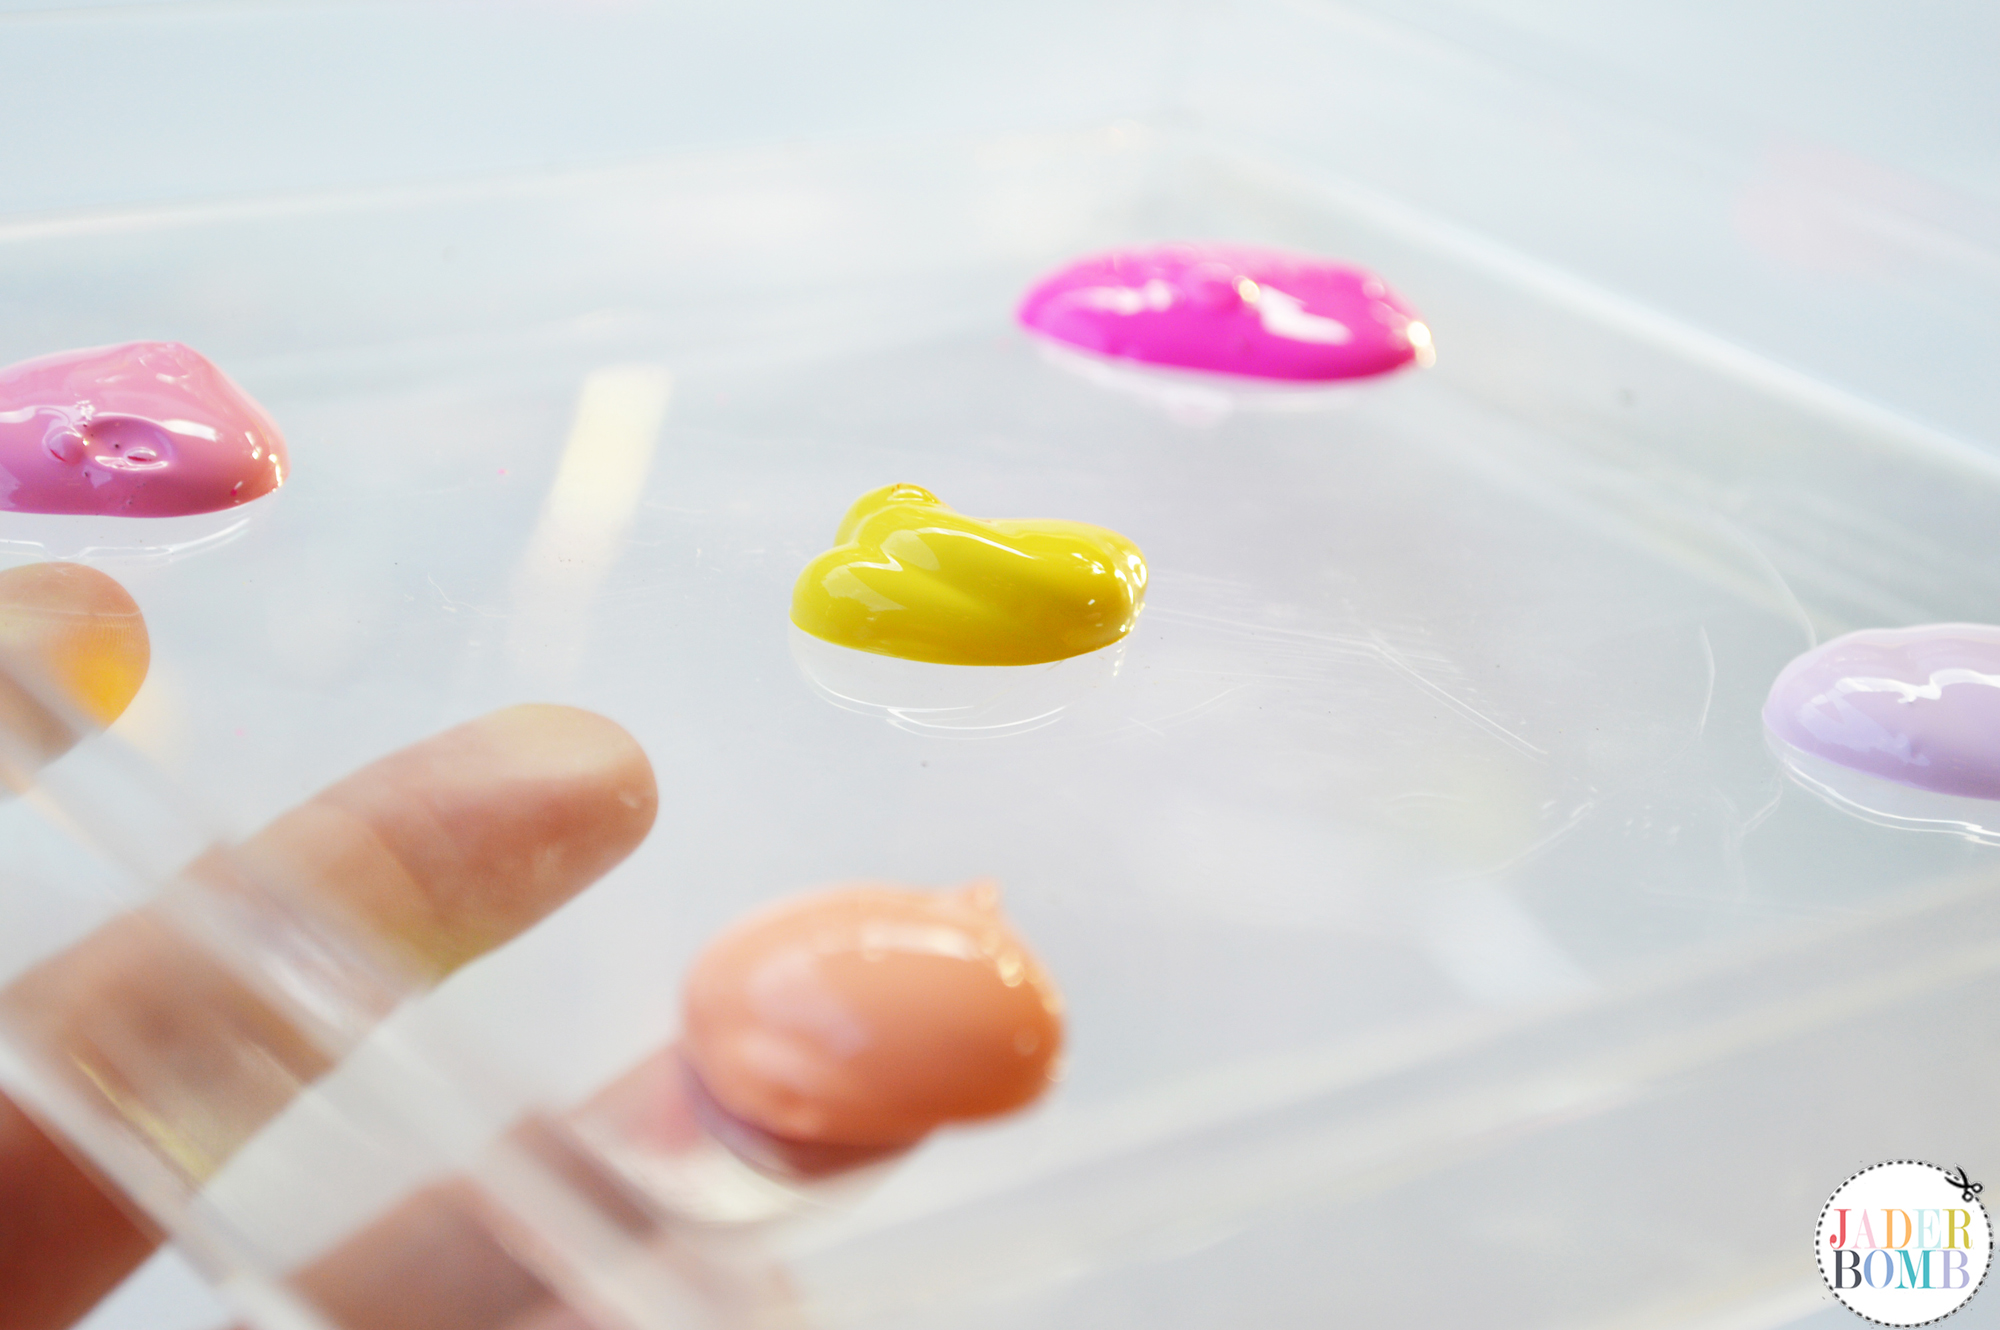
Step SEVEN: Start painting each section with your paint. I will tell you when you use a dark cork board like I am using you might have to put two or three coats of paint, depending on how opaque you want it.
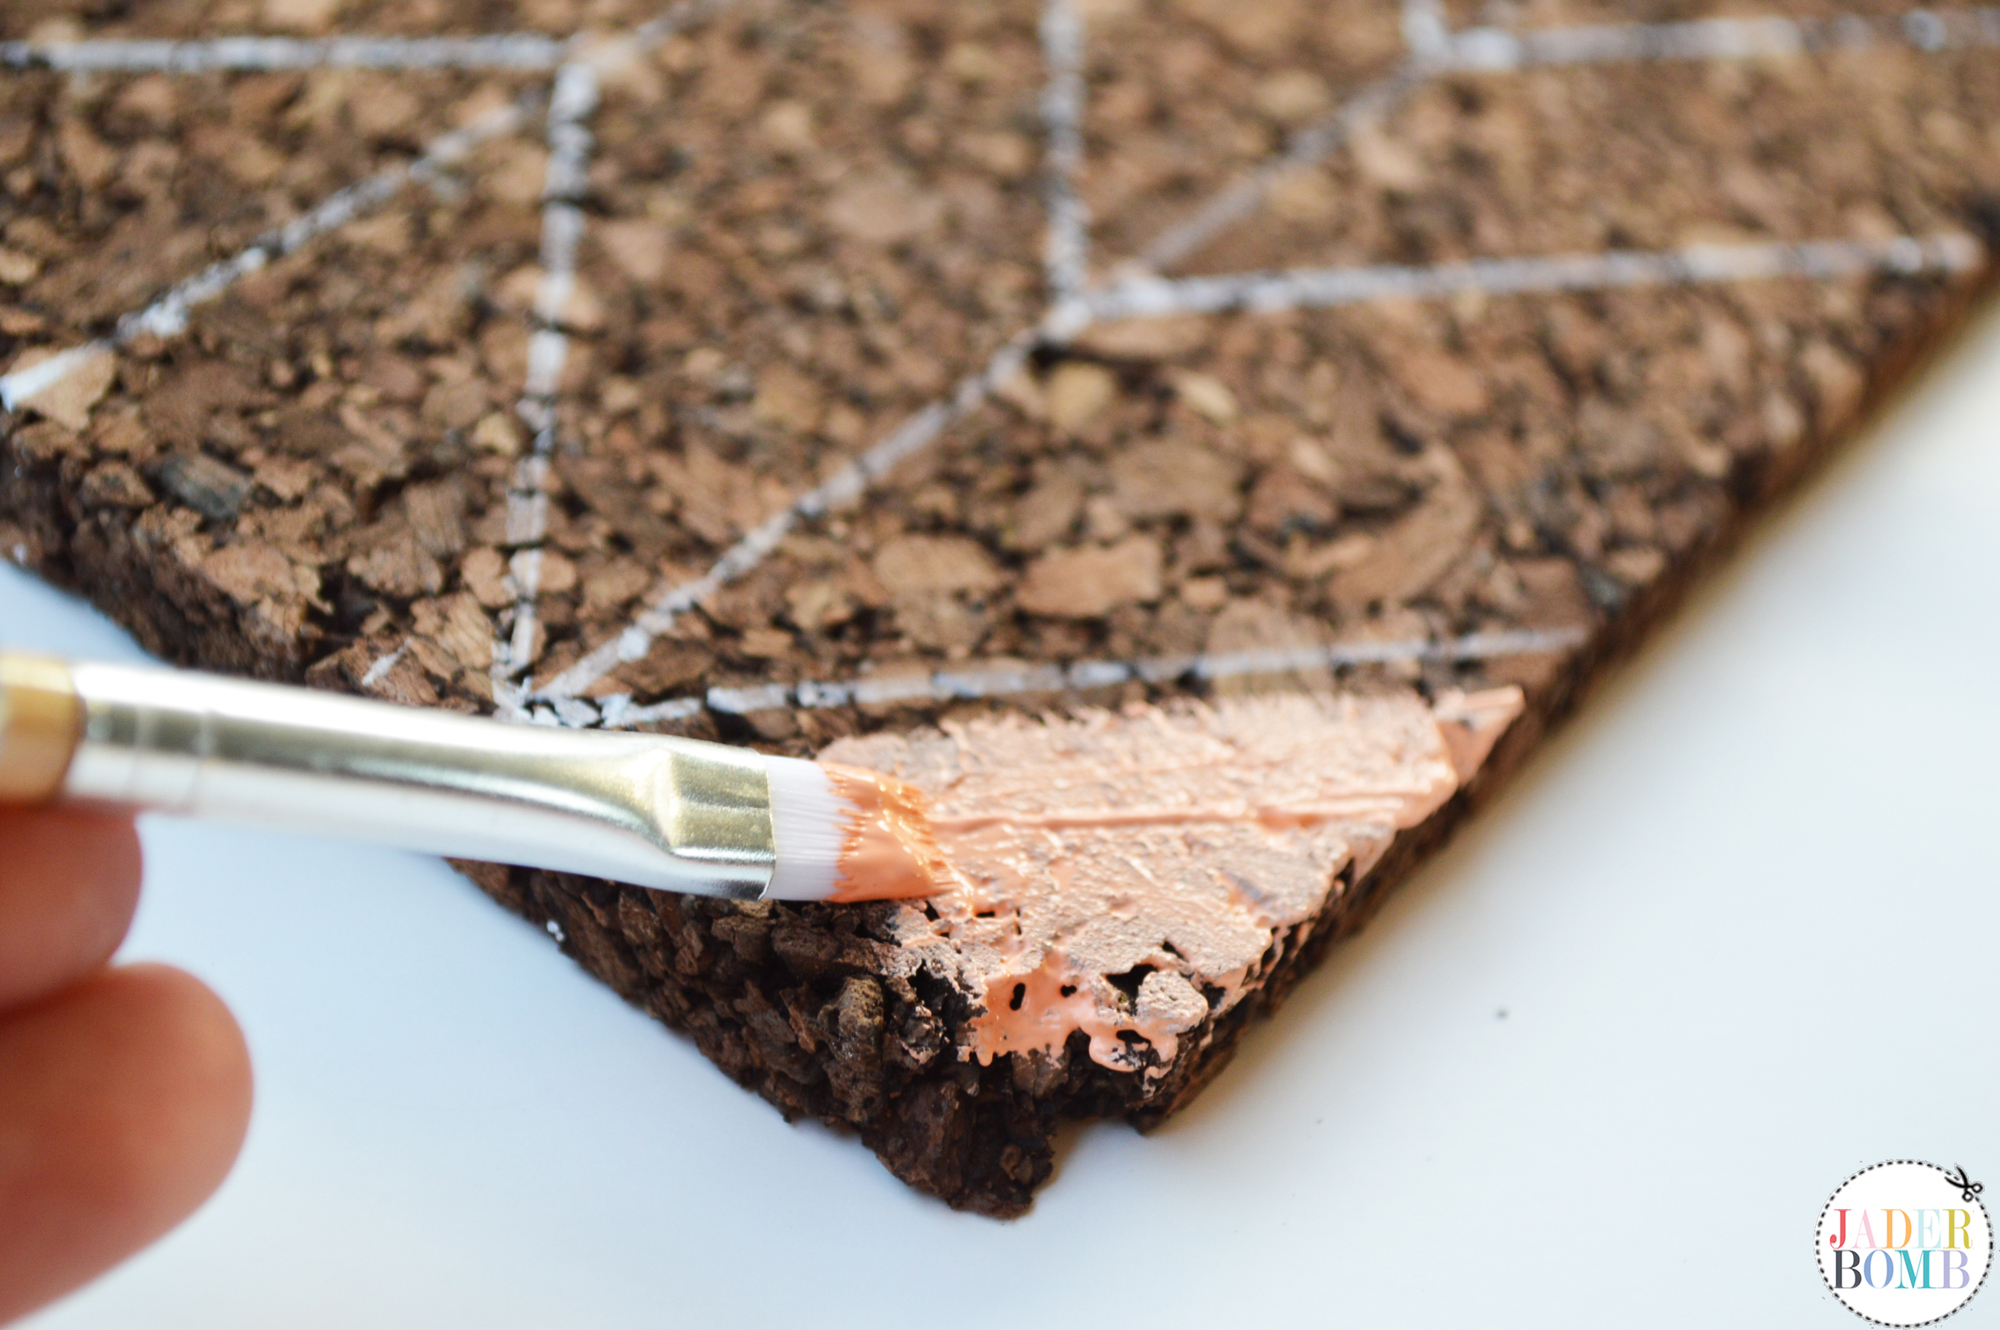
 DSC_0314

DSC_0116

I am very pleased with the way they turned out. I created one board with the entire board painted and the other one I allowed some brown pieces to come through. I thought each look came out completely different and gave off a different vibe. DSC_0113DSC_0122

DSC_0118

Don’t forget to connect on social media! Make sure to use use the hashtag #JADERBOMB on Instagram or Twitter or Facebook so I can keep track of all your awesome creations! HAVE A GLITTERY DAY! ♥, Jade

P.S. If you LOVE printables then check out my site where you can download hundreds of FREE printables!

DIY-PHOTO-CREDIT-Photography: Jaderbomb // DIY tutorial by: Jaderbomb // Cork Board : Michael’s //  Paint: Michael’s // Chalkboard Marker : Michael’s // Affiliate Links: Amazon I do get a percentage from the links you can order from, so thank for helping me buy tons and tons of glitter!

HASHTAG LOGO


I am so stoked about my latest post for the I Love to Create Blog where I will show you how to paint stripes. I always have fun using Tulip products and for some strange reason this project made me feel super duper inside. Check out these too!

I think I may have a slight addiction to color, as you can see here. If I had to explain to you in this moment what COLOR does to me it’s like kids that sit down at the table to eat and the entire time they sorta “dance” with their legs under the table. You know what I am talking about? I can always tell when I cook a good meal if I feel the floor shaking a little.

Now when the floor doesn’t shake. I just take an extra sip of wine and go cry in the bathroom. Well not really but you get it, RIGHT!

These napkins represent a big juicy hamburger from your favorite joint. Maybe with extra pickles and a good coke! Make sure to click at the bottom for the FULL tutorial ♥
How to Paint Stripes

CLICK HERE TO SEE FULL TUTORIAL
Enjoy and have a GREAT weekend!HASHTAG LOGO

Don’t forget to connect on social media! Make sure to use use the hashtag #JADERBOMB on Instagram or Twitter or Facebook so I can keep track of all your awesome creations! HAVE A GLITTERY DAY! ♥, Jade

Today we are getting all urban country making a Stencil 1– Deer Stencil Table Liner using my best friend Ed Roth’s banging stencil line.

Check out these rainbow coasters I made using some of his stencils with Plaid! OH WAIT: Check out this ginormous yarn bombed deer that will stare at you till you are blue in the face. Literally.

Ed Roth Stencil 1_jaderbomb

Not only does he have the cutest face on the planet but he gives the best hugs in the world.

Now if you know me then you know I live in the South, specifically Louisiana which means everyone here loves a good deer in their life. I sometimes pretend I am living in New York with the sounds of horrific traffic in the background and the only chance I will see any deer is by using a stencil like this. I guess I’m not the kinda girl who likes to eat them or hang them on my wall as “decor” but more power to those that do. Today I am showing you how to use this stencil in a spectacular way. So put on your boots because we about to get COUNTRY, urban country that is. On another note check out this business that really is called “Urban Country”. It’s legit.


 Stencil1 has collaborated on DIY events with high-profile brands, like The Gap, Converse, Sharpie, and Etsy, to engage their customers and grow their base through interactive, creative, hands-on experience. Ed is an engaging host who knows his stuff and is equally comfortable in front of a crowd and a camera.

Stencil 1- Deer Stencil Table Liner

YOUWILLNEEDEd Roth Deer Stencil // Book // Craft Paint // Glitter // Craft Knife // Scissors // Tape // Pouncer // Fiskars Paper Punch
DSC_0015
Step ONE: 
Tear out a few pages from a book. You can use any book that you have laying around but for some reason I always crafts with pages from Twilight. I guess I am still a die hard fan. Yes. I still dream of turning into diamonds like Edward did. Go ahead, judge.

You can rip the pages out or use your crafting knife to get a nice fine line. If you don’t have one just grab your trusty pair of scissors.

Step TWO: Get your paper punch and punch those pages till they can’t be punched anymore. Notice I am only doing the sides of the sheet. It’s kinda like edging your hairline or your yard. I think. I don’t edge either of those so it’s just a guess.

Step THREE: Line the pages up on top of each other and tape them down on the back side.

book page paper punch
Step FOUR: Grab your deer stencil and place it on the bottom of your “book sheet table liner”. Grab your dauber and pounce your little heart out with your color of choice.Continue doing this until your get to the end of your liner.  I liked the masculine look of orange or I just thought it’s was sorta “Urban Country” looking. While your paint is still wet sprinkle a little bit of glitter on top and let it dry till the cows come home. That is about 20 minutes.

Or if you are impatient like me you could blow dry that baby.
book page table runner deer head stencil

craftgawker1

Note cards are always fun to make which is why you have to see what I made on some precious rainbow cards!

Don’t forget to connect on social media! Make sure to use use the hashtag #JADERBOMB and you might see your stuff on Instagram or Twitter or Facebookor Pinterest.
HAVE A GLITTERY DAY! ♥, Jade

HASHTAG LOGO