Author Archives: jaderbombllc

About jaderbombllc

I am a Southern DIY blogger and Designer known for fearlessly conquering anything and everything do-it-yourself. I aim to create unique designs by working through my thoughts, dreams, emotions, and tons of glitter! I believe in doing things that make my heart flutter and smile, and I live by my motto, “Life is simple and so should your style.” To learn more about me, visit jaderbomb.com or email me at [email protected]. You can also visit my Etsy shop at jaderbomb.etsy.com. Make sure to check out my FREE PRINTABLES site www.freeprettyprintables.com My biggest accomplishment thus far is being a guest on the Martha Stewart show, yes she smells good. I love my dog Ceaux Ceaux, pens,the smell of Christmas, GOLD, Dr. Pepper and blogging. BTW: I bleed glitter, all shades.

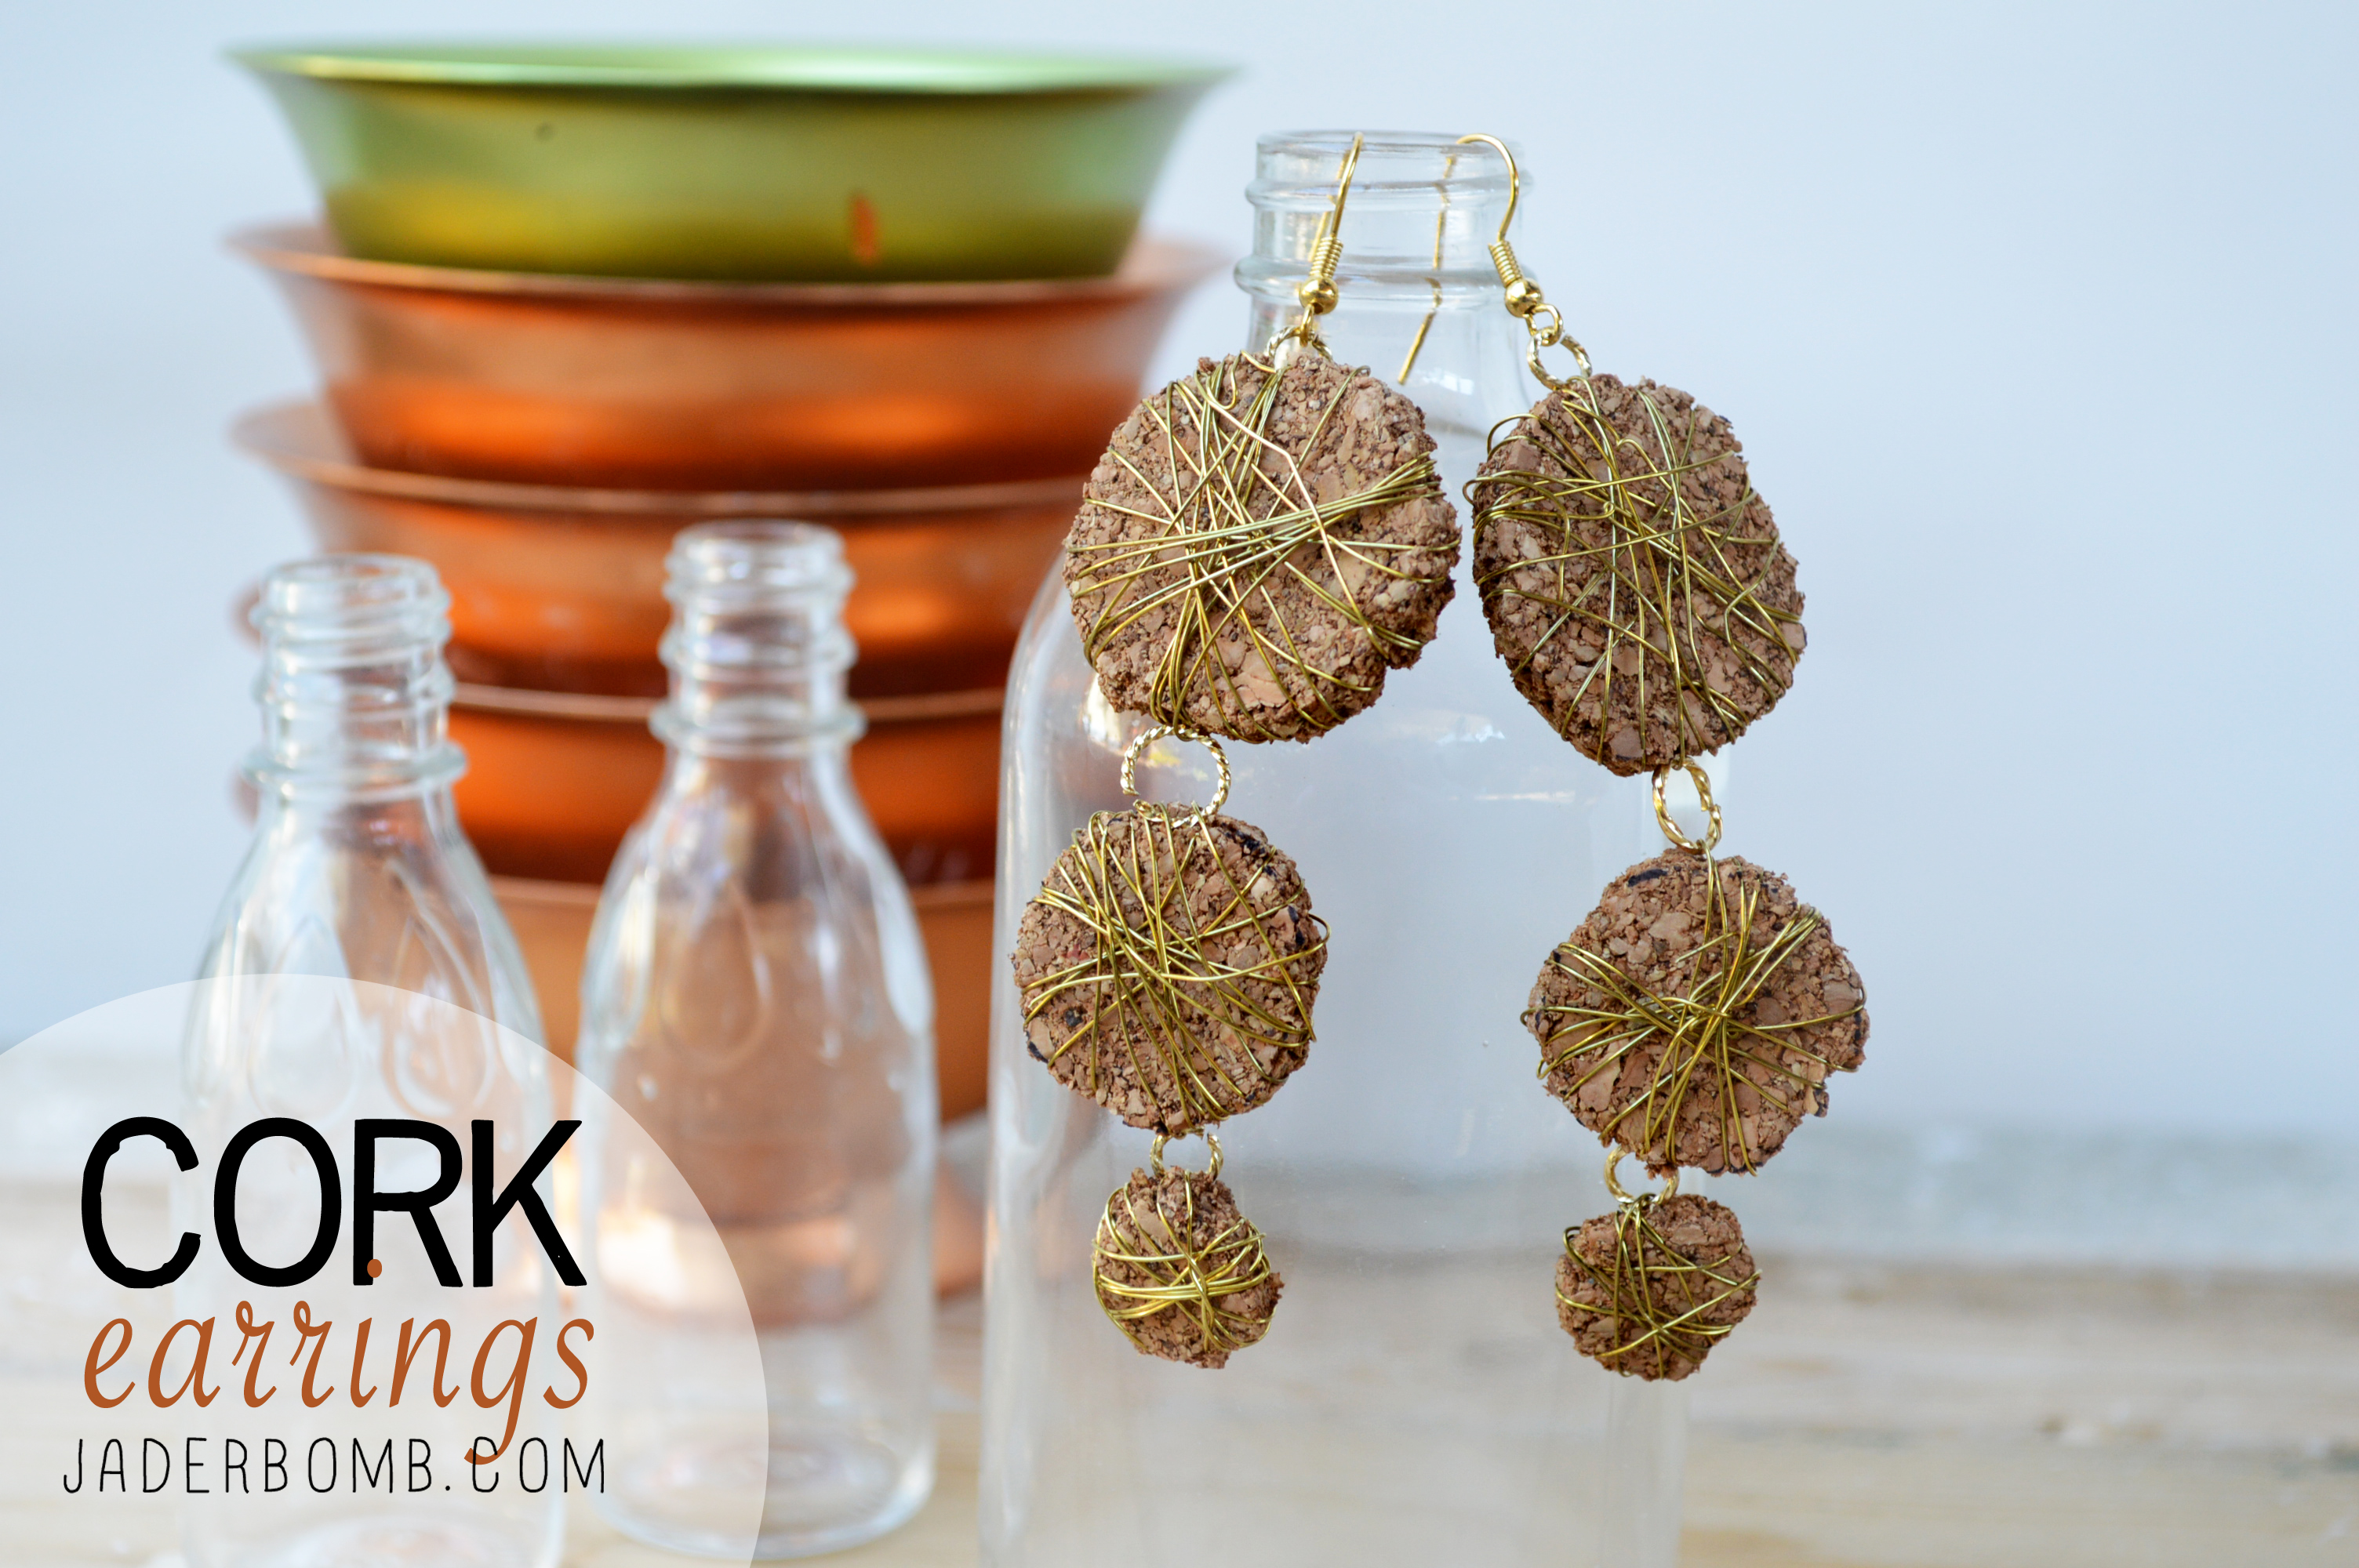
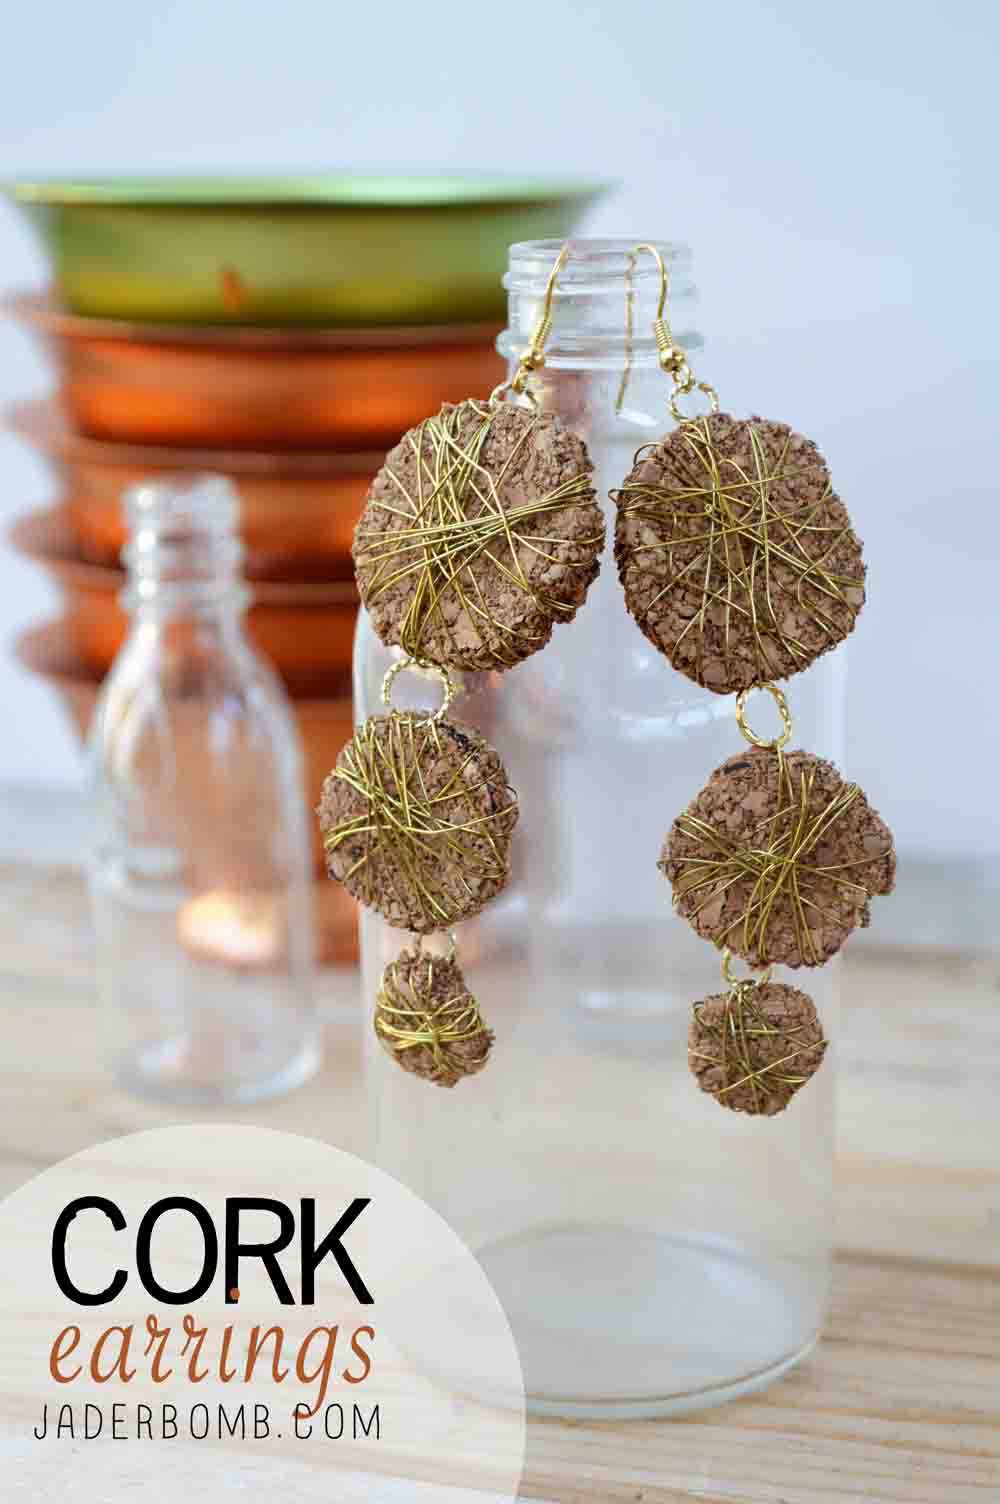
What is better than a nice bundle of sweet cotton candy? Welp, I will tell ya! Learning how to make Earrings

Cork and Wire Earrings, y’all! What? You didn’t know this was the new thing for 2056?

These day’s corks are used for many crafty creations. Sometimes things you use in your daily life can quickly become a fashion statement if you simply use your imagination. Did you ever think you would use corks to make earrings? I sure did.  Let me show you how easy it is to make them.

big2YOUWILLNEED
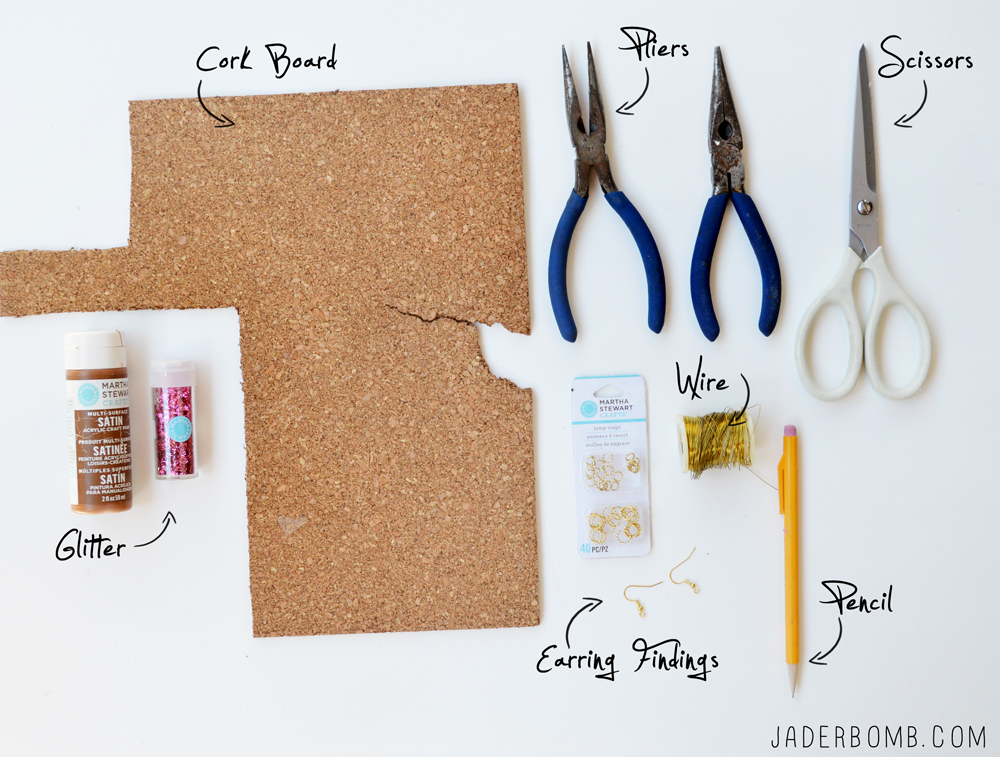
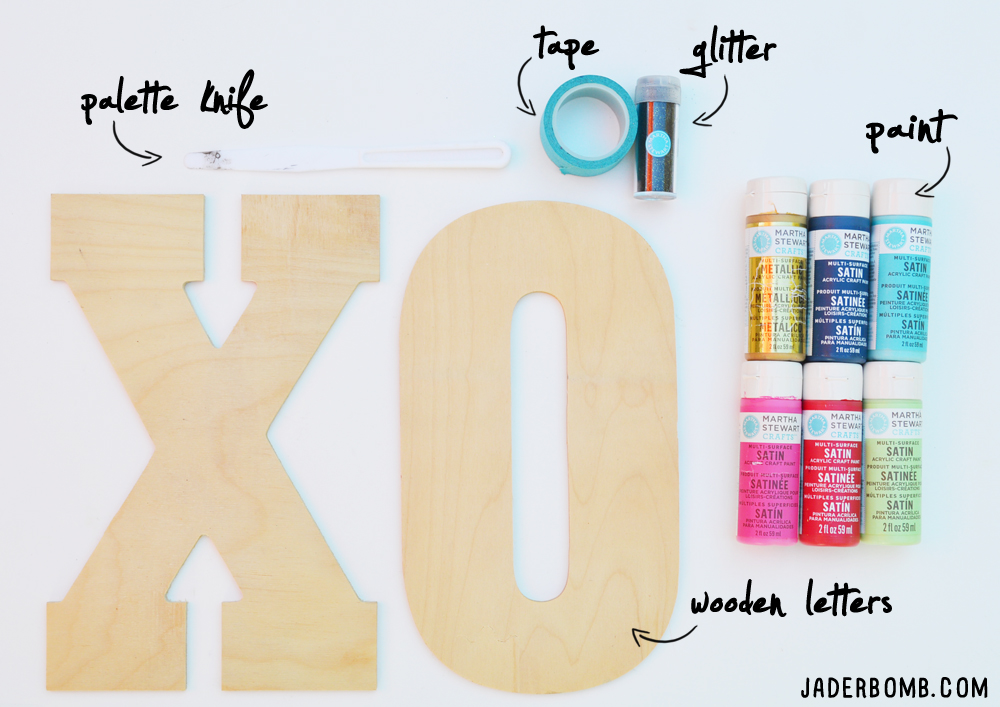
Cork Boards | Pliers | Scissors | Glitter and Paint bottles (to trace with) | Wire | Findings | Pencil
corkearringsupplies

The first thing we need to do is create our circles. I used a paint bottle and tube of glitter to create my circles. howtomakecorkearringscorkearringdiy
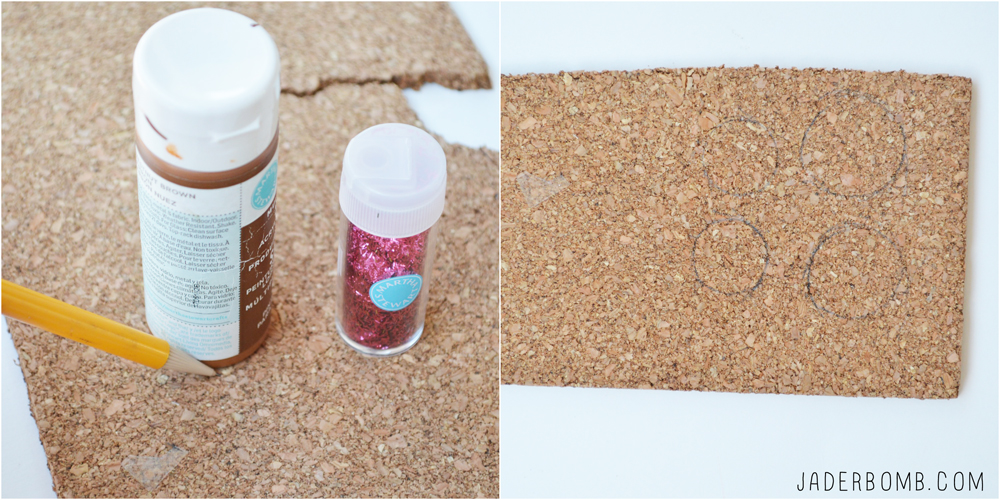
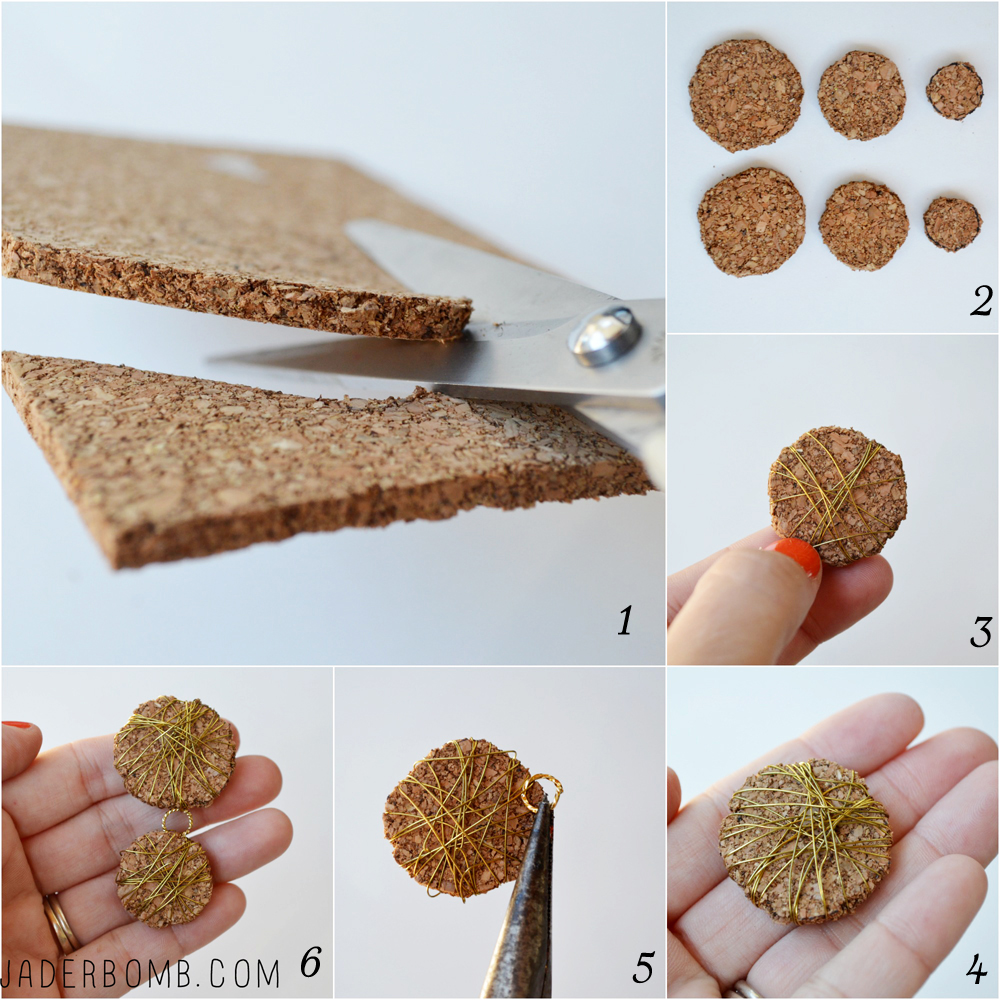
1. Grab a good pair of scissors and cut your cork.
2. Create different sizes.
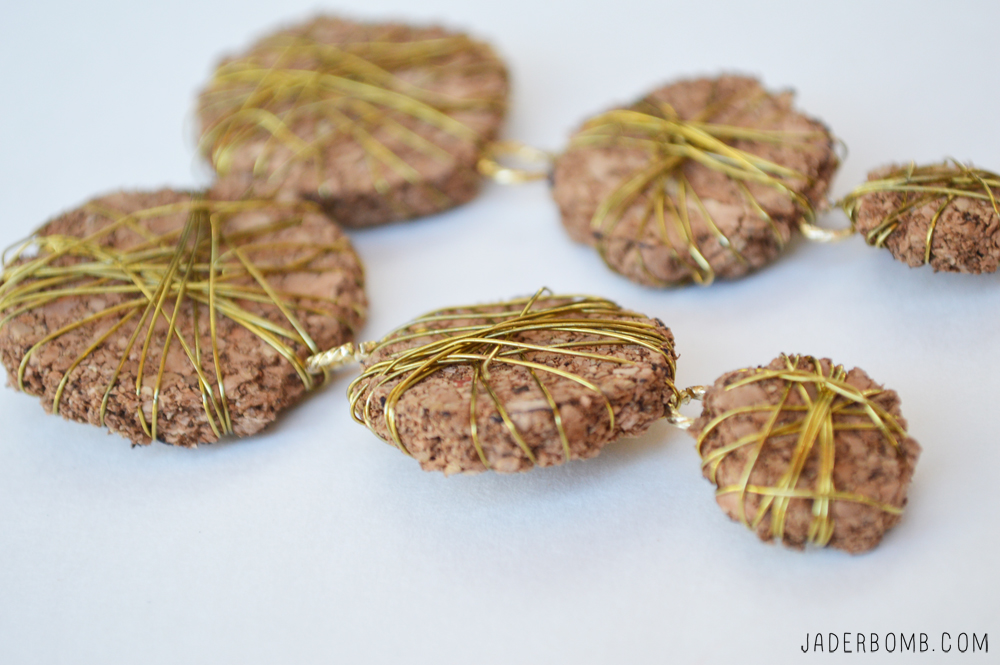
3. Start wrapping your cork circle with wire. I used gold, duh!
4. The amount of wire you use is up to you. I like to go big so you can barely see cork, hehe.
5. Grab a jump ring and attach it to the wire.
6. Attach them all together.

corkandwireearrings1howtomakeearrings

ending

Huge glittery hugs—See you in the next post! Visit me on FacebooknofollowTwitternofollow,Pinterestnofollow, or Instagramfollow!

Christmas Ornaments

Today I am sharing something that will make you go ga-ga! Not Lady GaGa just candy cane Ga-Ga.

I made these cupcake ornaments a few weeks ago and they were a hit so I figured I would make another version of them.

YOUWILLNEED

Cupcake Liner | Clear Ornaments | Glue Gun | Puff Paint | Glitter | Glue Sticks
You can purchase all of these items by clicking on my affiliate links!

cupcake ornament supplies

I am using white puff paint so it looks like real icing! Have fun, use any color that makes you smile from ear to ear. how to put icing on an ornament

I like to set them down in the container they came in after I apply the puff paint. Once in the container, sprinkle with glitter. decorate cupcake ornaments

When they are dry, add a little hot glue to the bottom of ornament and stick on a cupcake liner.

peppermint ornamentsRED AND WHITE CHRISTMAS ORNAMENTS

I cut a few pieces of black and white bakers twine to hang them with. I think they are just precious!how to make candy cane ornaments

ending

Huge glittery hugs—See you in the next post! Visit me on FacebookTwitter,Pinterest, or Instagram!

You all know that I am a fan of homemade desserts. Especially these Cherry Cupcakes! I have never met anyone who does not like yummy cupcakes. I made these on accident the other day and before my hungry friends ate them all I decided to grab a few for a picture. Let me just tell you now, if you don’t plan on eating 4 in one sitting then don’t waste your time making them, haha!

These are made with cherries and topped with almond whip cream. YUMMY! The recipe is at the bottom of the post, ready to print out. CHERRYCUPCAKES

I just had these cupcake toppers laying around in my studio and I grabbed them to add a little decor to them. Not sure why now that I am looking at them, haha! I think these cupcakes are so cute that a topper is not really important. EASYCHERRYCUPCAKES

[amd-zlrecipe-recipe:4]

A few day’s ago I created some fabulous cupcake ornaments for the I Love to Create Blog. I knew they were cute as a button but I didn’t realize they would be such a big hit! I never make a ton of ornaments, I usually make enough for a photo. I knew these ornaments would make me smile during the holiday’s so I made lot’s of them! At least enough to fill up my cute gold tree.

If you want to see the FULL tutorial on how to make them check it out HERE!
Cupcake Ornaments

Make sure to check out all of my projects for I love to create HERE.

This weekend I hosted a Pinterest party at the Lafayette Michaels store and let me tell you it was so much fun. I had so many happy faces come out to see me. Here are a few pictures from the event, before it got crazy busy!

1393672_682655965101902_634933774_n 1454941_682793525088146_545550327_n

This was one of the happiest employee’s I have ever met! Good job Michaels for snagging her, she’s a keeper!

1460246_682797195087779_1286995248_n

I had my handy dandy Tulip spray paint to protect me. Look, there are my cupcake ornaments. 1461872_682780021756163_1230335570_n

Someone was happy to have a Tulip glitter tattoo. I hope you enjoy making these ornaments. See you in the next post!
ending1

Wooden Letters

Wooden Letters make are special because you can create any word or saying with them. I always keep these in stock, especially for the holiday’s!

I think there will be an overload soon of these suckers so beware. You surely have to have fun and design them to reflect your personal space or personality.

Do I create things for a space ever, you ask? NO. I create AWESOME things and then my space has to work around them. (teehee). Let’s get started. you will need
Wooden Letters | Palette Knife | Tape | Glitter | Craft Paint 
You can purchase all of these items from ONE spot by clicking on the links above. (P.S. These are affiliate links, so thanks for helping me buy more glitter)

vintage wooden letters supplies

The first thing you will do is tape off sections of your wooden letter like below. You can create small spaces or big spaces. Totally up to you. how to paint strait lines

I like to mask off my entire letter before I start. MODERN WOODEN LETTERS

I will be applying paint using a palette knife. PAINTING WITH A PALETTE KNIFE

You will apply a thick layer of paint on the wooden letter. This will add great texture to them in the end. geometric painted letters

After you apply your first color move on the the next one. steps on painting on wood

I take off the tape as soon as I move onto the next section. When you take the tape off while the paint is still wet it gives you a fine, crisp line!painting strait lines with tape
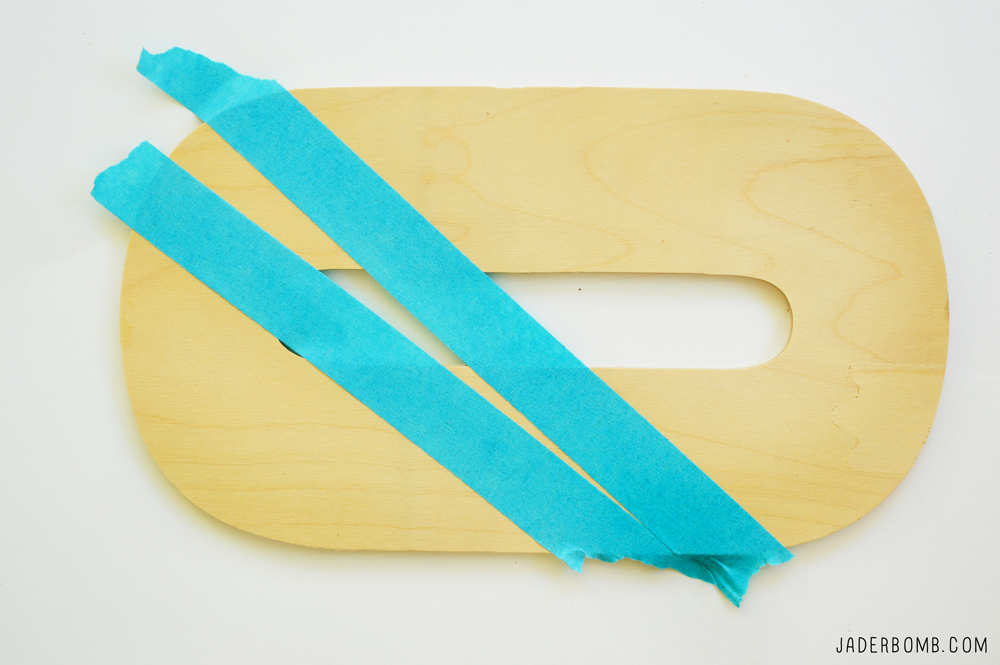
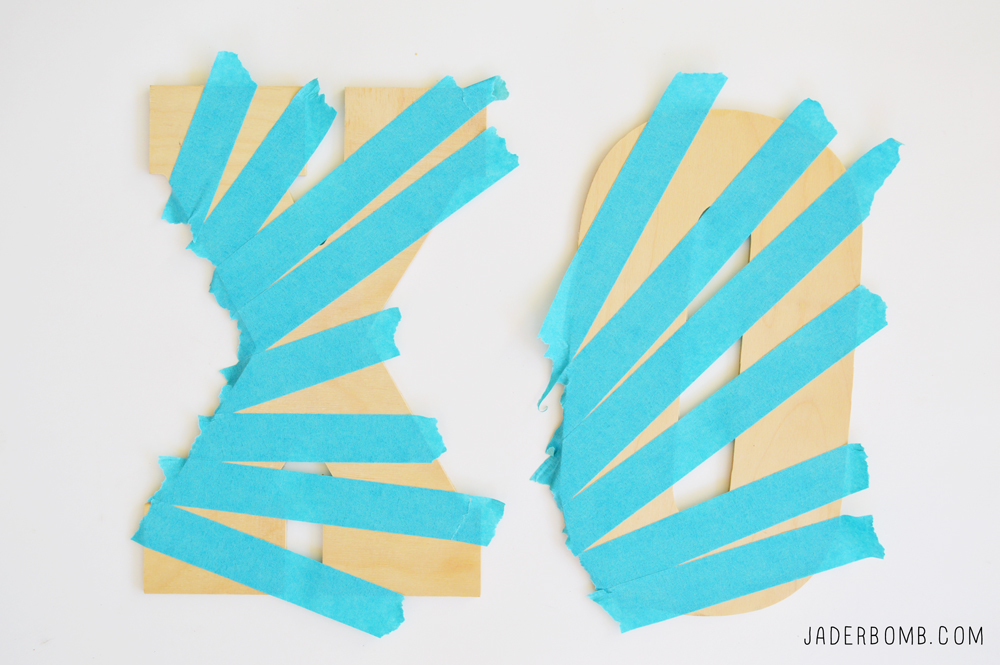
How cute are these babies. You see those black sections…That is black glitter! Once your paint is completely dry tape off a little section, put a little Mod Podge then sprinkle with glitter of choice. VOILA!

wooden letters

I hope you enjoyed this fun tutorial! What colors will you use for your letters?
ending

ST_12_months_of_Martha_Logo-1

I was so excited when I got this month’s box of goodies in the mail! I actually had ton’s of ideas once I started going through everything but I went with my gut instinct on this one.

The holiday’s are coming up and let’s face it, nobody likes store bought tags. I wanted to show you a simple and affordable way to achieve a “fannn-cyyy” look for a “fannn-cyyy” price! <—- yes say it like it’s spelled. I even threw in how to stamp your own ribbon.  This year we will make it all about personalized gifts.

Now your gifts will be bursting with DIY’ness.

Personalized Gifts

YOUWILLNEED

Tags | Burlap Ribbon | Martha Stewart Flourish Rubber Stamps | Love
***You can purchase all of these fabulous items in one spot by clicking on my affiliate links!

stenciled fabric supplies

Pure love is what I felt when I saw how this flourish rubber stamp set was packaged. Shoots I would buy it just for the box, y’all! It comes with 10 stamps and 3 colors of ink. Black, White & Silver. Perfect for any holiday decor. how to use a stamp

Since my tags were fairly small I decided to use a stamp that would fit perfectly on them. I also used a big stamp that went off the edges of tag and it came out so cute!

how to stencil fabric jaderbomb

Since your packages or bottles of wine will have a fun tag hanging from them why not add a little embellished ribbon to go with it.

I mean, it would really top things off. You could also wrap this stamped burlap ribbon around a candle or add it to any wreath for a pop of DIY.

How to print on burlap

Stenciled Labels 12 months of martha jaderbomb

These can be used for practically anything. I will be using them as gift tags for Christmas but I wanted to show you how you can use them as part of your display also.Stenciled Fabric

Personalized Gifts DIY 12 months of martha

I hope you enjoyed this 12 months of Martha post. Check out what else I made for Martha. If you are on Instagram, Twitter or Facebook make sure to search or share my pics by using this hashtag #12monthsofmartha and #jaderbomb

Wanna really stalk me? Come visit me on Facebook, Twitter, Google+, Pinterest or Instagram.

ending