I am a Southern DIY blogger and Designer known for fearlessly conquering anything and everything do-it-yourself. I aim to create unique designs by working through my thoughts, dreams, emotions, and tons of glitter! I believe in doing things that make my heart flutter and smile, and I live by my motto, “Life is simple and so should your style.” To learn more about me, visit jaderbomb.com or email me at jade@jaderbomb.com. You can also visit my Etsy shop at jaderbomb.etsy.com.
Make sure to check out my FREE PRINTABLES site www.freeprettyprintables.com
My biggest accomplishment thus far is being a guest on the Martha Stewart show, yes she smells good.
I love my dog Ceaux Ceaux, pens,the smell of Christmas, GOLD, Dr. Pepper and blogging.
BTW: I bleed glitter, all shades.
Happy Saturday Jaderbugs.
I am living a crazy hectic life lately. You know how that is right? Ton’s of deadlines, people ordering you around and crying because you just can’t do it all. Oh, you don’t know what I am talking about? Paahaha
I am sure that sounds very familiar to all of ya. I have a ton of new tutorials going up on the blog this week I even have a video tutorial and a Fall Haul video. Did I mention a THOUSAND other deadlines. Do you ever wish you had another you to help out? I do, and she would wear turtlenecks, pencil skirts, fish net stockings and high heels every single day. She wouldn’t drink Dr. Pepper everyday, eat Christmas cakes or stay up late. She would prolly have a house that was all painted (inside) vintage white and she would have a maid. Sheesh I can’t forget an assistant.That’s right. My other “me” would have an assistant. Hey nobody said it isn’t fun to dream.
Today I wanted to share with you some things that can brighten up your day or just your life. NEON. No matter what kinda day your are having, just slap on some neon and BAM. Just like that you will feel better. Plus the good thing about NEON is it really makes you look darker. Even if you have pale skin it’s like an instant snooki tan. Well maybe not a snooki tan, I don’t want you to look orange.
I hope you enjoy these amazing things I wanted to share with you.
I hope you enjoyed this post! Remember to mix and match all of these to get great looks! Don’t forget to come back this week to see all of the exiting things I will be showing you.
See you in the next post
Quote of the Day: TOMORROW IS ANOTHER DAY -American Proverb
Hey Jaderbugs! I am so excited to share today’s tutorial with you because it’s that time of year to put them to good use. This tutorial is for a live google chat that I will be doing today with Karen from The Graphics Fairy and Gina from The Shabby Creek Cottage. I will be streaming the Google chat LIVE so make sure and come back later! If you want to read a little more about what us three musketeers are up to click HERE.
If you need any of these items just click the work and it will take you to a link to purchase them.
The first thing you will do is lay your spoon down onto concrete. I like to use concrete because when you hit the spoon with the hammer you get little indention’s from the cement onto the spoon. Trust me this will work in your favor later. I hit a few times with the spoon faced own and then flip it over and repeat the exact thing. It kinda is a stress reliever, haha!
This is what it will start to look like once you start hitting it. The goal is to get it completely flat.
Once your spoon is flattened out you will grab your steel letters. You can get these at most hardware stores and they are NOT expensive. Maybe 15 bucks or less. Make sure your letter is facing the right direction, position the stamp on the spoon and hit the top real hard with the hammer. I hold it really tight so I can hit it about 2-3 times. This just imprints the letter better but you don’t have to do this.
Since we are doing Thanksgiving Place Cards you can now personalize each spoon with a person’s name, nick name or the party name. You can do whatever you want at this point. Fun right!
After you stamp them take them to a spot that is well ventilated. Grab whatever spray paint color you want and we will spray these babies. If you notice one of these looks like we antiqued it already. The reason why I am showing you this right now is because you might actually like the way it looks at this stage. If you want to know how I got the antique look on the the “Give Thanks” spoon scroll down a bit and you can see how I did it .
If you are spray painting them this is what they will look like with a quick coat on them. I don’t like to cover them 100% only because I will be rubbing some of the paint off. When it’s thicker it will be a litter harder to remove and it usually peels when it’s too thick.
After you spray them you will let them sit for maybe 10-15 minutes. It just depends on how thick your paint is. If it’s not thick it will take 5 min to dry. Grab a little piece of sand paper and lightly rub the surface. I usually rub a little harder in some spots to remove more. When we age the spoons this will look great!
This is what they should look like after you rub them with sand paper. I honestly don’t know the number of the sand paper I used because it’s all I had. If it’s really course you will rub a little softer.
Next we will squirt a little drop of brown paint onto our spoon . Grab a paper town and start rubbing this brown all over the spoon. At first it will look like it’s covering the whole spoon but just keep rubbing until you are happy with the darkness or lightness of the color. You want to make sure you get the paint in the letters though. This is what gave that antique look in the spoon I showed you earlier. The good news is, if you rub too much of the brown off you can always add more.
You also don’t have to use BROWN. Just make sure it’s a darker color than your spoon color. I like brown’s and black’s because it ages them.
This is what my spoons looked like after I applied the brown paint. I put a little gold paint on top which you can’t really see unless you are looking at it in person.
Next we will get the cardboard roll from our paper towel roll and cut them like I did below.
Grab a sheet of paper with words on it. You can get this from an old book, a new book, newspaper, magazine or a letter.
Tear pieces of it and start putting it on with your Mod Podge. If you have never used Mod Podge it will go on opaque but when it dries it will be translucent. That is my favorite thing about Mod Podge. I am using the SPARKLE one today to add a little flavor to these babies.
Grab your fabric and cut a few strips like this.
The width should be smaller than the piece of cardboard. Start applying your fabric with your Sparkle Mod Podge.
The other good thing about Mod Podge is when it dries it kinda stiffens your surface which in our case today is nice! Below is what they will look like when they are completely dry. Pretayyyy ayy!
Get a little piece of your rope, twine, or whatever string you are using. Tie it around the middle and make a small bow.
That’s it everyone! It’s that simple. What I really love about this craft is when your guests leave they can take the spoon with them as a keepsake.
See you in the next post with glitter and glue sticks,
What the WHAT! I already know what you are doing right now.
Prolly jumping up and down already taking off of work to attend this AMAZING event hosted by Google, and of course all of us bloggers!
It’s going to be so exciting to share this eventwith you guys!
All of this week, Monday – Friday, over 20 awesome DIY Bloggerswill be hosting live Google+ Hangouts on Air, with a Homemade Thanksgiving theme!
That’s right! Full of GOBBLE GOBBLE GOBBLE going on.
Google+ Hangouts on Air, are live Videos that you can watch online, it’s just like watching TV, but you can watch it anywhere Jaderbugs!!
What’s really great is that, if you miss the live broadcasts, you can watch them all afterwards on YouTube, as they magically end up over there when we’re done.
If you are unsure about your Thanksgiving decor then this is the place to be! Included are videos on Crafting, Decorating, Cooking, Setting the perfect Table, and Gardening!I’m hosting one too, with my pals Gina from The Shabby Creek Cottage and Jade from Jaderbomb. I hope you can join us! The Schedule is below, all times are Pacific Standard Time, so make sure you convert them for your own Time Zone!
So if there is a particular craft video you want to watch just click on the name and it will take you there. The good news is, if there is a video that you missed it is saved strait to You Tube. Just click on the name and it will take you there! Don’t forget to tune in FRIDAY to see Me, Karen and Gina LIVE!
See ya in the next post
Make sure you come visit me in these places too! (look below this line, hehe)
Get your DAILY dose of DIY delivered in your inbox! Just put your email address below!
I am so excited about this wonderful post! It is so easy plus it looks great in ANY space. Let’s get started.
You will need :
Scraps of fabric
Yarn
Scissors
Cut a small strip.
Tie it evenly on your yarn.
You will continue doing this until it is all filled up! Hope you enjoyed this tutorial Jaderbugs!
Make sure you come visit me in these places too! (look below this line, hehe)
Get your DAILY dose of DIY delivered in your inbox! Just put your email address below!
Quote of the Day: “We build our temples for tomorrow, strong as we know how.” -Langston Hughes
Well. Today is the day! I think it’s very important to go out and VOTE only because…well…YOU can!
The one thing I am so happy about TODAY is that we will find out who our fearless leader will be for the next four years…but I am more excited about not seeing everyone’s Facebook, Twitter and Instagram posts about who they obviously are voting for. It’s kinda getting OLD.
There is a fine line between sharing something because you believe in it, but e.v.e.r.y.d.a.y.a.l.l.d.a.y. I am sure you understand, right?
Well happy voting! I hope whoever you voted for wins!
See ya in the next post!
Make sure you come visit me in these places too! (look below this line, hehe)
Get your DAILY dose of DIY delivered in your inbox! Just put your email address below!
Quote of the day: “Go out and fight so life shouldn’t be printed on dollar bills.” – Clifford Odets
Happy second of the month. I can’t believe OCTOBER is already over, can you? It went pretty fast this year but that’s ok because this means we are that much closer to the Christmas holidays. For me, this means Christmas started yesterday. Yep, I get to start all of my awesome Christmas crafts NOW for YOU… So put on your Santa gear and grab your sleigh mobile license because we are about to take off in Jaderbomb winter wonderland.
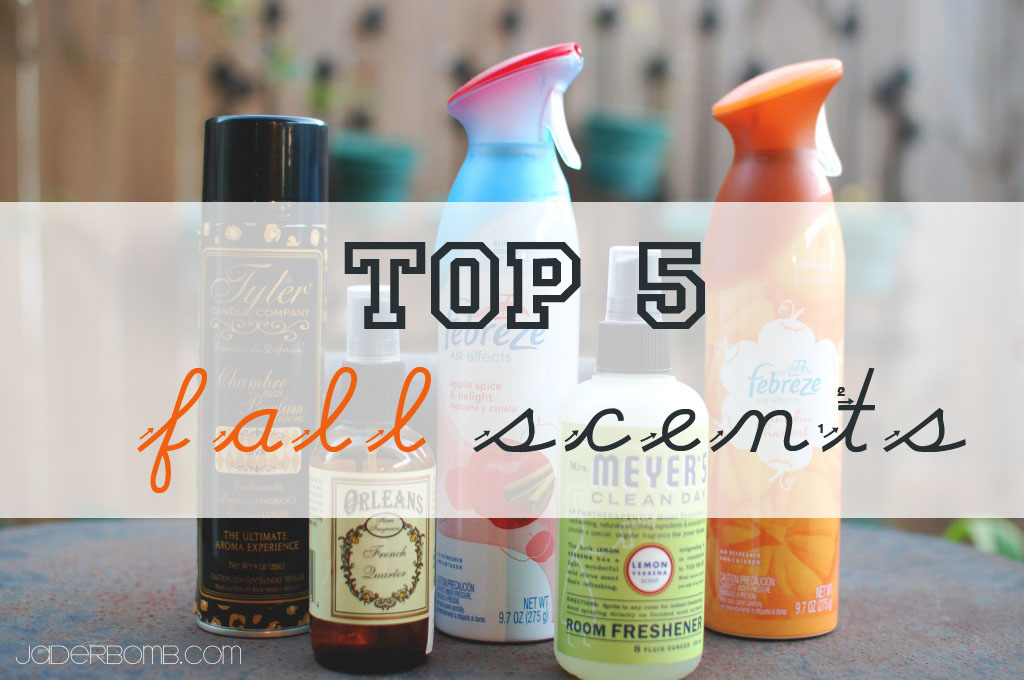
I wanted to share with you some of my all time favorite TOP 5 FALL SCENTS . I have a variety in today’s post that range in price which is nice if you don’t want to spend too much money on sprays for your home, or whatever space!
Did I mention these are my FAVORITE? Ask my seester, I am a SPRAY addict. I get super excited for bottles of crazy chemicals that I can hardly pronounce but more than happy to spray all over my house. HAHA
So, below are all of them together. You can click on the links and order them strait from one site if you like! What can I say. I’m here to make your life easy I tell ya.
I especially love when my favorite scents come in {{fannnn cyyyy}} bottles.
These are around 11.99 and it smells wonderful. I would say this is affordable and it will smell your house like nothing you have ever smelled before. I have EVERYTHING in this scent including the washing liquid for my bath sheets and towels. YUMMERS! Here are some reviews or this particular smell.
This room spray is around 7 bucks. Just in case you think this is a lot of money for a room spray, I want you to know that it takes very little to smell a whole house. I like to spray it in my main vent and next thing I know it’s all over. My dad always picks these up for me…. I should of told him I LOVED diva a little more, hehe.This is also a great name brand. Usually I am not all about the name but they definitely give you a bang for your buck!
I’m not too sure where I should start with Febreze. Me and seester are always competing to see who can find “Limited” scents and I usually fail. LOL
I have noticed when I use these sprays the smell does not last as long. Don’t let that fool you because they do smell great and last a while just NOT as long as I would like. I might take a picture in a later post of my ENTIRE collection of room sprays. OK that’s making me nervous, time to move on. HAHA
I am really going to rave about this stuff because although I am in love with MANY sprays this one always makes me happy. I believe deep down I love it more because it’s not bad for my family and it’s 94% natural. I keep this particular one in every single room because lemon always wipes away any smell that might be bothering you. Even if there is no smell it adds that pure, clean, crisp smell to a room. If you ever get this make sure to get the hand soap also. Totally worth the buck! Check out ALL of these products.
I wanted to end this post with two pictures that I absolutely am in love with today. My dad always brings us bags and bags of oranges from a tree and I always love the way a fresh batch looks in this bowl. You know if you stick cloves into an orange it will smell your house also! I usually take orange peelings, cloves, cinnamon and burn it on the stove in a little bit of water. It’s like heaven in your nostrils. Pinky promise.
I had to end with this distressed wooden sign I made. I have a load about to go up in my etsy shop which you can find here.
It says it all, right! No matter who or what you encounter…smile…bring the white light into your body…and carry on. I usually play my theme song when I am in a situation and it makes me feel great. I mean, you can even add some special effects to your situation like pretending you are walking in slow motion, a wind machine and a spot light (maybe even a fog machine). Just saying.
I guess now you know my secret. It’s ok because it’s worth sharing.
I hope you enjoyed this tutorial, see ya in the next post!
Make sure you come visit me in these places too! (look below this line, hehe)
Get your DAILY dose of DIY delivered in your inbox! Just put your email address below!