Tag Archives: diy

Today is a perfect example of my motto “Why buy when you can DIY”. It’a almost Halloween and I always dress up my house and studio with DIY Halloween Houses. I love today’s craft because you can keep it when the holiday is over or toss them to avoid clutter. I know you are prolly thinking I am crazy for saying I would toss them but I am pretty over the top like that. It’s one of those things that I wouldn’t want to stuff in the attic. After all it’s not like it’s a Glitterville collectible.  With that said, you can purchase these cardboard houses from Hobby Lobby and they are really inexpensive. I think the large house was around $5 and the other two were $2 and $3 dollars. I hope you enjoy them!

P.S. Check out today’s FREE Fall printable on Free Pretty Printables.

decorated cardboard boxes for halloween

diycardboardhouses

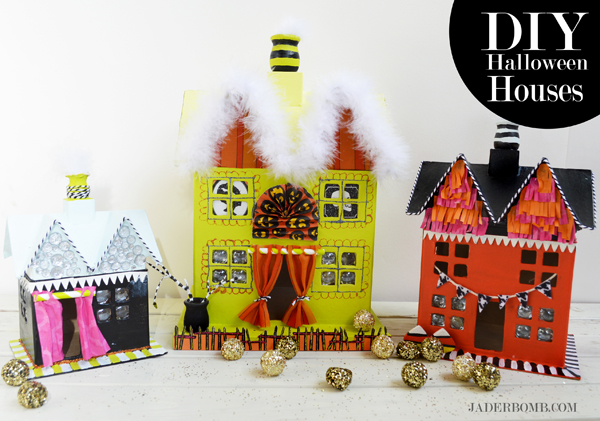
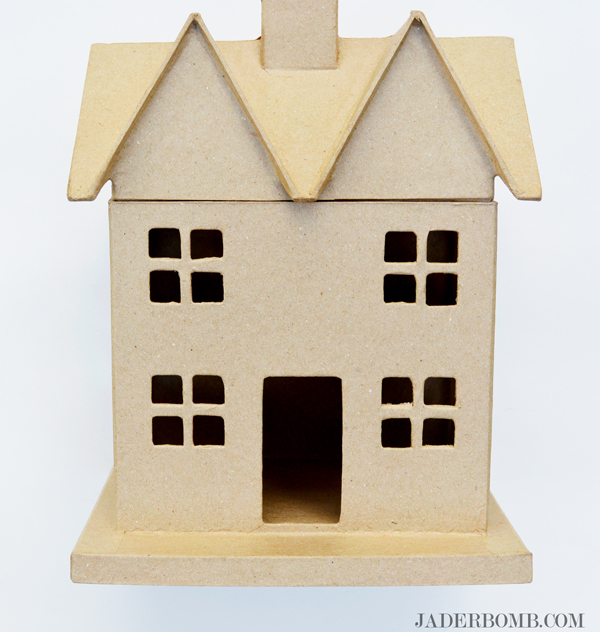
You can purchase these from Hobby Lobby!paintcardboardhouse

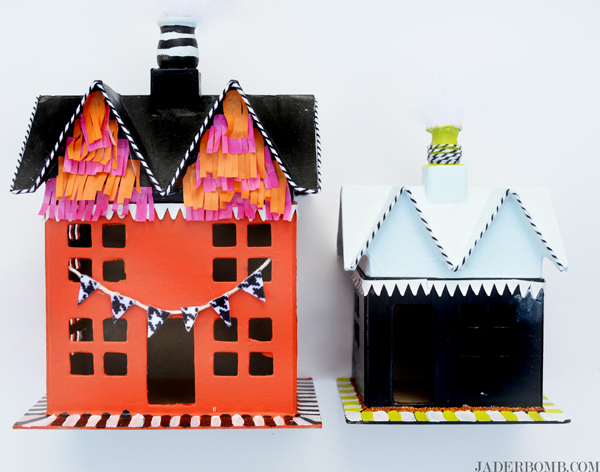
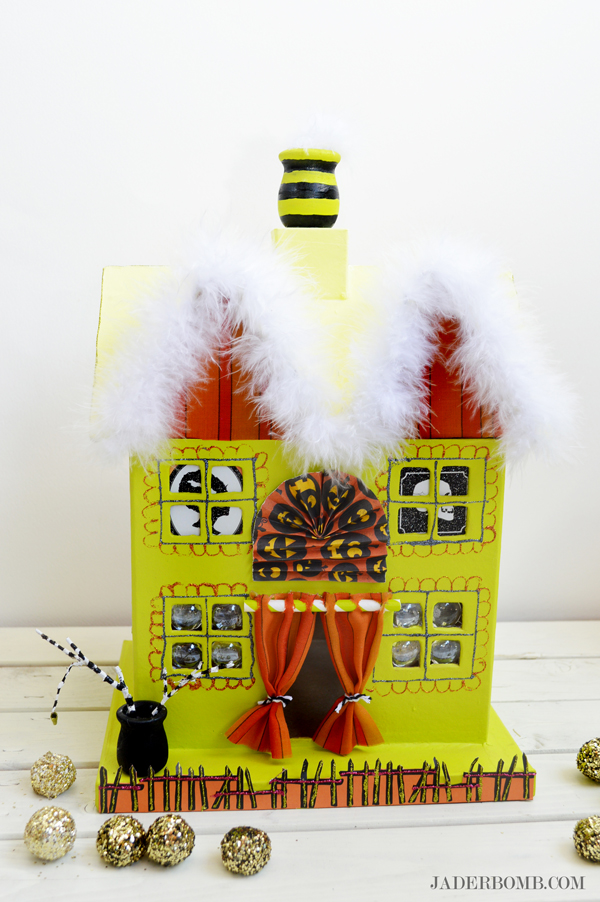
I started by painting the houses with acrylic paint. I lined the roof with baker’s twine and added tissue paper to the front of house. diy halloween house

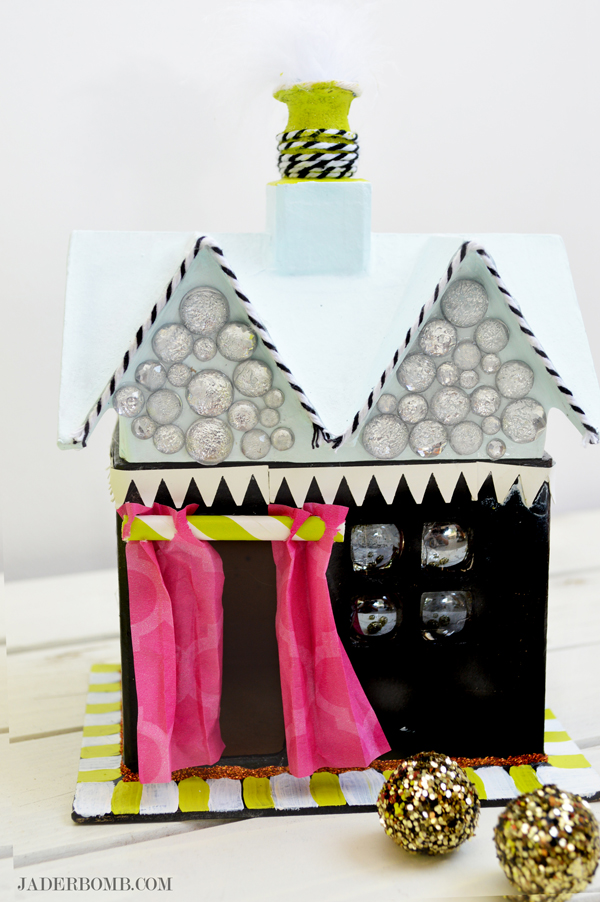
I used glass beads for the windows. For the curtain I used a paper straw and a piece of tissue paper. I let my godchild help me and I am so happy I did. It’s a fun craft that any kid can do and trust me it will keep them busy! halloweenroof

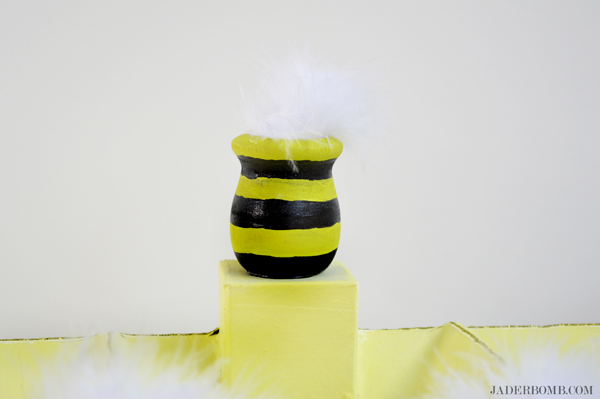
For the roof I used a little wooden planter and stuffed it with a fluffy boa! You can get these from the craft store also. I say use any fun goodies you have at home and be creative. After all that is where the fun comes in. how to decorate cardboard house

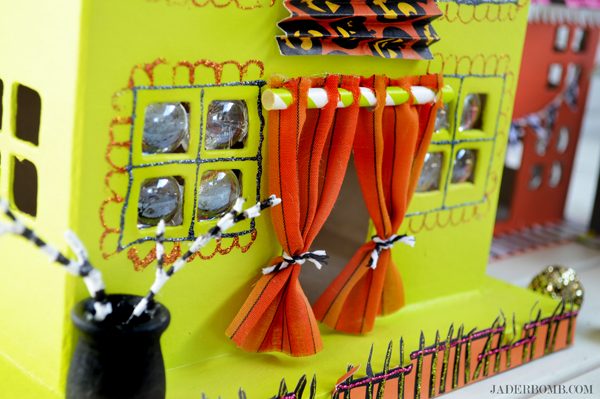
For the fence I cut a strip of Martha Stewart craft paper then added glitter to it. Just have fun with your house! halloween diy houses easy halloween diy houses

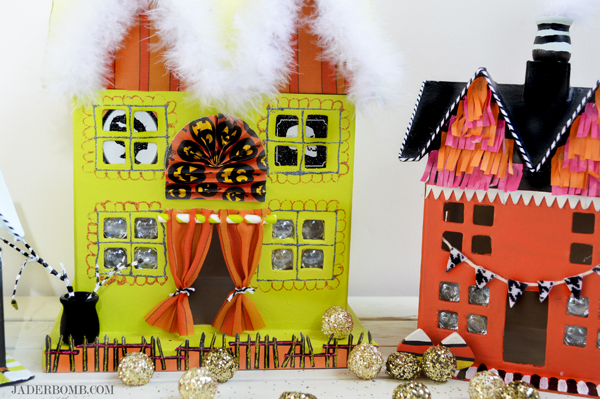
I hope you enjoyed these and you create your own magical houses for the holidays. See you in the next post!

Huge glittery hugs—See you in the next post! Visit me on FacebookTwitter,Pinterest, or Instagram!

sponsoredpost

This month the world came to a sudden halt with the launching of this product —> Martha Stewart Decoupage.

Decoupage on glass? Why yes, this will become your next secret addiction.

This is not like your everyday decoupage, y’all. It’ the cream of the crop.

Decoupage on glass

YOUWILLNEED

*Martha Stewart Decoupage Soft Bristle Brushes
*Martha Stewart Decoupage Fabric Appliques
* Martha Stewart Multi Surface Durbable Matte Finish (found at Michaels)
*Alcohol
*Glass Pitcher and Glasses

decoupage-pitcher-supplies

I purchased my pitcher and glasses from Target and they were completely affordable. That is always nice, incase you mess up 3 times.

I have to admit, Martha Stewart consistently impresses me but she really did it with these fabric flower embellishments. Pre-cut, why YES THEY ARE!

decoupaged-pitcher-cups

1) The first thing you will do is grab a little rubbing alcohol clean the surface. This will take care of those greasy little fingers that just touched it.  Wear gloves if you feel like touching it.

2) Grab your Durable Matte Finish Decoupage and roll that sucker on a flat table to mix it up. Please, for the sake of all the bubble makers out there don’t shake. We want to keep the bubbles in bubble-land not in the decoupage bottle.

3)Grab your soft bristle brush and apply a thin layer over the section you will be placing your flower. Don’t over do it, we just want to apply where the flower is going to be placed.

4)Quickly grab your flower and place it on top of your thin layer. Brush a light coat of decoupage on top to make sure it’s secure. Apply as many flowers as you want. Make sure you work at a good pace so the decoupage does not dry. The fabric embellishments are easy to put on however if you decide to use paper make sure to rub your finger over them to get any hidden air bubbles out. Set aside and let dry 1-2 hours.

When dry, the Durable Matte Finish Decoupage looks just like frosted glass. I almost flipped in my chair when I went back to look at them. I may have blurted out a few curse words that were purely out of excitement.

5) When you are finished applying your flowers get the 1 1/2 in 3.81 cm soft bristle brush and apply a thin coat over the entire glass. It’s important that you brush in the same direction when applying your final coat.

6) When done let them air dry 2-3 hours.

7) You can put as many layers as you want just make sure you allow drying time in between each layer. 

8) Set this aside for 21 days to cure completely and guess what, this will be dishwasher safe!

flower-decoupage

You can really see in this picture how the decoupage looks like frosted glass. It is beautiful!

decorate with strawberries

I ate these while I crafted and they were yummy. Want one?

how to decoupage on glass

decoupaged glass that is dishwasher safe

I hope you enjoyed this post. I had a blast playing with these new products. BTW: these decoupaged glasses look cute on anyone! 

Huge glittery hugs—See you in the next post! Visit me on FacebookTwitter,Pinterest, or Instagram!

This is a sponsored post through Blueprint Social and Plaid but all opinions are 100% my own.

For the complete line of Martha Stewart decoupage at Michaels.  Visit Plaid on FacebookTwitter,Pinterest, or their blog. Trust me they post great things daily!

I am not quite sure what I love more white pumpkins, fake pumpkins or a good ole milk glass pumpkin. If you have never heard of a fake milk glass pumpkin then you are in for a real treat. I created some today and they are on the I Love to Create blog. It’s sorta like a “white Fall” instead of a “white Christmas”.

Let’s be real ok. I try my best to think logically when I craft. In other words I think about YOU then ME. 

I know me and Martha are pretty much best friends and all but I am NOT her. With that said I can’t afford to buy 27 real pumpkins and embellish each and every one of them. I have to eat ya know. Which is why I craft with FAKE ones. The kind that you can decorate, store in a huge tupperware then take them out the next year to use all over again. Please tell me I am not the only one who does this. What’s funny is I went in my attic today to look for things I made last year and I couldn’t seem to find anything.

Maybe last year when I was about to put them up I realized it was more work to take down the ladder, walk up the stairs and store them nicely so I just threw them all away. I tend to do cray-cray stuff like that anyways. I will more than likely find what I was looking for when I take down Christams decor.

Milk Glass Pumpkin

All Photos by Jade Harrington / Jaderbomb

Wanna see everything I have created for the I Love to Create blog? Check it out here!

I hope you enjoy this tutorial. Big huge glittery hugs from my fake pumpkins to yours!

Visit me on FacebookTwitter,Pinterest, or Instagram!

jaderbomb love


This is a sponsored post by Darby Smart. I was given a free kit to review and compensated but all opinions, as always, are 100% my own…Pinky Promise!

80's Throwback Bag

What is Darby Smart?

At Darby Smart, leading designers launch simple DIY projects based on the latest fashion and home trends.
We turn their projects into kits that include chic materials and simple instructions, and send them to you. Create a unique design and show off your style.

It’s like an online vacation for DIY addicts. You can visit the site, find a project kit that is interesting to you and voila. This is what makes this company stand out from others! When you visit this site you will notice that the layout is very user friendly and each project is up to date, trendy and ridiculously cute!

I was so stoked when I received my Darby Smart 80s Throwback Tote Bag kit in the mail the other day. The box was sitting at my front door and I instantly knew what it was. How did I know? Maybe it was the fact that the box was a bold teal shade and the sides were filled with white chevron stripes. Yes, I kept the box. You already know I am a box hoarder.

I have one goal in mind. To create a killer 80’s bag that I could pull off wearing with anything.

fdfd

*Tulip Fabric Spray Paint (yes these colors are amazing and metallic)
*Baggu Tote Bag
(which is legit)
*Tulip Sponge Dauber
*Ronda Palazzari Cassette Tape Stencil
(this alone is an art piece)
*Aleene’s Tacky Adhesive Spray
(this was not in the kit but I use for all stencils)

Darby-Smart-Throwback-Bag-Supplies

I am in love with these stencils. They truly scream 80’s graffiti! The second I saw them my brain was going crazy. I can’t wait to play with them some more.

darby-smart-bag-stencil

If we are going to talk about falling in love with something else it’s Tulips fabric spray paint. When you use these once just consider it an addiction. I promise you will find anything and everything to spray paint.

darby-smart-tulip-spray-paint

The first thing you want to do is place the stencil on the bag where you want it. I wanted to use the entire stencil since the each cassette was uniquely designed. I used a little tacky spray on the back of stencil to hold it in place. This really prevents it from moving while you are working with it.

I am going with a true 80’s graffiti styled bag.

DARBY-SMART-THROWBACK-BACK

Once your stencil is in place start spraying away. Since each of the metallic sprays make my eyes sing with joy I decided to use all of them. Why not! These sprays are amazing and need to be seen! When you are done let the paint dry. I usually let it sit for 1 hour before I remove the stencil.

darby-smart-tulip-spray-paint-bag

darby-smart-80s-spray-paint-bag

The best part is when you take the stencil off. It’s like magic, y’all!  I only designed one side of the bag but you can do it on both sides or wrap the image around the entire bag. If you only want to use one of the cassettes you can place it where you want then tape off the others. Don’t you worry, I made a shirt to go with the bag also!

80S-darby-smart-throwback-bag

Darby-Smart-80s-Throwback-Bag-Jaderbomb-680x1024

I hope you enjoyed this post and don’t forget to order it! If you want to see the other kits they offer check them out here and don’t forget to check out all of the fun things I Love to Create has going on right now.

HUGE GLITTERY HUGS FROM ME TO YOU,

jade

This is a sponsored post by Darby Smart. I was given a free kit to review and compensated but all opinions, as always, are 100% my own…Pinky Promise!

Who wants boring white thumb tacks on a fun bulletin board like this? I know I don’t!

Which is why I made painted thumb tacks. Let’s be real, white thumb tacks cost .99 and colored ones in the store cost 3.99.

I simply love this  because I can change the tacks for holidays, special events or to match a room. I always have multiple bulletin boards in different spots in my house and trust me they are filled up. I use them for inspiration and daily reminders of who I am, what I love and things that always make me smile. For example yesterday was the Wifey’s birthday and she got this awesome card that is now on my board. Yep I stole it. It was a shark sitting in a recliner watching him on television. The quote said, ” It’s ME week”. You get it? SHARK WEEK!

Everyone knows I love shark week and Wifey’s birthday.

Like this board? You can get it here.

 PAINTED THUMB TACKS

spray-paint-thumbtacks

YOUWILLNEED

*SPRAY PAINT
*THUMB TACKS

steps-to-painting-thumbtacks

Lay out your tacks in a well ventilated spot and spray away.  I started with a light coat then added another one when it was dry.

painted-thumb-tacks

You have to admit this is super cute! I know for me certain colors make me happy which is why I love this tutorial. Everything on the board screams inspiration why not let the tacks do the same.

See you in the next post!

jade

blog-love-jaderbomb.jpg

It’s Thursday and you know what that means! It’s all about BLOG LOVE today with my friends! Happens every thursday so come back next week♥ Today we have some fun fall crafts. I know you will enjoy them after all they are by the best bloggers in the CRAFTERVERSE. Ok, I just made that up.

Kathy Cano-Murillo the CraftyChica.com made this amazingly stylish purse from a Mexican embroidered blouse.

Cathie Filian made these stiffened FALL leaves. This will save me money, just wait till you see how easy they are.

Margot Potter made a chic screen printed Napoleon Dynamite T-shirt for www.ilovetocreate.com. This will be cute with a blue jean jacket over it!

Mark Montano flipping rocked my socks this week with his super stylish tuxedo pants. Good news they are for girls and boys!

Heather Mann for Dollar Store Crafts made a cute pumpkin candy dish. You can spruce up your pumpkin by painting it also! This is great for easy Fall decor.

We can’t forget my latest tutorial for the JADERBOMB blog. I made a cute decoupaged lace lamp, and it looks like a big candy corn!

I hope you get ton’s of inspiration from this post! Come back next thursday to see our round up again!

jade