Tag Archives: chevron

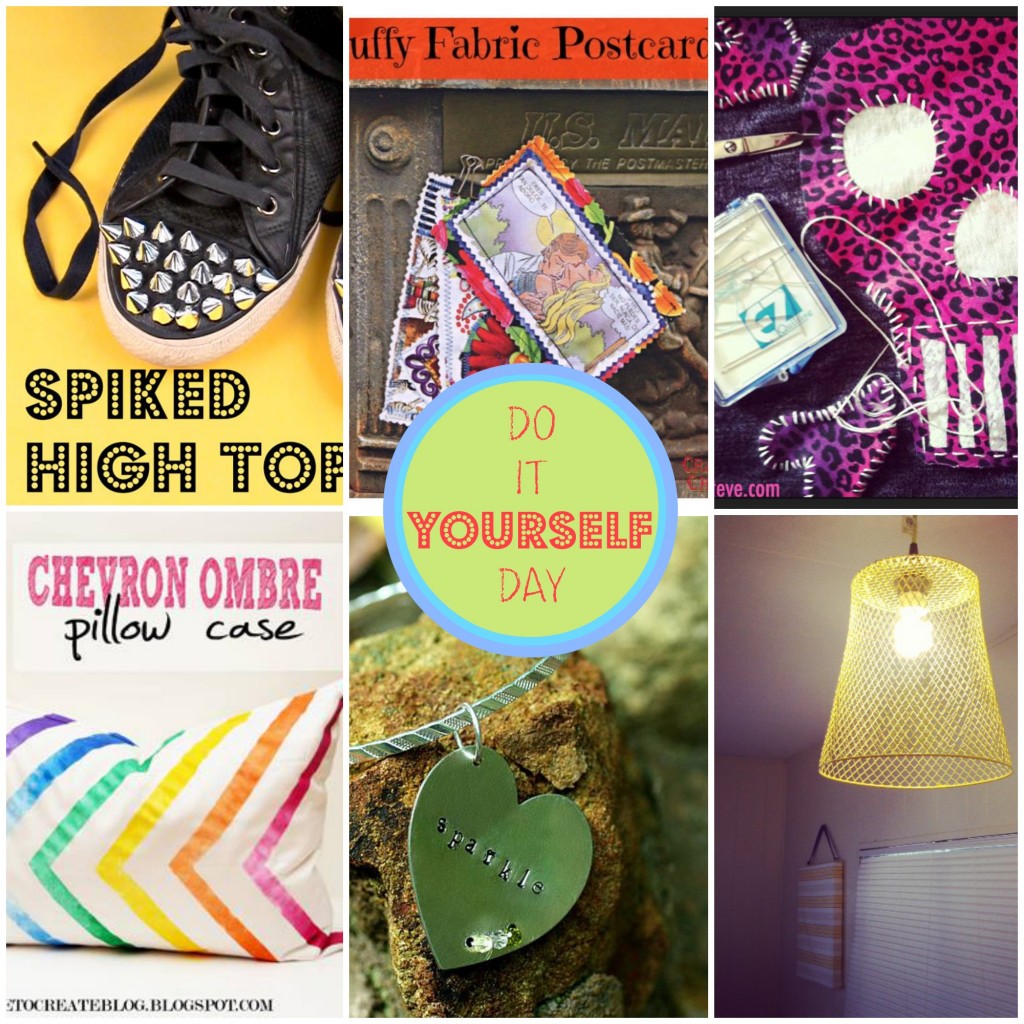
It’s a wonderful day today because it’s all about “do it yourself “. Crafty peeps put on your glitterey seat belts because my friends Mark, Margo, Cathie, Heather and Kathy have some great tutorials for you! You can click on the links below each picture to get to their site. We have been doing this every week for almost 4 months now. I look forward to each week because it feels so good support other crafters like myself.

We are a tight bunch and if you mess with us we will pull out our glittery tools and bedazzle you. Don’t forget this is a linky party so link up your favorite DIY tutorials at the bottom. Every thursday this will take place!

Oh! If you have a minute check out their Facebook pages, blogs, you tube channels and whatever else you can find to give them to love.

do it yourself jaderbomb.jpg

1079662_584813768226963_879993483_n

Mark Montano poked my heart today with his crafty high tops. I need these in gold please. I can’t wait for you to see how easy they are to make.  I have this secret passion for spikes. Could you imagine if someone messed with you while wearing these? OUCH!

908218_10201379133776193_31795233_n
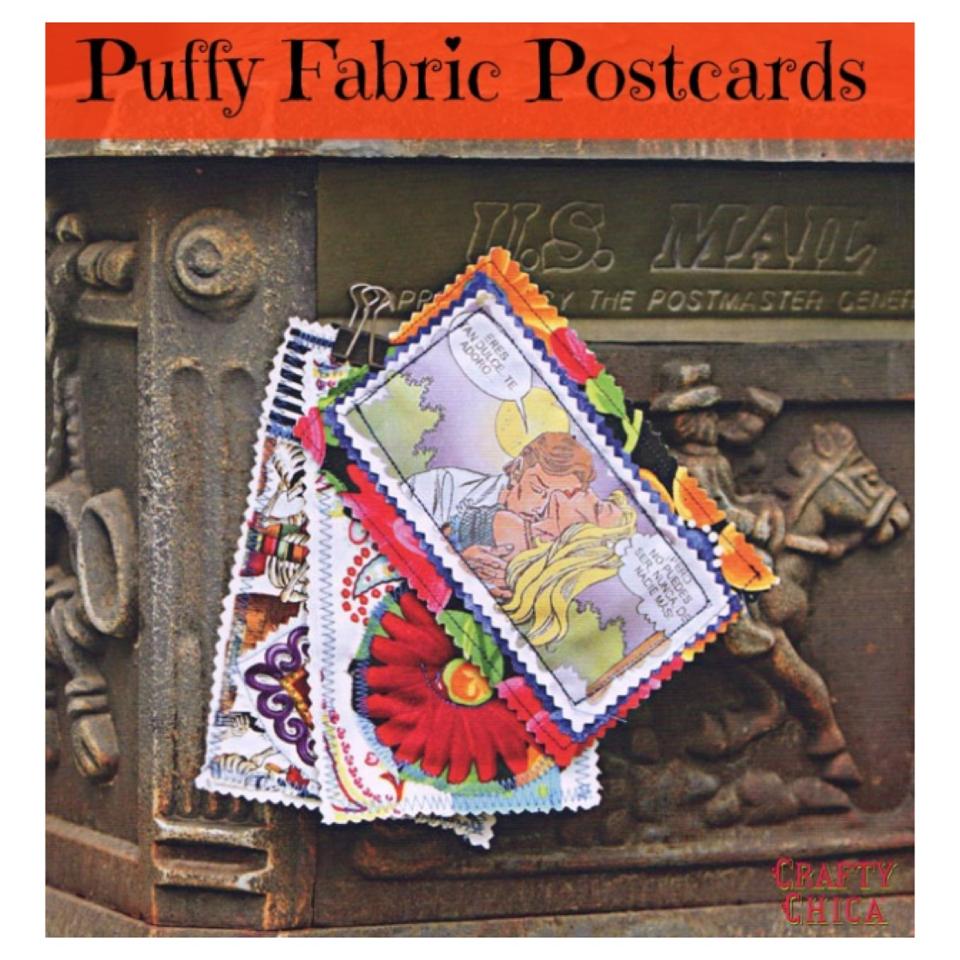
Kathy Cano-Murillo puffed up my heart with these fun fabric postcards. Can you imagine someone’s face if they got this in the mail. They could frame it after! How fun would it be to pick your fabric based off of your your trip.

1148269_10151532967895807_1750612897_n

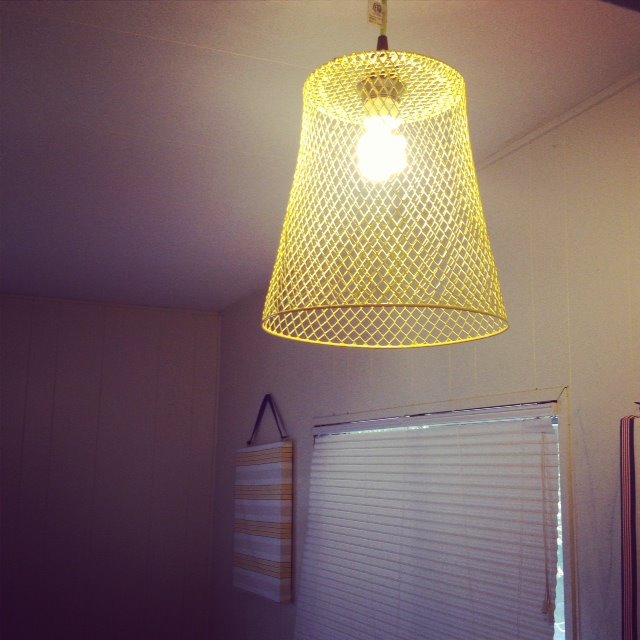
Heather Mann transformed my heart from “trashy” to “wham bam thank ya ma’am” with this waste basket light fixture. It’s so easy to make and would look great in a kid’s room or a dorm room. Great idea!

1082231_10151839237102429_2134284179_n

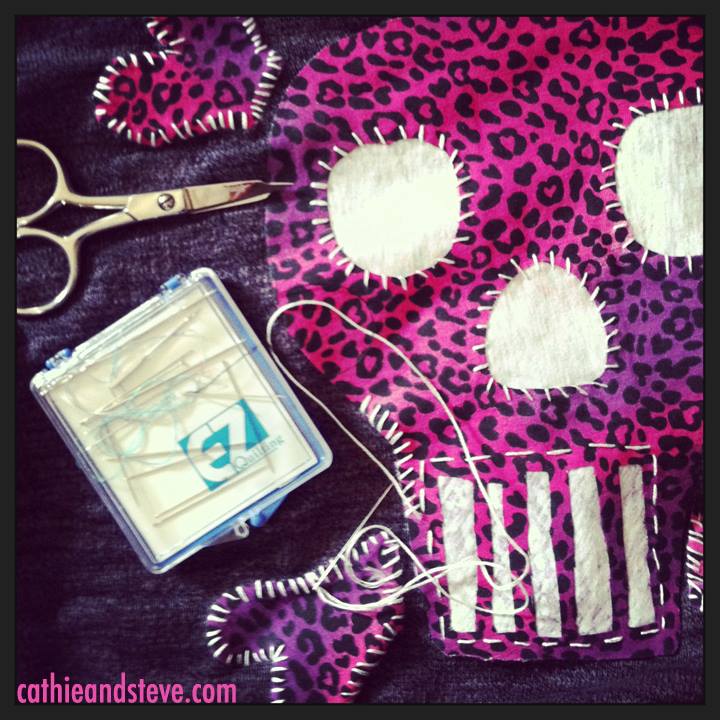
Cathie Filian spooks out heart’s with this fabulous Halloween sweater. I need these in 3 different colors, thank you… Did I mention Halloween is my favorite holiday asides from Christmas. What is your favorite holiday?

1232468_10151871862972774_33786315_n

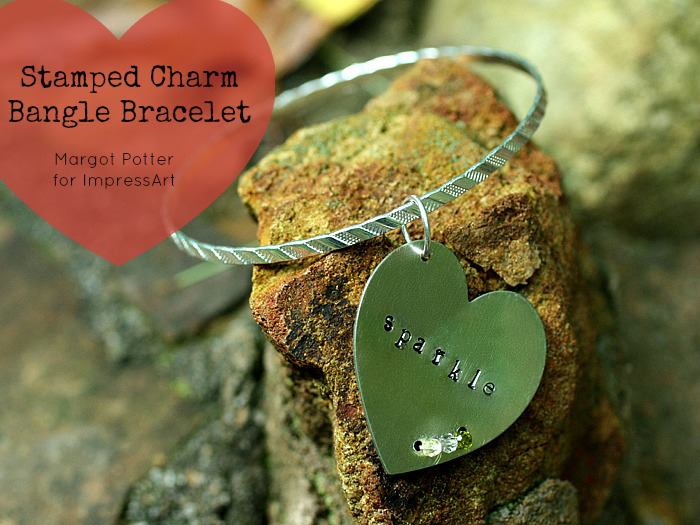
Margot Potter stamped my heart with this crystal embelloshed bangle bracelet for ImpressArt. Christmas is right around the corner, I’m just saying… I know a lot of people who would love this. 

chevron-pillows-jaderbomb

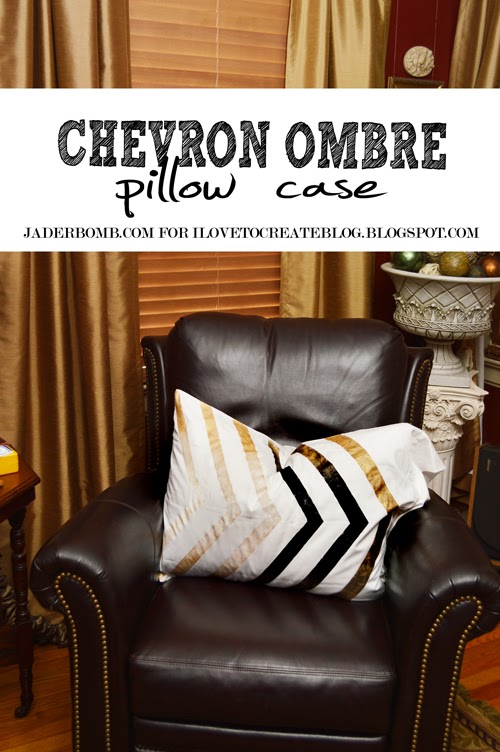
Last but not least if you did not see my latest tutorial for the I love to create blog. I am so happy with these chevron ombre pillow cases. 

Happy hugs on this spectacular Friday. Yippeee Halloween is near, well not really but YAY! See ya in the next post.

jade


Welcome to the happiest place on earth, well besides Disneyland. Today I will show you the chevron pillow cases that I created for the I love to create blog. Incase you do not know already, I am a contributor for them and I post every two weeks. So that is something you can surely look forward to. Click here to get to the site.

First things first. I had a blast making these. I originally planned to make two rainbow ones but the Universe told me to make a more sophisticated one for anyone who is not fond of every color on earth.

chevron pillow cases

So I did. I am super giddy about the multi-colored one however I am very happy with the black, white and gold one. I hate to even say this because it’s going against my rainbow fairies’ orders but I like it better than the multi-colored one. I know you are shaking your head right now in disbelief. How could I like anything more than rainbow!

Could I use the excuse that I am from Louisiana and I love the Saints? Even if I can’t I am still going to go with that.

diy-chevron-pillows-jaderbomb

After looking at the darker pillow case I realized that it would be so easy to accessorize with a load of chevron pillows. A group of black and white would look so stinking chic. Sheet, I am shaking my head just thinking about it.  How-to-paint-on-fabric

Hopefully you are jumping like a jumping bean right about now. Have fun making these and make sure to send me pics of the ones you make!  I’d love to see what creative colors you choose to use. See you in the next post Jaderbugs!

jade

Oh HAPPY day Jaderbugs! I have this post I am working on featuring 5-10 homemade crafts you can make to decorate your Christmas tree with. That will be coming up this week but I wanted to share a few of my favorite ones with you now. I love making things that fill those empty spots in my Christmas tree. You know? Those spots that are screaming for love and affection? This year is the FIRST year we ever got a real tree. It was so much fun going through the entire process. Lil one had fun picking it out. The one thing I didn’t realize is that you can’t BEND the branches like a fake tree.

HAHA.

Do you know what this means? HUGE spots that need love and affection. I tried sticking ornaments in those lonely spots but it was just not working. Our living room tree’s theme is GOLD, WHITE and a pop of red. I thought why not add a little bit’O candy in the tree and that is where this idea came from. I didn’t want to go out and buy candy ornaments because they are super duper expensive and I just don’t like throwing away money like that.  I hope you enjoy this craft because they turned out SO cute. Just think you can do silver ones and put bright fun paper around them. I love this because you can be creative and add paper on them that you personally love.

Stay tuned because I have THREE trees in the house this year so you will be seeing some fun ways to decorate a tree. Did I mention each room has a different theme? Eh…. I know. I have OCD.
Let’s get started:

INGREDIENTS:

*Scissors
*Twine
*Mylar Tissue (purchased from Walgreens)
*Scrapbook paper
*Paper towel roll

You can click on any of the ingredient links to purchase these items in ONE spot.

 The first thing I want to tell you is this Mylar Paper is GOLD and SILVER. This is what it looks like right from the package. You can see that there will be a crease from where it was folded.

If you flip the paper over it will be silver. I didn’t know this until I bought it. I think this is great because you can choose this side if you don’t want GOLD.

The first thing I did was lay my cardboard roll on the edge of tissue, roll it over so see where I need to cut.  The goal is to have no cardboard showing.

Once you cut it it will look like the picture below. It will be too “long” so you will need to cut the strip in half. I used the crease that was already showing as a guideline.

Once you cut it wrap your roll with the tissue paper and secure with tape. I like to use double stick tape so I can “hide” the tape from the human eye. It actually just looks a little better this way.

Get a piece of twine and tie it around the ends of the roll. This will give us that CANDY look. Are they not so cute? I planned on leaving them just like this but I really wanted them to pop.

Soooo. I added red and white chevron paper around them.

This is what they will look like once you are done! I hope you enjoyed this tutorial… Make sure and post yours on my facebook page so I can share with my readers. I love seeing your take on one of my crafts.

Don’t forget to make it a DIY kinda day,

Facebook Twitter Gplus Pinterest YouTube E-mail RSS

Quote of the day:
“It is the first duty of the citizen to be calm.

Won’t you take me to… FUNKY TOWN with FUNKY ROCKS… with FUNKY MAGNETS…

You get it, I am pretty excited about these babies. However I never even got to put them up because dad took them to Hawaii and already gave them away! He said all of his friends there would love them. I was hoping he would of “forgot” to give them away. Eh. He didn’t.

Good thing is it’s only rocks! I can make TON’S more Jaderbugs! Let’s get started on our halloween rock magnets

Halloween Rock Magnets

 INGREDIENTS: 

*Paint
*Glue Gun
*Craft Brush
*Baker’s Twine
*Rocks
*Magnets

Make sure you click on the links of ingredients to order these items!

The first thing you will do is paint your first coat of paint onto the rock. I like to do one half, let it dry then do the other half. Remember your first coat will be translucent to a certain degree.

I love taking pictures of my paint. It looks so pretty! NO. I don’t want to eat it, today.

Once your rocks are fully coated you can start painting your design on them. I really enjoy whimsical, organic designs.  Remember if you are putting different designs on your rocks to let each color dry thoroughly. I won’t show you the rocks that threw in a pile because I thought I had magical brushes that would not mix the paint together.

HAHA

To make the little designs with your baker’s twine I like to start by wrapping them around my finger like this. If you find an easier way please do that!

I know. I was lazy. I did NOT paint the  backs of my rocks. I mean, had I known they were taking a trip to Hawaii I would of.  But, once you are done painting and gluing you can place your magnet with an adhesive backing to the back of the rock. Where ever you choose to put your baker’s twine just hot glue it down.

This one kinda reminds me of Charlie Brown’s shirt. I love the way the black and white baker’s twine makes everything pop!

I am totally in LOVE with my little pumpkin. Guess I will make a new one!
(Insert shaking head here, haha)

I have this vintage serving plate in our kitchen and I use it to post important notes. These little magnet’s were cute on it.

I hope you enjoyed this tutorial, see ya in the next post! Make sure you come visit me in these places too! (look below this line, hehe)

Check what else I did  these Halloween earrings that look like these magnets here.


Howdy Hoo Jaderbugs! Can you believe it’s already almost Thursday? I started thinking earlier about this…what if we worked on Saturday and Sunday and our “weekend” was the entire week! That would be so great, right! The only bad thing is a blogger’s life is spent blogging. So I really wouldn’t have any time off.

Quote of the day: 
Whoever knocks persistently, ends by entering.”

The picture at the top is fun right. I think is super fannn-cyyyyyy (say that with your lip cocked to the side and a victorian voice). I don’t have a  CAT but if I did it would look like this. Top hat and all!

Did I share the news with you that I am now a contributing editor for The Graphics Fairy-Crafts. How coolio is that! She has the best graphics ever! I really had fun getting creative with this one and if you want to see the FULL TUTORIAL on how I made this from beginning to end then head on over to Karen’s blog to see it!

CLICK HERE TO GET TO IT!  

—————————————————————————————————————–

Did you get to see my fun Chevron Halloween printable? It’s FREE! They come in three different looks so get them now and start crafting with them. Something that would be really cute is to print it out, put a round picture in the black circle and frame it. Perfect for the Fall season, and Halloween.

A “dubleeeooo” for you.

Click HERE to see all of them

—————————————————————————————————————–

Even though it’s the 5th of the month, you still have plenty of time to start this fun photo game I started. Don’t worry, if you start on the 19th it doesn’t mean you have to post all the days prior. Just start, be happy, have fun and share with your friends. It’s a fun way to stop and click. Kinda centers you actually.

Click HERE to get the info on it or just save this picture! Don’t forget to use the hashtag

#ispywithjaderbomb

I hope everyone sleeps well and I will see ya in the next post