
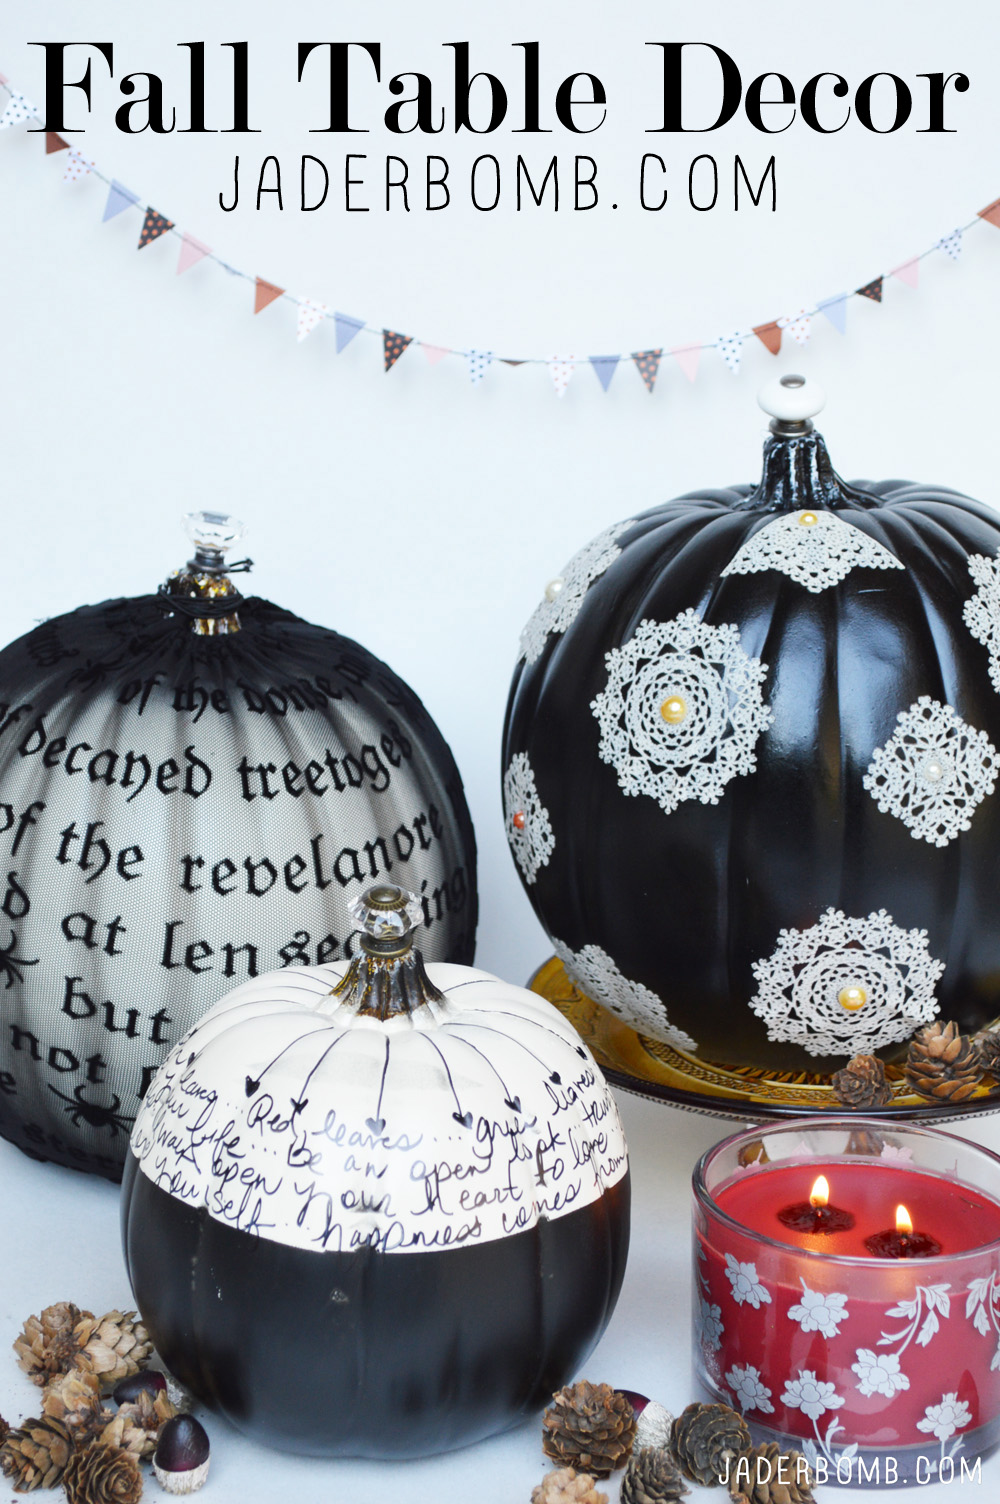
 This month’s theme for Michaels Makers is Fall Home Decor. Fall is my favorite because the weather is changing, the leaves on the trees are changing, even food tastes better. Today I will show you how to dress up your table with a punch of Fall, surely this will make all of your guests excited! All of the materials I am using today come from Michaels. I hope you enjoy it!
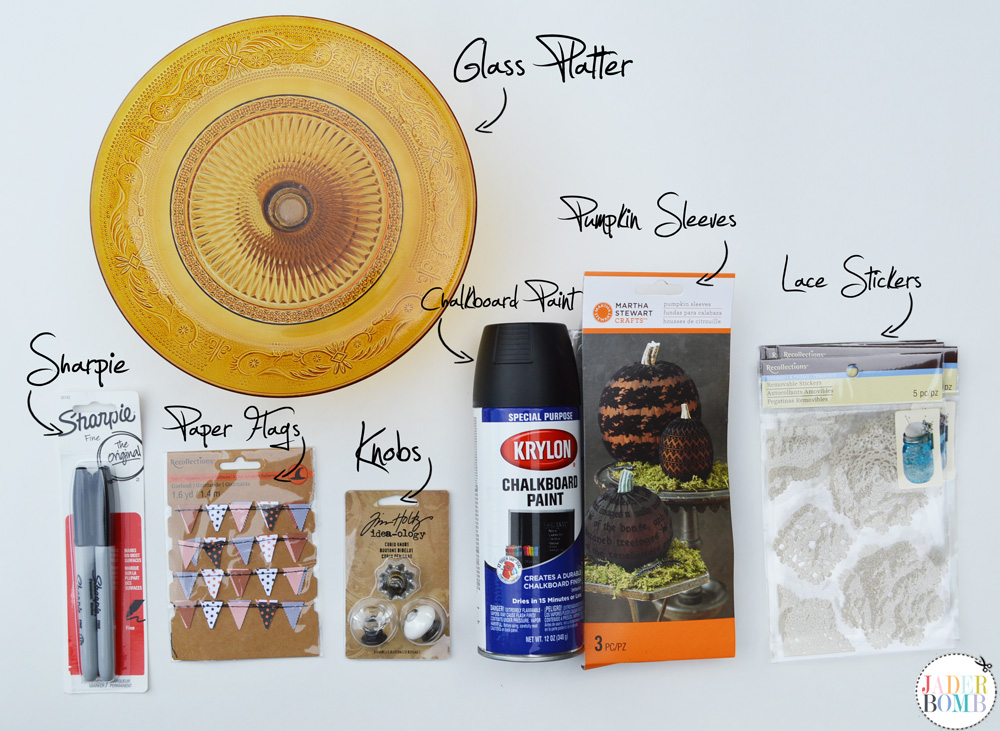
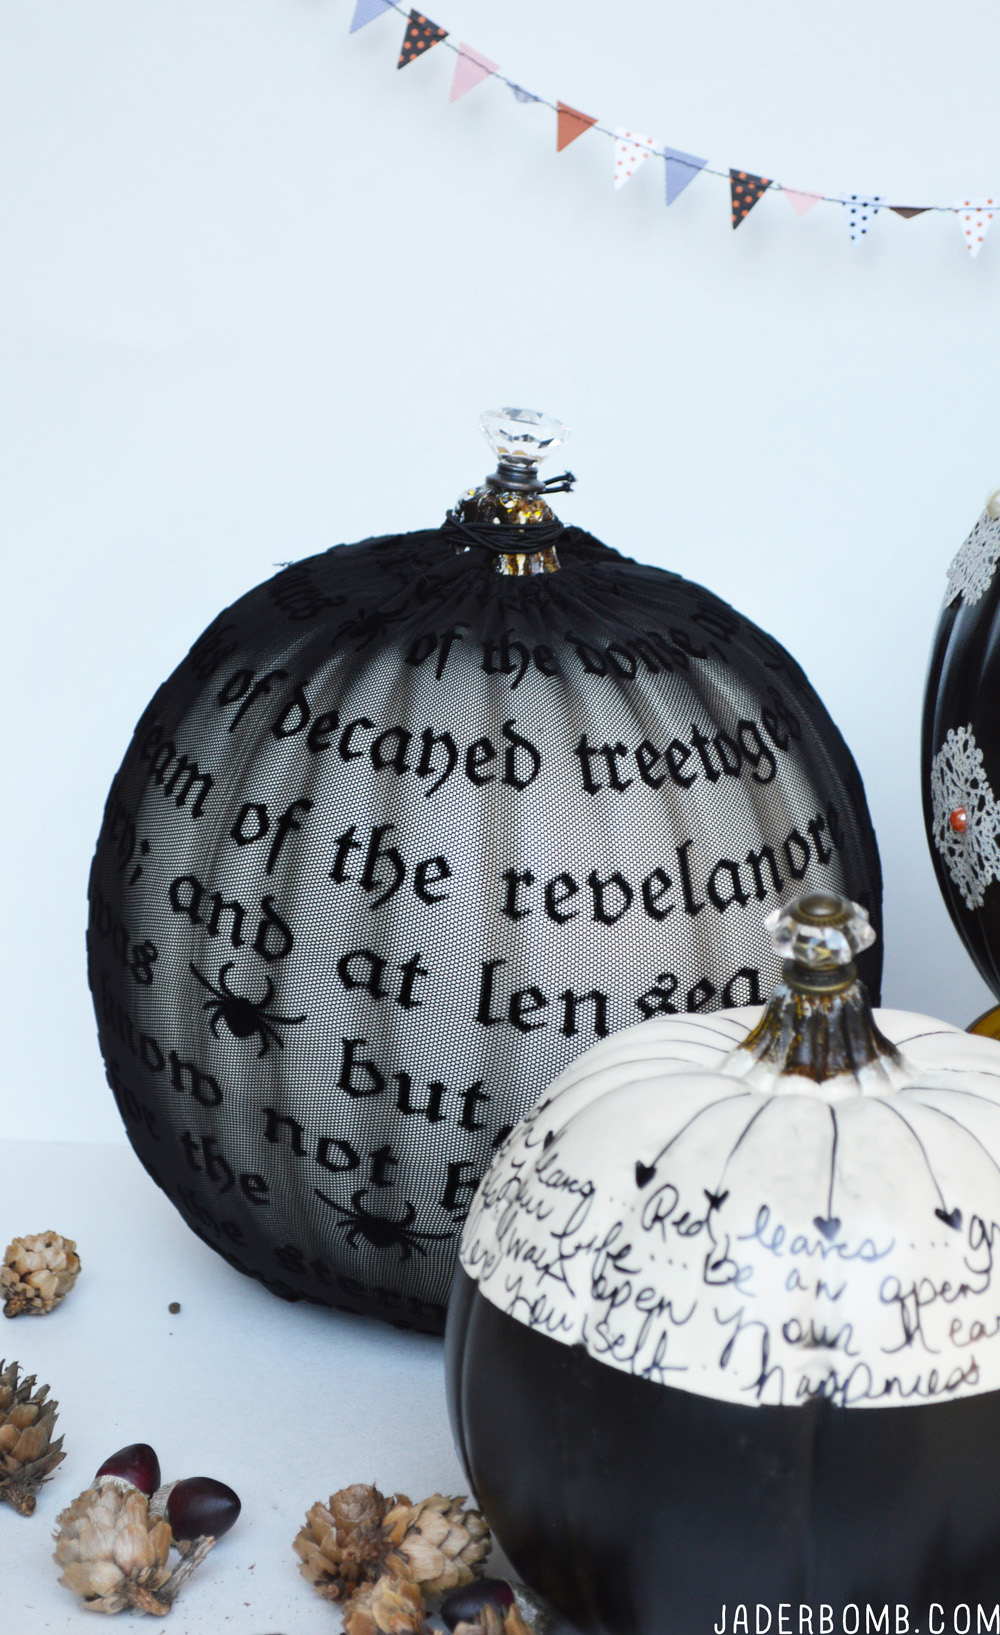
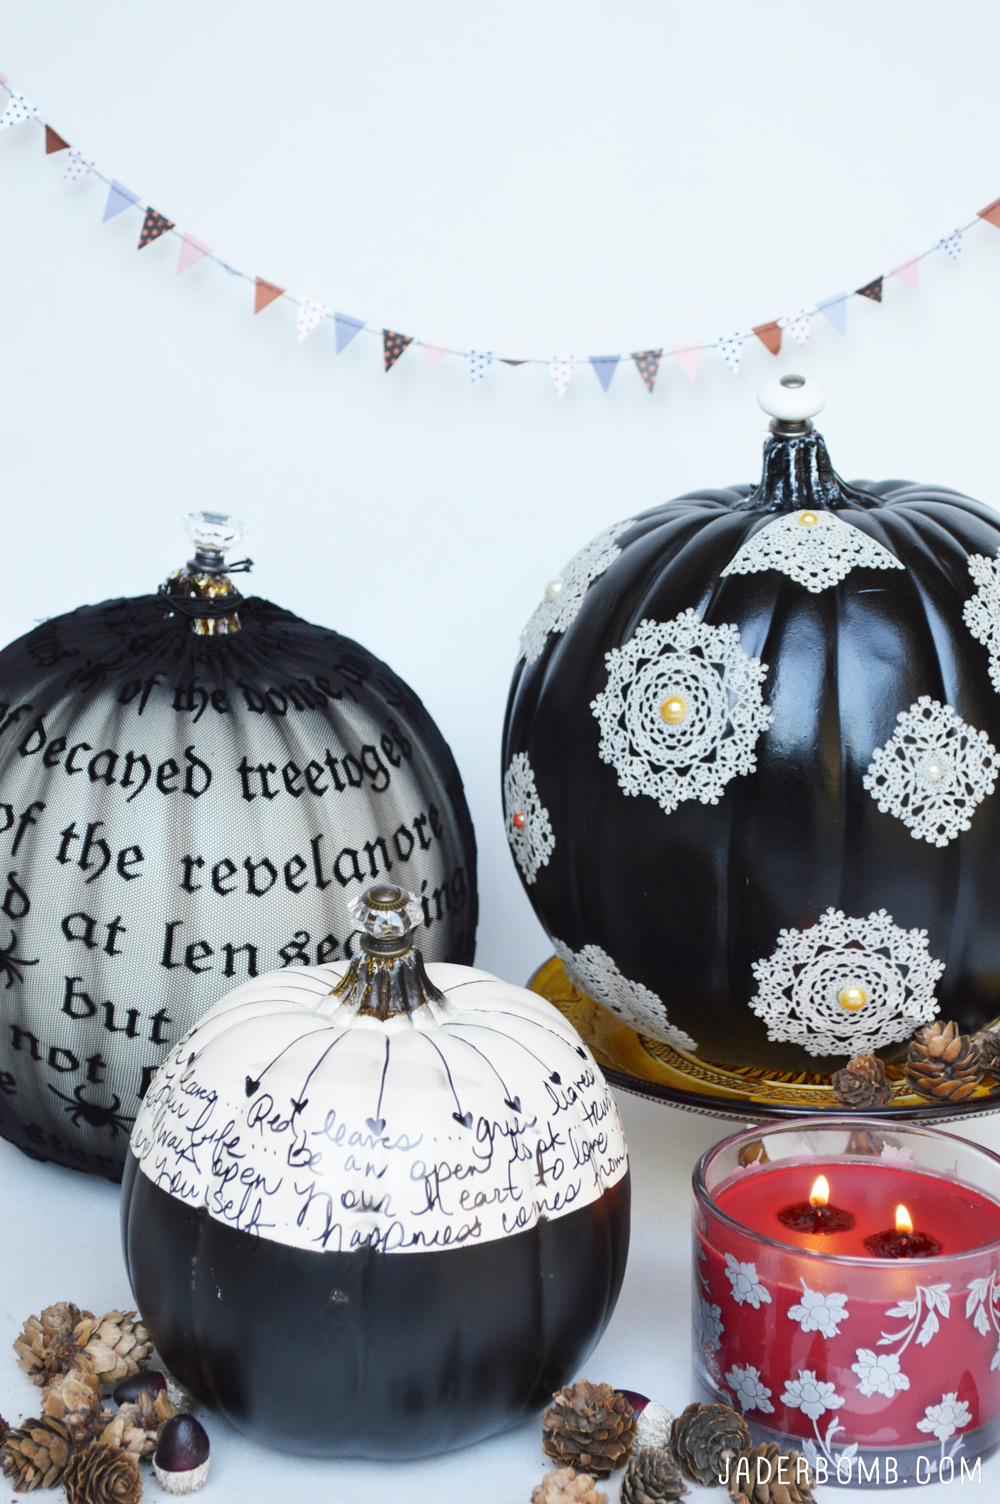
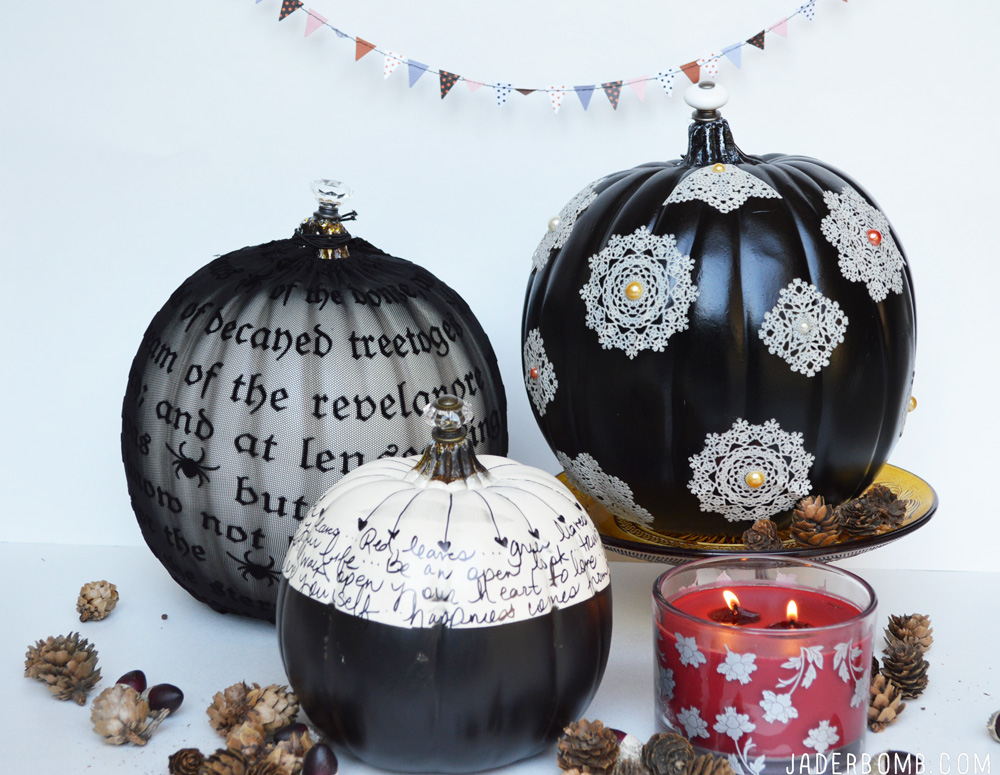
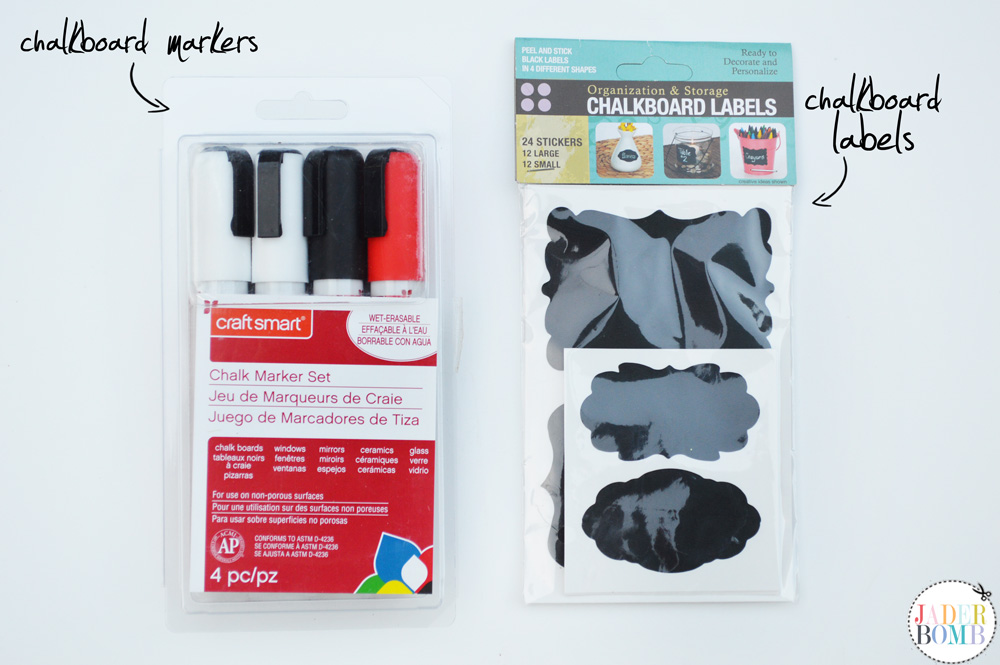
YOU WILL NEED: GLASS PLATTER | SHARPIE | PAPER FLAGS (OPTIONAL) | TIM HOLTZ KNOBS | CHALK BOARD SPRAY PAINT | LACE ADHESIVE STICKERS | E6000 | TAPE | MARTHA STEWART PUMPKIN SLEEVES
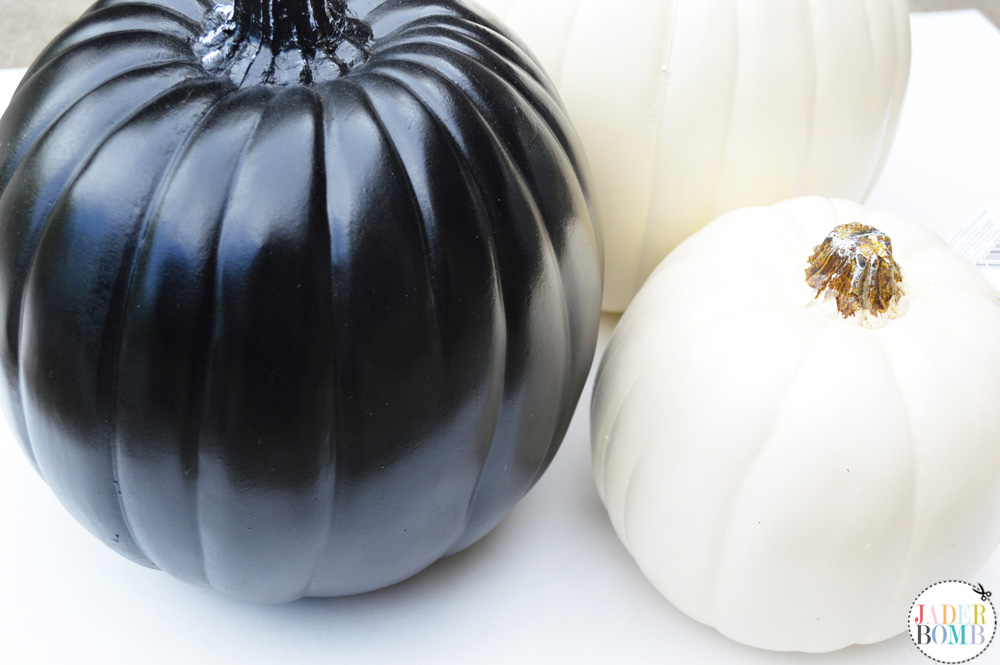
 These pumpkins come in different colors so you don’t have to spend time painting them, my kinda pumpkin. They are on sale right now at Michaels so go grab a few. You can do so many different things with these pumpkins. The best part of these pumpkins is they will never rot! So you can bedazzle your hearts away and save them for next year.
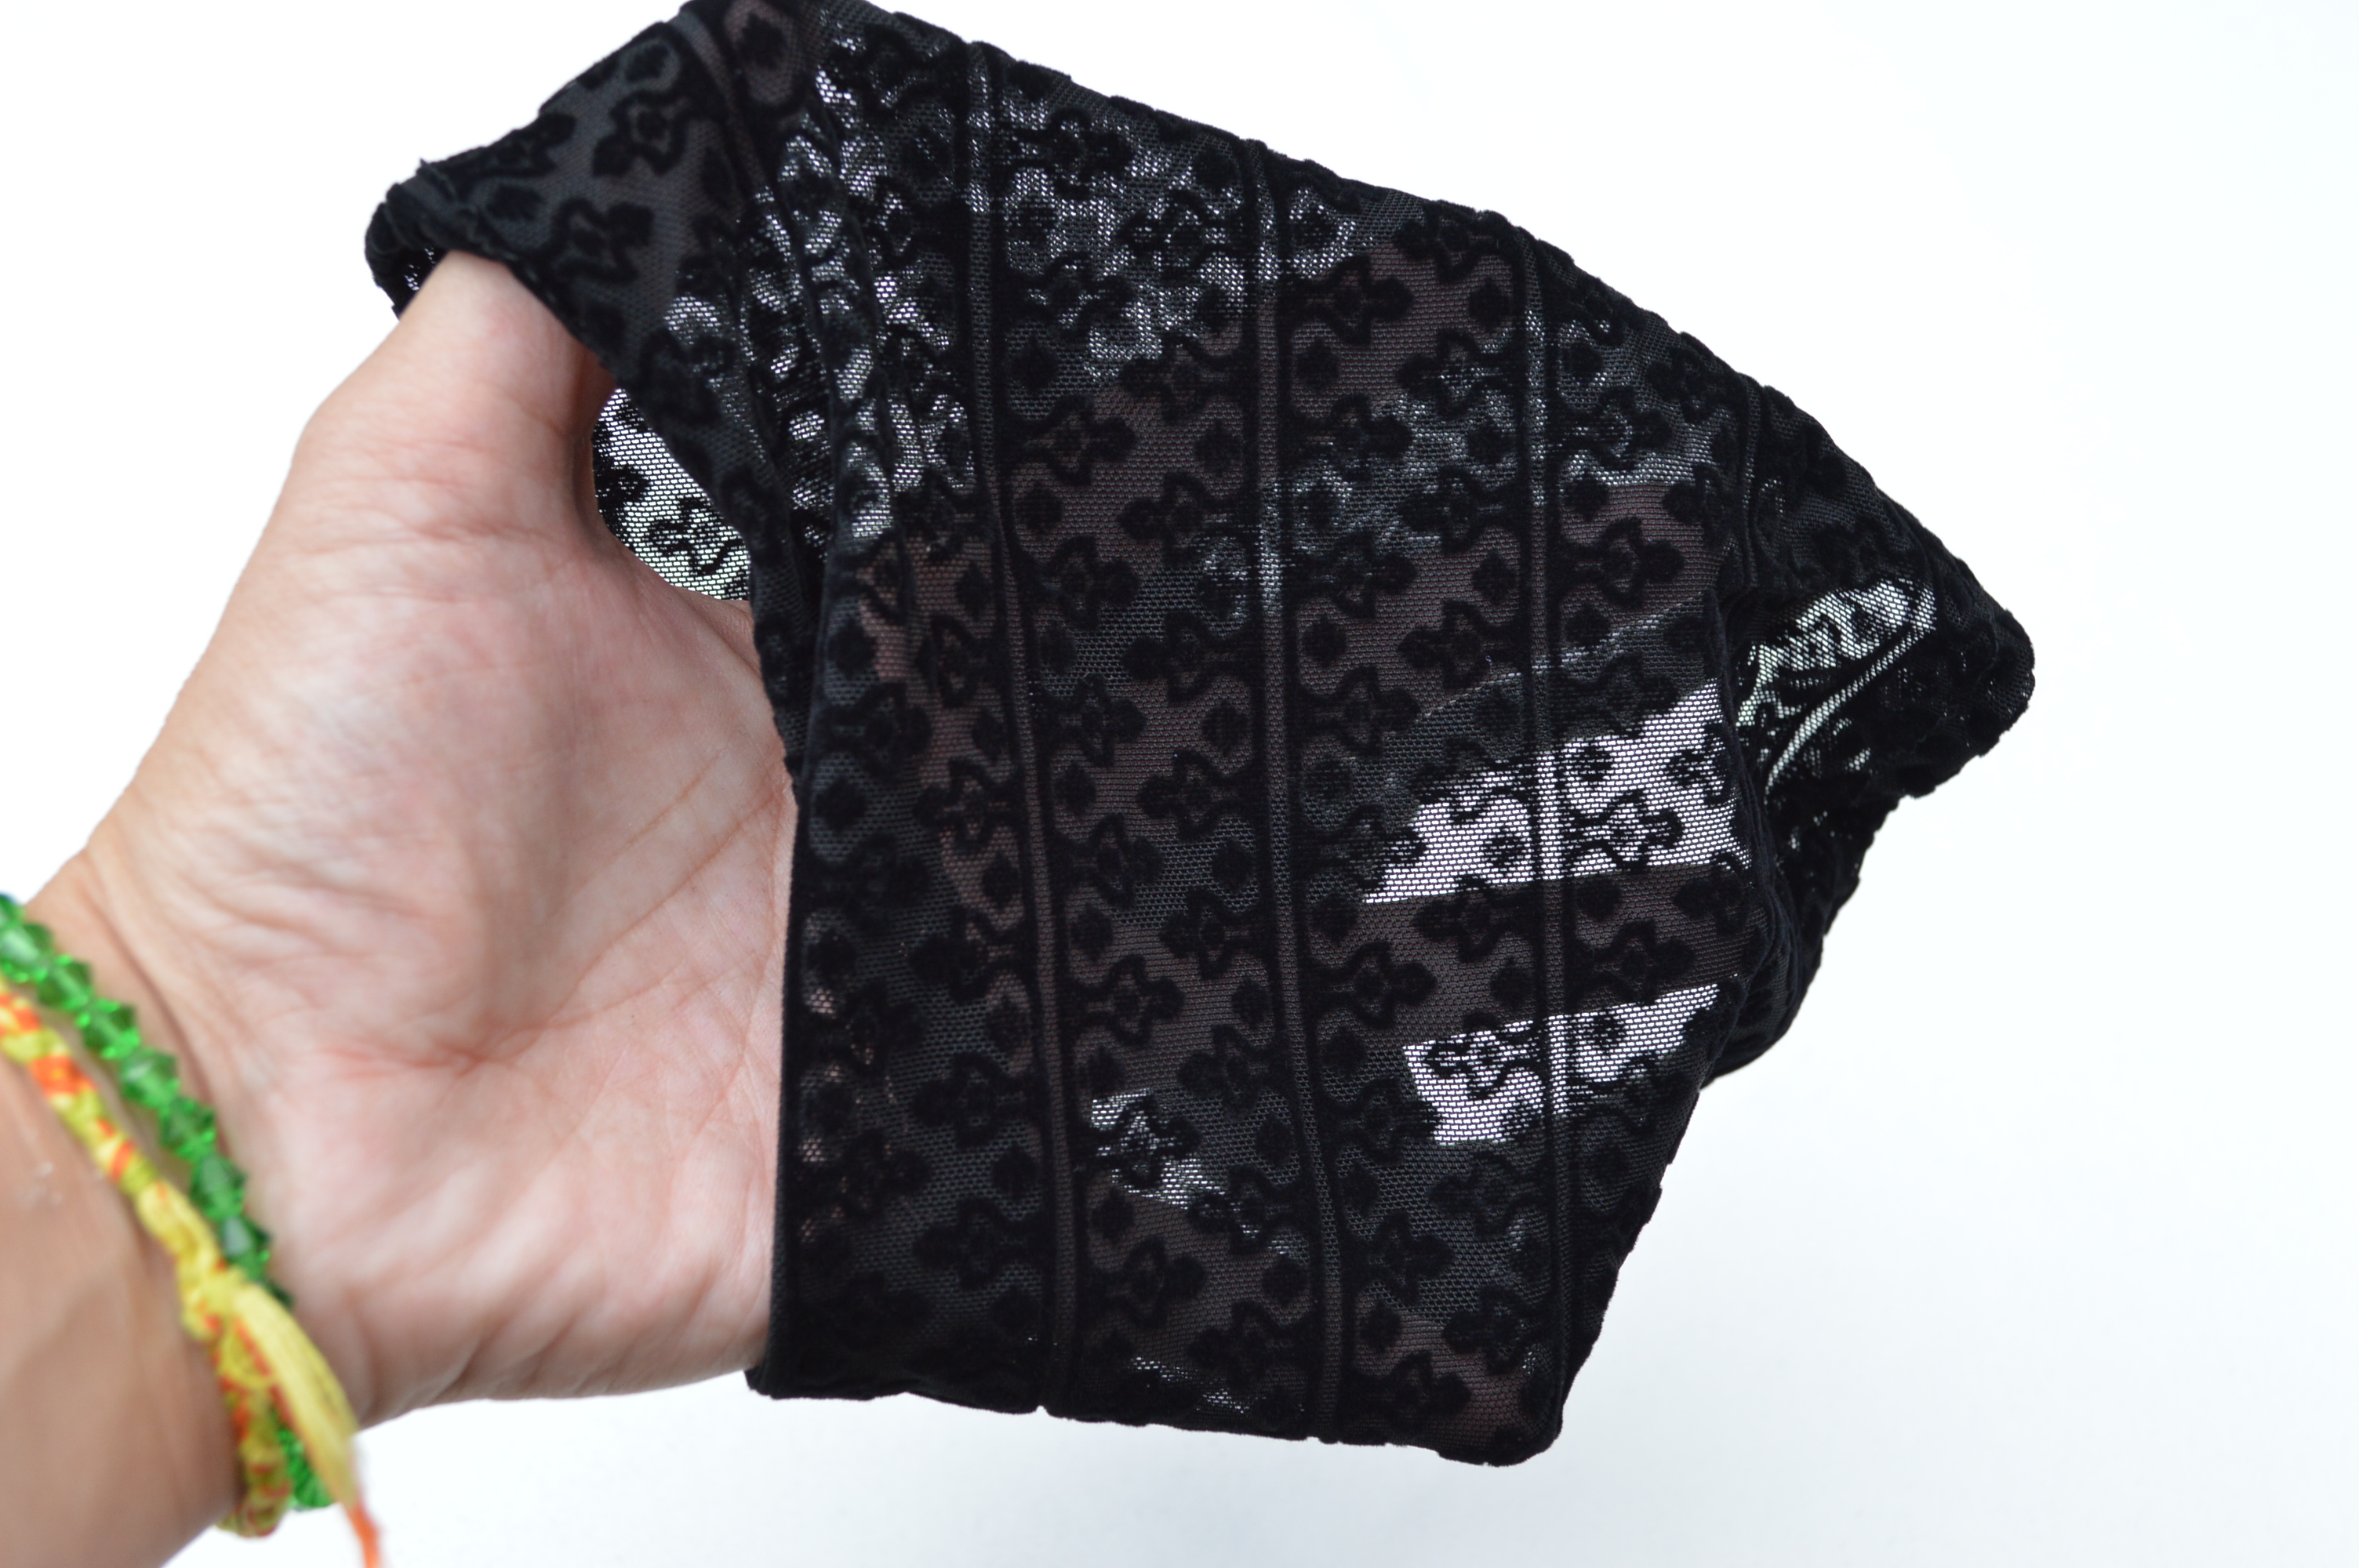
 These Martha Stewart pumpkin sleeves are phenomenal. They are made from a stretchy mesh material that can cover a pumpkin in no time. The best part is you can take the sleeve off when you get tired of it, leaving you with a blank canvas!
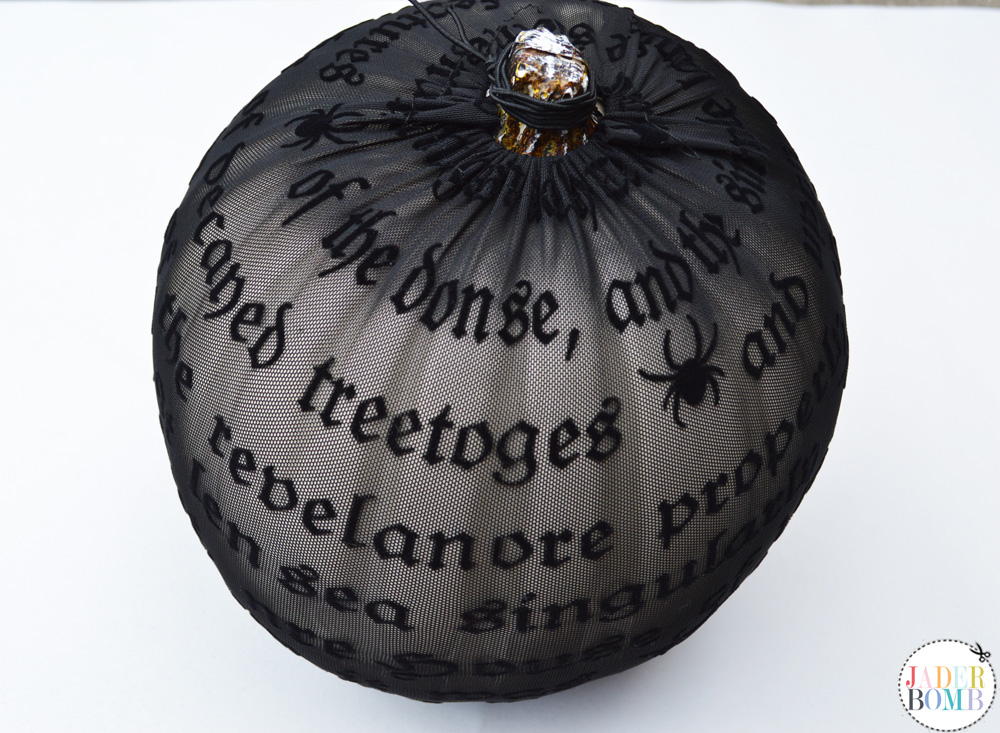 I love the lace design on this pumpkin sleeve.
 To make our chalkboard pumpkin, tape off the top part of your pumpkin. I am using tape from Martha Stewarts line.
 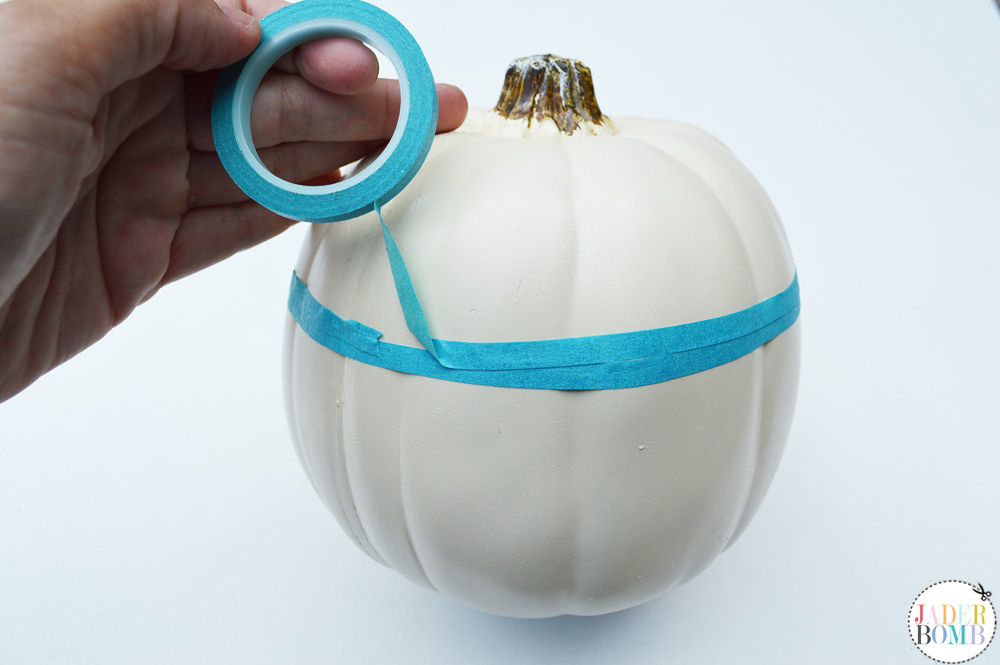 Once you have it taped off you can spray paint the bottom portion of your pumpkin with chalk board spray. Make sure you do this in a well ventilated spot.
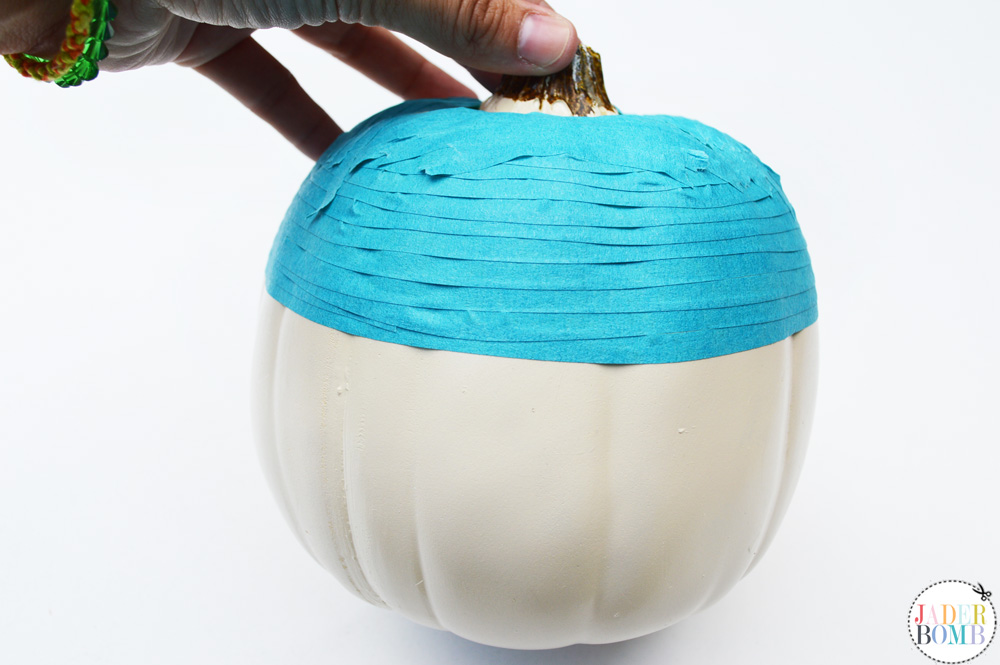 Add some E-6000 to the top of your pumpkin and place the knob on the top of it. This will make your pumpkin look a very classy.
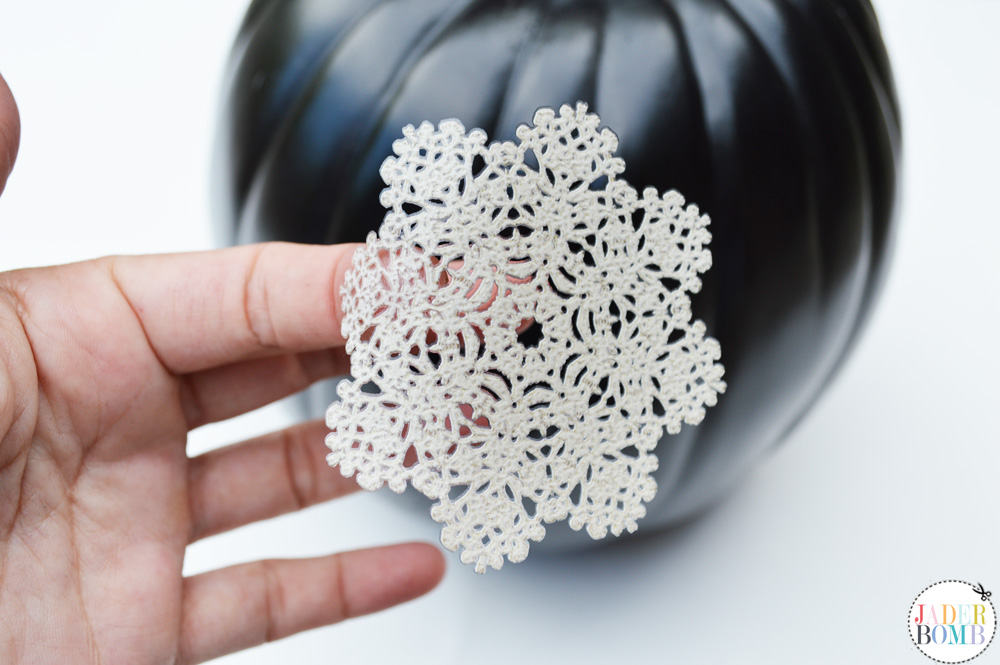
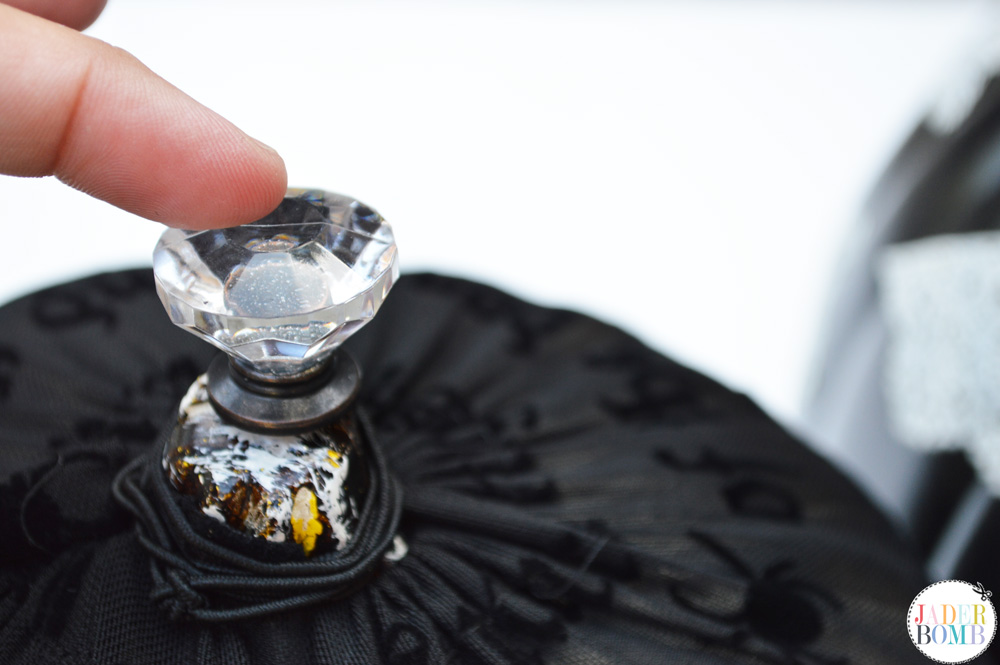 On one of your plain pumpkins we will apply these lace removable stickers to them. It adds a pop of class to them.
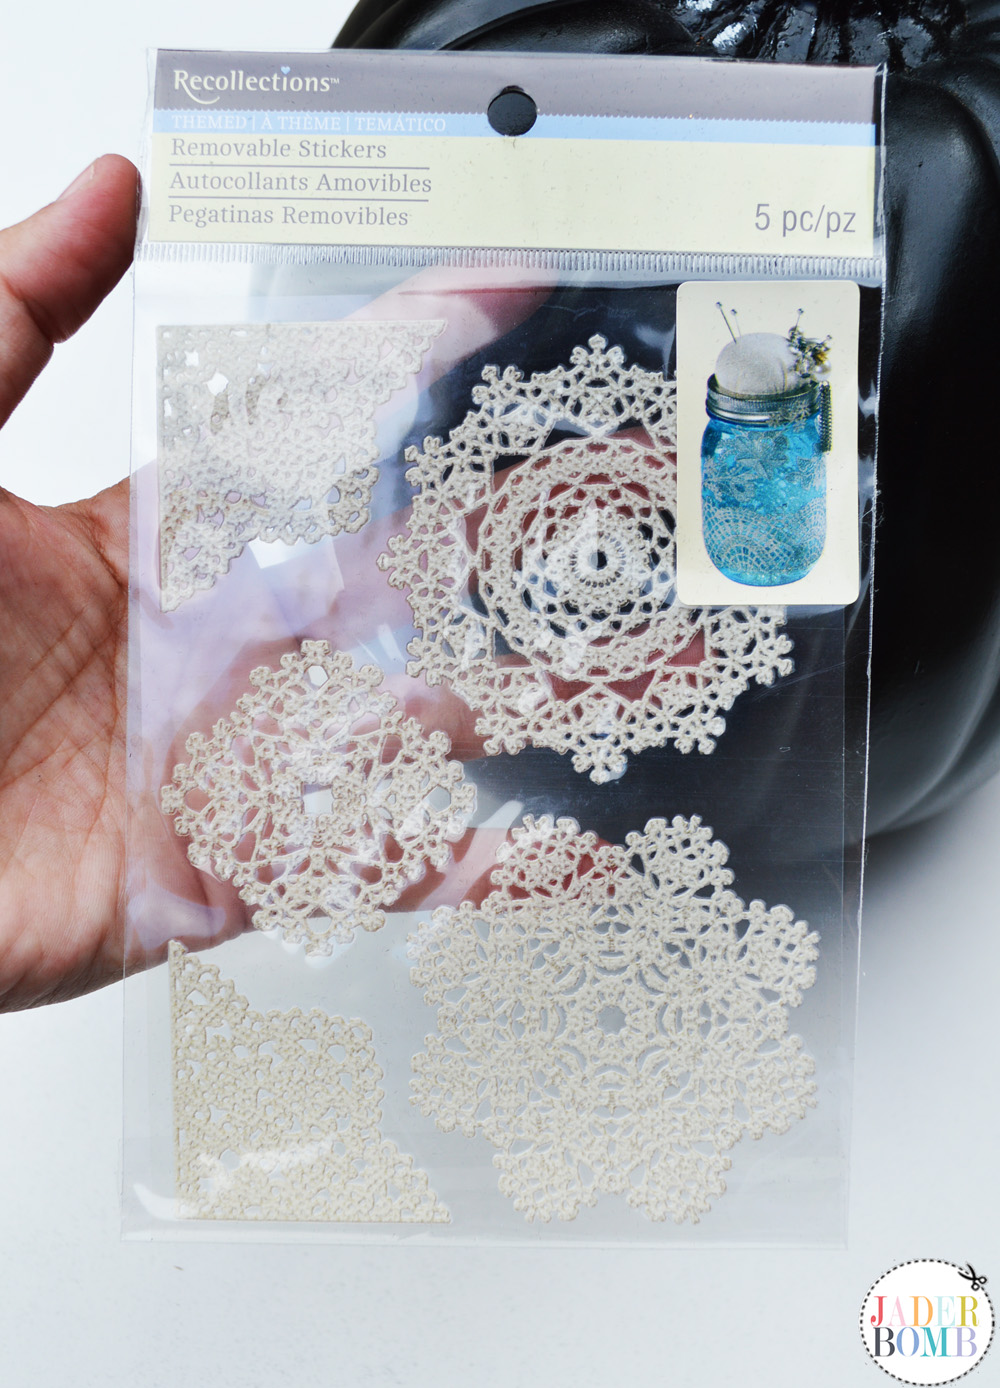
 I am placing these adhesive dots on top of each lace sticker. The great thing is you can purchase these in multiple colors. Did I mention this whole sheet is only $1.
 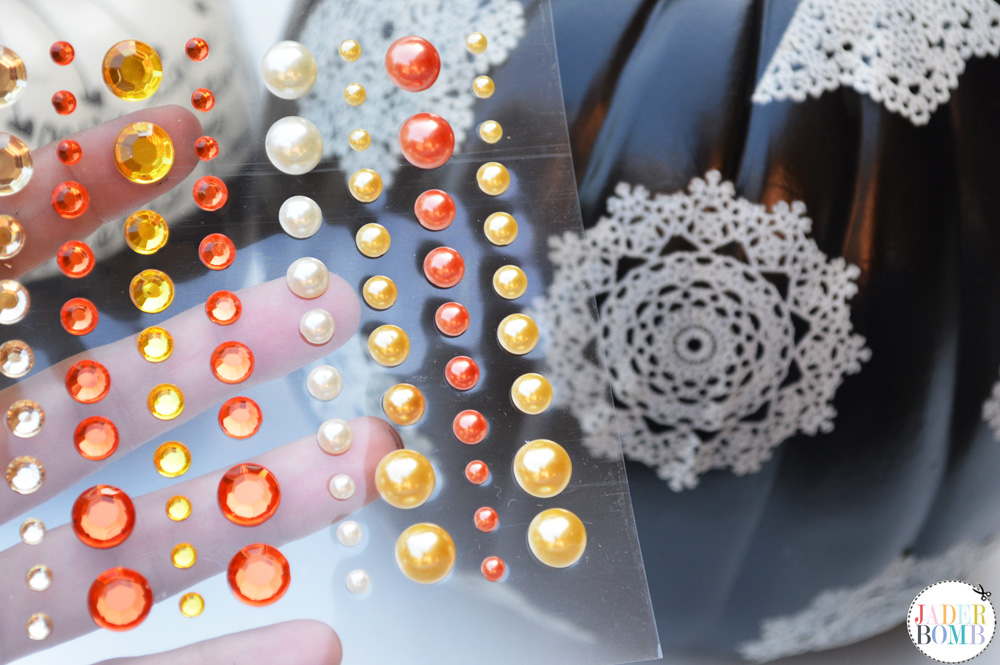 On your chalkboard pumpkin, grab your Sharpie and write whatever inspires you on the top portion. This is a great time to grab your favorite quote or poem. Don’t forget to grab some chalk for the bottom part.
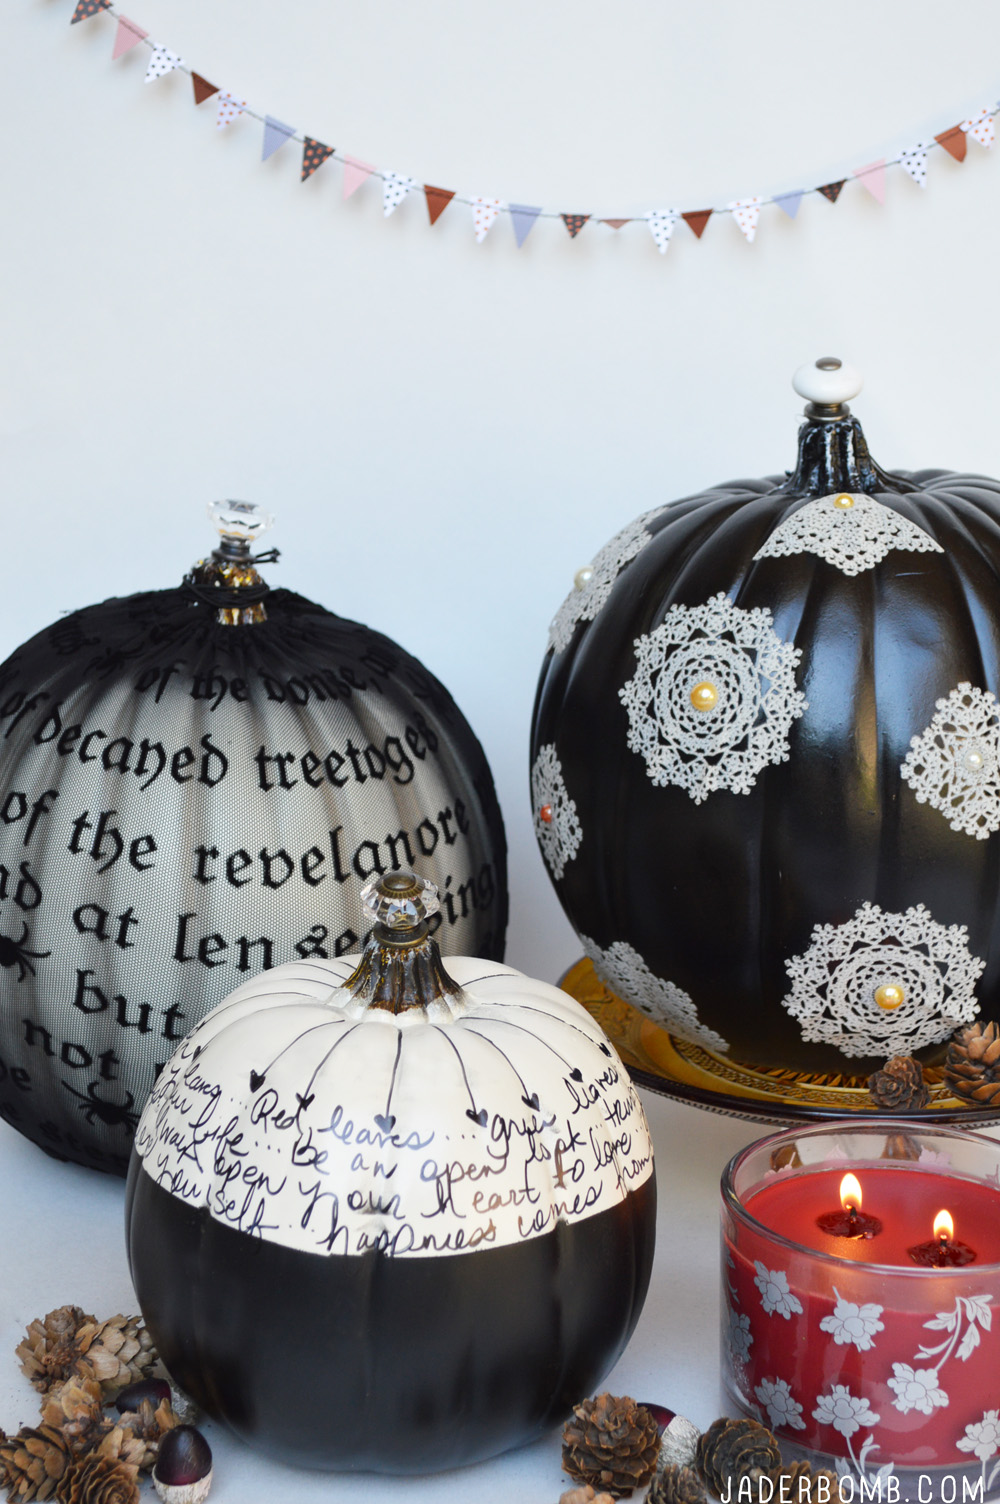
Want more Fall inspiration, check out Michaels’ Fall Market lookbook! Check out the Michaels Fall Ideas Pinterest board.
There are all sorts of easy fall and holiday themed projects for your whole house on Michaels’ Fall Project Page.
![]()
Don’t forget to connect on social media! Make sure to use use the hashtag #JADERBOMB on Instagram or Twitter or Facebook so I can keep track of all your awesome creations! HAVE A GLITTERY DAY! ♥, Jade
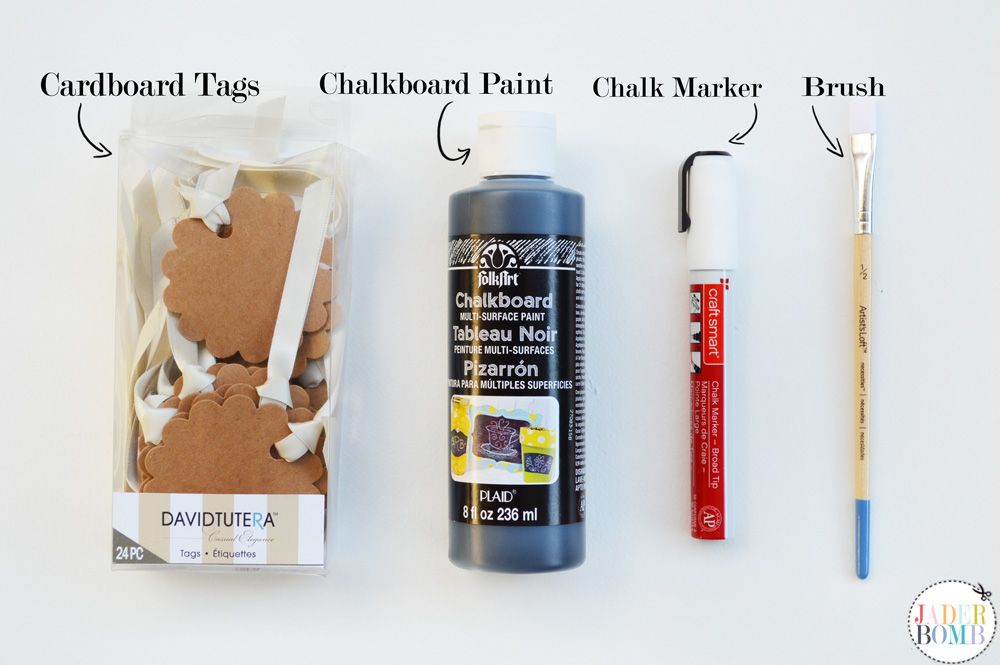
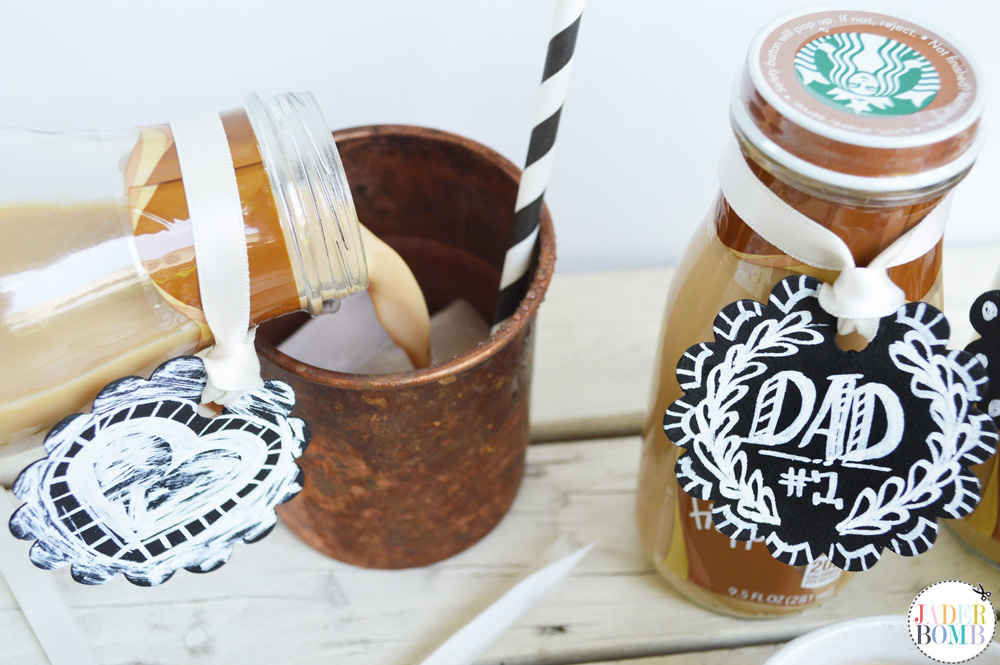
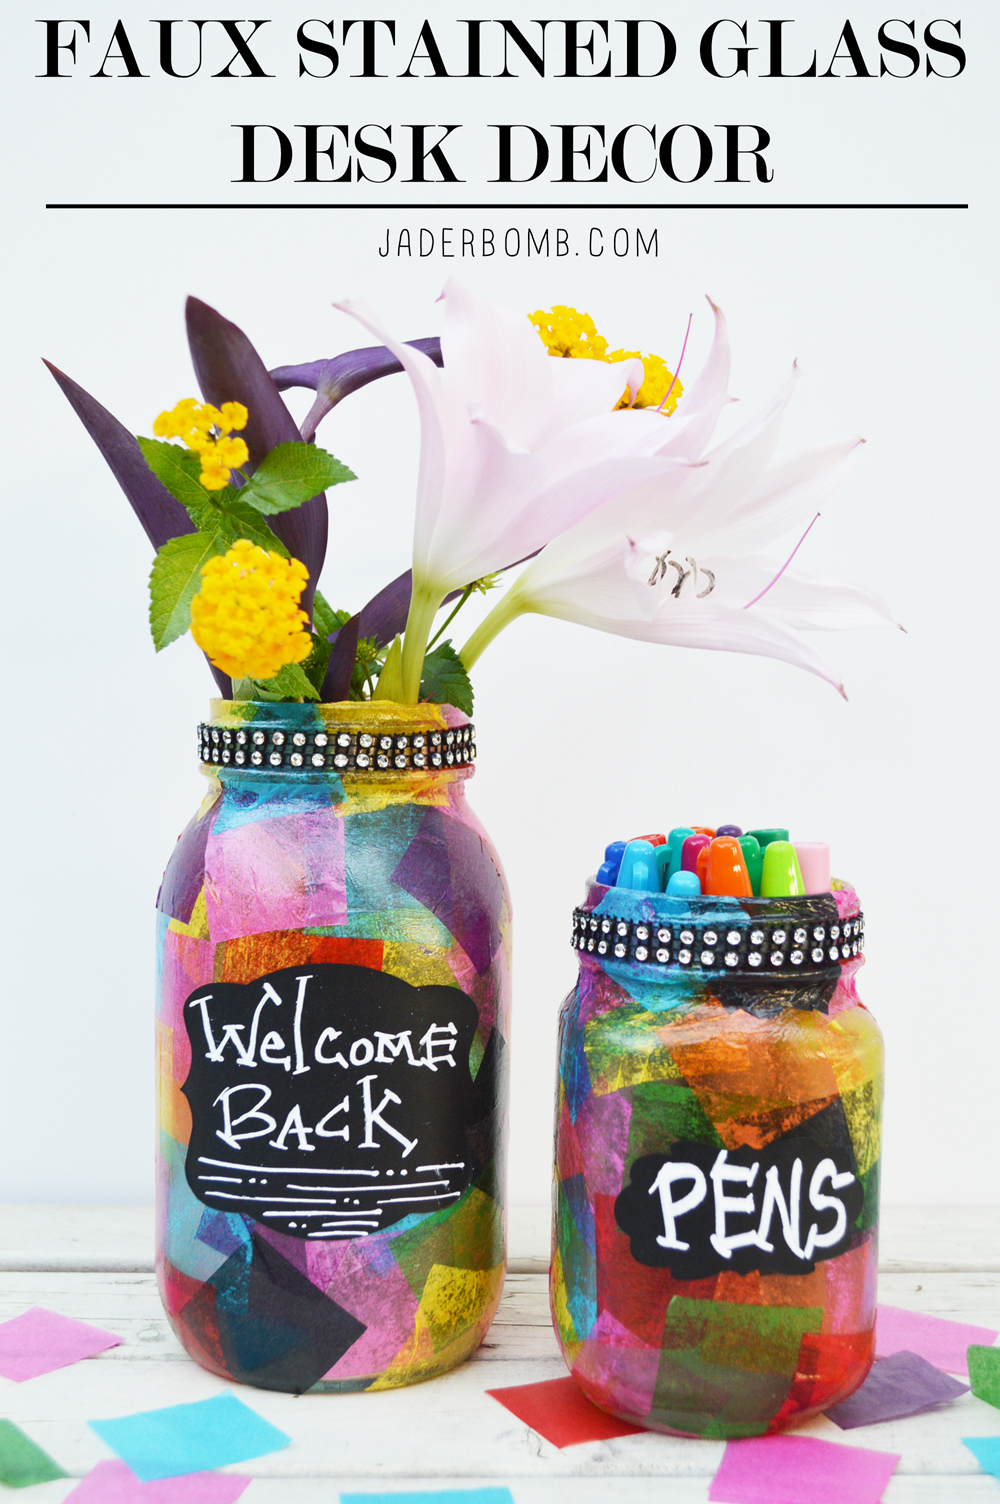
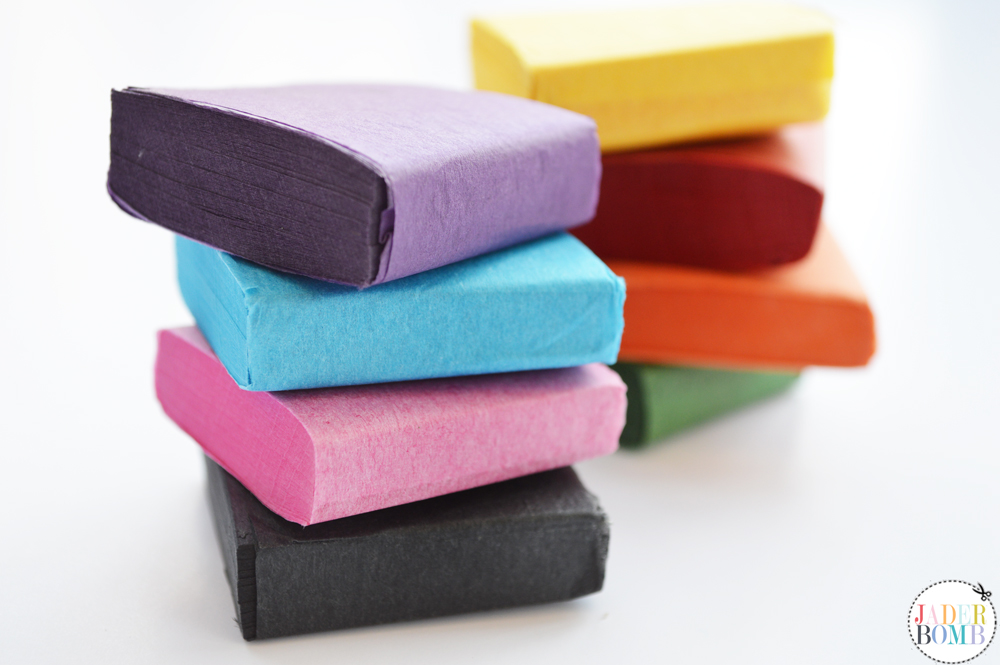
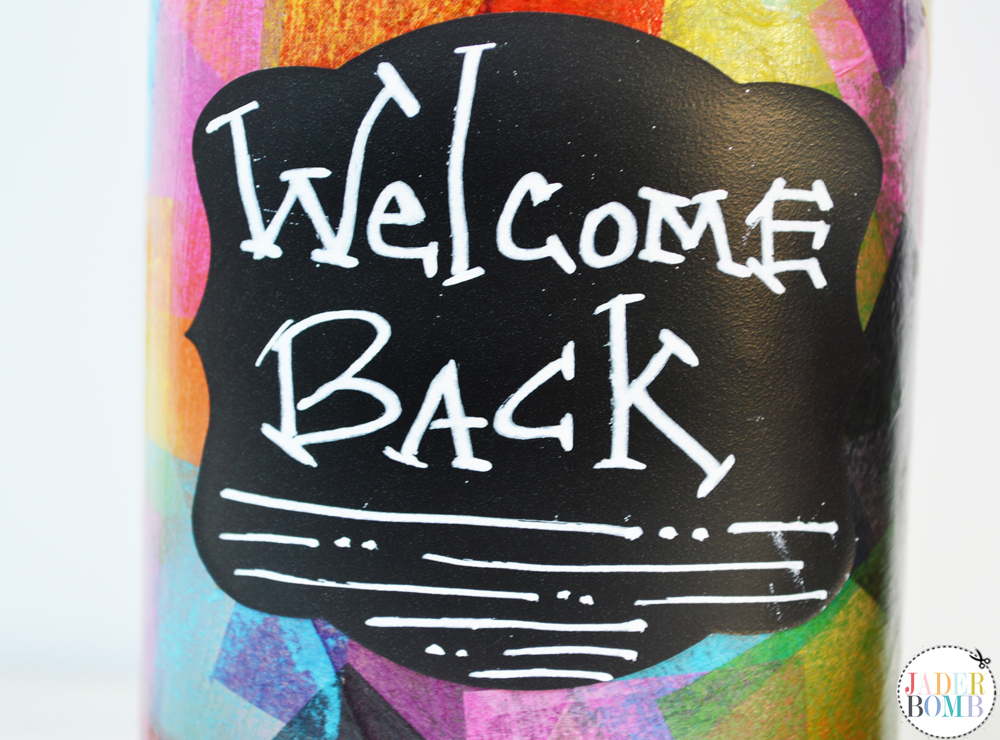
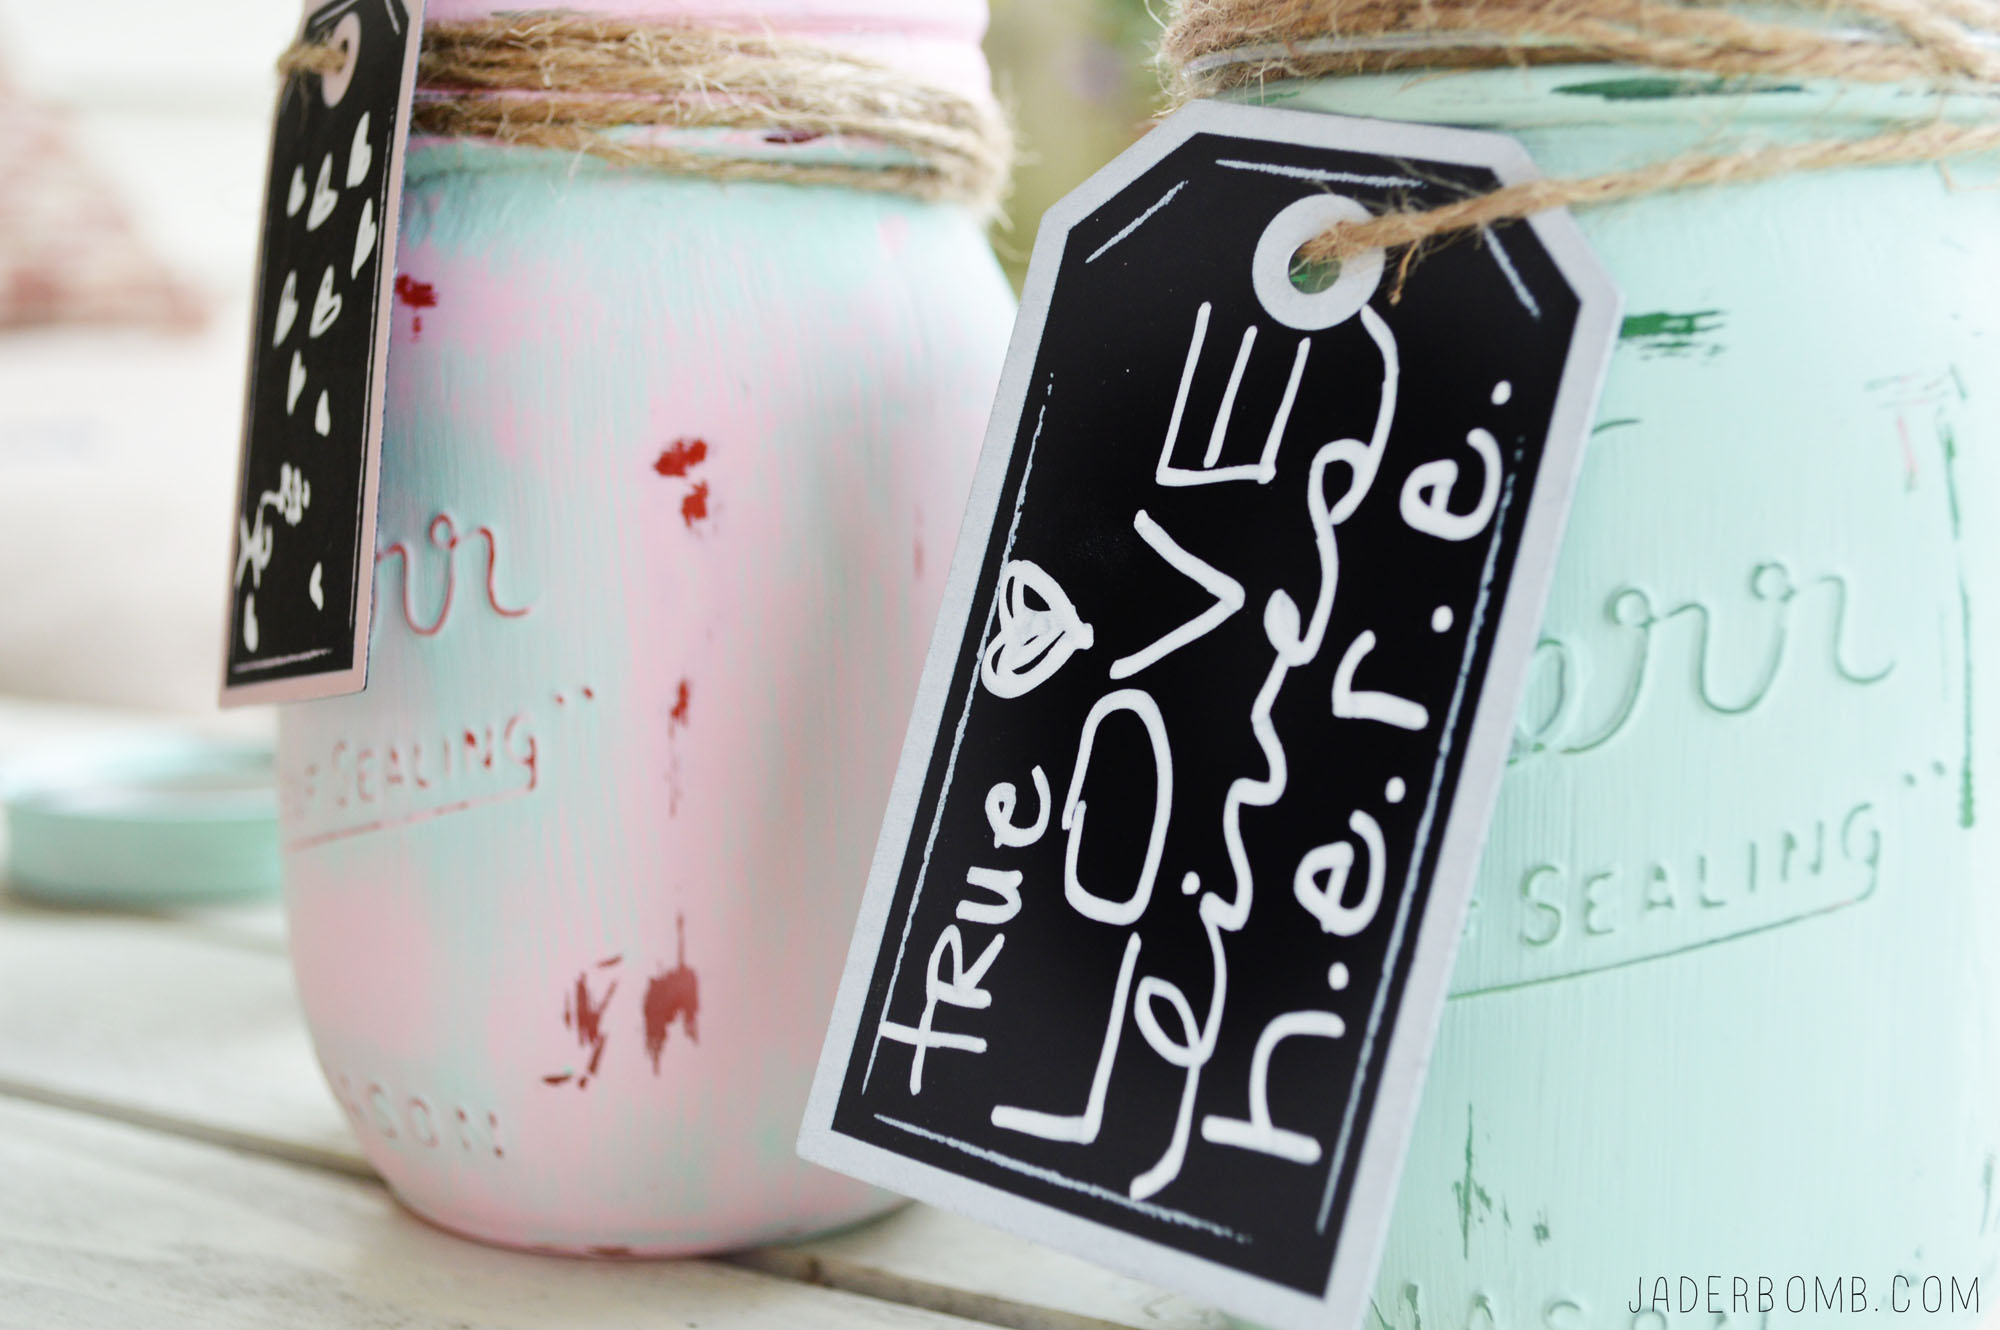
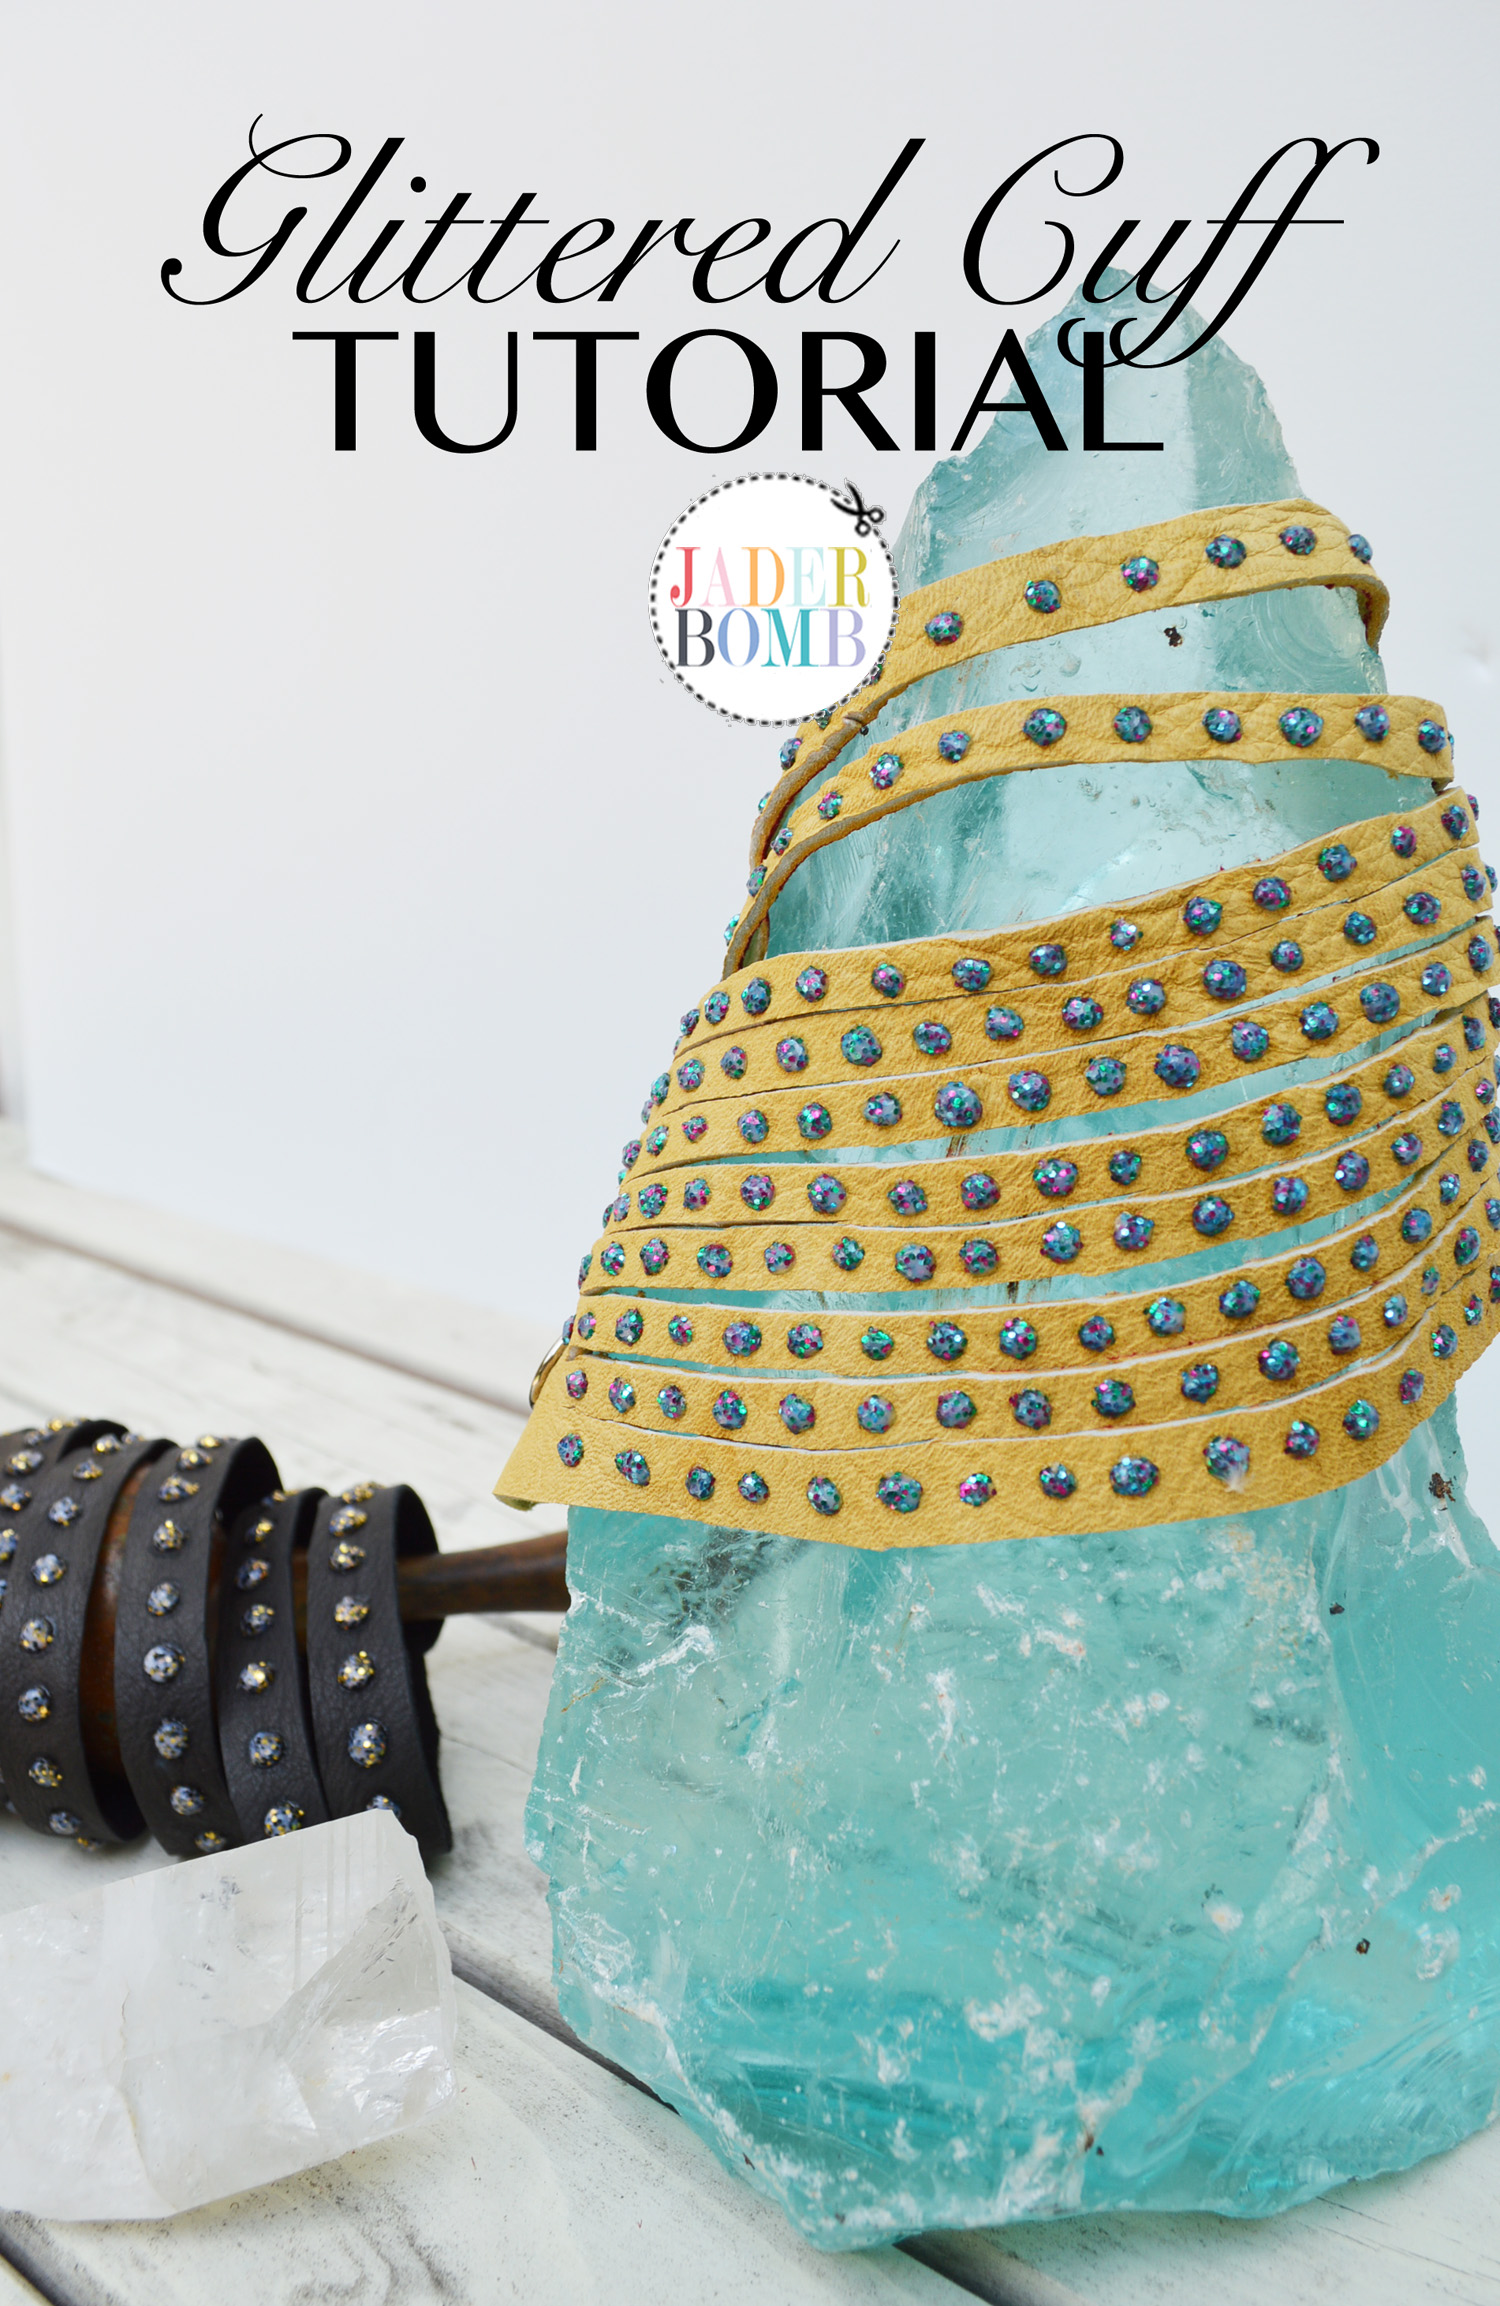
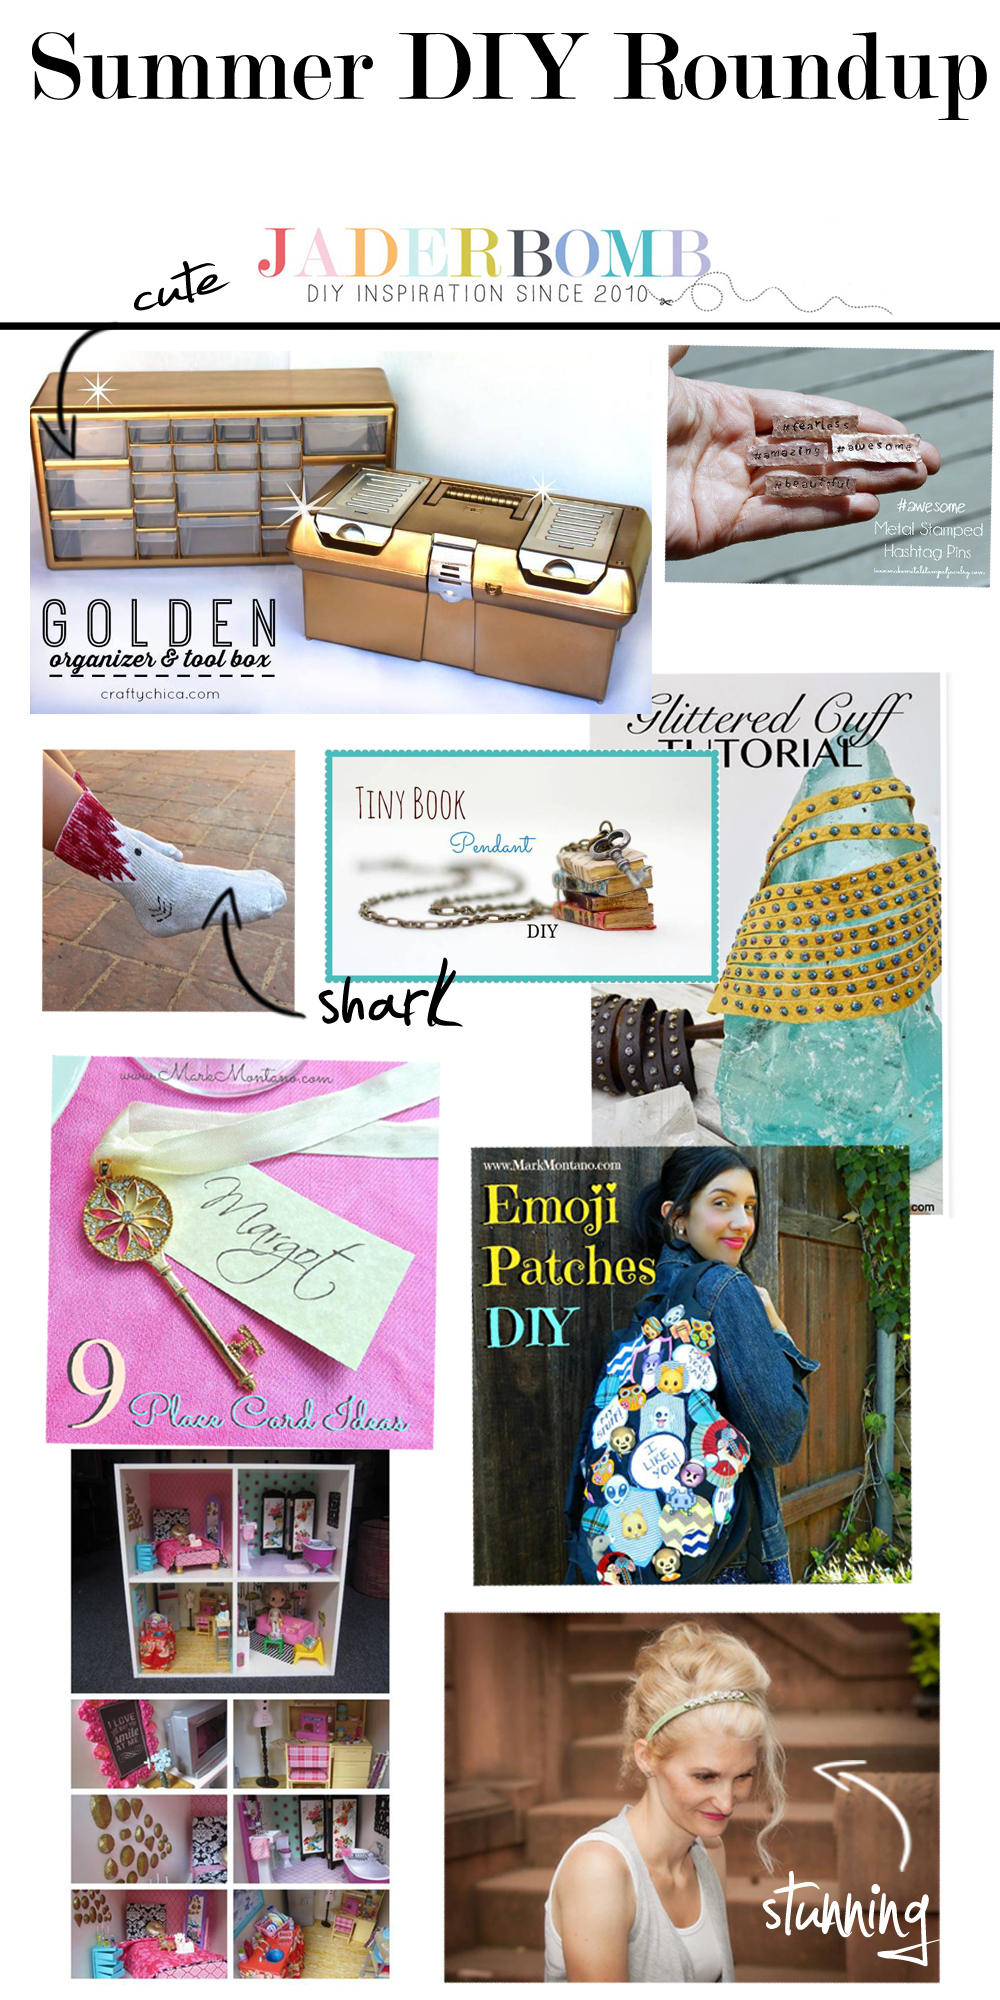
Today I will be showing you how to make Chalkboard Labels ! I love these for the simple fact that they can be used for practically anything and everything. There are a few different ways to create these labels and I obviously opted out for the “lazy” version which means my cardboard labels are already cut out. Chalkboard labels, Prints and Chalkboards in general are popping up all over the place so this is the perfect time to share this with you. Check out these antique chalkboard mason jars I created for Michaels, they are great to store things in If you have a certain paper punch that you love you can use it to make labels also. It would certainly have to be a durable punch to go through cardboard but it’s possible. Let’s get started! You will need: Cardboard Tags | Chalkboard Paint | Chalk Markers | Brush I hope you enjoyed this tutorial! Make sure to come back tomorrow to see what I have up my sleeve. XOXO Don’t forget to connect on social media! Make sure to use use the hashtag #JADERBOMB on Instagram or Twitter or Facebook so I can keep track of all your awesome creations! HAVE A GLITTERY DAY! ♥, Jade P.S. If you LOVE printables then check out my site where you can download hundreds of FREE printables! I am so thrilled to finally show you my Michael’s Arts ‘N Crafts Haul! I had so much fun filming this video minus all of the complications like… ♥ Filming for 30 minutes only to realize my camera DIED! Needless to say I am thrilled to be a Michael’s Maker! All of the items I chose for this Arts ‘N Crafts Haul were purchased at Michael’s. I didn’t get to take any still shots due to the “MANY” complications but I grabbed some from the video! ENJOY I hope you enjoyed this Art N Crafts Haul! MUCH LOVE from my computer to yours! Remember to live your life colorful! Don’t forget to connect on social media! Make sure to use use the hashtag #JADERBOMB on Instagram or Twitter or Facebook so I can keep track of all your awesome creations! HAVE A GLITTERY DAY! ♥, Jade P.S. If you LOVE printables then check out my site where you can download hundreds of FREE printables! This month the theme is “Back to School” and I love this time of the year. It’s always fun to get re-organized. Kids love nothing more than going to school and giving their teachers a gift which is why I wanted to make something that would stand out all year long! Come check out the other Back to School projects that the other Michaels Makers created! YOU WILL NEED: GLASS JARS | MOD PODGE | ADHESIVE RHINESTONES | BRUSH | TISSUE PAPER | CHALKBOARD MARKERS | CHALKBOARD LABELS Don’t forget, Michaels has everything you need for Back to School! Create one of a kind projects for your classroom and get 15% off all your purchases. All of your creative ideas come alive when you walk into Michaels and if you are stuck, pop on over to the Michaels Back to School Pinterest Board! Don’t forget to connect on social media! Make sure to use use the hashtag #JADERBOMB on Instagram or Twitter or Facebook so I can keep track of all your awesome creations! HAVE A GLITTERY DAY! ♥, Jade P.S. If you LOVE printables then check out my sitewhere you can download hundreds of FREE printables! Check out my other Michaels Maker’s projects! Today I am giving you a small glimpse into my latest project that I created for the ILoveToCreateBlog! This DIY Glittered Leather Cuff is a simple and fun craft that anyone can do. I love that you can choose any material to make it, however I prefer leather. Hold up wait a minute, I said “ugh ahhh uhh ahh ahhh”… Remember that song? It’s pretty much stuck in my brain right now and will not leave. I have played a million other songs but this sucker is stuck! I guess I will just keep singing it so it does not drive me insane. Don’t forget to check out my Tea Stained Bleached Blue Jeans! Wanna check out all of my tutorials I have created for ILoveToCreate? Check them out here! Check how Martha Stewarts visit to Louisiana! ALSO! You can still enter the Michael’s sweepstakes to win MOOLAH! If you are looking for some last minute summer crafts check out my roundup I just posted! You will LOVE all of these crafts! Don’t forget to connect on social media! Make sure to use use the hashtag #JADERBOMB on Instagram or Twitteror Facebook so I can keep track of all your awesome creations! HAVE A GLITTERY DAY! ♥, Jade P.S. If you LOVE printables then check out my site where you can download hundreds of FREE printables! Happy #ThursDIY Jaderbugs! I have my craftabulous crew sharing a great “Summer DIY Roundup“! Even though school is pretty much in our grill we can still bust out some great crafts while the little or big ones are in school! Don’t worry if you have a day job I give you permission to bring your craft supplies and do them at your desk! If your boss has a problem tell him to call JADERBOMB… Sounds threatening huh! Don’t forget to share your ideas or crafts photos with us so our clan can see what you are creating! After all it’s all about spreading love here. It’s all about patches this summer! Mark Montano shows us how to make some web savvy DIY emoji patches in his latest YouTube video! It’s always good to show off our patchy personalities everywhere we go! #backtoschool Margot Potter has a hand. Literally. Her hand created the most amazing DIY Metal Stamped Hashtag Pins AND she has a BIG hopping giveaway going on where you can win a set of ImpressArt’s new font Juniper! #giveaway I don’t know about you but Shark week is my favorite holiday. What? It’s not a holiday! That’s ok because Morena Hockley for Dollar Store Crafts created the best DIY Shark Week Shocks to protect my “pete and joe’s” from the all the sharks in my life! #sharkweek Who needs a Caboodle when you can make this glamorous DIY Golden Organizer from the only chica out there, THE Crafty Chica! I think this would be great for traveling. It might make me look “important”… #gold Looking for a way to impress your guests at your next get together? Mark Montano shows us 9 Place Card Ideas that will leave you “card-less”. If you are not hosting a party shoots, print them out and put your name on all fo them! It’s what I would do. #printable Debi Beard is so cute I want to put her in this DIY Tiny Book Pendant that she just created using her magical mind. Seriously. The best part is she was inspired by Anthropologie and it’s not the “ANTHRO” price! #deal Cathy Attix will make you look epic with this DIY Jeweled Headband. Now I don’t know about you but anytime I can make my head look fancier than it already is I know I am an adult but Cathie Filian just made me want to start collecting dolls and make this DIY Book Shelf Dollhouse. RIGHT! I think this would be cute to put all of my rocks in also, or your favorite collectibles. SO CUTE! Come check out my DIY Leather Cuff that I just created for ILoveToCreate! Why buy when you can DIY, plus you won’t believe what product I used to embellish it! Don’t forget to connect on social media! Make sure to use use the hashtag #JADERBOMB on Instagram or Twitter\or Facebook\ so I can keep track of all your awesome creations! HAVE A GLITTERY DAY! ♥, Jade P.S. If you LOVE printables then check out my site where you can download hundreds of FREE printables!

 I am absolutely in love with this chalk paint from FolkArt. It’s convenient and very compact. It also comes in multiple colors!
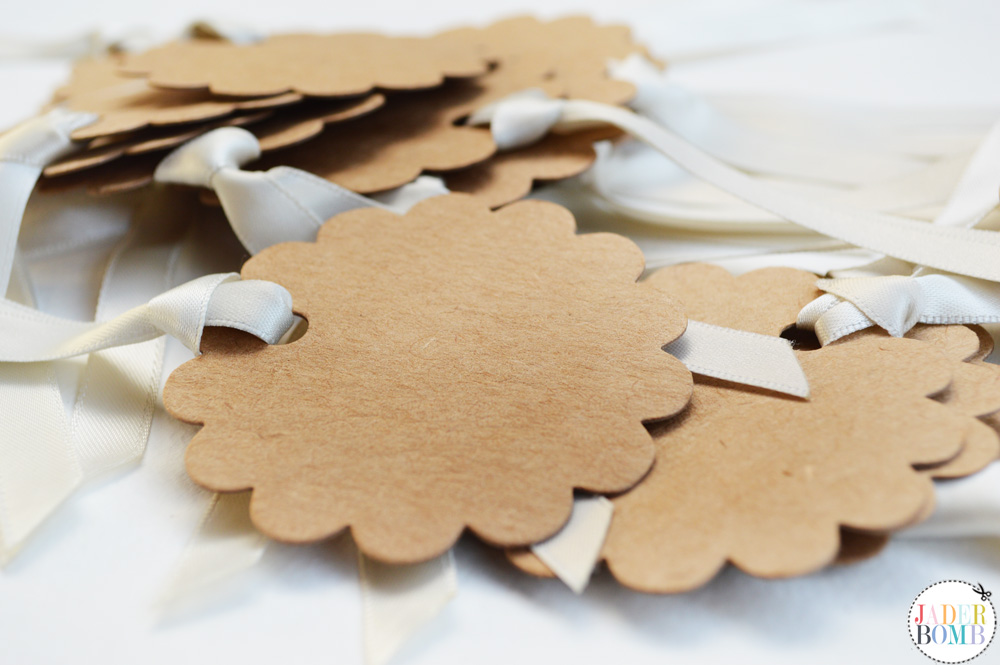
 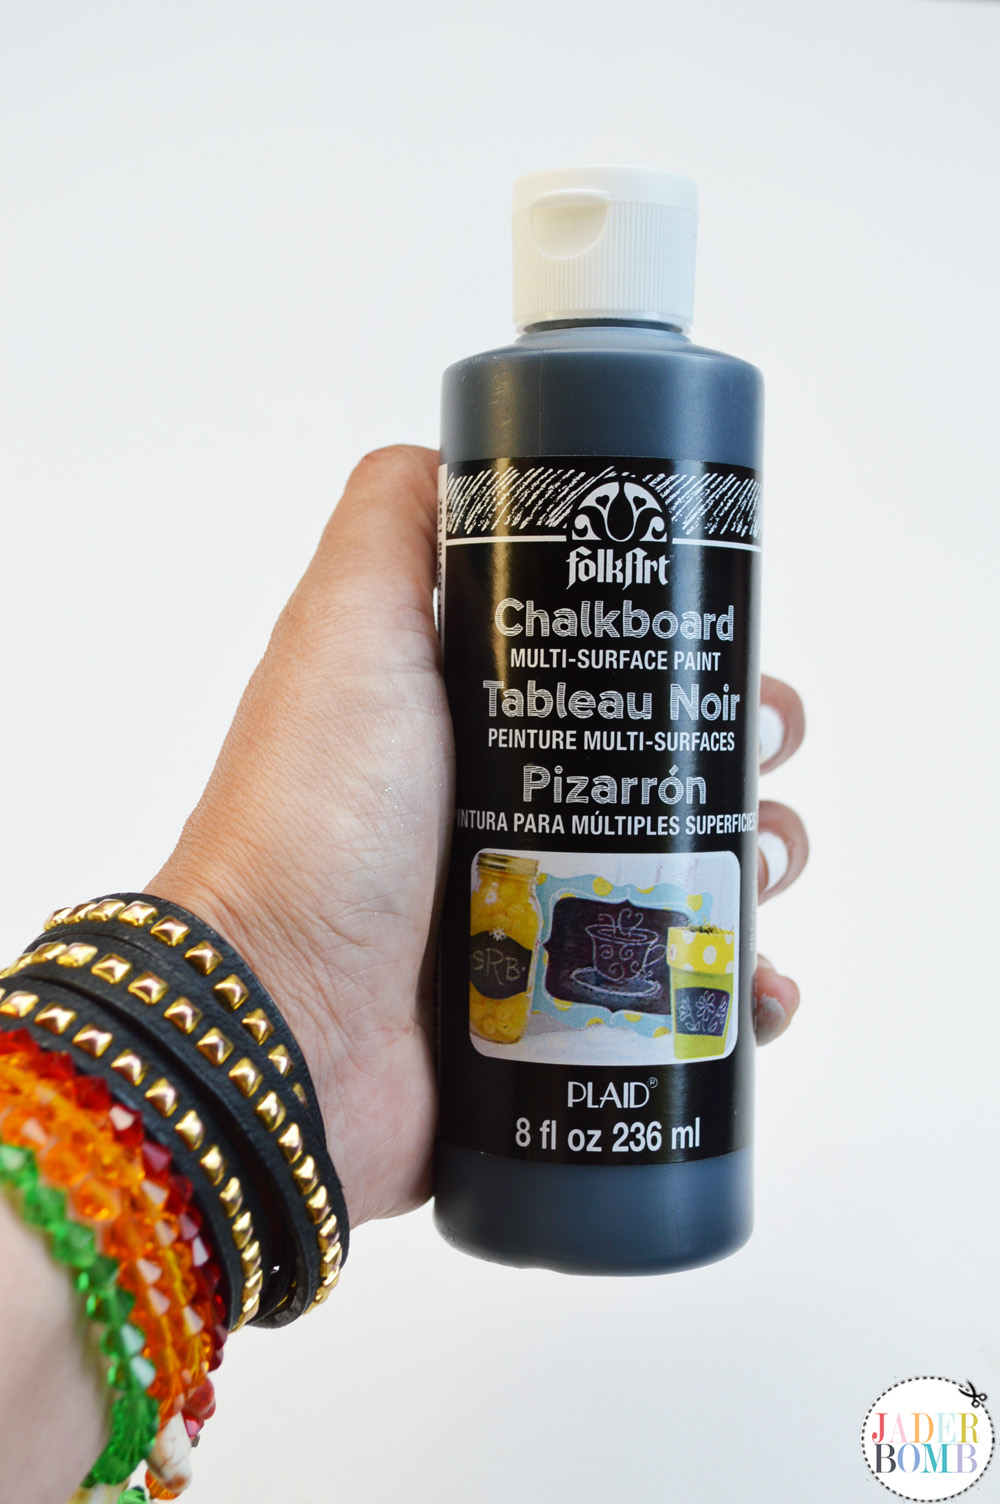 These particular tags came with ribbon on them. Make sure to remove the ribbon before you start painting them.
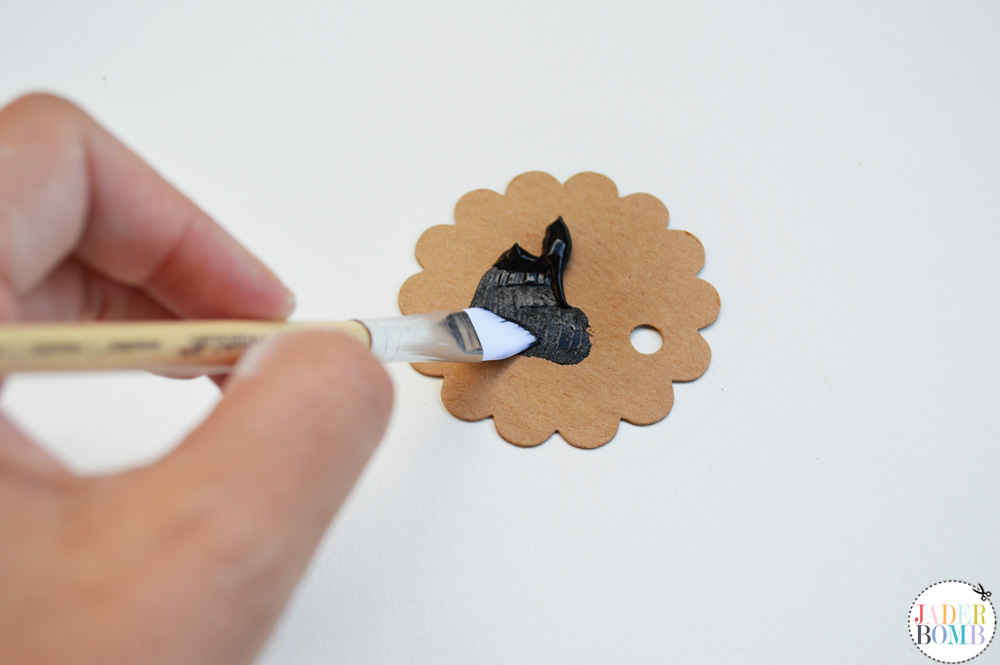 Let one side dry before you turn them over to paint the other side.
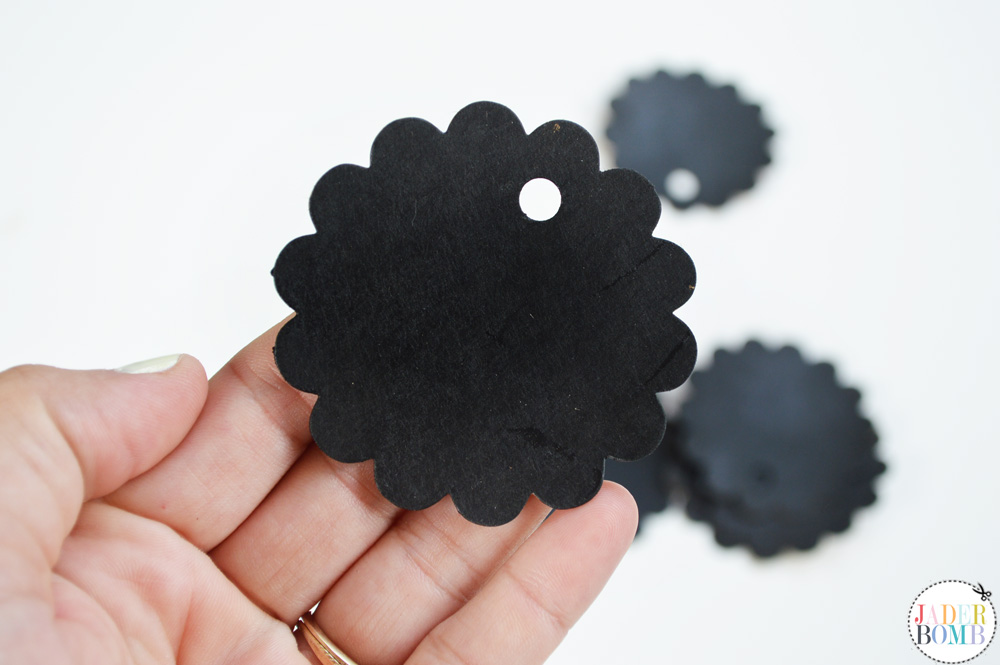 If you love chalk then you will love these markers! It works just like a paint pen and the best part is when it dries it looks just like chalk! You can also wipe the chalk away with a wet washcloth and start over again.
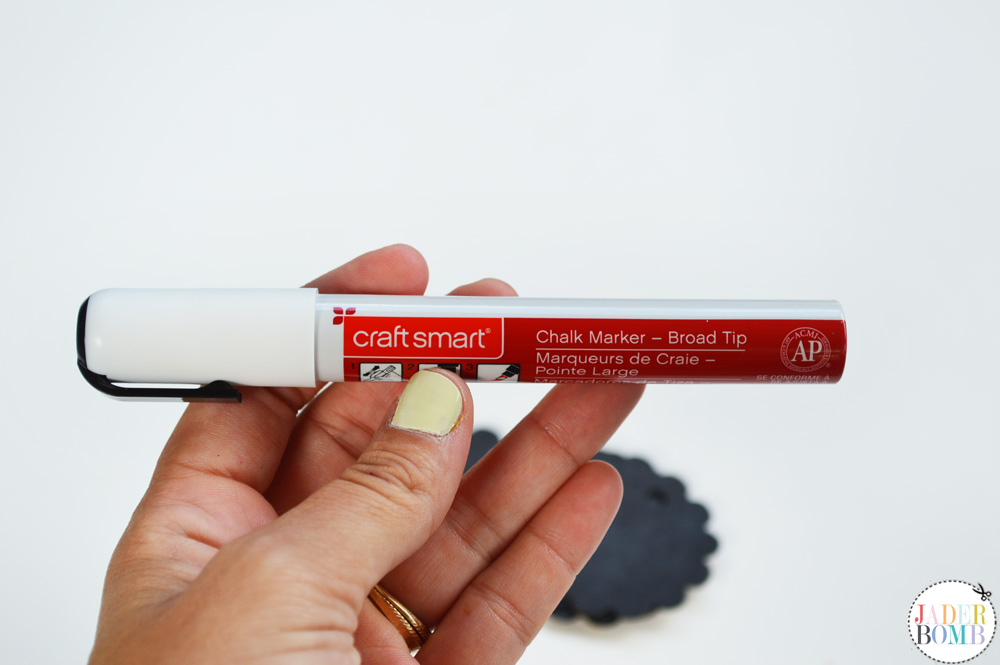 Once they are dry, have fun drawing whatever you want on them.
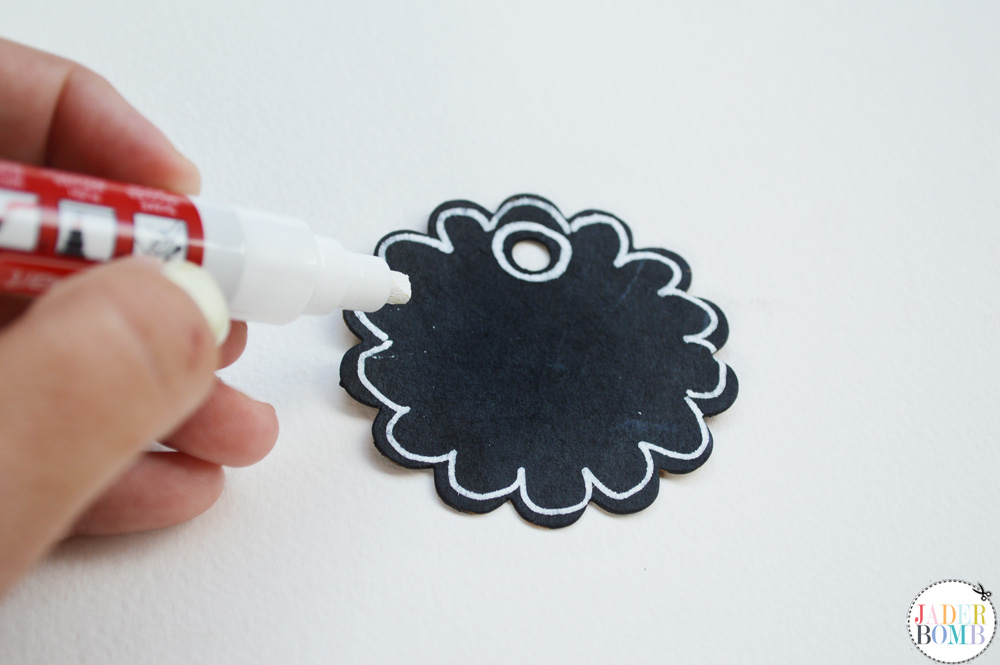 I thought it would be cute to re-apply the ribbon and attach them to coffee bottles. You can buy a 6 pack and give them to someone as a gift with personalized labels.

![]()
♥ Filming again for quite possibly longer than 30 minutes not realizing my memory card ran out 15 minutes into it.
♥ Sweating profusely due to 100 lights blasting on me.
♥ Having to “re-package” all of my items every time I started over.
♥ Having my son film and STAY behind the camera to let me know if it dies, memory card runs out or anything else! Finishing the WHOLE thing then realizing he didn’t “focus” in on me at all!
♥ STARTING OVER AGAIN. Shall I go on?
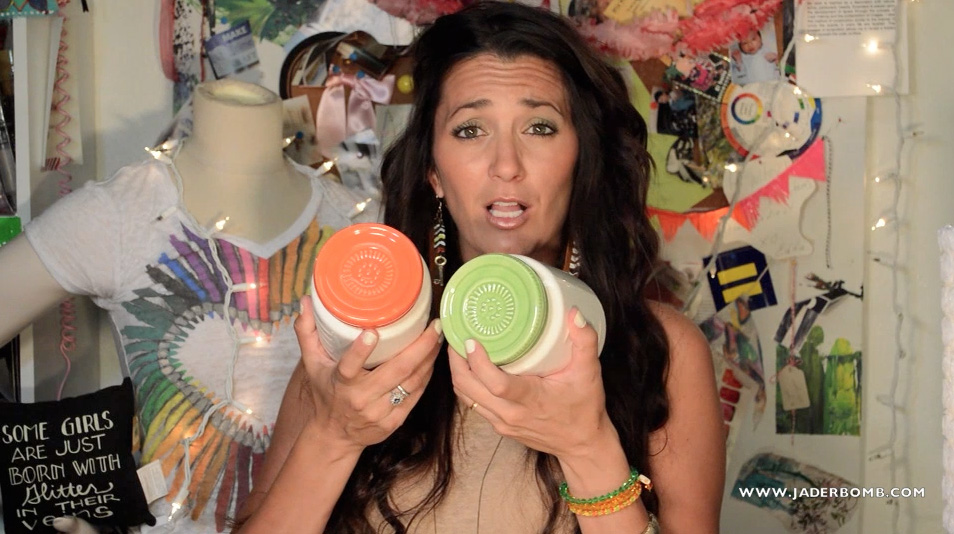 These ceramic jars have lids on them and a painted chalkboard label on the front. You can put clothespins, pens, rulers or trinkets in them.
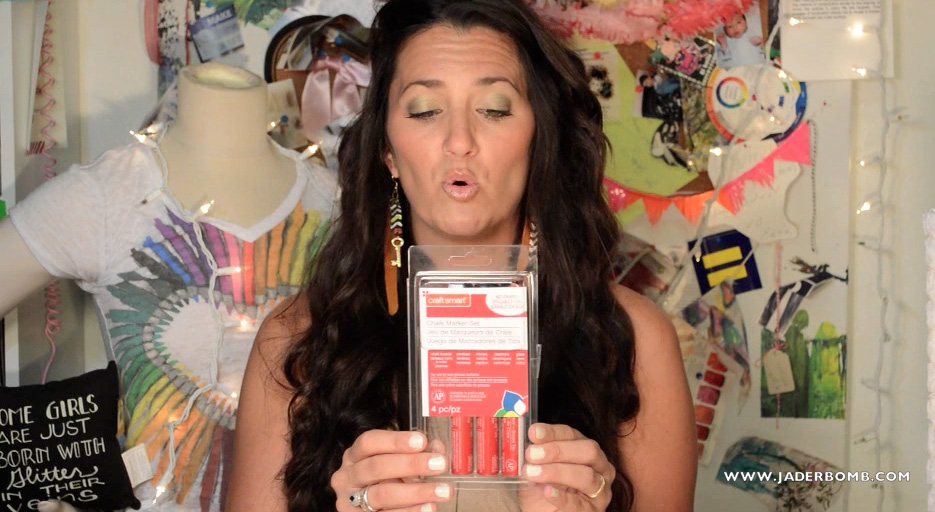 If you like chalk paint or writing on chalk boards then you have to get these markers. I have always wanted some but for some reason I never got them. I am all like “Girl why did you wait on this”….
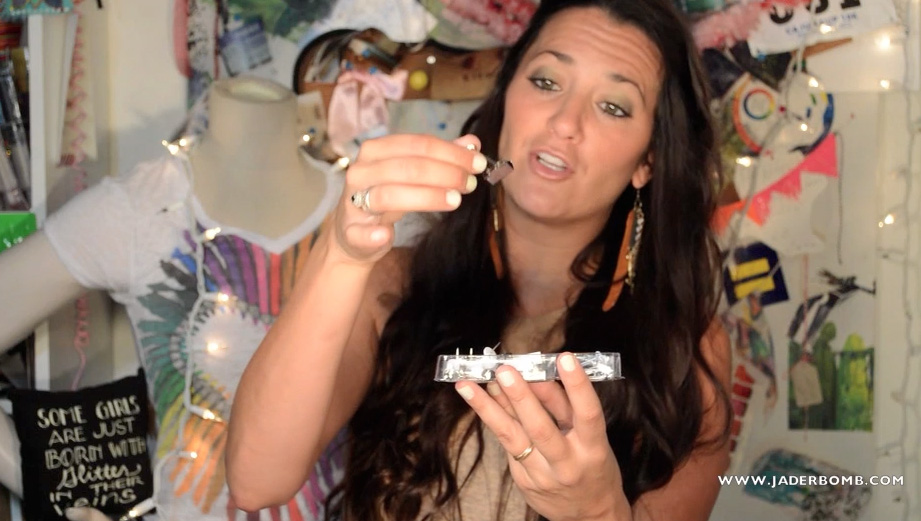
  If you want to go back to your roots grab some plain chalk. Michaels has many color options to choose from. I purchases every color, imagine that!
 How cool is this adhesive chalkboard calendar! You can move this calendar around multiple times and it will continue to stick. Pretty amazing!
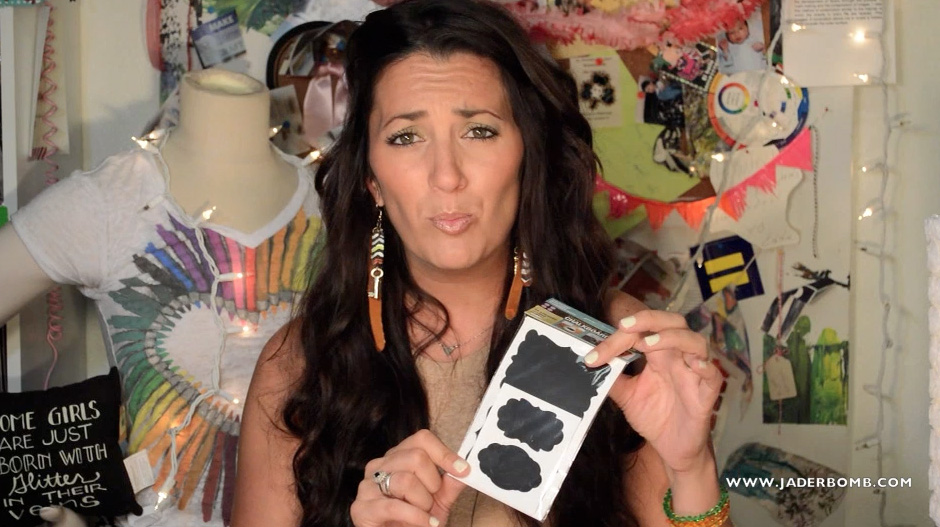 Everyone needs labels so why not get chalkboard labels. You can place them anywhere and write your own special message. I love when labels are black because they seem more elegant so this is a win win!
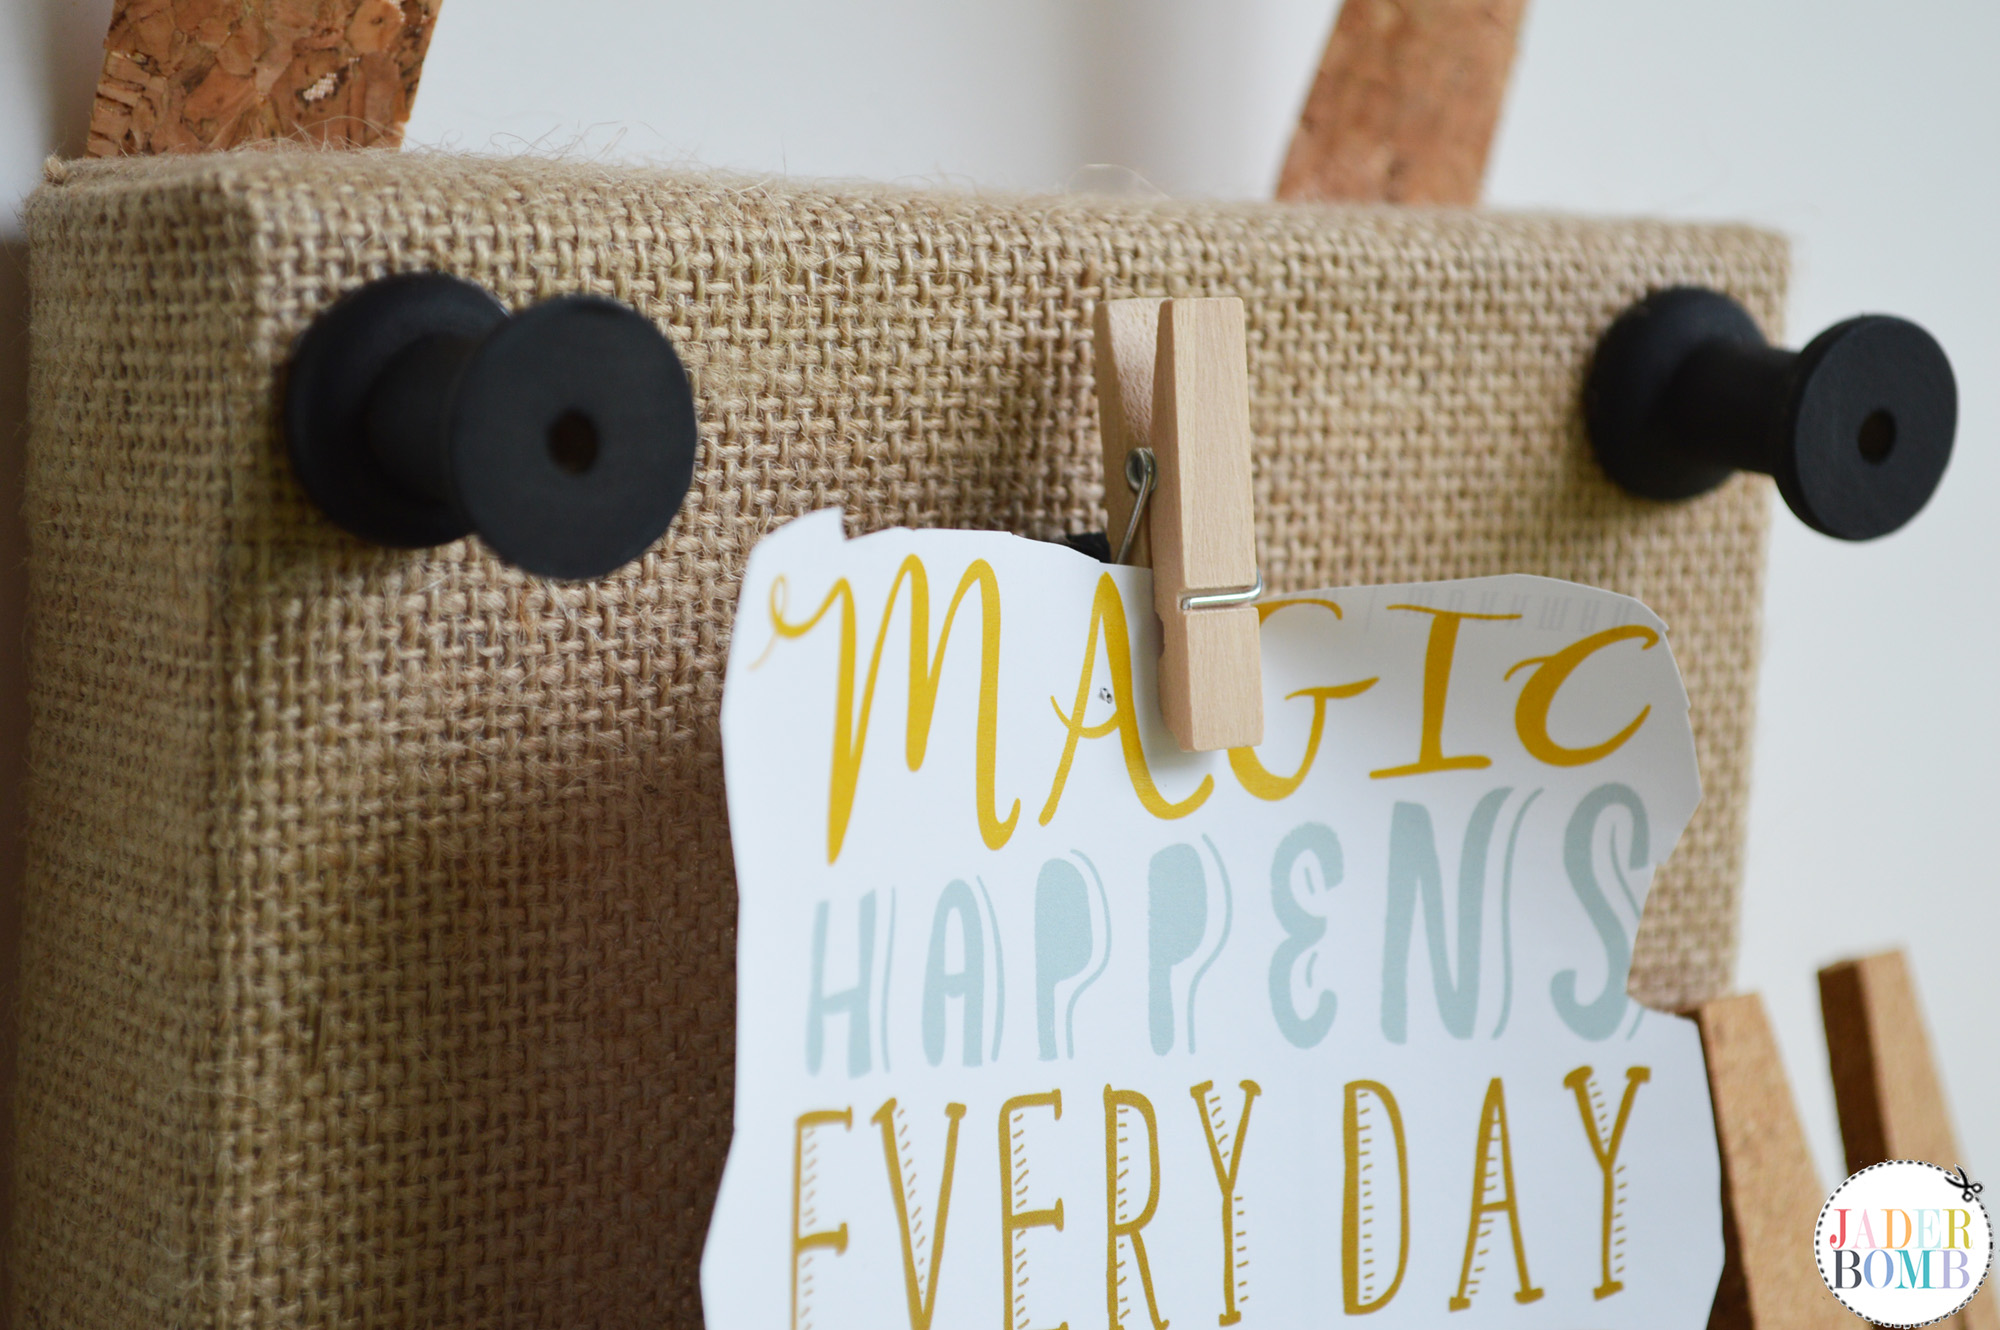
  I fell in love with this black canvas which you can get in the canvas section at Michaels. This is great as an inspiration board or a bulletin board to put all of your favorite pictures and memorabilia on.
  You can never have enough colored pens! These are by Recollections and come with 20 different colors.
  I have never been a fan of gel pens until I used gel pens, haha! These are also by Recollections and come with 20 different colors. I stay organized by using certain colors for different events, birthdays, blog deadlines, and my son’s practices and games. If you have never color coordinated your agenda book then now is the time.
 I love this set of push pins, clothespins and binder clips. Michael’s has packs with multiple colors so you can match your room decor.
 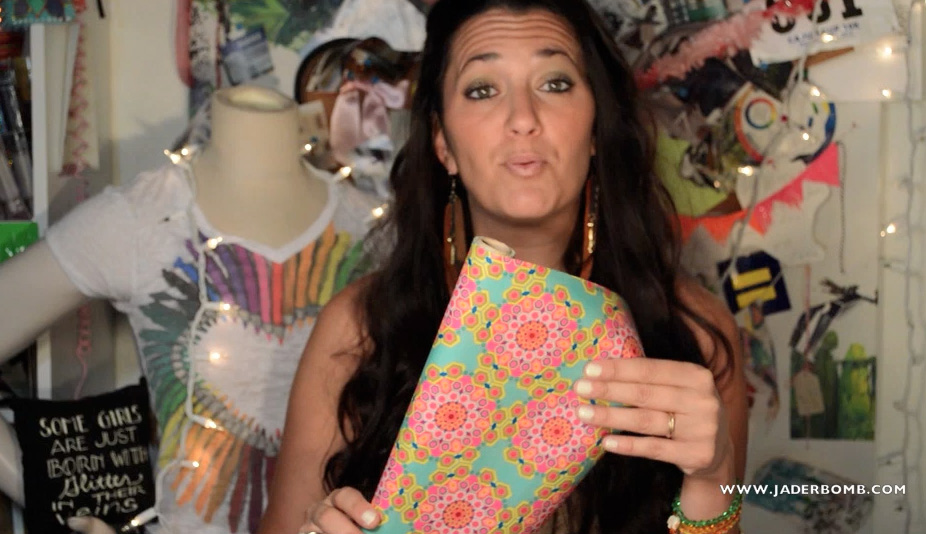 This wrapping paper is not only FABULOUS but can be used to line the inside of a locker, wrap books or to wrap a gift with!
 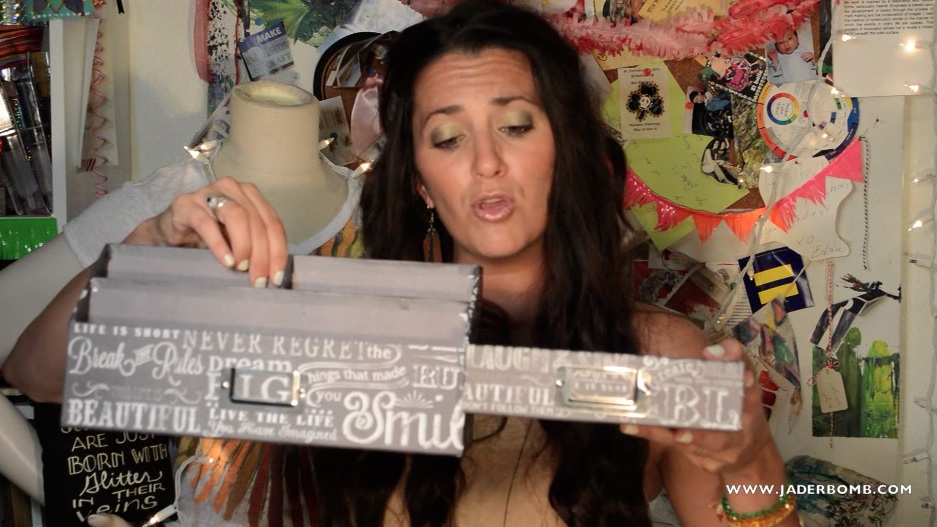 Stay organized on your desk with these paper trays. I love that they look like real chalkboard art. You can also slip a piece of paper in the front of them to label them.
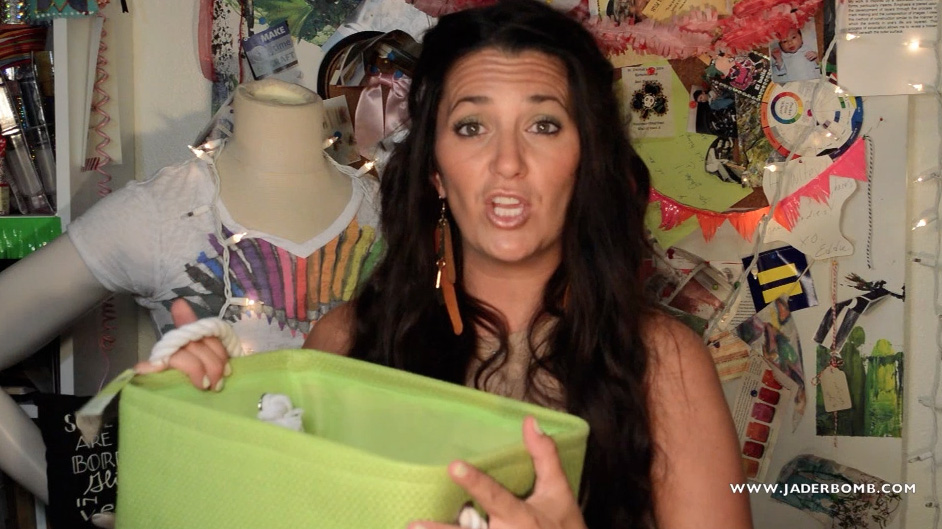 Grab some colorful bins to prevent things from getting scattered all over. These are great for socks, bows, undies, craft supplies or things to keep out of your way.
 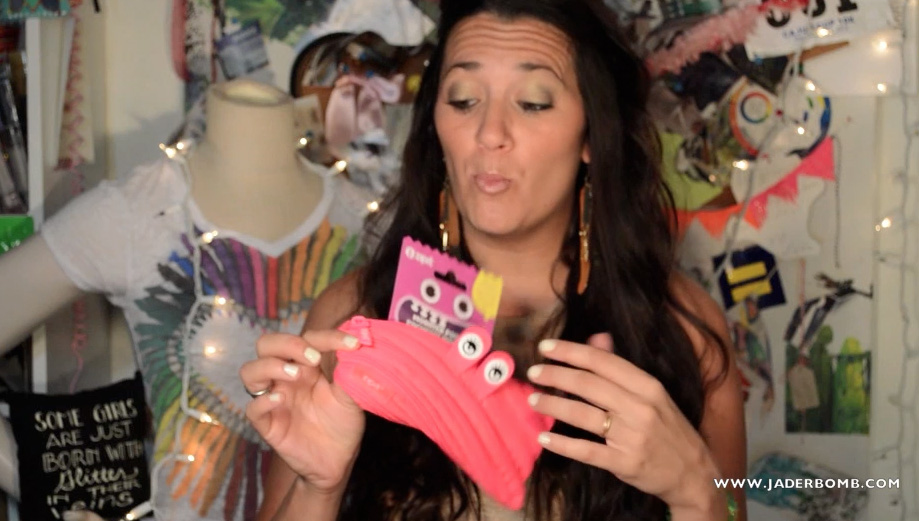 Who wants a boring pencil bag when you can get this rad monster bag. It’s so cute! When you unzip it the teeth show! This is worth getting just incase you are having a bad day, it will surely make you laugh.
 Plastic trays are great to throw things in that you use on a daily basis. You can put your keys, id’s or money in them. When you wake up everything is there and you will never forget what’s in it.
XOXO, Jade![]()
 Howdy Hoo Jaderbugs! I am super stoked to bring to you another fun Michaels Makers project today – this easy DIY Back to School Teacher Gift! This is officially my third project but check out my other two. I am still in love with these Antique Chalk Mason Jars and this shabby chic Burlap Canvas Display. I also created a fun back to school bag for Michaels that I think every kid should wear!
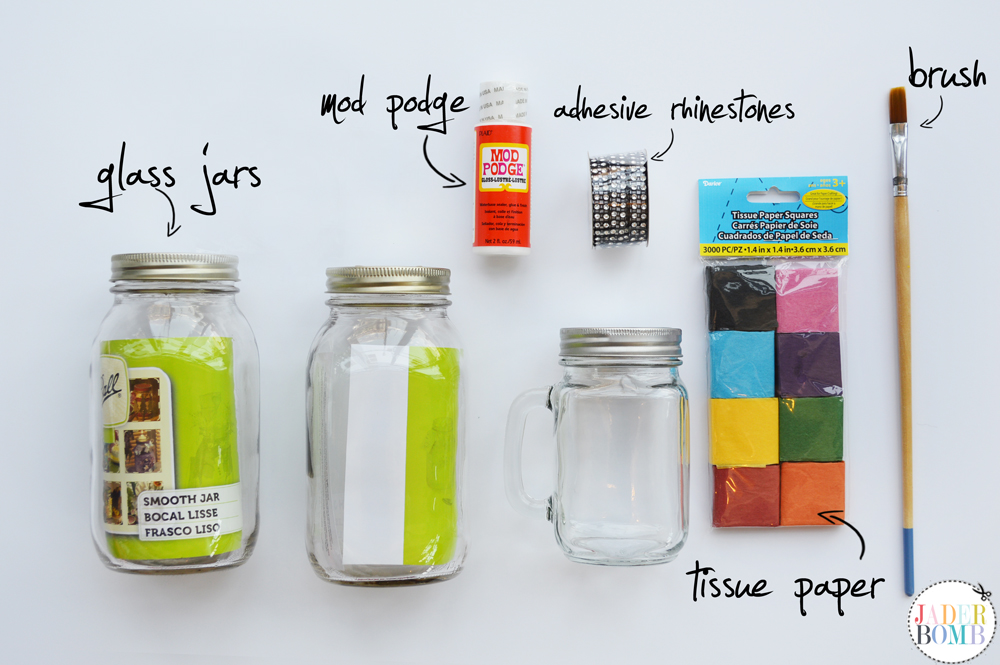
 Step 1: Apply Mod Podge directly onto glass.
 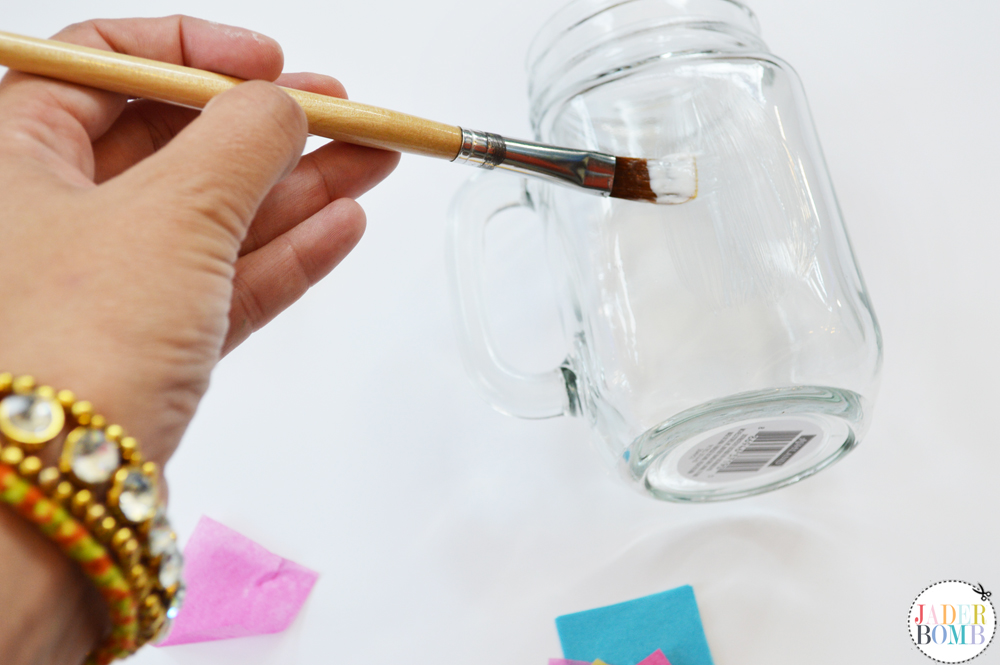 Step 2: Place a piece of tissue paper on top of the Mod Podge then add another layer directly on top of tissue paper.
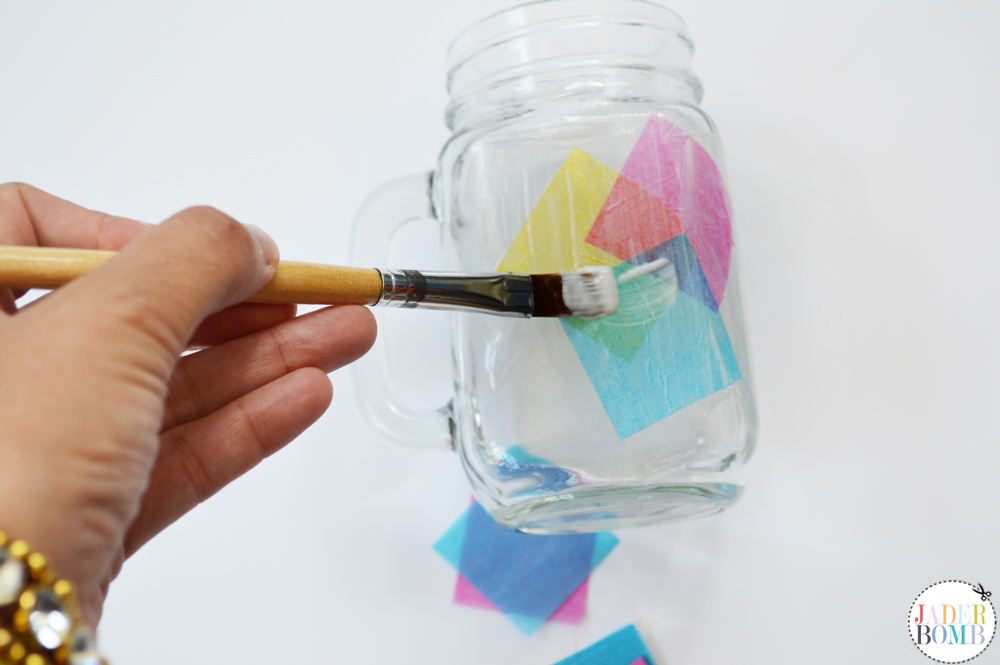
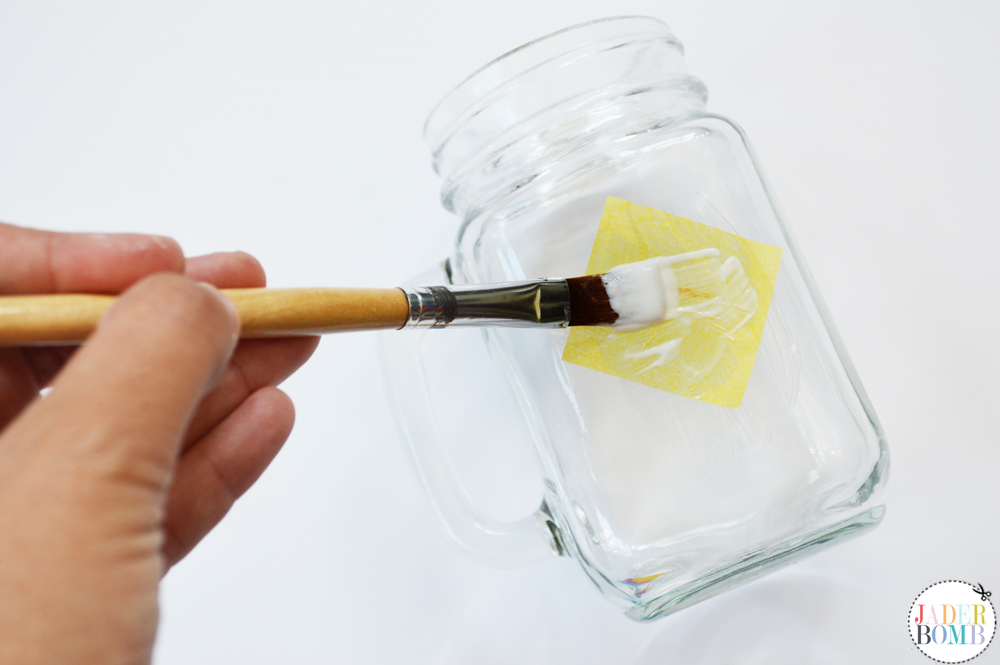 Step 3: Start overlapping other colors on top of each other repeating the same process with Mod Podge. If you notice layering certain colors will create a brand new color. This is my favorite part!
 Step 4: Grab your adhesive rhinestones and peel off the back layer of paper.
 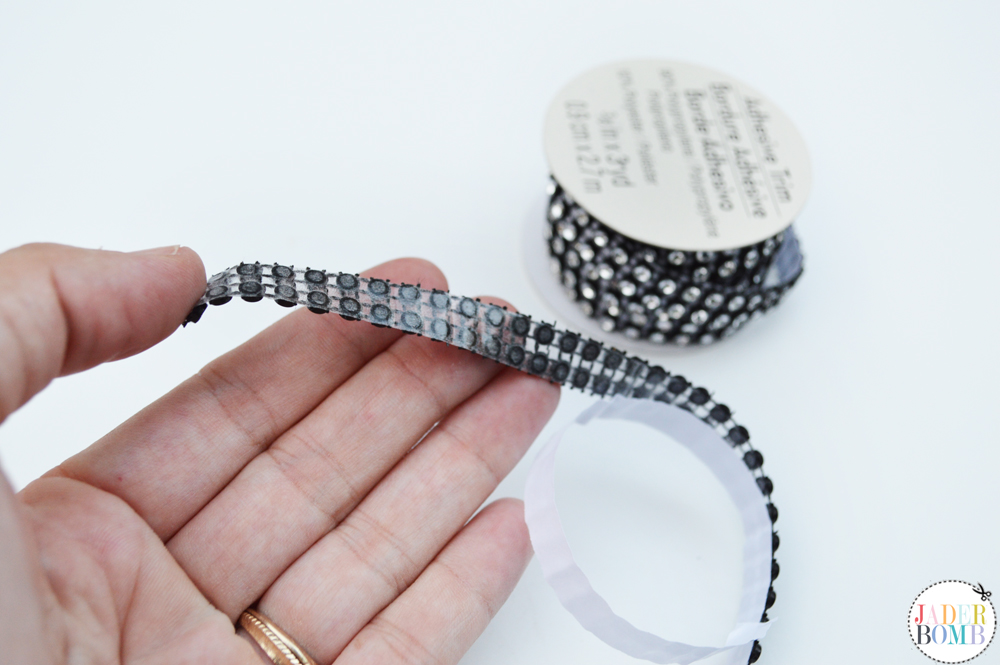 Step 5: Wrap your rhinestones around the top of glass jar.
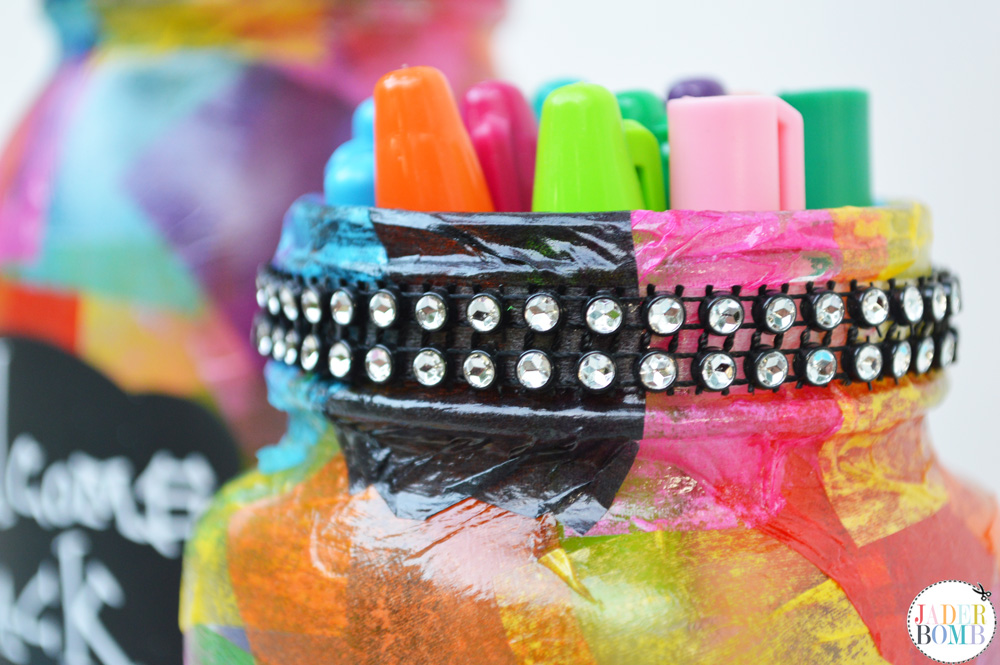 Step 6: Grab a adhesive chalkboard label and place it on your jar.
 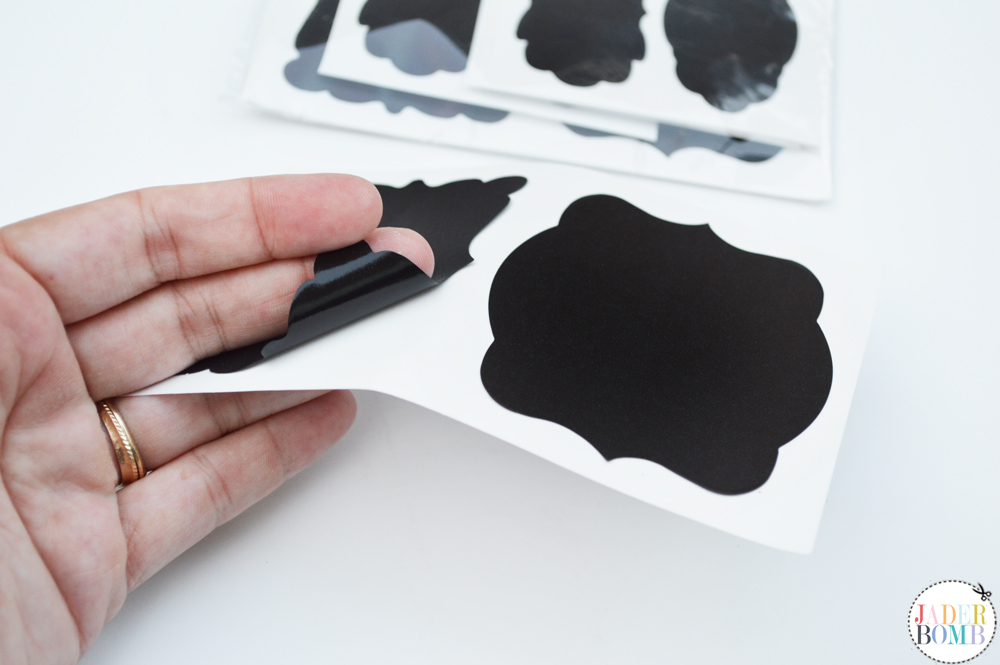 Step 7: ENJOY!
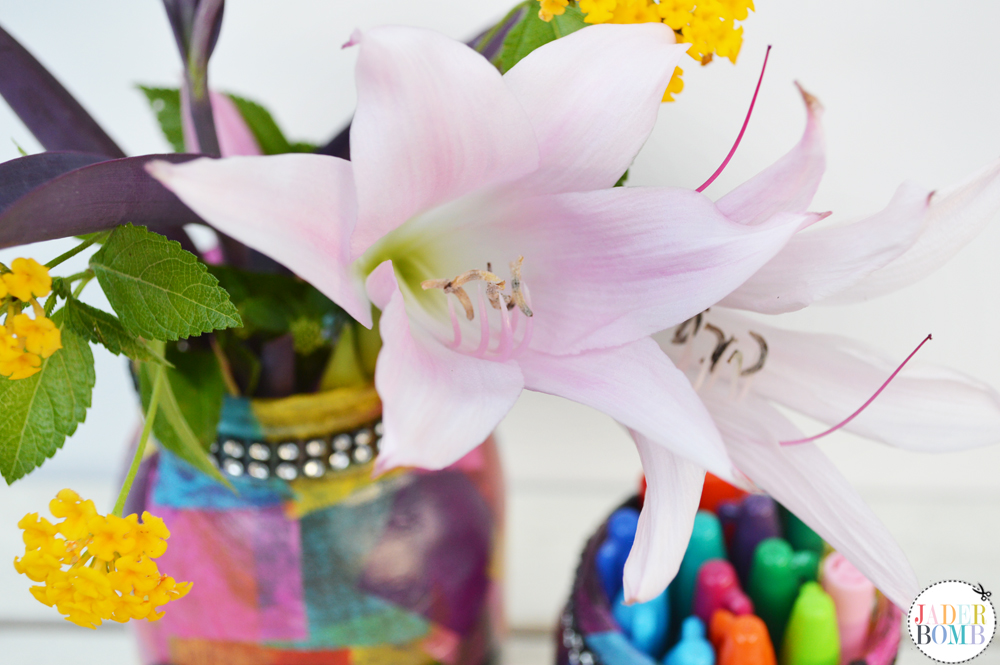
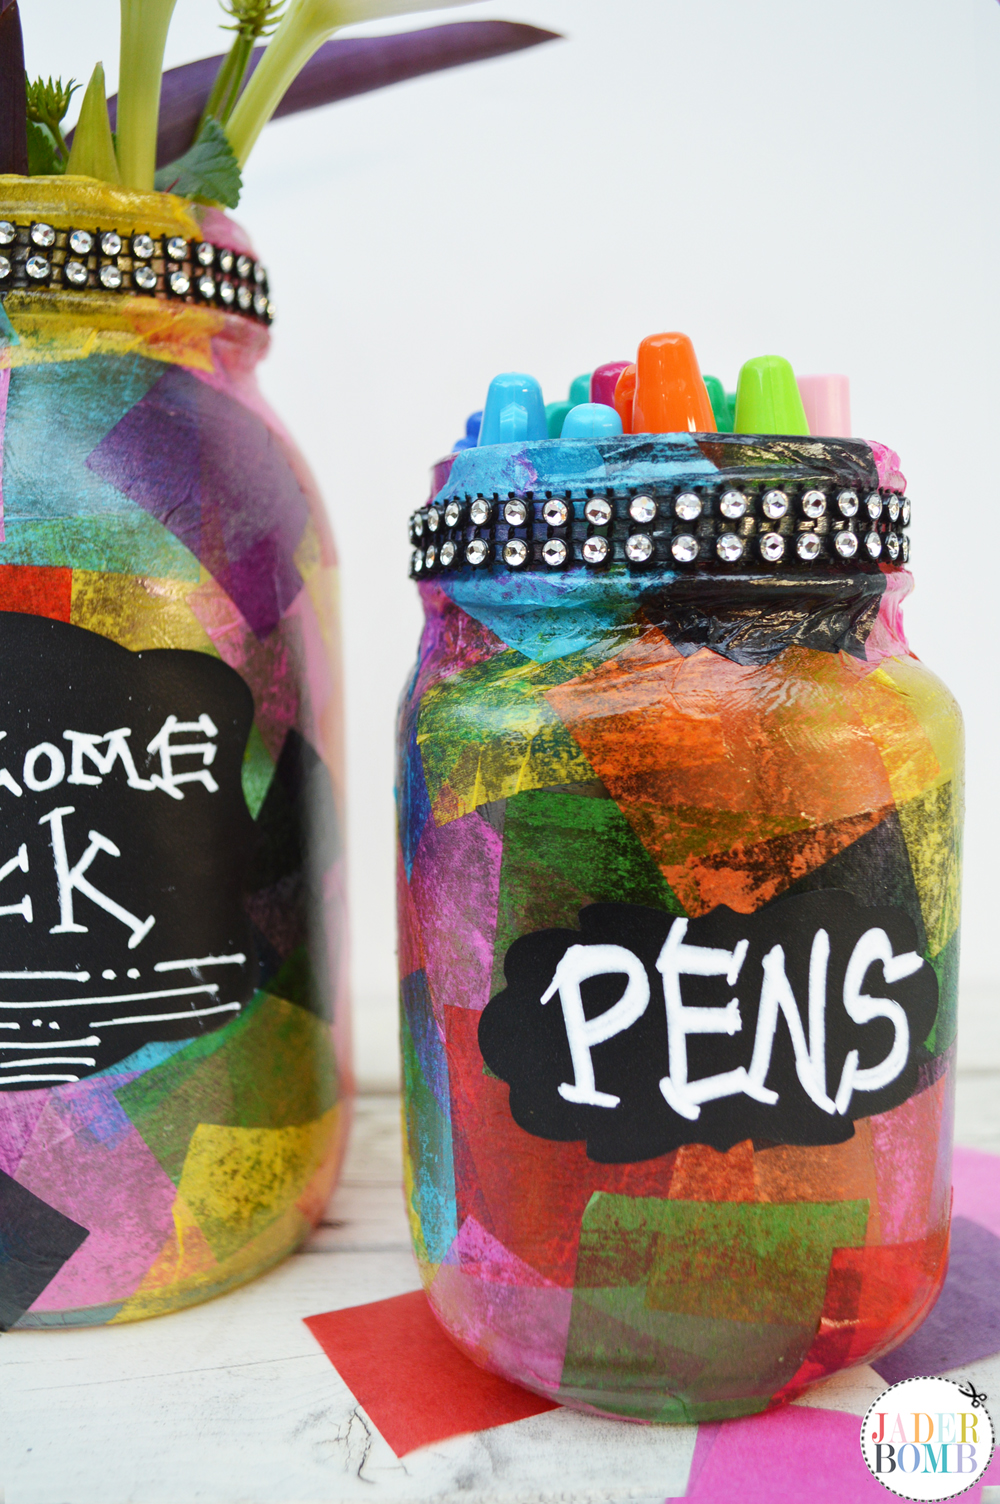
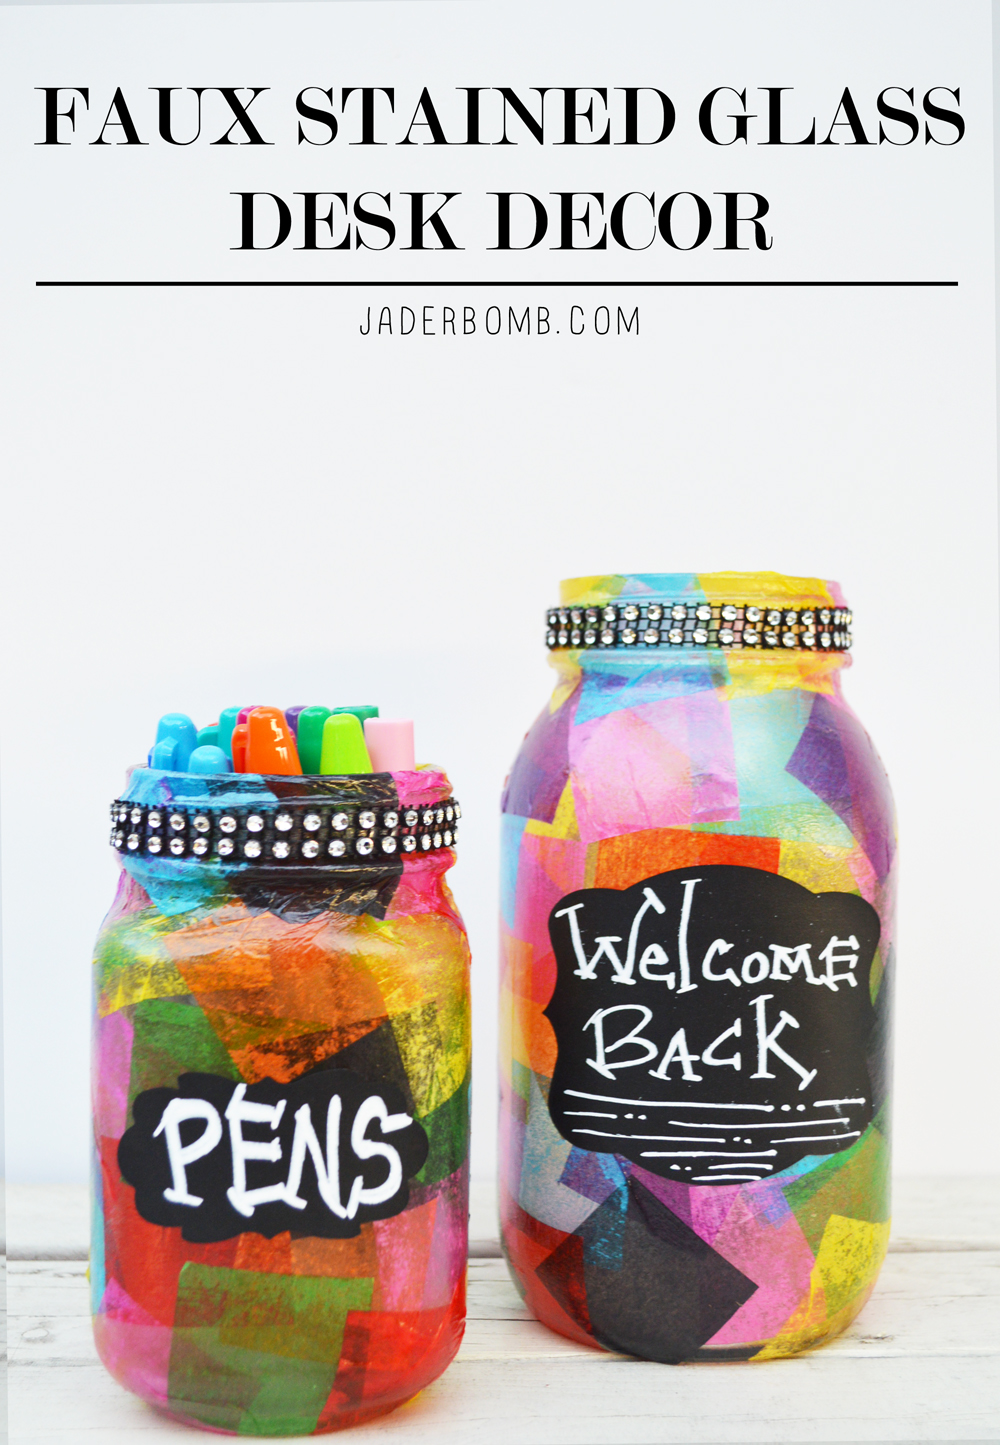
This DIY Back to School Teacher Gift is the perfect gift for any teacher. Not only will they feel special but it will add joy to their face every time they look at them. You can put flowers, markers, pencils or rulers in them. They are so practical for any teacher.
![]()

![]()
(not) I am game! Hey, Mardi Gras is coming up…![]()