


Dear Universe, thank you for sending me a huge box of Martha Stewart Crafts Glass Paint by Plaid. When I say there is a party going on in my head, believe that! I am always amazed by Martha Stewart’s products. They are consistent and dependable. Martha Stewart has this new line of glass paint out and I was so honored to review the glass paint and glass accessories. I will tell you the one thing I could not wait to get my hands on the adhesive silk screens. Yep, you heard that right. Adhesive.
In today’s tutorial I will show you how to turn a boring plate into a phenomenal work of art, and all by using the Martha Stewart Crafts Glass Paint.

These are all of the new glass tools. They work great with her Crafts Glass Paint.

Check out these whimsical colors! The groups matter in this case. Some of the frost colors look very pigmented but in actuality they are very translucent. I don’t mind that because when I think of glass paint I think of something that light can actually pass through.

These are some of the new stencils for the glass line. The great thing about all of the stencils are the adhesive backs. You can adhere them to anything, which in return will give you a perfect stencil. No bleeding with these!
You can find the Martha Stewart Glass Paint from Plaid at all at Michaels stores.
 I made this “sample” so I could see what color I want to use. One reason I recommend doing this is because some of the colors change once they get on the glass. I used some plastic knives, painted each color on the tip, wrote the name on the other end, drilled a hole in them and voila! I can always go back to this for reference. I know, it’s extra work but totally worth it in the end. (I actually think this is so pretty).
Ingredients:
Martha Stewart Glass Paint
Glass Handled Squeegee
Glass Squeegee Set
Glass Tools & Accessories
Glass Silkscreen – Doily Lace
Glass Plate
Tea lights glass holders
Scissors
Alcohol
Cotton Balls
Paper towels
*Bright and Happy Thoughts
[this is the most important ingredient]

First thing you will do is clean your surface with soap and water. When it’s dry take off any residue by rubbing alcohol over the entire surface.

When you open your pack of silk screen stencils you will notice they are on one sheet. Get your scissors and cut along all of the lines. Your silk screens are separated and ready to use.

When your surface is ready you will gently peel the stencil off of the paper. Remember you have natural oils on your hands so try not to touch the adhesive backing too much. Place your stencil where you want it and lightly press the stencil down with your hand. I used a paper towel to rub it down onto my plate. Double check for any bubbles or lumps before you start applying the paint.

You do not need a ton of paint to do a silk screen. Put a line of paint at the top of your stencil and get your squeegee ready. If you wanted you could also use the dauber instead of the squeegee. I tried both of them and was pleased with how smooth the paint looked when I used the squeegee.
P.S. If you mess up and you need to start over, put some alcohol on a cotton swab and rub your paint off of the surface. This can only happen when your paint is wet. If you notice a mistake when it’s dry, use your scraper for that. That baby works wonders.

Slowly start pulling the paint down over the stencil. Try to let the squeegee do all of the work, be gentle and you will get consistent results.
Make sure to take your stencil off while the paint is wet. It’s very important after you put a coat of paint to take the stencil off immediately and put it in water. If you let it dry on your surface then pull it off, it will more than likely pull up some of your paint. You do not want the paint to dry on the silk screen.
After you clean your silk screen let it dry and you can reuse it again. How awesome is this!
[Are you getting excited?}

This is what it will look like when it’s done. Make sure to let the paint dry before you do your next layer of paint. It’s not mandatory but you will see better results if you do this.

One thing that I am loving is the tip on the bottles. The tapered tip makes it really easy to free hand pretty much anything. I think it adds that whimsical pop to your project.
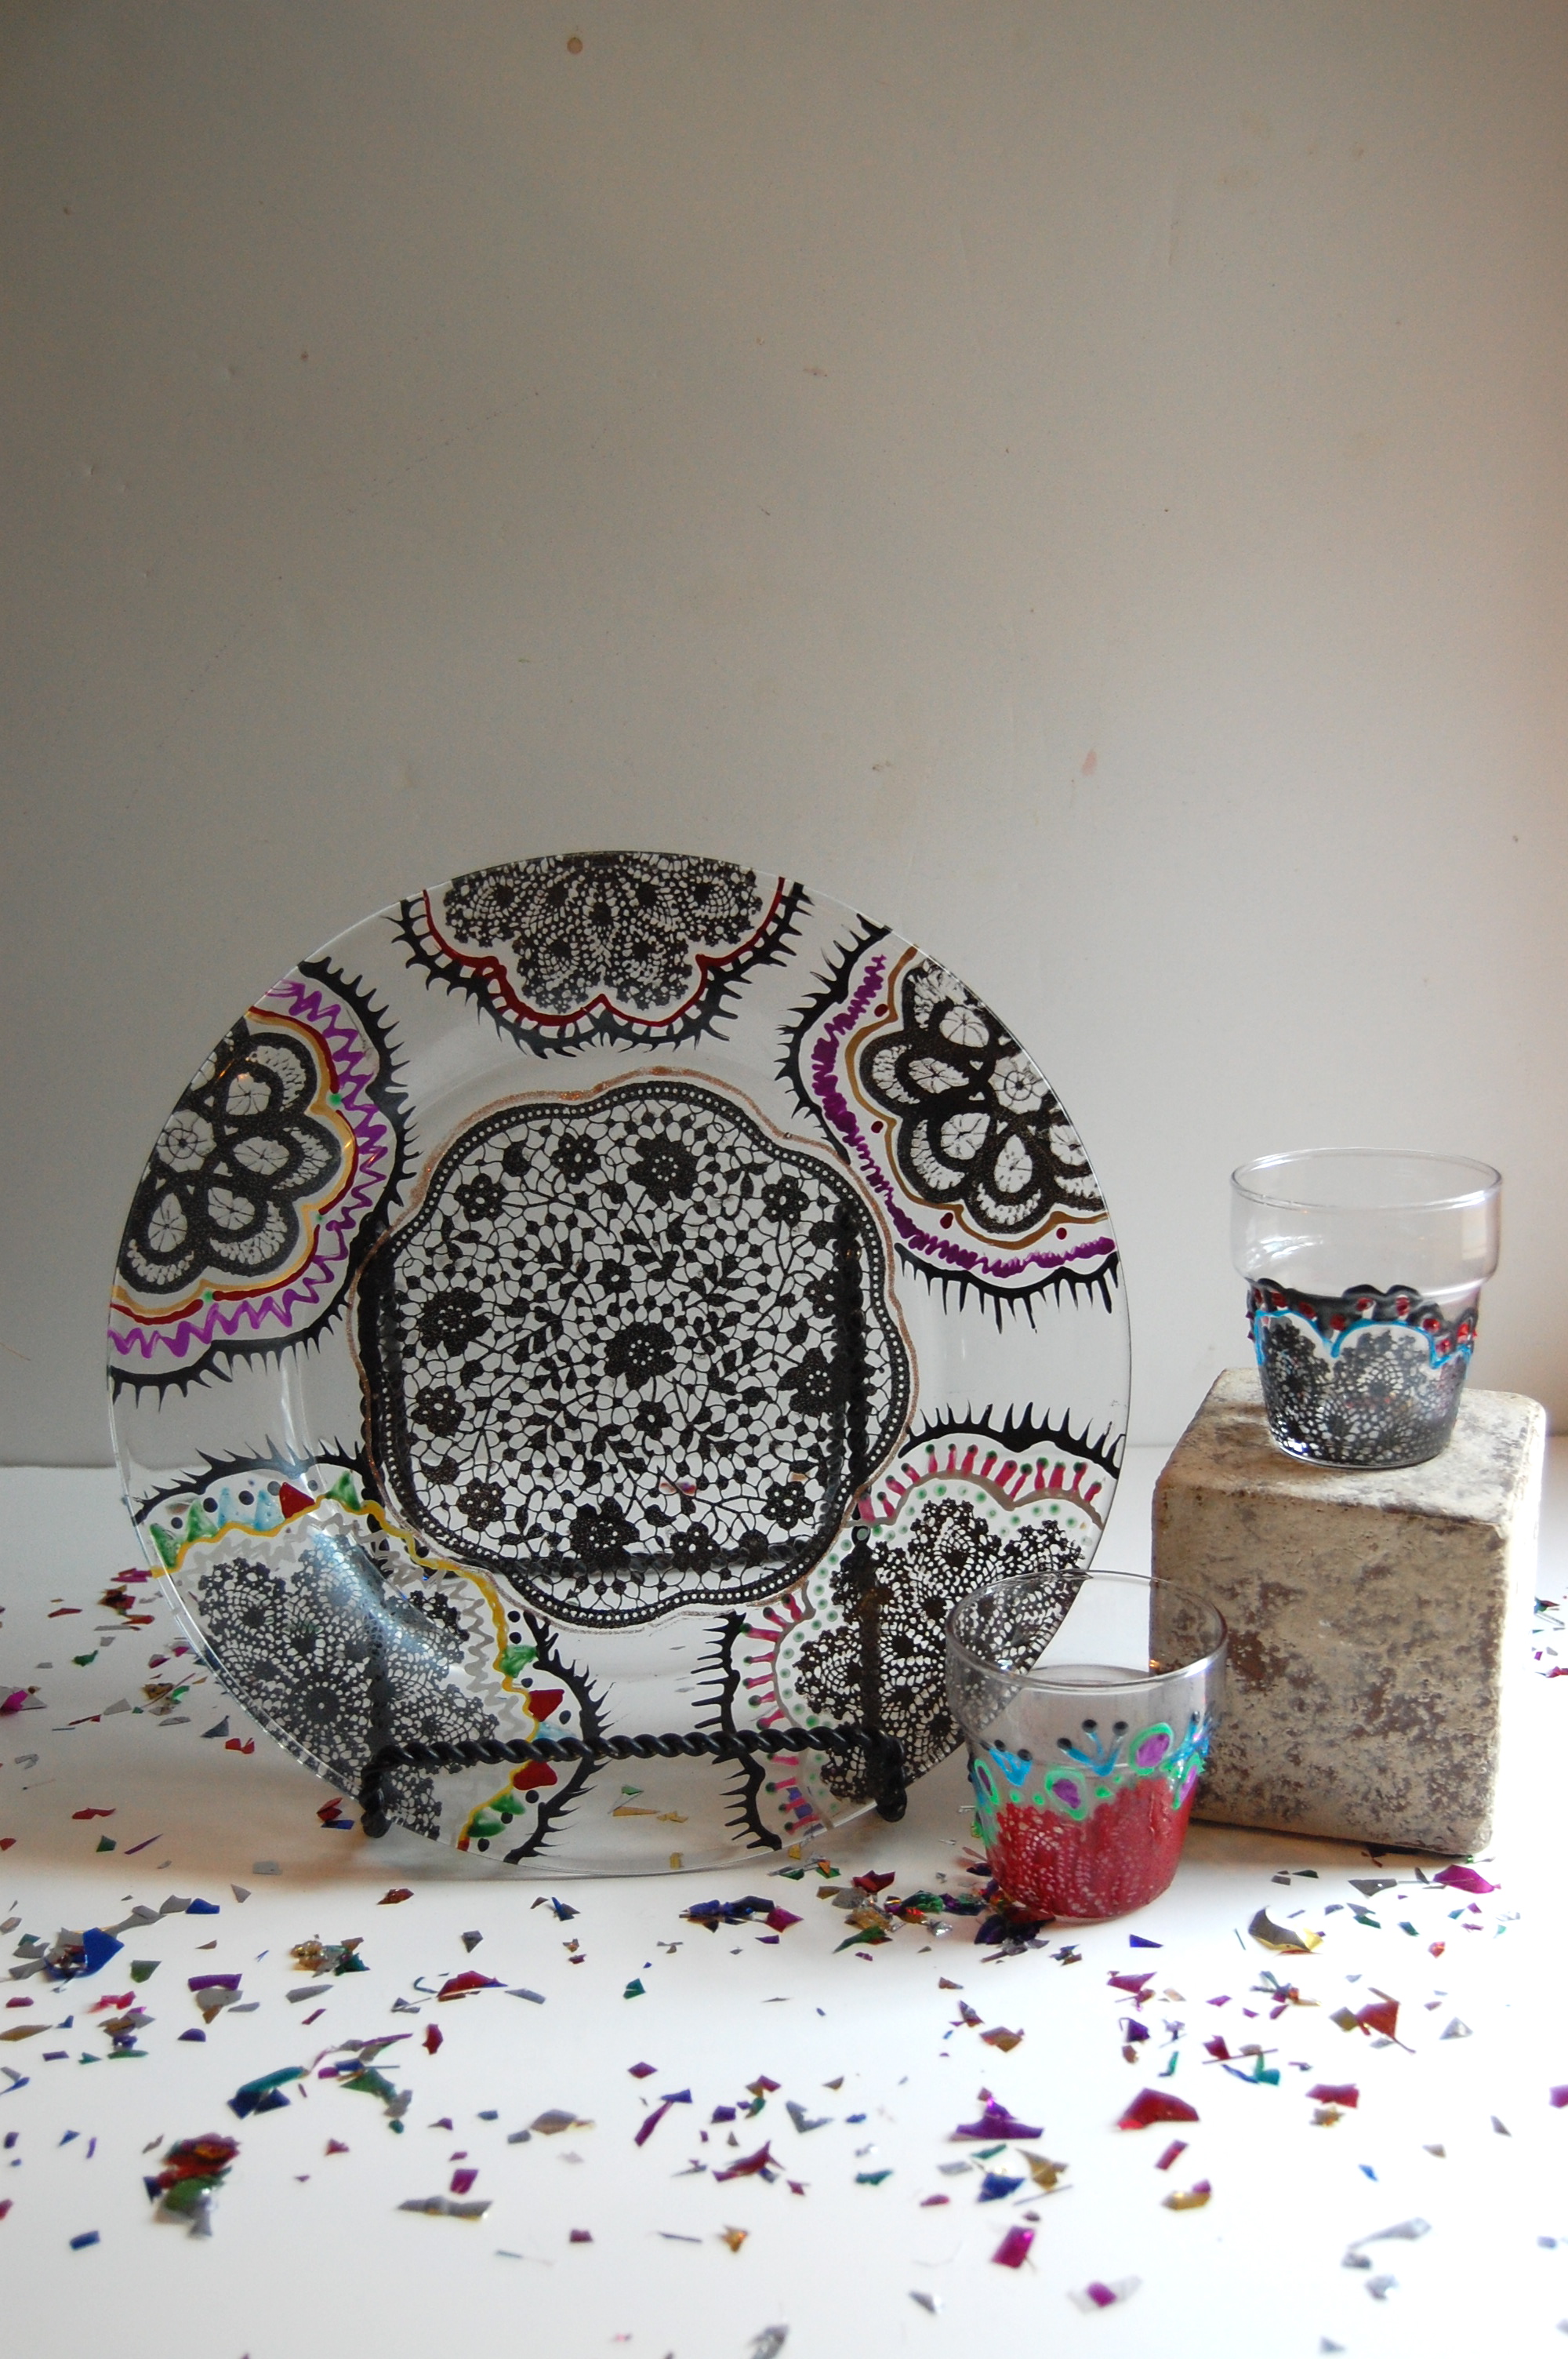
Mexican Folk Art is screaming all over this already, don’t you agree. I also made two tea light holders to go along with the plate. I used the exact same process as the plate.

Are you inspired yet?

When you are done it’s important you let your project air dry for about an hour. You can cure the paint by sticking in an oven for 30 minutes at 350°. Get the complete glass baking instructions here. FYI: The fine glitter paint can NOT go in the oven.

I hope you enjoyed this tutorial because I had a blast making this craft. I already have ton’s of ideas going through my head so stay tuned for more crafts with Martha Stewart Crafts Glass Paint.
Check out Plaid on Twitter, Facebook, and Pinterest!
#marthaglass
Disclosure: This post was written as part of a paid campaign with Martha Stewart Glass Paints and Blueprint Social. However all of the opinions in this post are my own.
Jade- I LOVE your plates….but I have to tell you I think your plastic-knife-swatch ring is GENIUS! I’m heading up to do that myself.
Way to rock it, girl!
Jenny, thanks!!! I guess I might have to do a post on how to make one! What cha think?!
Did the glass paint chip off the plastic knives? I have some of her glass paint leftover after doing some awesome glasses (thanks to your tutorial!!) and wondered if I could use the glass paint on other mediums or over acrylic paint.
Meg: I just put the paint on the knives to view how the color looks once it is dry! But the paint is awesome on glass! Send me pics!
I love this!!!! And I just love your idea with the plastic knives too. You’re brilliant!
Cyn, I am so glad you love it!
I love this idea!!
Thanks Morena!
wow, that plate is amazing. Seriously fine stenciling skills you have. 🙂
I’m pinning, because I love it, but your knife color swatch thing is genius!
gail
Thanks Gail! I agree with you about the knives..I had so much fun making that!
I LOVE your idea for a sample palette on the plastic knives. Stroke of brilliance!
Katie, thanks! Glad you enjoyed the knives haha
Love that doily stencil and the patterns you came up with for this plate are adorable! Great job!
Well how cute is that?!?!?! I love those doilies!!!! And I love that you added your own touch to them! You have inspired me!!! Thank you!!!
Jaime
Jaime! I agree with ya, it’s super cute.. hahaha Glad I could inspire you… <3
WOW! That turned out fabulous! You have mad stencil skills! 🙂
Sara, THANKS!!! Patience.. haha
Awesome, Jade! Beautiful. Love the layers and colors.
I really like what you’ve done with your glass painting. I’m a big fan of the Martha Stewart paint lines, they’re great colors and easy to use. I adore your plastic knife color swatch too.. I’m going to have to make swatches for all my paint collections now – brilliant! Thank you for sharing your creativity.
I love them – gorgeous!!
Heather: Yay, glad you like them!!!!
Wow! That turned out awesome! I have those exact silkscreens… and I think they’re about to become my new best friend. 🙂
Terri, they are AMAZING!
This is awesome! It turned out great.
WOW, such creativity!!! So many fun ideas swirling in my mind for those great glass paint products!!!
Pingback: Freelance Friday: Mexican Folk Art with Martha Stewart Crafts Glass Paint and Stencils | Paint Me Plaid
Umm… beautiful, Jader! I will be sharing the heck out of this. So inspiring.
Johnnie: Yay! Glad you liked them!
Knife swatches = pure genius!
And I like the plates even more… if that’s possible! 🙂
Vicki: BLUSHING… hehe. Glad you enjoyed the knives… 🙂
I would never have thought to turn those lacy doilies into Mexican inspired art – it is gorgeous! Thanks for the superb tutorial, you take amazing pictures!
Michelle: Thanks!!! Hope to see ya around!
Wow! Beautiful!
This is so beautiful! You did a fantastic job. Pinned 🙂
Thanks Taryn!!!
So vibrant and pretty! Love the paint swatch idea too. Brilliant 😉
Shannon, thanks! It made it very nice while I was working on my projects!
Pingback: JADERBOMB – SPARKLE TAPE DISPENSERSPARKLE TAPE DISPENSER
Looks Fun! I have used another brand of paint and cured in the oven and it has always chipped! How durable is Martha Stewarts Brand? Dishwasher Durable (or am I just dreaming)? P.S. If I could invite anyone to dinner she would be #1 on my list.
There are many large towels to choose from. Nevertheless quality and absorbency should be on the list for thing to consider. It should be made from pure cotton and has a very soft velour finish that is awfully soothing to the epidermis. The colors will remain vibrant and softer after repeated washings. Durability is one of the important factors as well. It is determined as a result of its features and cotton content. What is more amazing is a price that is budget-friendly. Smaller ones are obviously affordable in comparison to the large ones. Nevertheless, since you may a vacation so it is relevant that you feel at ease and relax with ones beach towels…
Take a look at our web portal too
<="http://www.caramoan.ph/caramoan-beach-resort/
Pingback: 20 Easy Glass Painting Projects (DIY Glass Paint) - Craftionary
What a beautiful piece! The motifs are really pretty too :O
Thanks!!!
Pingback: 18 Faux Stained Glass Projects To Experiment With
Pingback: Amazing Faux Stained Glass Projects