Tag Archives: diy

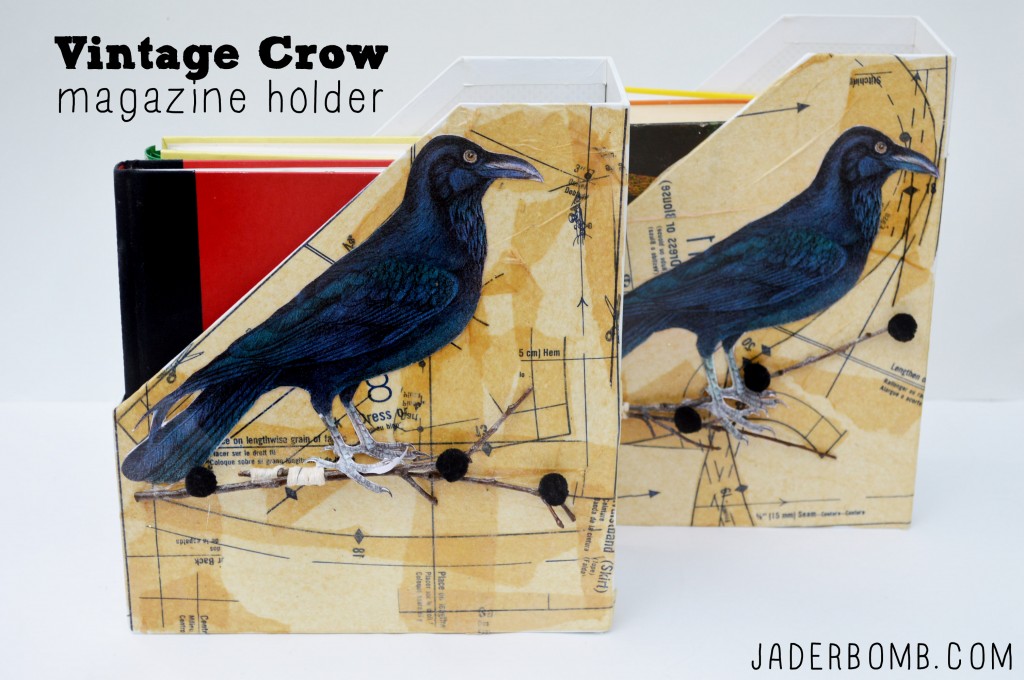
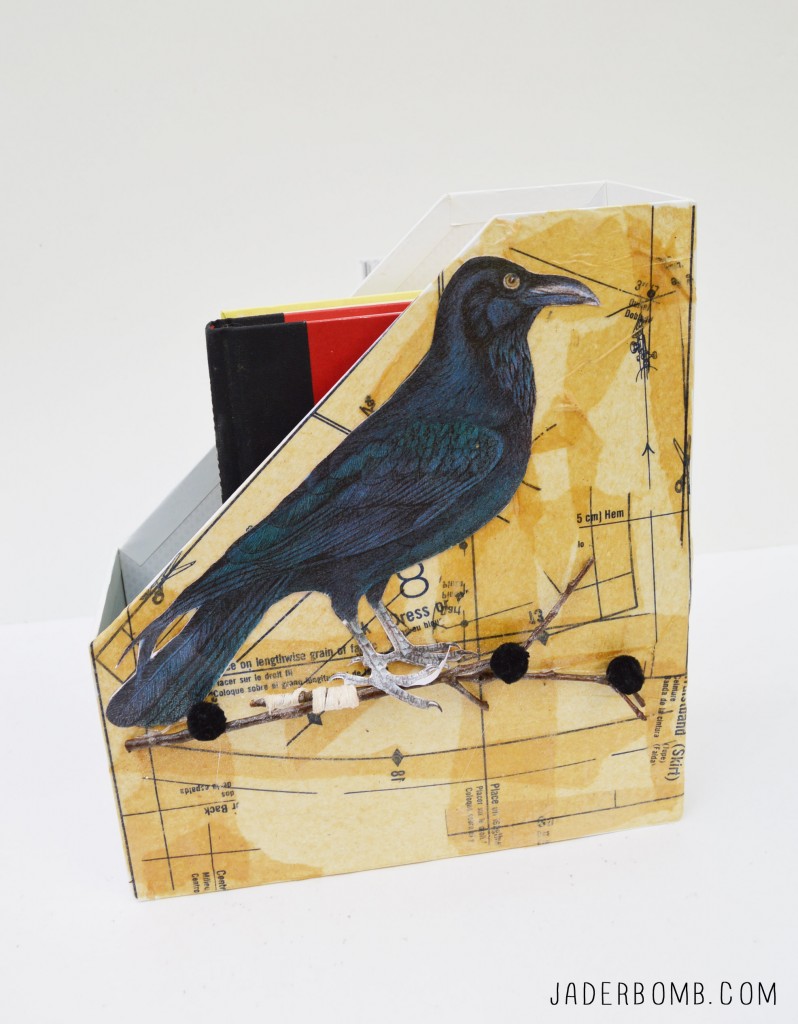
With Halloween right around the corner I wanted to share with you a site that you will fall in love with. I Love to Create has created a site that is filled with great Halloween inspiration.

For me I love this because when I start searching for ideas based around a specific holiday I like when everything is at my fingertips.

Pretty much like this site.

There are 5 different categories on the Halloween inspiration page. Pumpkins, Party & Decor,Body Art, T-Shirts and Totes and Costumes.

I honestly want to create every single thing on this site because for one they are fun to look at and two, the instructions for each craft are great which means nearly anyone can make them.

bad-to-the-bone-skull-shirtI want to share my favorite projects. This is actually hard for me to decide on but I promise to do my best!

FYI: When you see a category on the site make sure to click “more projects” to the right of the category. This will pull up all of the tutorials. I would just hate to see you miss out on this part!

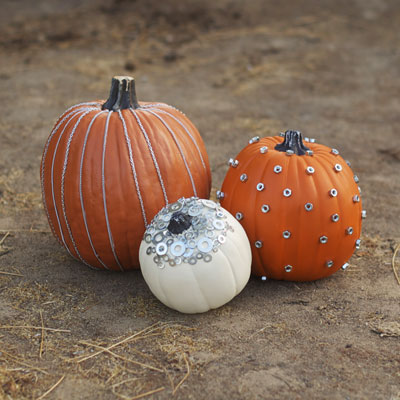
PUMPKINS: Hardcore Pumpkin

Even if you’re not in the mood for carving and cleaning, you can still make some hardcore Halloween pumpkins this season! Washers, chains and other hardware make for an easy, inexpensive way to give your pumpkins an edgy new look.

I love things that look industrial. The white pumpkins looks so classy to me. I would probably choose this over diamonds!

a928046f-14ef-439c-a9f5-d4d6da438effweb12_142_02

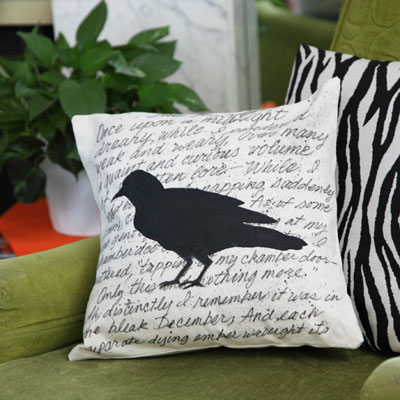
Party and Decor:Haunted Silouette Pillow

When it comes to displaying drab Halloween décor, vow to yourself, “nevermore”! Create this hauntingly haute pillow featuring Edgar Allan Poe’s “The Raven” easily with a black fabric marker and a little bit of paint.

I love ravens and this pillow makes me super excited. I like the look of anything handwritten and then you slap a good old bird on it. VOILA!

a8bbfbf2-72c7-4866-94e0-a3dc4a48ffecweb12_139_01

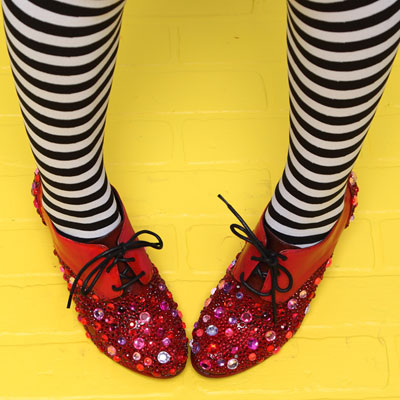
Costumes:Wicked Kicks

Follow the road to creativity in a sparkly set of shoes! No need to make a wish for kicks this fabulous, all you need is a little creativity, some glue and a lot of sparkly gems.

I will end this with my favorite craft! I love red and I love glitter so how can you go wrong with this? There is only ONE problem. I would wear these all year long.

3503c45a-afb8-411f-a3fe-eac7f499b6e4web13_024_30

I really hope you enjoy this site and I am happy to be sharing with you today. Now be a good faerie and share this with your friends!

One last thing, you have to check out I Love to Create’s Facebook , You Tube and Pinterest.

See you in the next post!

ending

Happy “whoa I am back from the land of OZ” day! Where the heck have I been you ask? You know, I might just have to ask you because quite frankly I don’t know.
(insert evil laugh here)

Last week I had major issues with my site which meant I could not post anything on this bad boy. Next thing I knew I was actually enjoying my time away from the computer.

Did I have the shakes, yes. What can I say my heart belongs in this crazy online home I have created and it’s just like when you go on a vacation away from home. It’s always “nice” but boy it’s good to get back home in your own bed.

I wanted to share with you my latest post that I did for The Graphics Fairy. I am positive you will like it so make sure to go check out the FULL tutorial.

I would like to say it looks sorta modern retro but who I am kidding. I just like crows and vintage patterns. So I brought the two tother to make a big ole explosion of happiness. Don’t these crows look real?!

Some say crows are bad luck but I think they are my guides. They follow me everywhere I go and I LOVE that. At least I know if they are around me and someone tries to hurt me they will shoot down and eat their eyeballs out…. Well at least I would hope.

DSC_0344

DSC_0347

FYI: Please go vote for my friend Kelly HERE! Voting ends tomorrow and we ALL WANT HER TO WIN! This is the LAST leg of this competition.

Huge glittery hugs—See you in the next post! Visit me on FacebookfollowTwitterfollow,Pinterestfollow, or Instagramfollow!

ending

HAPPY THURSDAY! It’s bloggy love Thursday and I am so excited to share 6 fun weekend crafts with you. I love that every craft can literally get transformed into something different depending on your personal style! My friends always amaze and I hope they give you loads of inspiration! Don’t forget to share these crafts because we all give glittery hugs over the internet!

1289865_10201630454939065_1995265869_n

Crafty Chica is showing us how to paint our faces, sugar skull style!

1376097_10151950179962774_66886013_n

Margot Potter made some ridiculously cute snap bracelets that look like MONSTERS! I would snap 5 on right away!

skull-necklace-pink-turquoise-final

Cathie Filian made a bomb Southwestern skull necklace. I love the red and teal together 

1374579_599739330067740_8055767_n

Mark Montano shows us how to update a skirt with a FUN ruffle hem on the bottom. I can just see this in black and white!

804437_10151591842875807_241068497_n

Heather Mann made a cute shrink necklace of her state. I love this idea. You could do bats, pumpkins or a candy corn!

1376194_657753847592114_970146752_n

Don’t forget about my classy coffee party!

If you love Halloween as much as I do then you need to check out these houses I made. Wear these shoes while trick or treating with your kids. I am in love with these black and white kitchens. Oh and don’t forget about my 12 months of MARTHA post. Let’s just say we are mixing shic and modern with a little splash of “coffee”.

FYI: Please go vote for my friend Kelly HEREnofollow! Voting end Friday and we ALL WANT HER TO WIN!

Huge glittery hugs—See you in the next post! Visit me on FacebookTwitter,Pinterest, or Instagram!

RAINBOW PUMPKINS

I don’t know about you but I love when certain HOLIDAY’S come around!

I used to dislike Halloween a lot but then one day I woke up and I realized how FUN it was. I am sure my love for Practical Magic and Hocus Pocus  affected my outlook also.

I figured I would play things a little different and make rainbow pumpkins. Don’t get me wrong I love black and orange but I like bright and whimsical a little more. I have my fair share of dark colors hanging around the house, don’t you worry.

I also think if you want to turn something from scary to WOW just add a little pinch of glitter. Glitter makes anything better.

If you love Halloween as much as I do then you need to check out these houses I made. Wear these shoes while trick or treating with your kids. I am in love with these black and white kitchens. Oh and don’t forget about my 12 months of MARTHA post. Let’s just say we are mixing shic and modern with a little splash of “coffee”.
RAINBOW PUMPKIN SUPPLIES

YOUWILLNEED

FUNKINS | PAINT | GLITTER | GLITTER GLUE 

You can order all of the products by clicking on the links above. Yes if you buy from these links it helps supply me with more caffeine!

It’s pretty simple. Paint all of your pumpkins with the colors of the rainbow. When they are completely dry add some glittering glue to the stem and sprinkle withe the same color glitter.

I am warning you now, you will prolly smile every time you see these.

HOW TO PAINT RAINBOW PUMPKINS

EASY COLORED PUMPKINS

See you in the next post! Don’t forget:

Huge glittery hugs—See you in the next post! Visit me on FacebookTwitter,Pinterest, or Instagram!ending

Huge glittery hugs—See you in the next post! Visit me on FacebookTwitter,Pinterest, or Instagram!

The rest of this week a few crafty bloggers are joining together with  Infarrently Creative’s “Show Your State Pride”  tour to conquer the world, or just every state.  Each day there will be a handful of us sharing something special about our STATE! Make sure to check out Infarrently Creative’s blog on Monday the 23rd for a ridiculously huge link party! Since I am from the crunk state of LOUISIANA I figured I would add a little FINE ART with FOLK ART. These are not for sale! This is completely an inpiration post and it is illegal to sell anything with the blue dog in it! My main goal is to show you how to draw on tiles using Sharpies!

I am linking to a crazy talented blogger so you have to check out what she did for her STATE project! Roeshel @ DIY Show Off

82a52b3824ddc8a1db418ff2450f1a3b

I was born and raised in good ole Louisiana. I have traveled to many places throughout my years but I have to be honest, nothing compares to Louisiana. It’s truly like another planet when I compare it to other places. Louisiana is known for many things. One of the hot spots is New Orleans and everyone knows about Mardi Gras! I live close enough that I can hop in my car and hang out for the day then come on home!

Our culture is filled with Mardi Gras, jazz music, crawfish, the Saints, great museums, people dancing at every nook and cranny, food cooking in any home you go to at any time of the day, where everyone is called “sha & baby”, George Rodgrigue, big swamps, Bourbon Street, strong drinks,and strangers who give hugs instead of looking at the ground.  I am a proud girl from this quirky state. I hope you enjoy this fun tutorial!

Sharpie Coasters

BLUEDOGCOASTERS

Here is  little snippet of George. He is great and I love him. Here are some other fun facts about Louisiana.

YOUWILLNEED

SHARPIE MARKERS | WHITE TILES | GLASS CLEANER

BLUE DOG SHARPIE COASTER SUPPLIES

I love making sharpie coasters. They are really easy and so much fun!

LEARN TO DRAW ON TILES WITH SHARPIE MARKERS

To make them look more like folk art I added a few fun quotes to them.

When you start clean your tile with glass cleaner then draw away. When you are completely done with your OWN coasters place them in an oven that is not heated. Place oven on 350 degrees and leave them in there for 30 minutes. When the 30 minutes is up do NOT take them out of the oven. Just like we heated them up slowly we have to allow them to cool down slowly. This last step will marry the sharpie with the tile and your image should be on for good. Now, I have to admit lot’s of people say this is dishwasher safe but I have no idea because I don’t have one! I would hand wash them anyway!

HOW TO DRAW GEORGE RODRIGUE BLUE DOG BLUE DOG ART.jpg

I sure hope you enjoyed this tutorial and learning a little bit about my great state. Please do not replicate the blue dog and try to sell as you can get into a lot of trouble!

Make sure to make your way to Tricia @ Simplicity in the South . What a perfect ending to my post right! 

Huge glittery hugs—See you in the next post! Visit me on FacebookTwitter,Pinterest, or Instagram!

jade

Happy Sunday Y’all! I took a break today and my friend Deb’s will show you how she made her “Candy Corn Banner”. It’s super cute and I know you will just swoon over it. I am super excited today because Martha Stewart featured my candy corn lamp on her website.

Candy Corn Banner

you will need

1/4 yd of yellow felt
1/4 yd of orange felt
1/4 yd of white or off white felt (I used off white)
2 yds black medium ric rac or other ribbon
1 small bottle of black dimensional fabric paint
Fabric scissors and paper scissors
2 pieces of cardboard (can use a cereal box or manilla folder)
Pen or marker tape
Candy Corn Template Candy Corn Template


CANDY CORN SUPPLIES

  1. Print the candy corn template to be about 7″x5.25″
  2. Trace and cut out two candy corn shapes on cardboard (cardboard is sturdier to draw around over the felt). Leave one template whole and cut the other into thirds as shown in the pic.
  3. Trace around cut templates on felt until you have four felt candy corns in each color for a total of twelve (Even though my banner was only 11 pieces I used an extra candy corn to write “or” on).
  4. Lay out the shapes alternating colors as shown to form the candy corns.
  5. Use tape to attach candy corns together from the back (you can also sew them together with a zigzag stitch).]
  6. Glue or sew on the ric rac along the tops, connecting them all side by side to create the banner.
  7. Write T-r-i-c-k- or T-r-e-a-t with the dimensional paint, let dry and then display on wall or in doorway.
  8. Note: you can also make these from card stock or if you want to display your banner outdoors, you can use vinyl/waterproof fabric.

DIY CANDY CORN BANNER FALL

I got the felt from Joann’s. It was reg $4.99 per yd on sale for 40% off and I only purchased 1/4 yd of each colour (felt squares may cost a bit more). Since I already had the dimensional paint and tape, the entire project cost less than $5! I hope you enjoyed my craft! You never know, you might see more of me on here! XOXO, DEBS

Check out these Fall and Halloween tutorials.