Tag Archives: diy


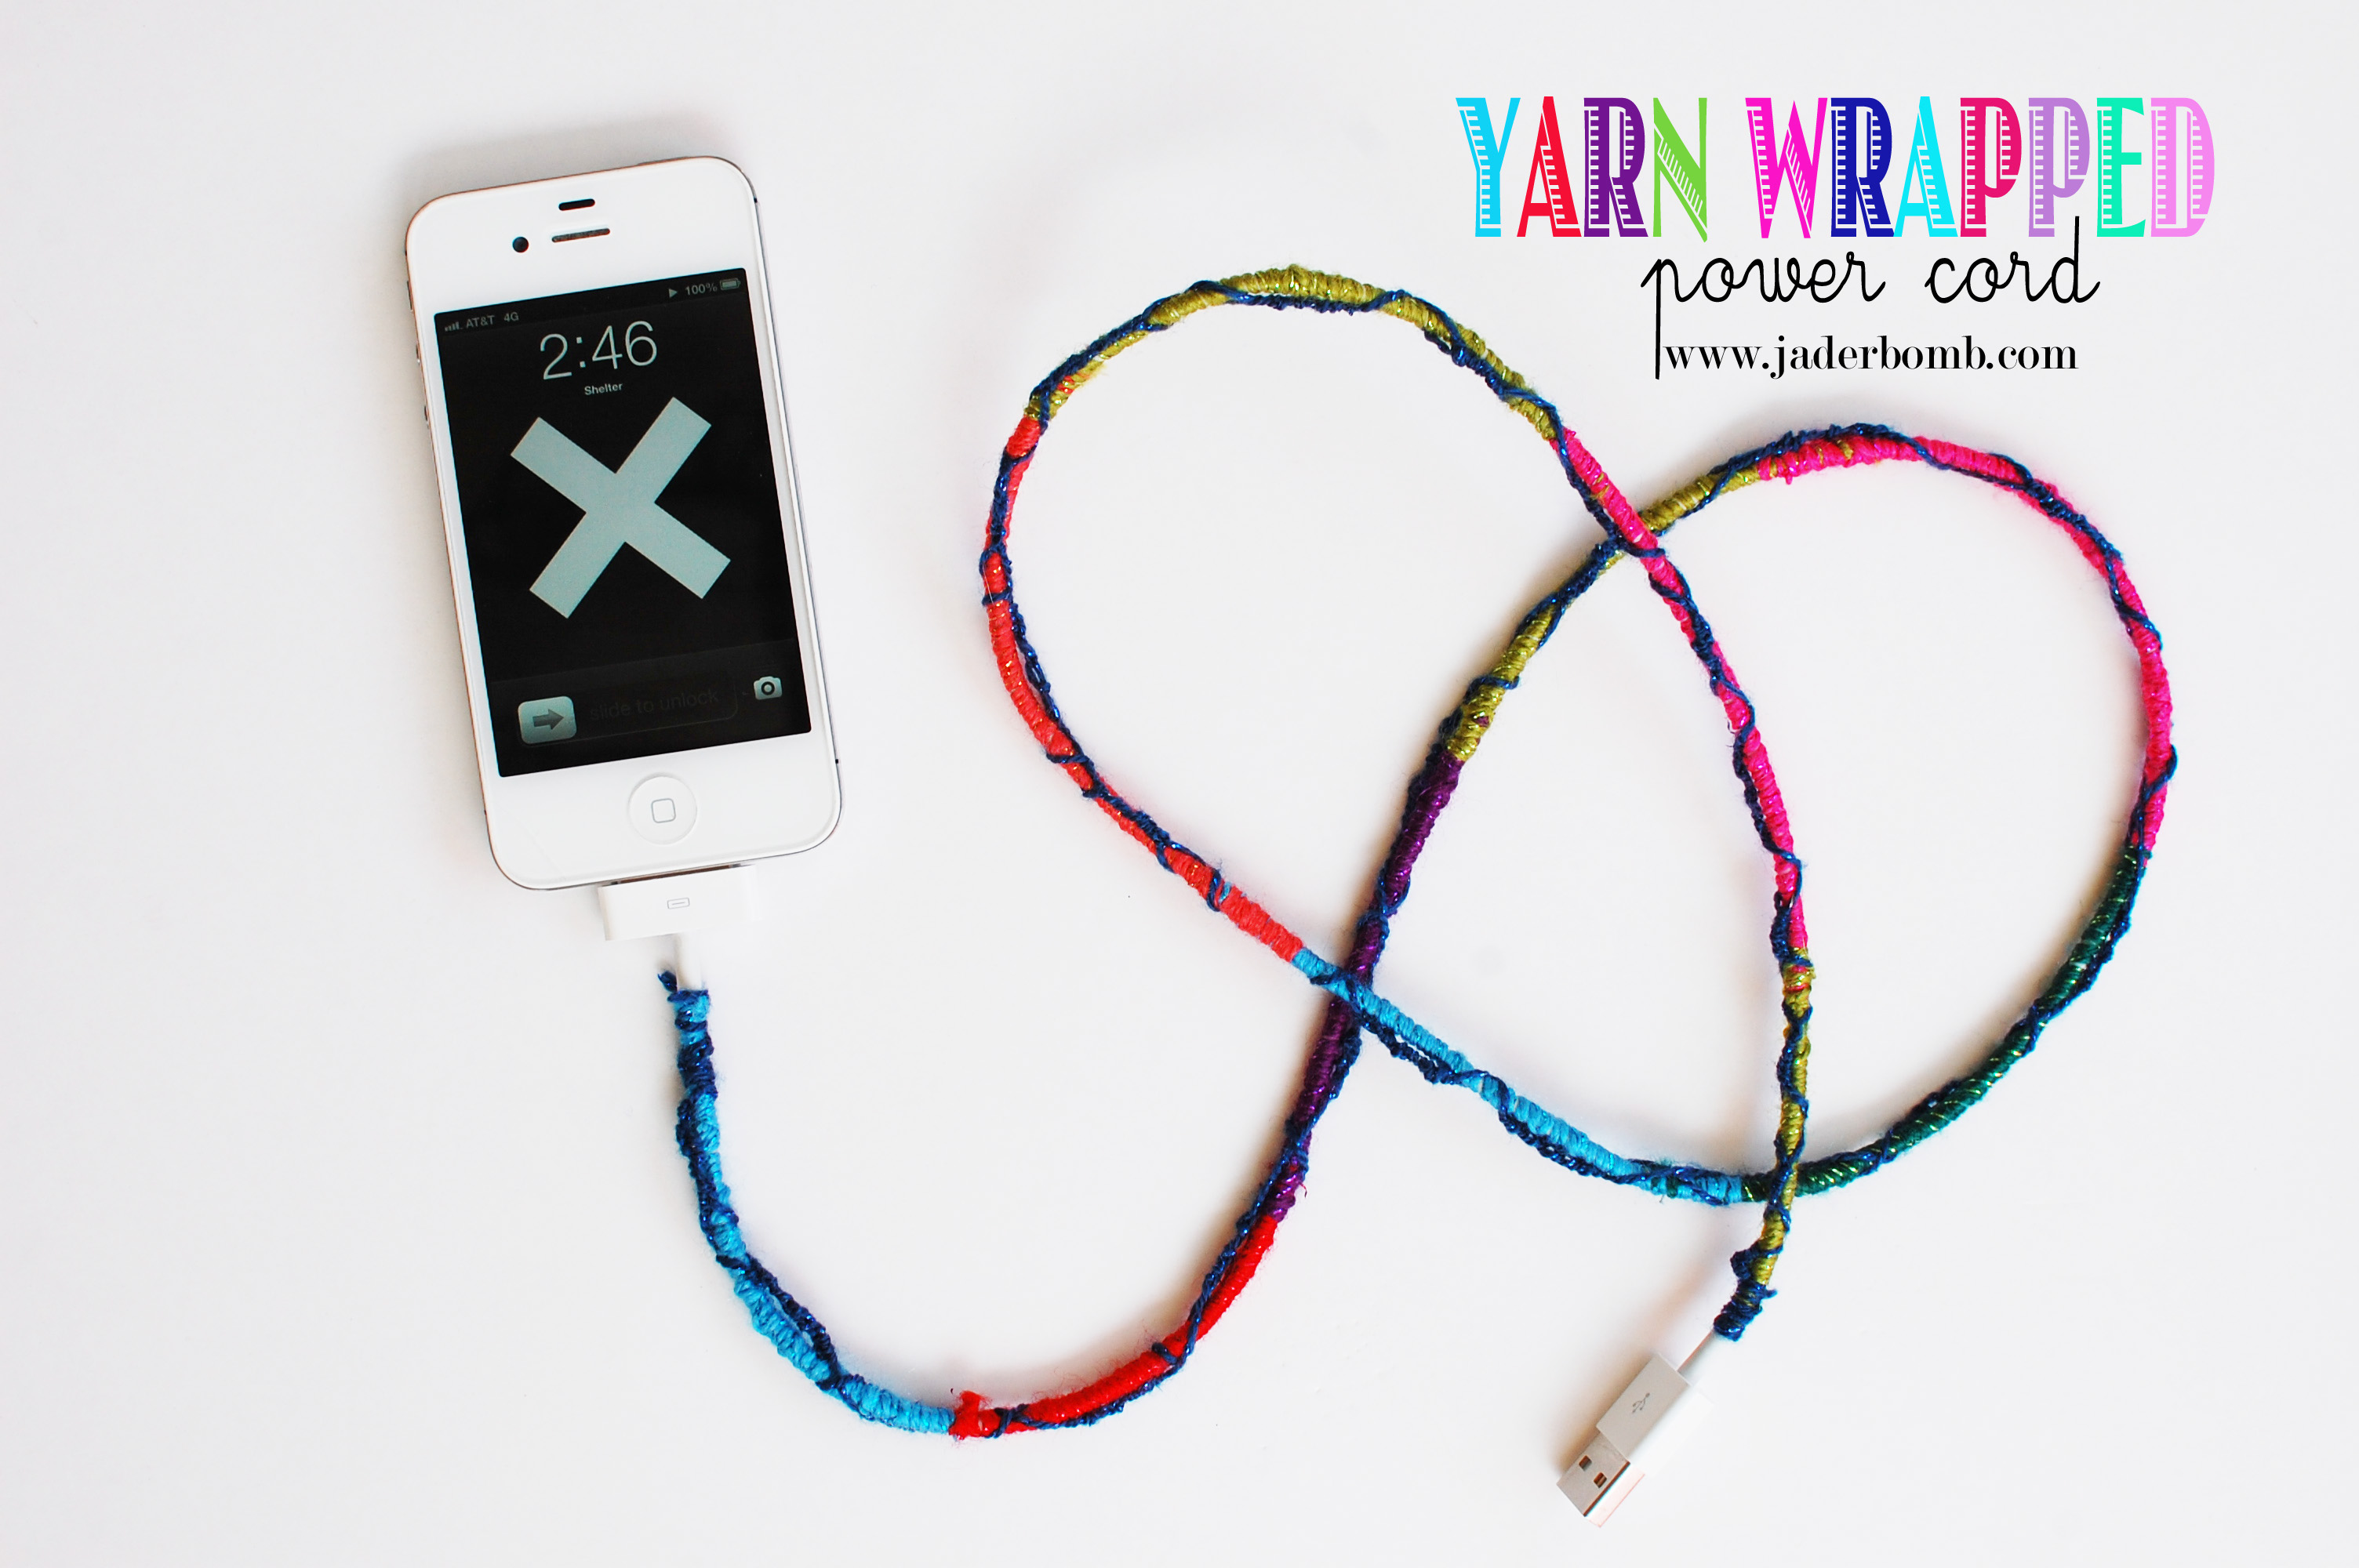
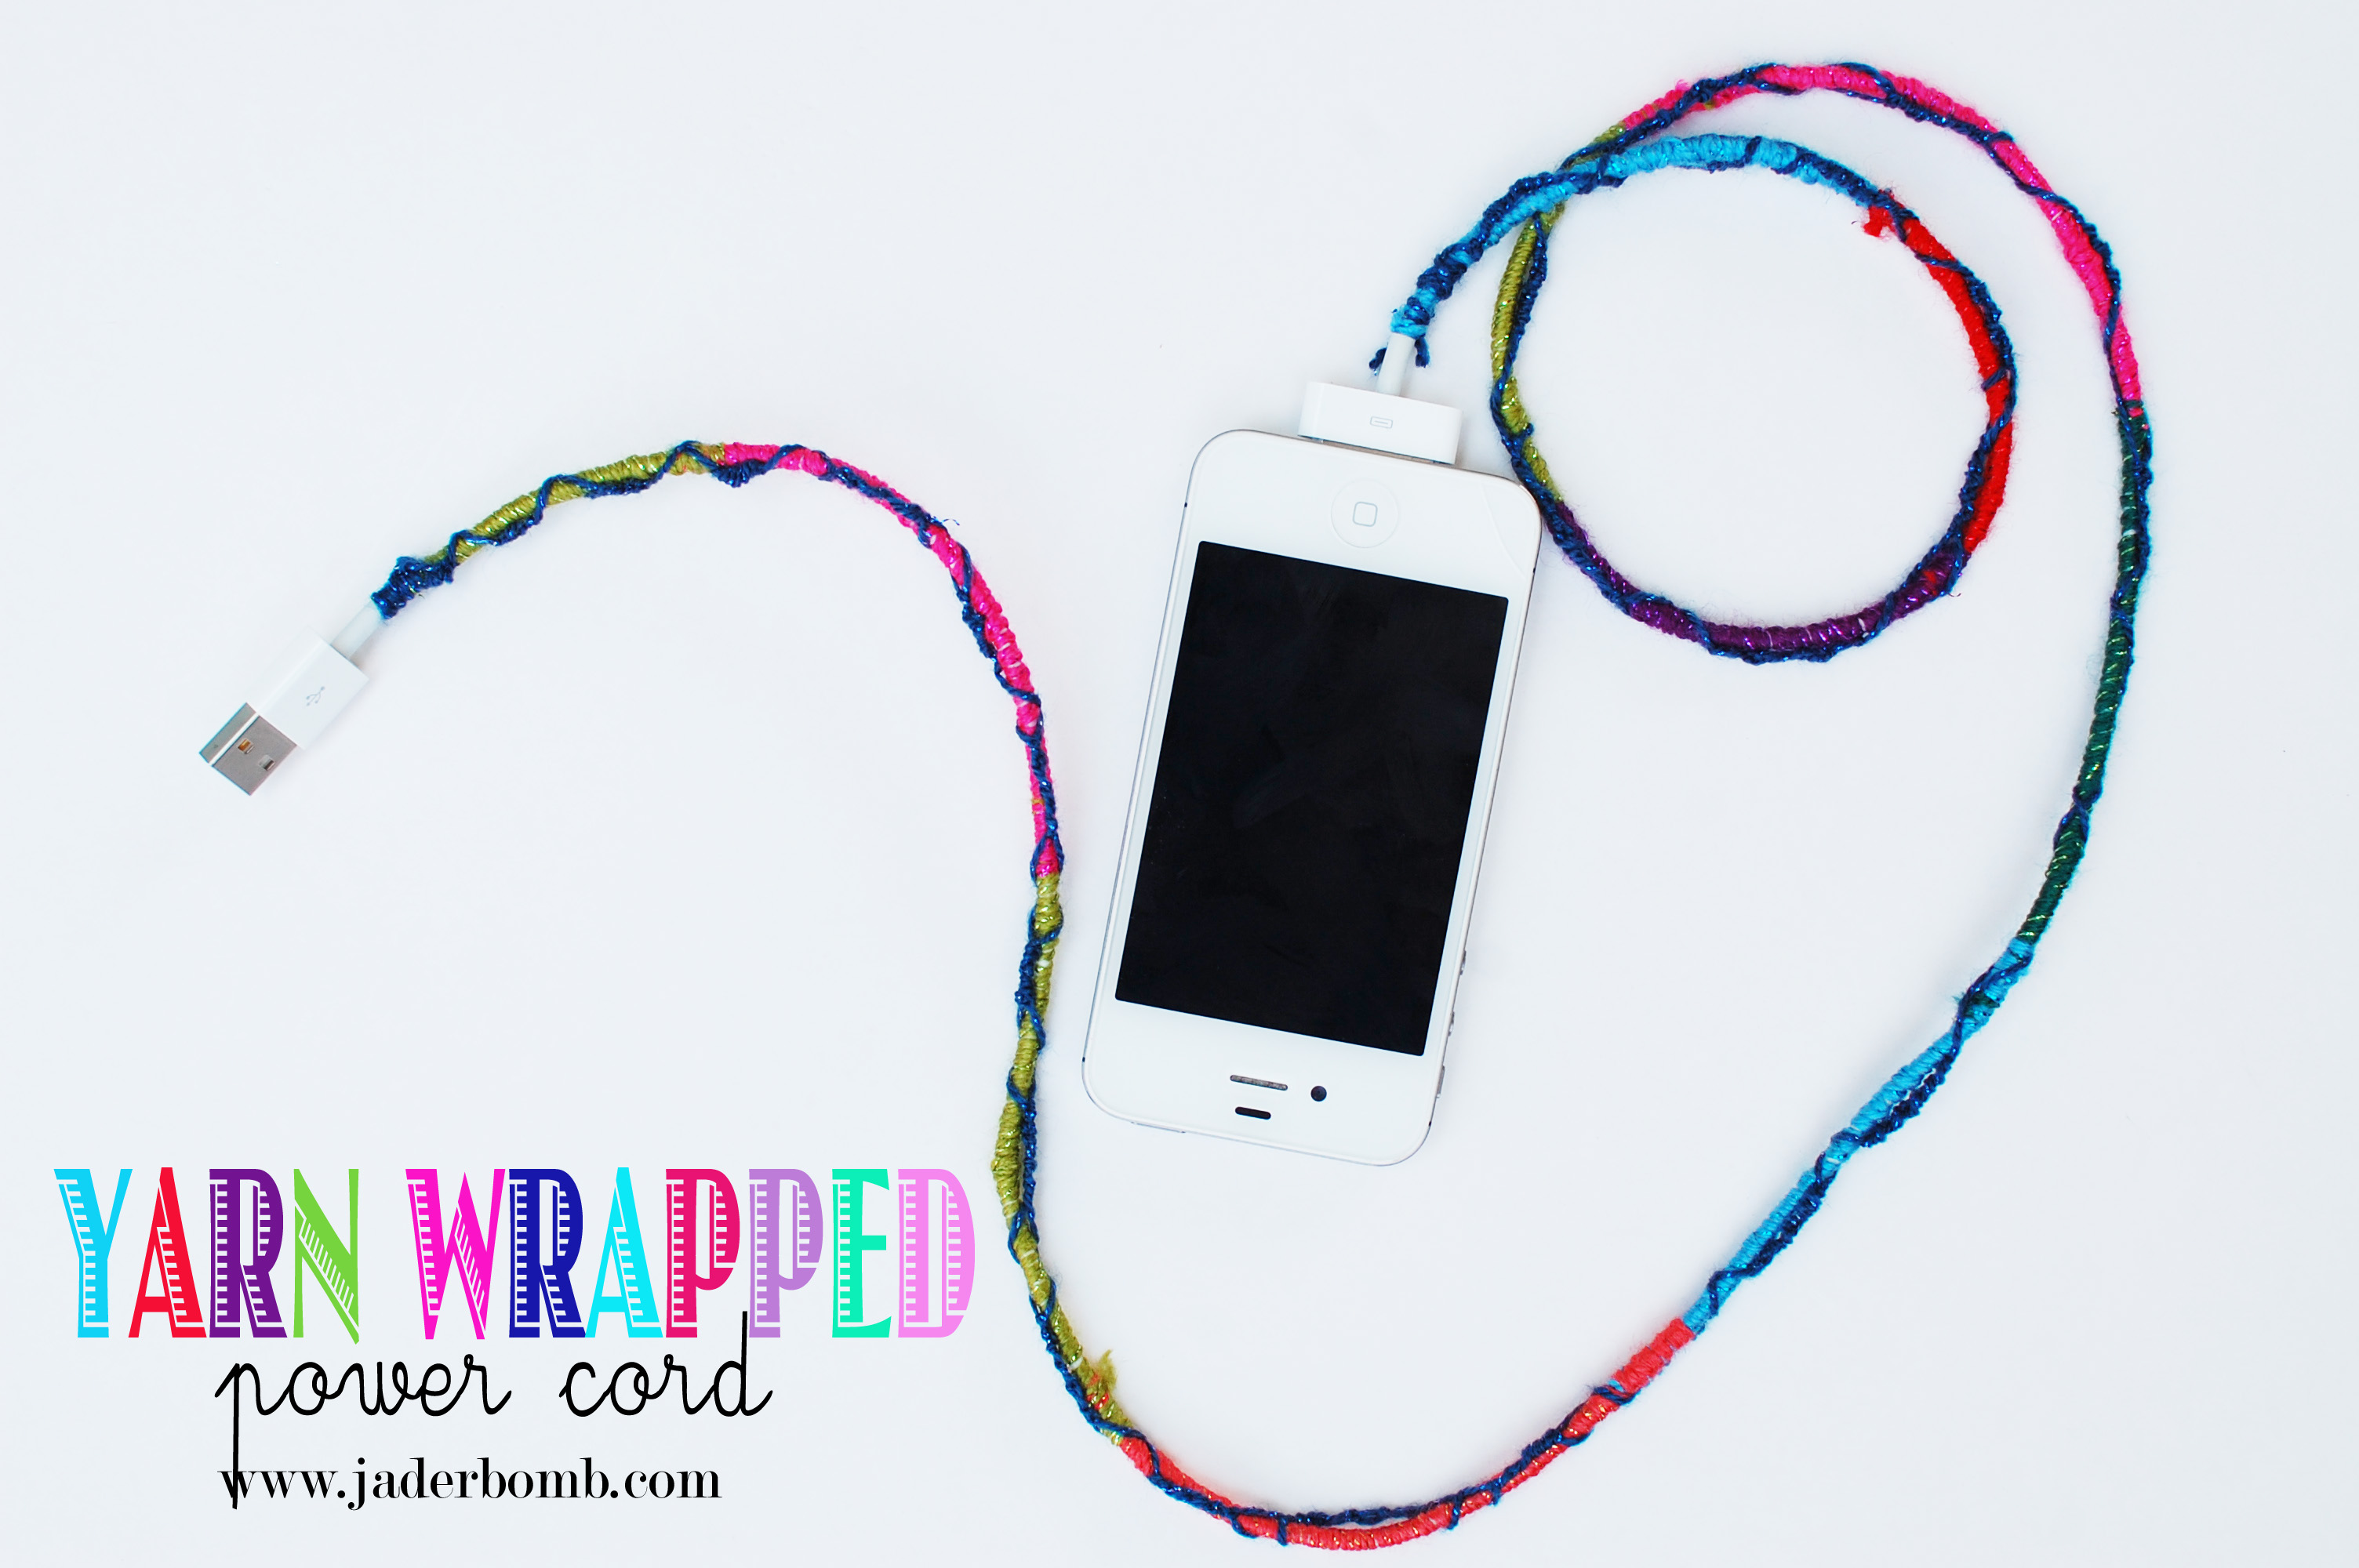
I am always traveling with my laptop and phone cords to charge them back up with ton’s of juice. I love that they are white but sometimes I want things to show my personality, especially when I am in a public space. Today we will be decorating our phone power cord with yarn. So many people will notice your fashionable power cord and say “Hey, where did you get that”… perfect way to make new friends. You can then explain that YOU made it and show them THIS tutorial so they can make one of their own. It’s a really easy so let’s get started.

It’s like a “YARN BOMB” cord… Yeah, that sounds delightful.

Friendship-bracelet-power-cords-jaderbomb


jaderb


Lion Brand Yarn Bonbons Bright

You can purchase the yarn by clicking on the link.


Friendship-bracelet-power-cords-jaderbomb
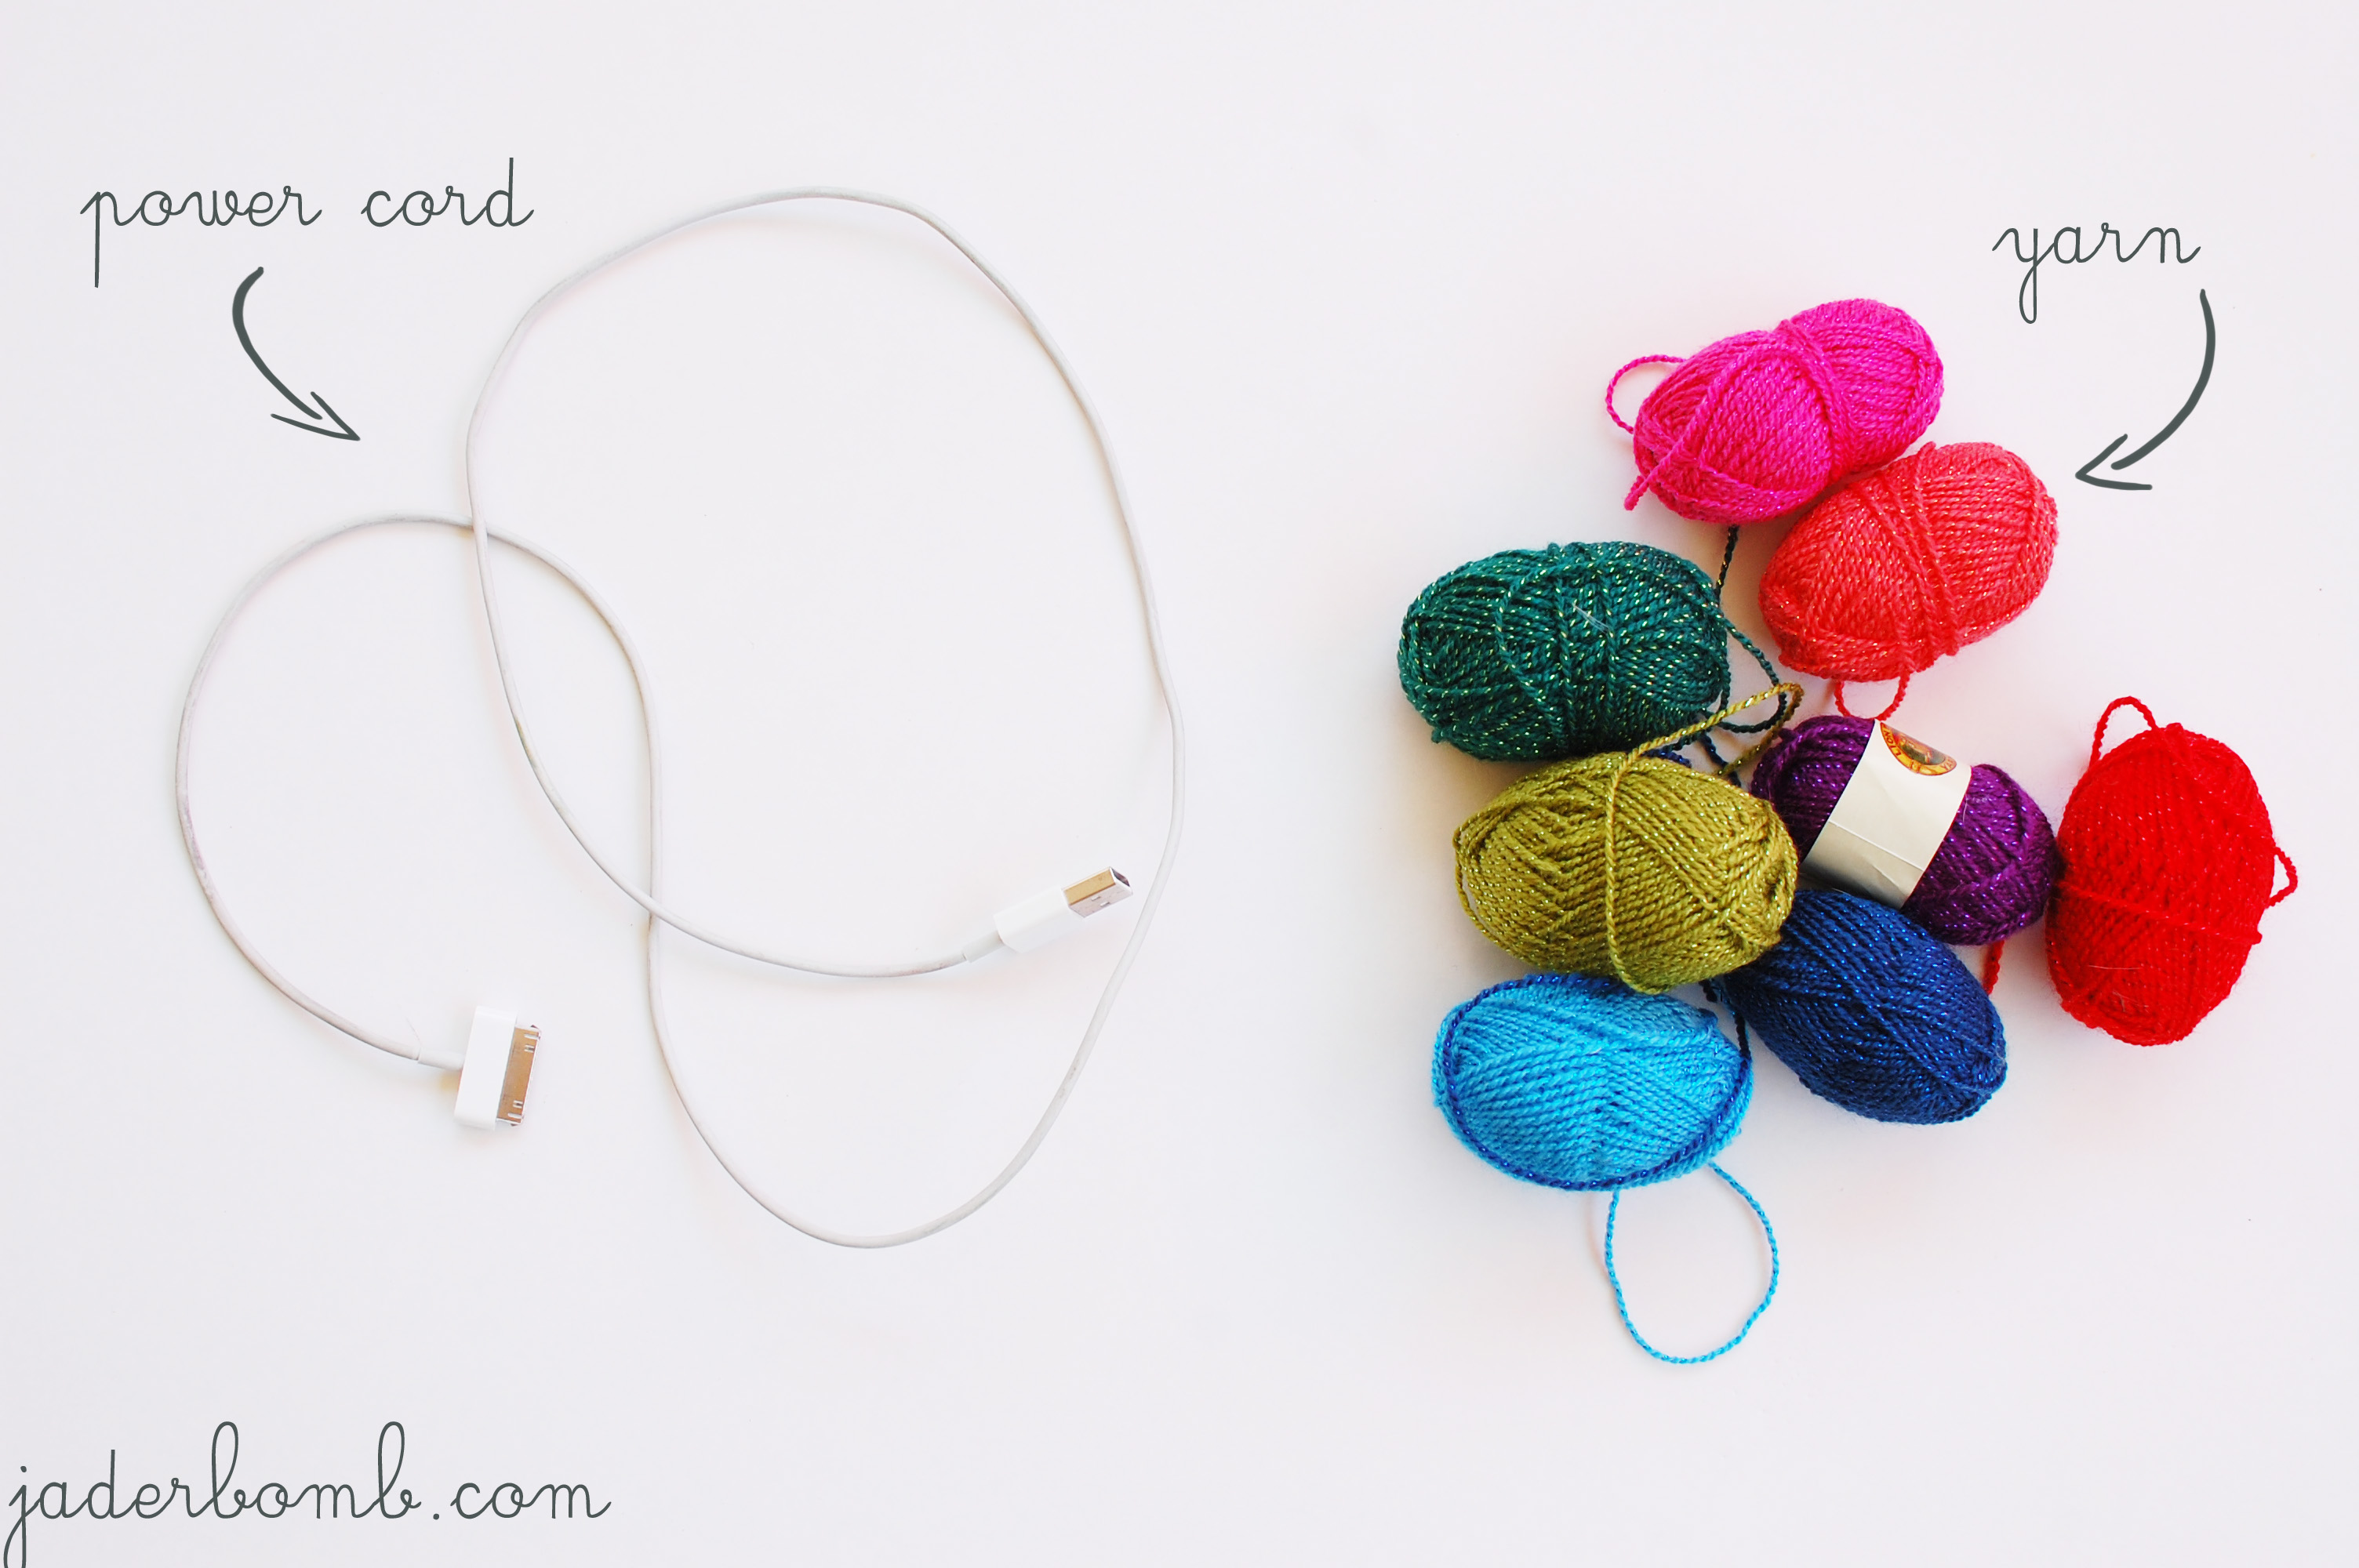
I love this yarn because it has a shiny pieces woven into it and it makes for some pretty cool projects. Check out this wall art I made using it HERE.


Friendship-bracelet-power-cords-jaderbomb
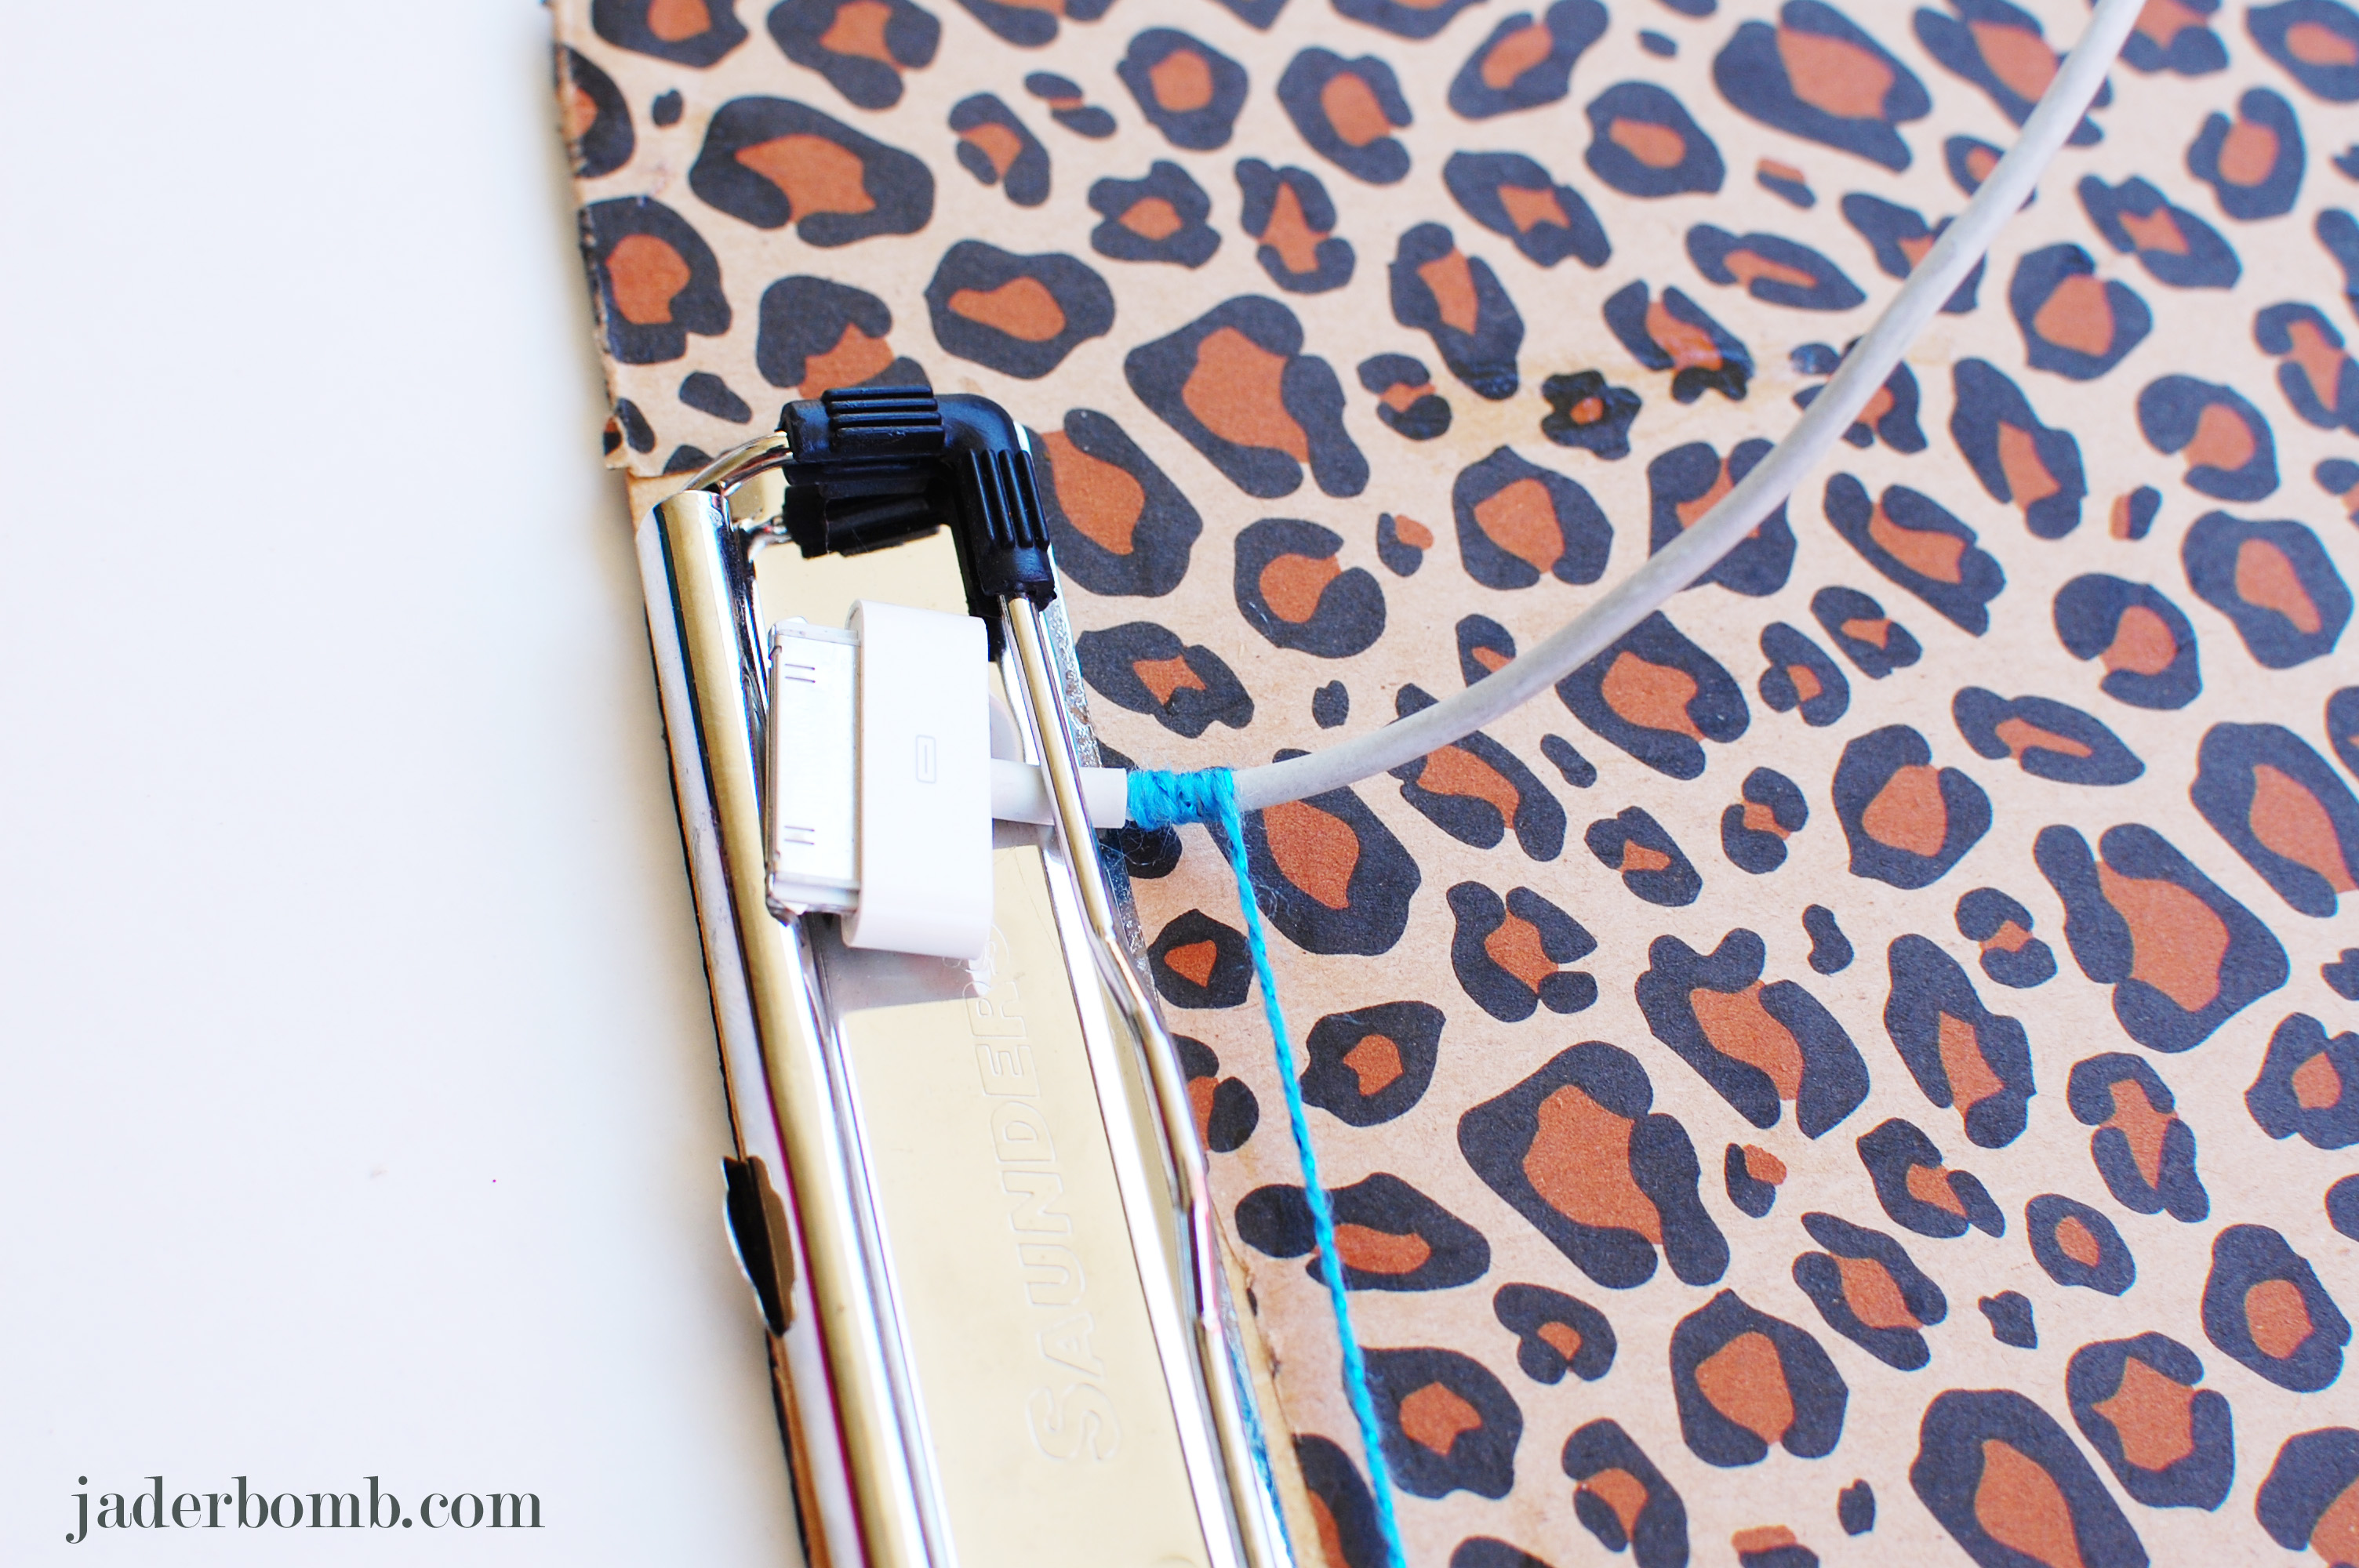
Start by wrapping the yarn around one end and tie a knot. You can use as many colors as you would like.


Friendship-bracelet-power-cords-jaderbombI started by using one color.

Friendship-bracelet-power-cords-jaderbombWrap your first color down your cord. Make sure you do it tightly.

Friendship-bracelet-power-cords-jaderbomb
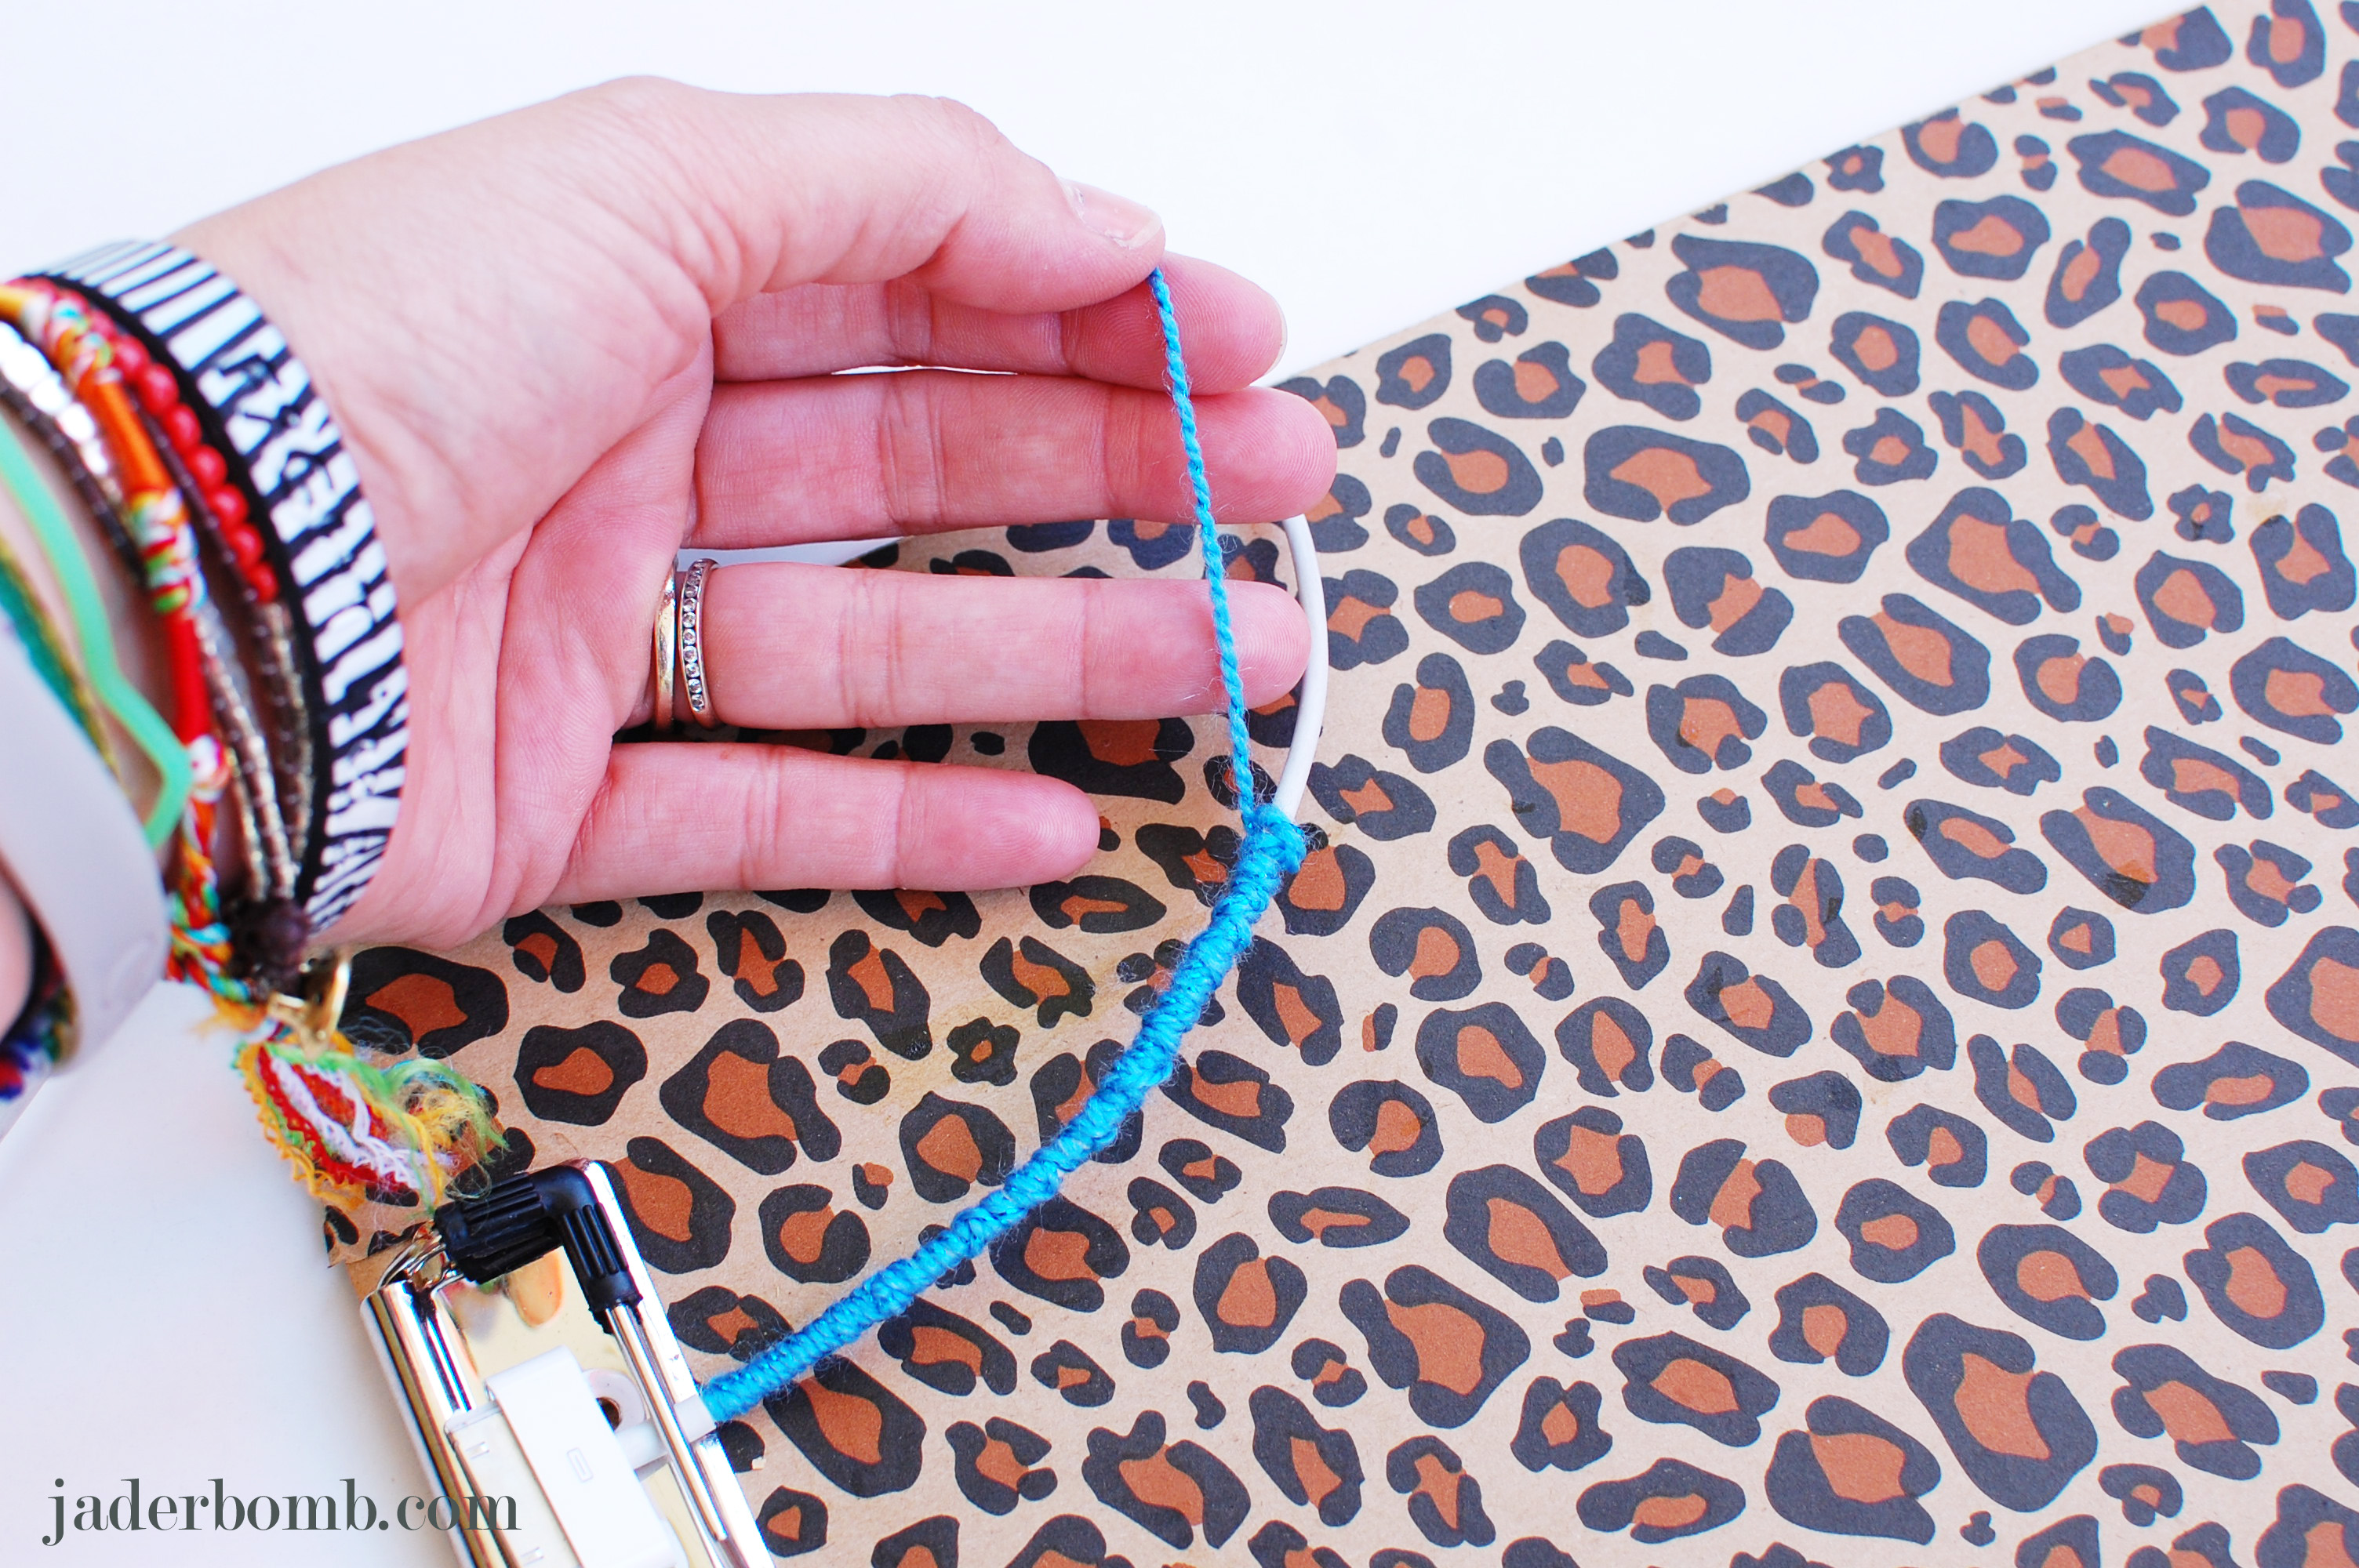
You can make your section short or long, it depends on what you like.

Friendship-bracelet-power-cords-jaderbomb
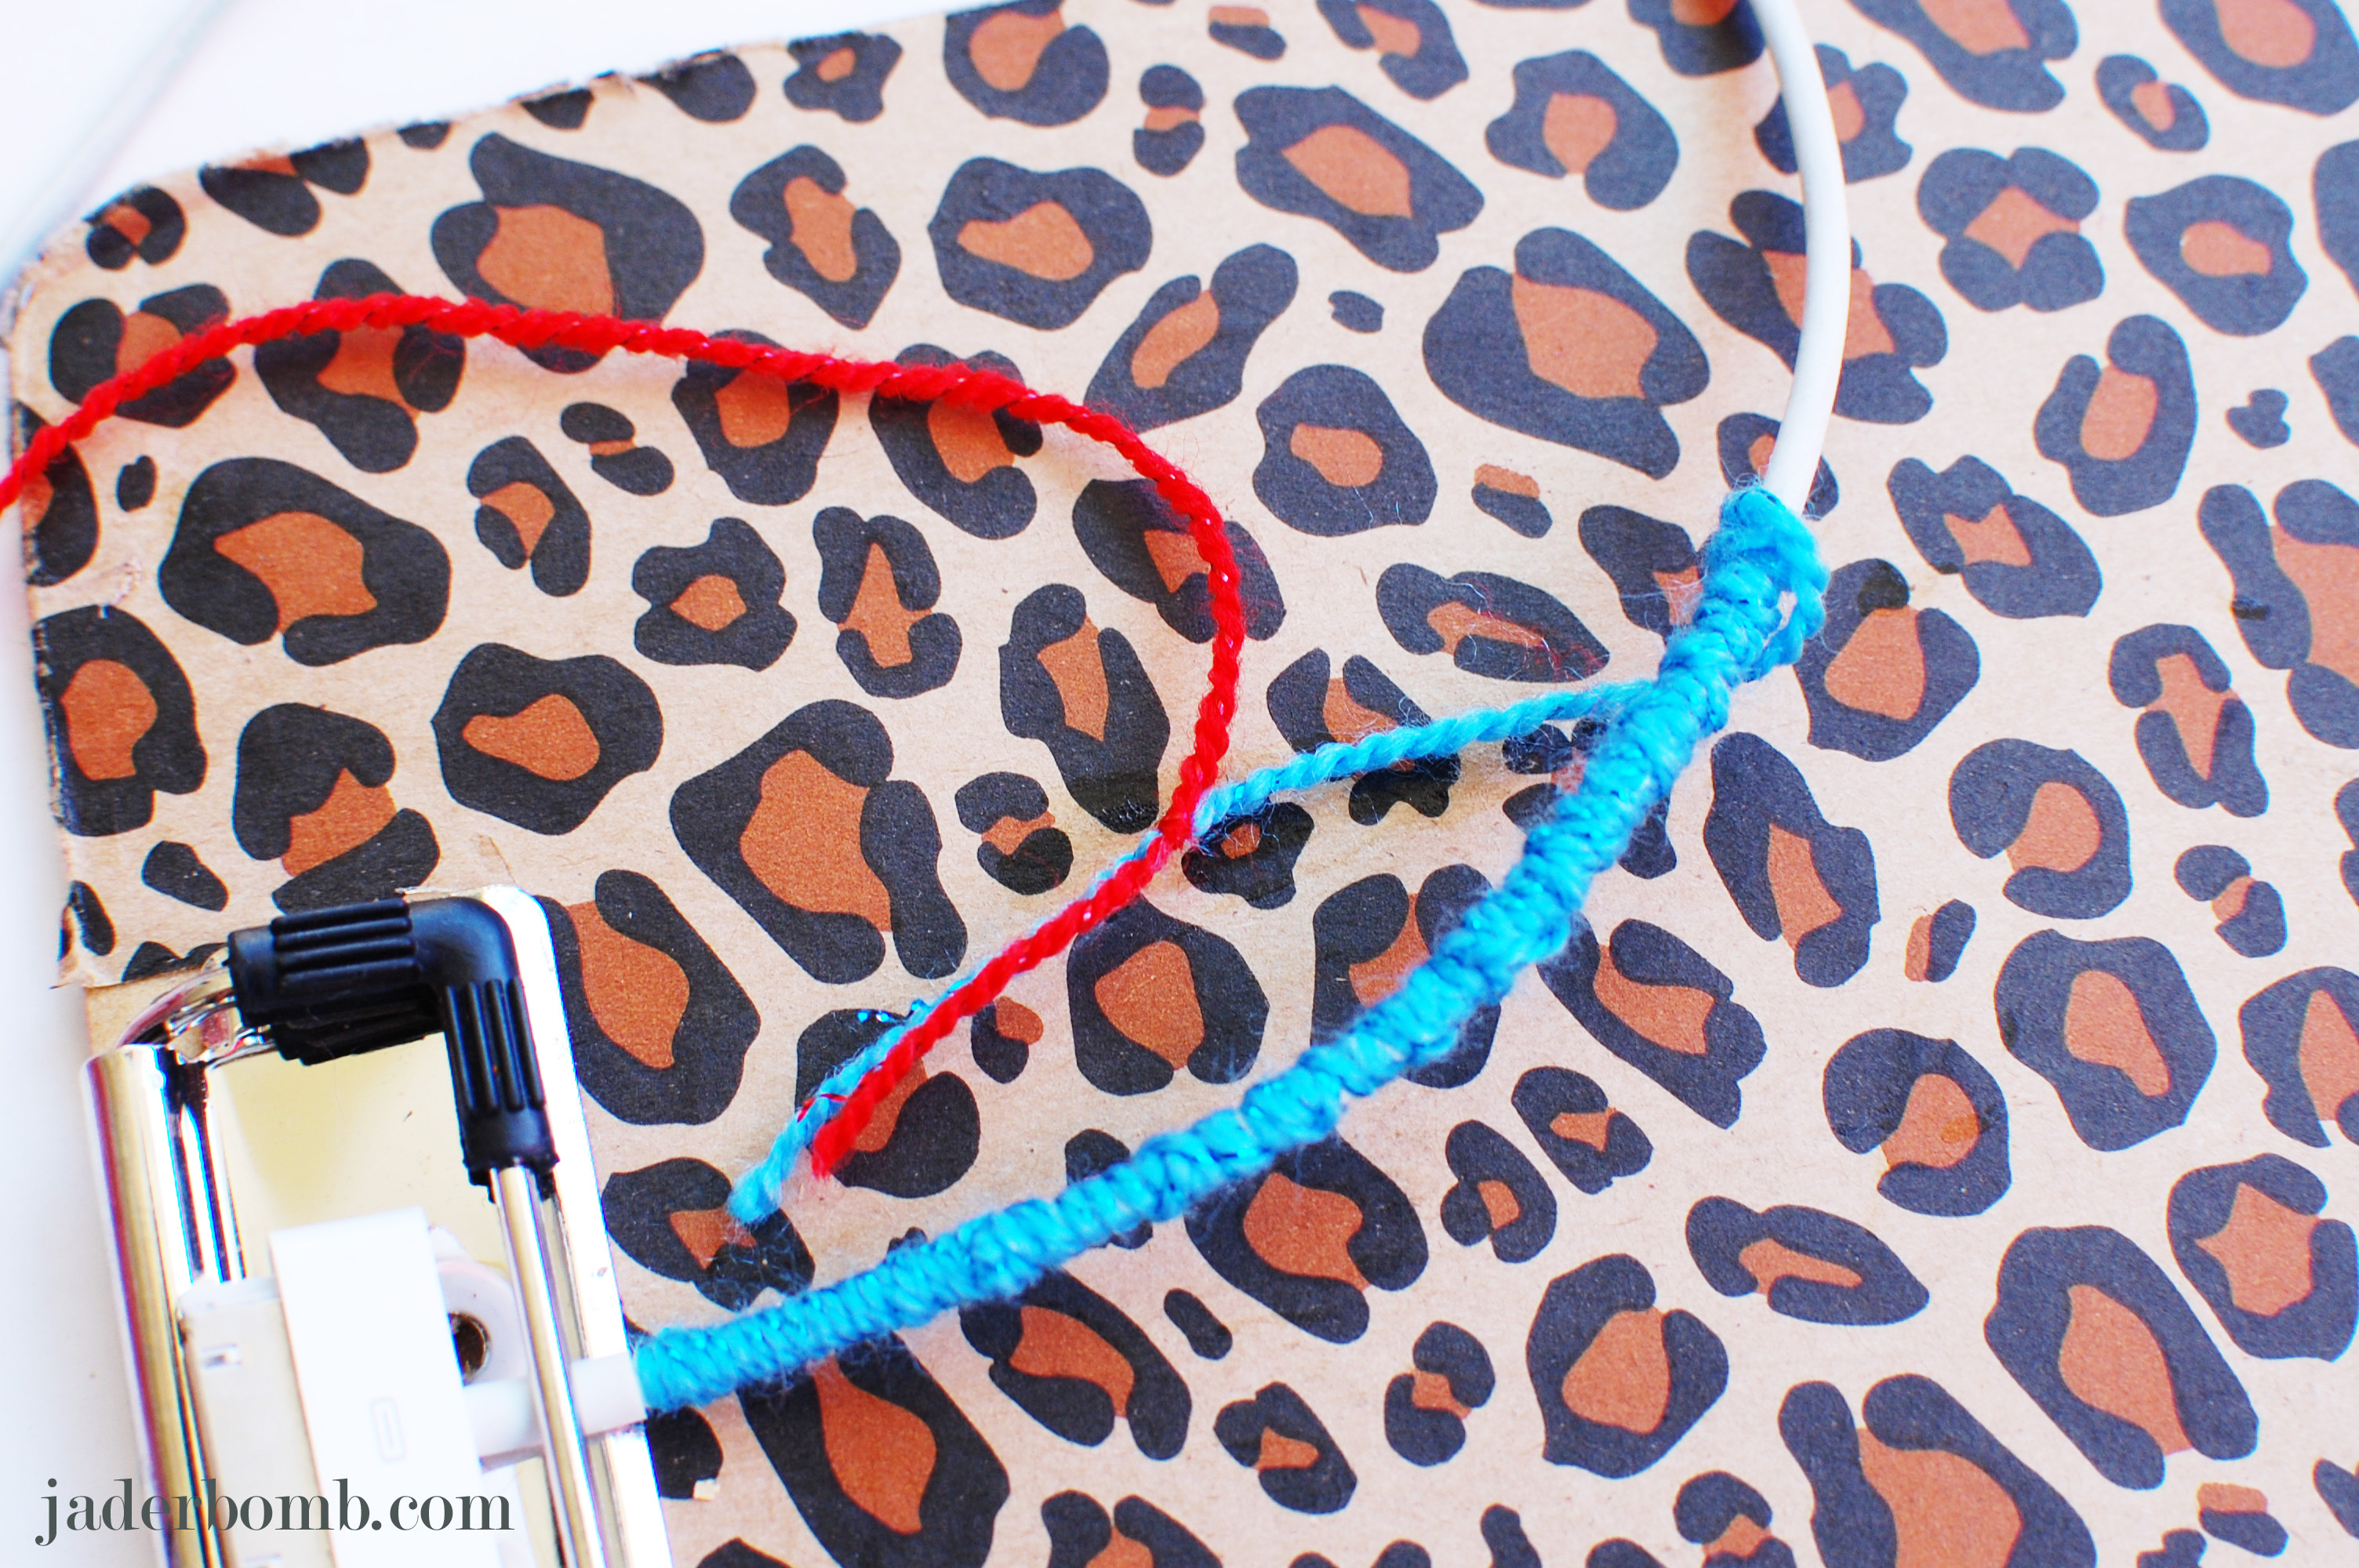
When I was ready to move to my next color I took my red and tied a knot at the end of my blue. Just continue wrapping the next color. It’s really that simple. Continue doing this until you are completely done.

Friendship-bracelet-power-cords-jaderbomb

I added a little flare on top with some navy yarn. I tied a knot on one end then took two pieces and tied knots then wrapped around the cord to start the knotting over again.

Friendship-bracelet-power-cords-jaderbomb
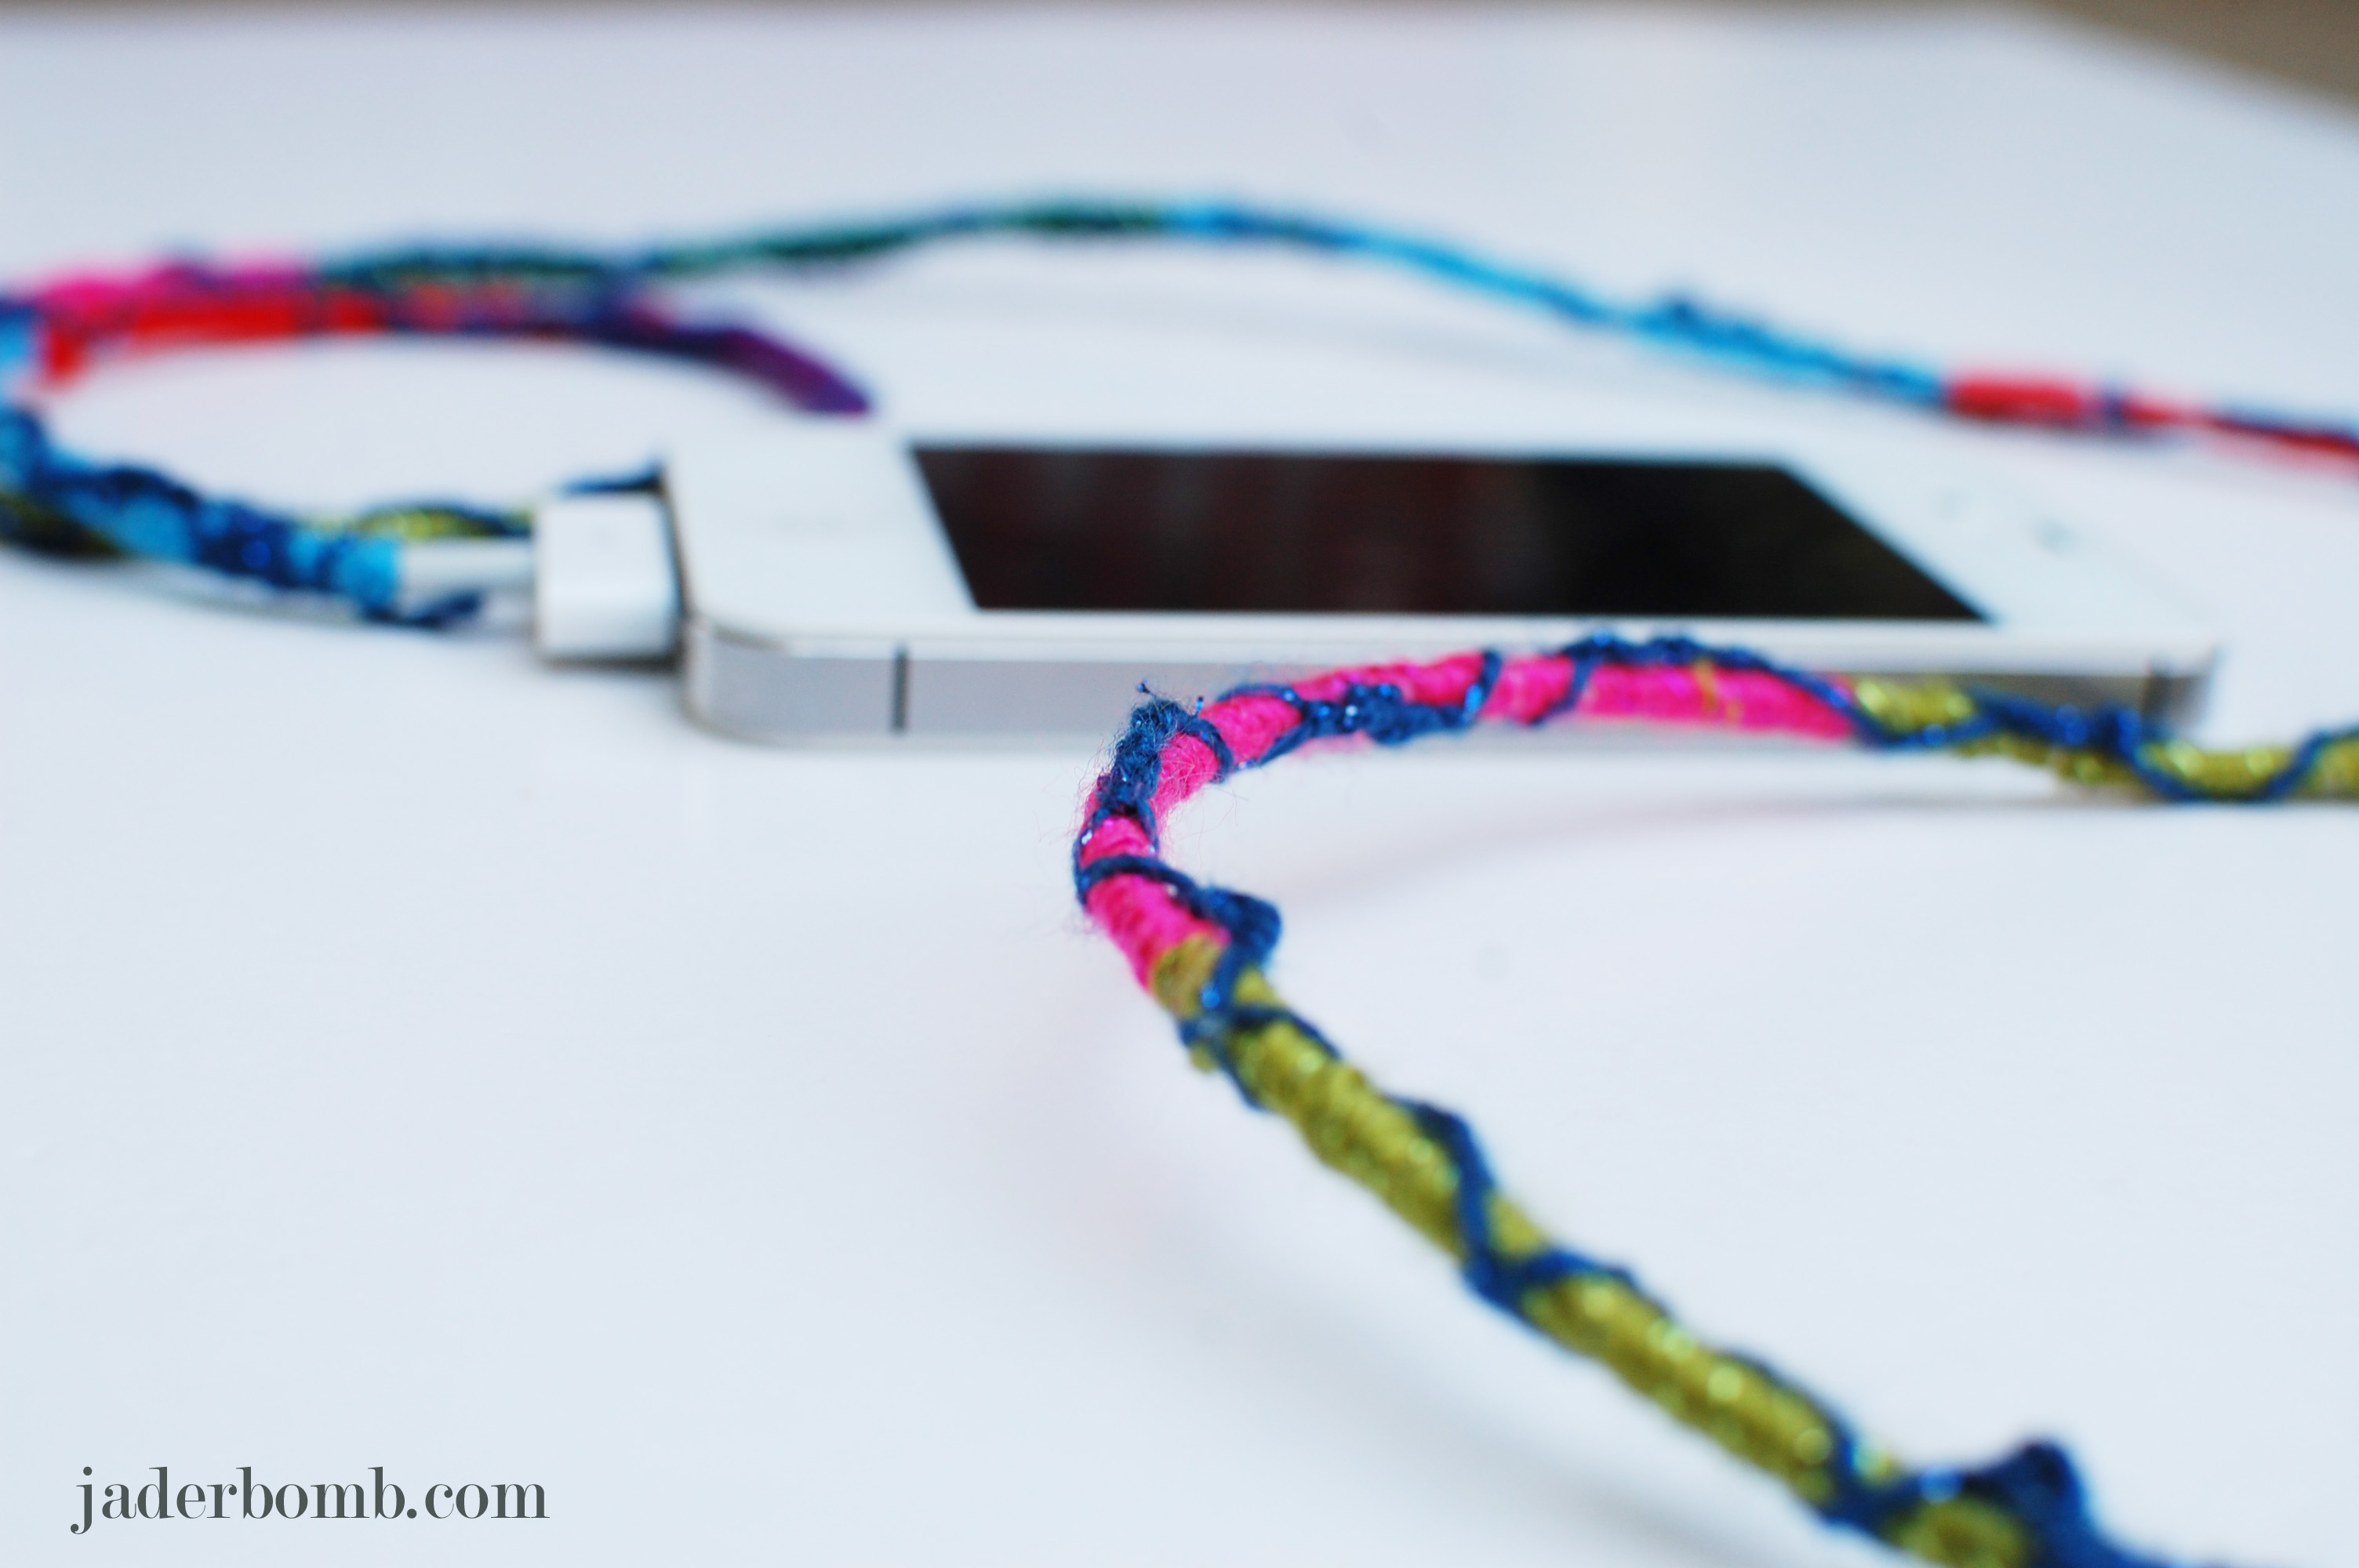
I am loving how cute it came out. It’s bright and whimsical just like me.


Friendship-bracelet-power-cords-jaderbombMake sure you share with all of your friends. I promise everyone will start making them.

See ya in the next blog post!

craft


jaderbomb

* My good friend Margo Potter just launched her new website. It’s pretty awesome click HERE to check it out.

* If you want me to feature any of your free printables shoot me an email: [email protected]

*DON’T FORGET ABOUT MY MARTHA STEWART GIVEAWAY! 

Happy 12 month’s of MARTHA! I am so glad you are here and I know you will love the tutorial I am sharing and the giveaway I am doing!  This month’s box of goodies made me smile from ear to ear. I especially loved the floral paisley adhesive silk screens.  Trust me when you use them you will become addicted. I made some fancy apothecary jars using them. Martha always knows what I love.
Let’s get started. 

Oh, if you are not familiar with the 12 months of Martha let me tell you about it.

I will be sharing a new project each month using Martha Stewart Crafts.
#12monthsofmartha & #marthastewartcrafts <——(this is the hashtag you can use if you repin this or want to see other’s who are a part of this project)

I am super giddy about it and I think you will too. Each month you will get to see new items from the Martha Stewart crafts line that is brand spanking new~

So yes! You will be seeing things that are not yet in the stores…

You can find all of her products at Michael’s Arts and Crafts, Jo-Anns Fabrics & Crafts and Amazon.com.

I’ll be giving away Martha swag monthly – so be sure to subscribe to my email updates… —–> LOOK AT THE TOP RIGHT!

Martha-Stewart-Giveaway-APOTHECARY-jars-jaderbomb

 How simple, cute and elegant are these apothecary jars?! Seriously, these would look great in any room. I made them for my kitchen and I filled them with coffee, tea and pomegranate powder for my water.

Martha-Stewart-Giveaway-APOTHECARY-jars-jaderbomb

 You will need:

*APOTHECARY JARS
*MARTHA STEWART SATIN CRAFT PAINT
*MARTHA STEWART SQUEEGEE
*MARTHA STEWART FLORAL PAISLEY SILK SCREENS
*LOTSA LOVE

You can purchase all of the above supplies by clicking on the links.

Martha-Stewart-Giveaway-APOTHECARY-jars-jaderbomb

 Don’t you just love these great colors. Someday’s when I feel down I just go in my studio and look through my tubes of paint. They are filled with happiness I tell ya.  For this project I used Geranium and Pool.
(colors of paint)

 Martha-Stewart-Giveaway-APOTHECARY-jars-jaderbomb

 When you open your pack of silk screens they will look like the picture above, all connected on one sheet.

Martha-Stewart-Giveaway-APOTHECARY-jars-jaderbomb

If you notice they have white lines separating each design. You should cut along the line to separate them.

Martha-Stewart-Giveaway-APOTHECARY-jars-jaderbomb

 This is how they will look once you cut them.

Martha-Stewart-Giveaway-APOTHECARY-jars-jaderbomb

 Find the image you want to use and gently peel the silk screen off of the paper. I like to start on a corner. Plus if it get’s crinkled it will not mess up the actual image. Once you remove the silk screen place it where you want on the glass.

Martha-Stewart-Giveaway-APOTHECARY-jars-jaderbomb

Once you apply your silk screen to the glass add a bead of paint right above the image.


Martha-Stewart-Giveaway-APOTHECARY-jars-jaderbomb

 Get your squeegee and pull the paint down over the image. I suggest going from the top to the bottom in one stroke. It will make the paint consistent and even. Repeat the step if you have to do it in two layers.

Martha-Stewart-Giveaway-APOTHECARY-jars-jaderbomb

 As soon as you finish, peel the silk screen off of the glass. Very important that you wash it immediately.  If you let the paint dry on the silk screen it will not work properly again. Once you wash it lay it out on a towel to dry.

Martha-Stewart-Giveaway-APOTHECARY-jars-jaderbomb

 Move on to your next jar.

Martha-Stewart-Giveaway-APOTHECARY-jars-jaderbomb

It’s really that simple. I hope you enjoyed this tutorial!  I have some great news… I am doing a GIVEAWAY featuring the supplies I used today… HOW AMAZING.  Please enter by putting your information in the Rafflecopter box below. I am excited to see who will win all of these products. Don’t forget to share this fun giveaway with your friends.

THIS GIVEAWAY WILL END APRIL 12, 2013.

Martha-Stewart-Giveaway-APOTHECARY-jars-jaderbomb

a Rafflecopter giveaway

jaderbomb *JANUARY craft HERE
* FEBRUARY craft HERE and HERE

ST_Martha_Stewart_Crafts_Coupon
*Click HERE (US) and HERE (CANADA) for a 30% off coupon for any Martha Stewart Craft paint, tools and accessories

Want JADERBOMB delivered right to your inbox?
Just enter your e-mail in the box below!

Enter your email address:

Delivered by FeedBurner

MarthaStewartPost


Bloggy Love Thursday- jaderbomb

It’s THURSDAY and you know what that means! LINKY LOVE DAY. I am sure by now you are following all of my wonderful crafty friends, and if you are NOT then today can be the day <3 Surely the most talented people your eyeballs will meet. Enjoy Jaderbugs!

Crafty genius Cathie Filian from Cathie and Steve made these “Ombre Beaded Easter Eggs“. They are EGG-stra special

My oh my it’s Margot Potter Pie… Well not really but she should have a pie named after her. Check out her “Emerald City Necklace“. I love this color you could wear it with practically anything!

Magical Mark Montano shows us how to make our glass grand by “Painting On Them Permanently“. I can’t wait to do this and personalize everything in my house.  He will win your heart in this video! 

The one and ONLY claudine hellmuth: artist + illustrator shows us how to make a “Recycled Birds Nest“. Are you kidding me! I officially want to be a paper bird and live in them…

I hope you enjoyed my crafty friends! Make sure to add them on EVERYTHING! 

Don’t forget to add me here:

FACEBOOK   TWITTER  PINTEREST  GOOGLE+

jaderbomb


Happy hump day Jaderbugs! I am so excited to share my “Chick Magnet’s” with you today. It’s almost easter and I thought it would be the perfect time to put these on your fridge or anything magnetic. Magnets add a lot of fun to your fridge especially when it’s holding up special notes or your child’s art. Let’s start making them!

Chick-Magnets-Jaderbomb


you will need
*Fluffy Chicks
*Adhesive Magnets

You can purchase all of the supplies I used by clicking on the links above.


Chick-Magnets-Jaderbomb


I purchases my chicks at Hobby Lobby and they were $2.99 for a box of 24. Pretty affordable, right!


Chick-Magnets-Jaderbomb

Start by peeling off the side of the magnet with paper on it. It should be sticky.

Chick-Magnets-Jaderbomb

Take your fluffy chicks and stick them to the sticky side of magnet. That is pretty much it! It’s a super easy craft that your kids could do in no time.

I hope you enjoyed this tutorial, see you in the next post…

jade-261

Today’s post is super sassy and fun! Come on, it’s EGG CANDLES. I will show you how to transform boring eggs in your fridge into a great centerpiece for your table. You can even use them individually if you choose too! Did I mention they smell DELICIOUS!

How-To-Make-Egg-Candles-Jaderbomb

you will need

How-To-Make-Egg-Candles-Jaderbomb

I bought my blocks of wax from Wal-Mart. Completely affordable!

How-To-Make-Egg-Candles-Jaderbomb

Take your ice pick and lightly crack a piece of the egg. Then you can start peeling the egg to create a hole at the top.

How-To-Make-Egg-Candles-Jaderbomb

This is what they will look like when done.

How-To-Make-Egg-Candles-Jaderbomb

Make sure to rinse out the egg completely. We want to get rid of any egg smell.

How-To-Make-Egg-Candles-Jaderbomb

I used my burner to melt my wax. If you have a ceramic dish you can do it in the microwave but please be careful. It can get really hot. If you decide to do it in the microwave make sure you do it for a minute, stir it then continue doing that until it is completely melted.

How-To-Make-Egg-Candles-Jaderbomb

I filled a pretty antique dish with moss that I bought from Hobby Lobby.

How-To-Make-Egg-Candles-Jaderbomb

Next, lay out your eggs in the moss.

How-To-Make-Egg-Candles-Jaderbomb

Gently place your wicks in the eggs.

How-To-Make-Egg-Candles-Jaderbomb

Then start pouring your wax. I used a plastic spoon, it works really good.  Once you fill them all up let them sit for a few hours to harden. Trim the wick with scissors and voila!

How-To-Make-Egg-Candles-Jaderbomb

There you have it. A cute arrangement for any space. Just remember if you make them in different scents that when you light them they might not smell great mixed together. I recommend doing them in one scent if you plan on lighting multiple eggs at a time. I hope you enjoyed this post, see you in the next one Jaderbugs!

craft

jaderbomb

*My good friend ED ROTH has a huge giveaway on his blog, check it out HERE.

*Check out my latest post from the #12monthsofmartha HERE.

*This is FUN news! I am now a contributing editor/blogger for I LOVE TO CREATE! Check out the blog HERE.

*Incase you didn’t know, I started a new site. Check it out HERE!

*Some other fun exciting news, Martha Stewart pinned some of my posts to her Pinterest page!!!

Bloggy-Love-Thursday

I am super excited to share with you something that will be taking place EVERY THURSDAY!  What is BLOGGY LOVE THURSDAY?
It is the one day of the week where me and four of my friends will showcase each other’s crafts! If there is something you would like to showcase send me an email [email protected]. You never know when something of yours will show up on here! Let’s get started on today’s wonderful crafts.

Cathie Filian always puts a smile on my face. Check out these epic crackle eggs she made!http://cathiefilian.blogspot.com/2013/03/diy-crackle-finish-easter-eggs.html

Margot Potter is a bloggy queen, did you know that? If you don’t believe me you can check this out….She made a stunning “rustic elegance centerpiece”…http://www.theimpatientcrafter.com/2013/03/diy-rustic-elegance-centerpiece.html

Claudine hellmuth: artist + illustrator …Well there is not much to say except TALENTED.. If you love illustrations then she is the person you need to stalk! She has a free download on her site, click the link below to get to it… All I will say is it’s “Bunny-licious”.
http://claudinehellmuth.blogspot.com/2013/03/free-easter-bunny-ears-printable.html

Mark Montano is going to rule the world one day. Maybe I can be his assistant or something. I can’t wait to make these “Tiny Hat” bobby pins that he put up yesterday on his blog! Can you imagine these in your hair! OMG!
http://markmontanoblogs.blogspot.com/2013/03/How-to-make-tiny-hats.html


I hope you enjoyed bloggy Thursday!

jaderbomb