Tag Archives: halloween

12monthsofmarthaHALLOWEEN PARTY DECOR

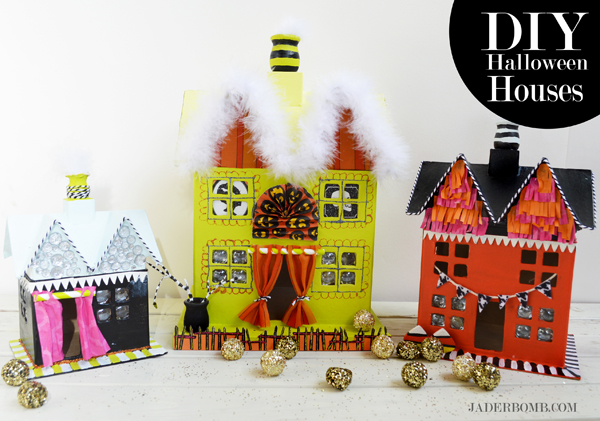
Boo-Yah!  I don’t know about you but I love HALLOWEEN PARTY DECOR. What do I love about it? EVERYTHING.

It doesn’t always have to be bloody and dark, ya know. Even though that’s the real way to celebrate this holiday.

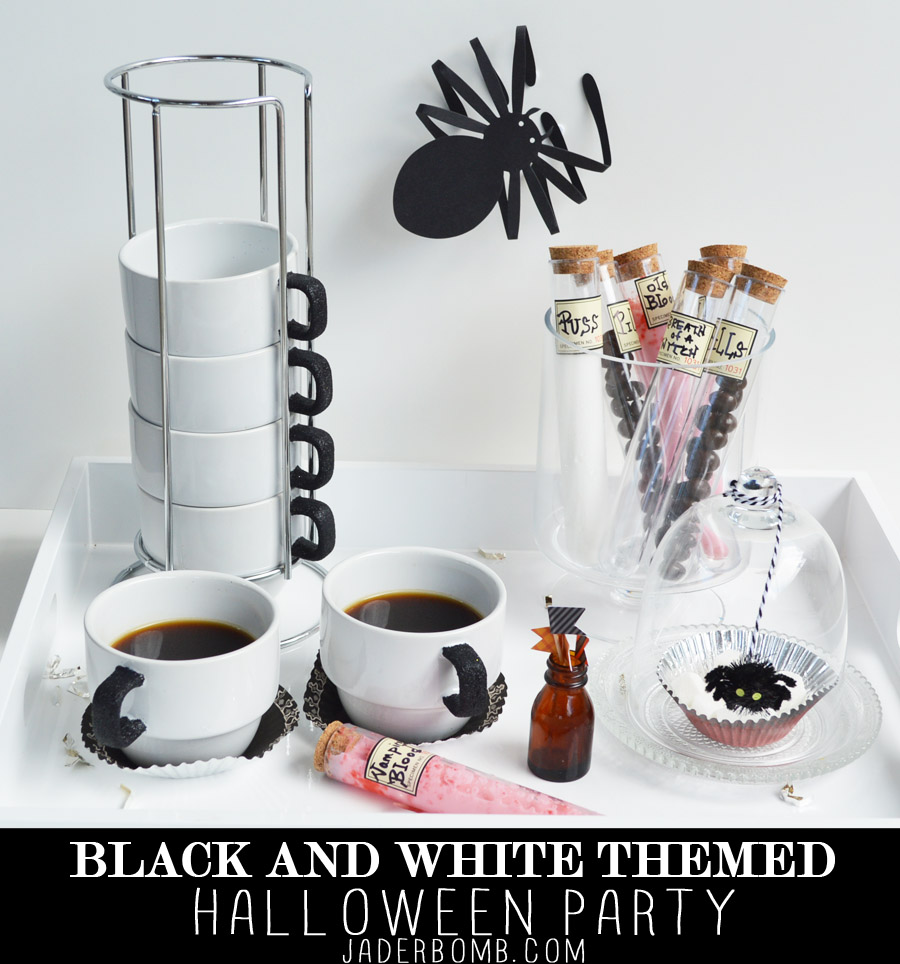
I wanted to throw a black and white themed coffee party and I know you will love all of the little details. Witches “brew” is what we will call it.

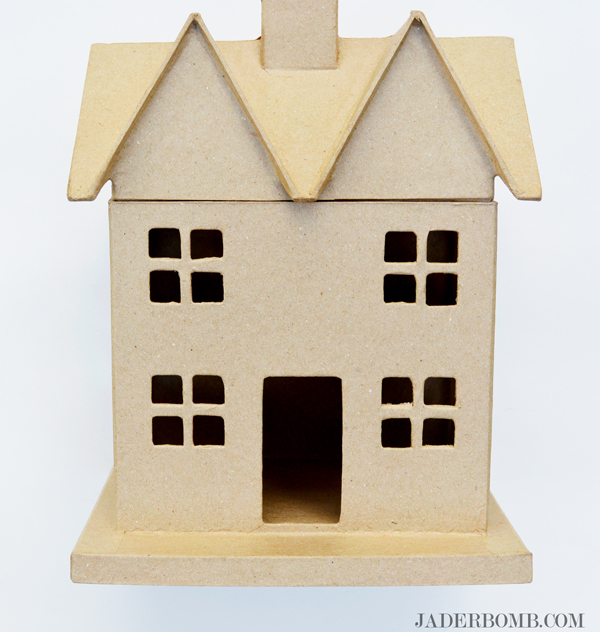
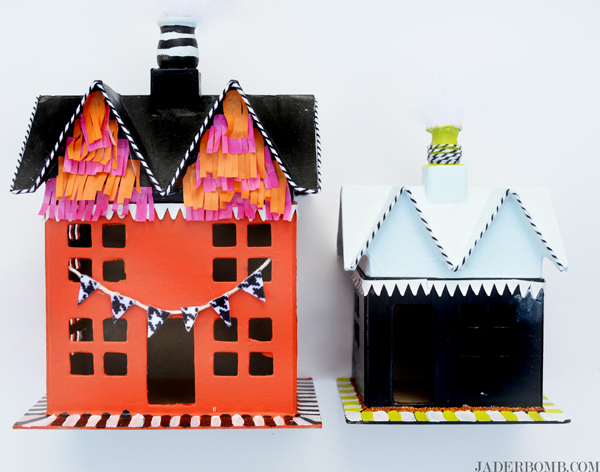
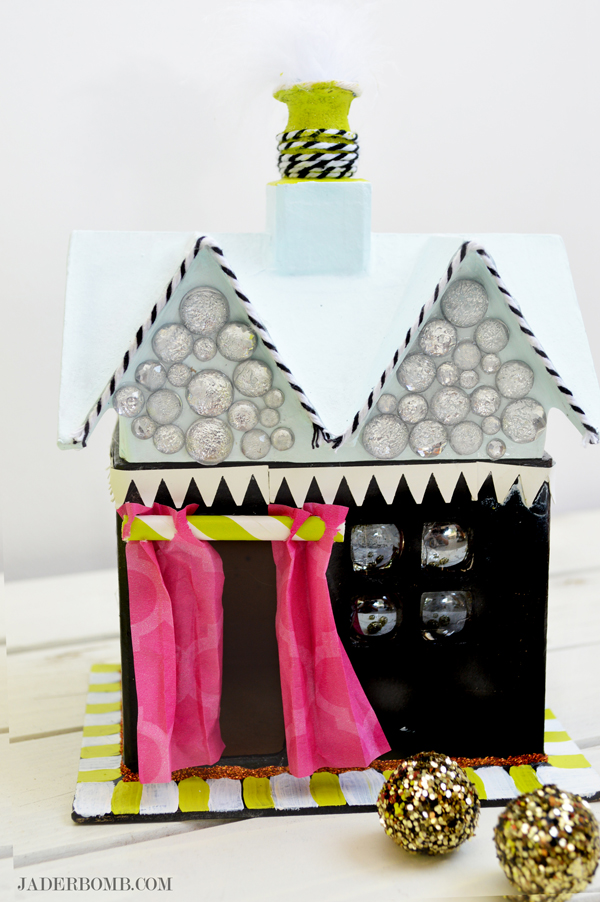
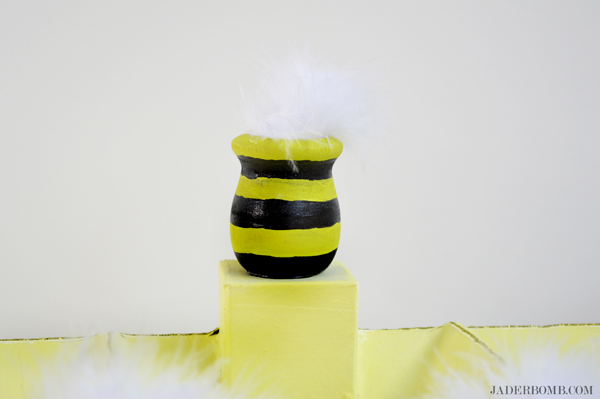
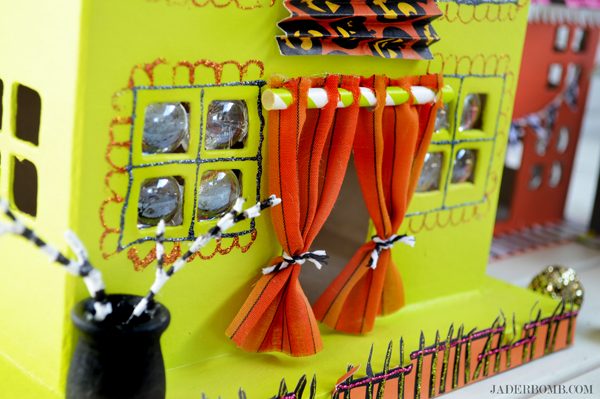
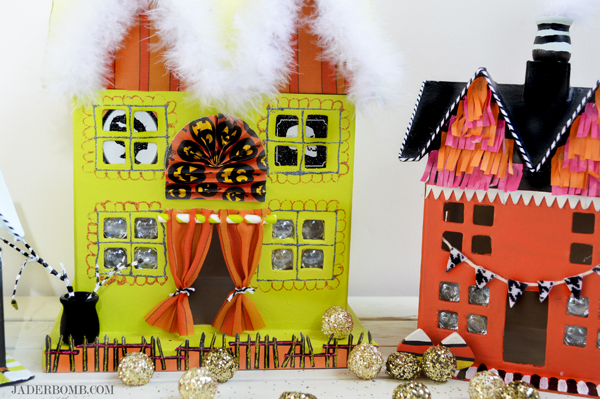
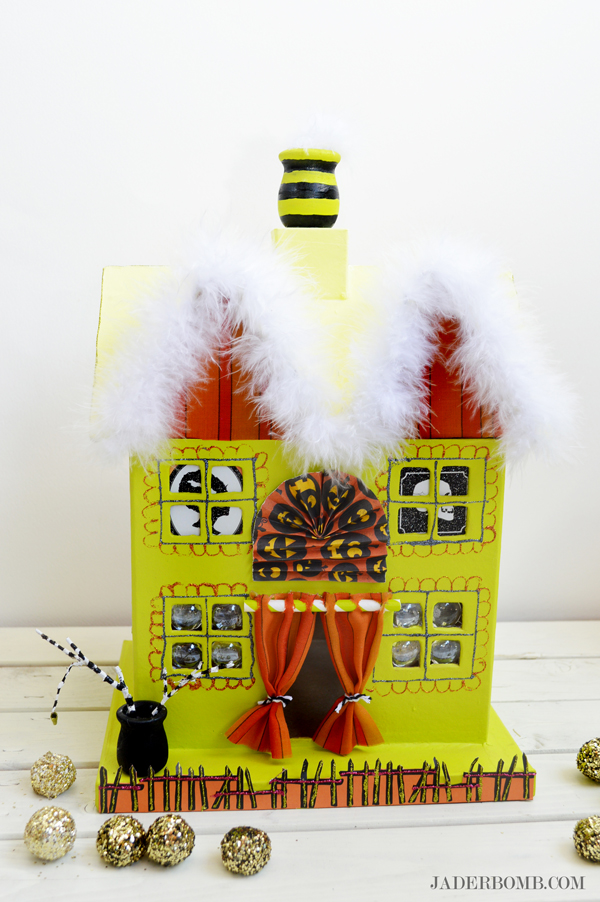
If you love Halloween as much as I do then you need to check out these houses I made. Wear these shoes while trick or treating with your kids. I am in love with these black and white kitchens.

BLACK AND WHITE HALLOWEEN PARTY DECOR

I know I would love to attend a spooky “brew” party, what about you? If you can’t find the items I used in this post you can click on ANY of the links below the pictures and order from one site! Hey, I am just trying to make your life easy.

I think everything looks clean and crisp. Kind of reminds me of a sterile hospital room.

Still want coffee?

HOW TO DIY YOUR HALLOWEEN PARTY DECOR

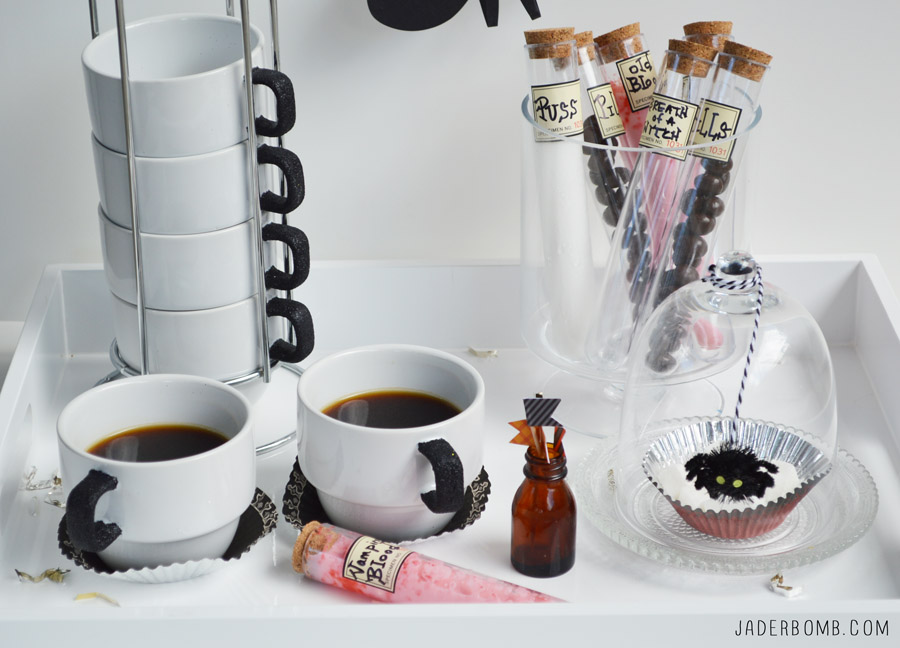
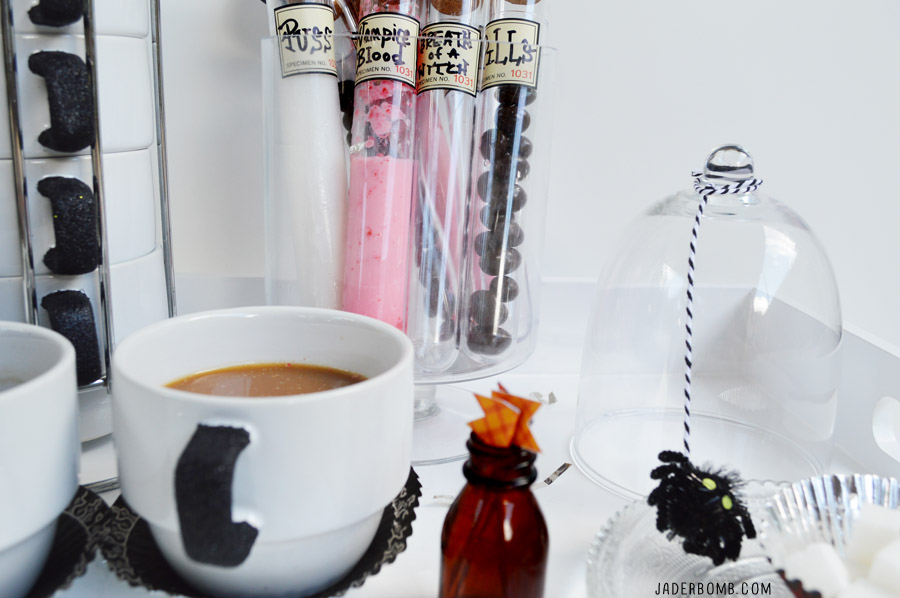
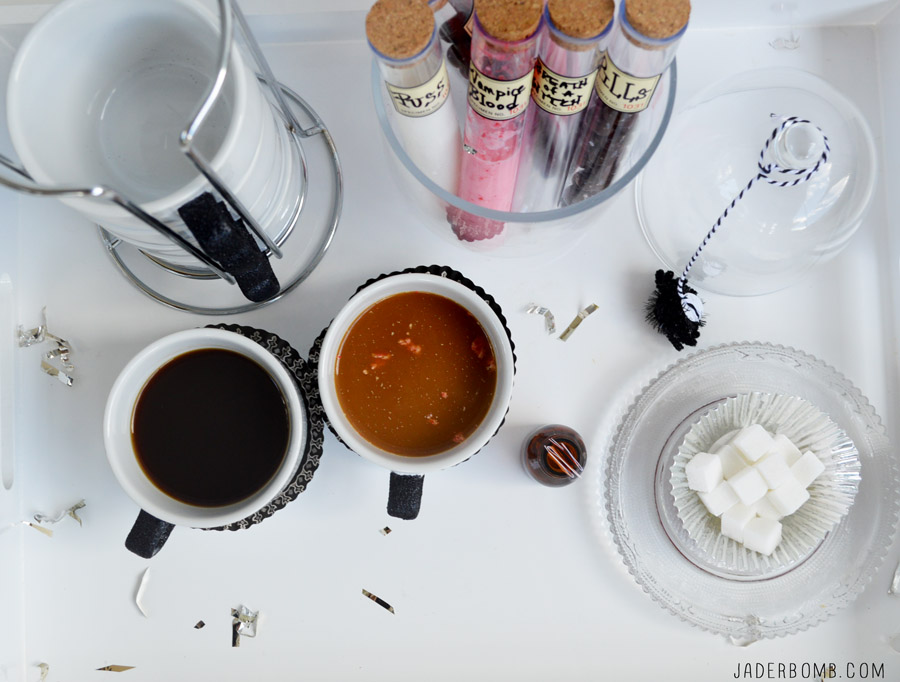
I purchased these mugs from World Market and dressed up the handle with glitter. Glitter will always make things better.

EASY DECOUPAGE ON GLASS TUTORIAL PARTY MUGS To start you will place stencil tape around your handle. Coat the handle with a nice coat of Martha Stewart’s new decoupage. Sprinkle your favorite shade of glitter on the wet decoupage.

Of course I used classic black. Carefully peel the tape off before it dries. You can clean up your mug now easily. Check out what else I decoupaged.

HOW TO DECORATE FOR HALLOWEEN PARTY

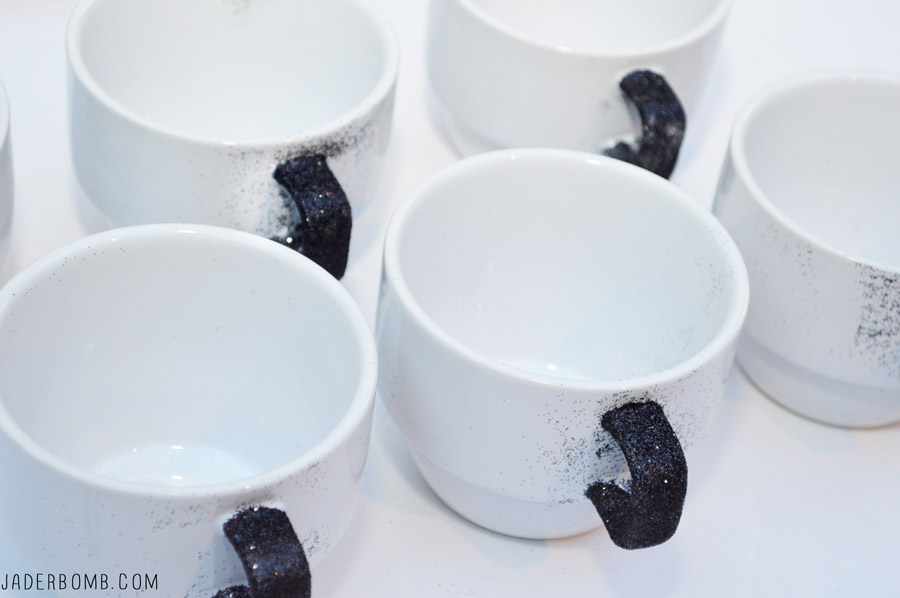
Once I removed the tape I sprinkled some more glitter on them before they dried. When they are dry just dust them off with a brush. Remember to let these cure for about 28 days then you can wash them by hand or in the dish washer.

They will stay fully glittered if cured correctly. HOW TO DECOUPAGE ON GLASS

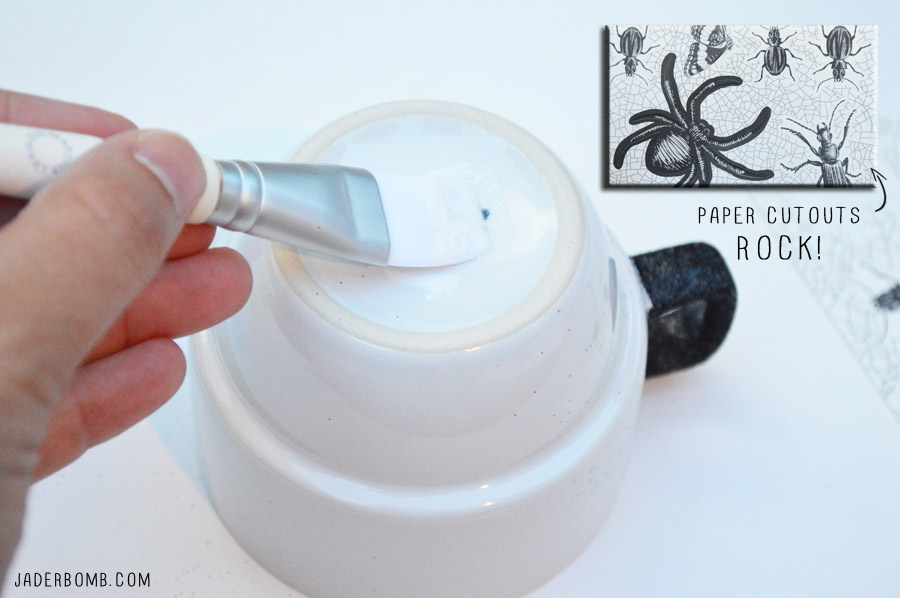
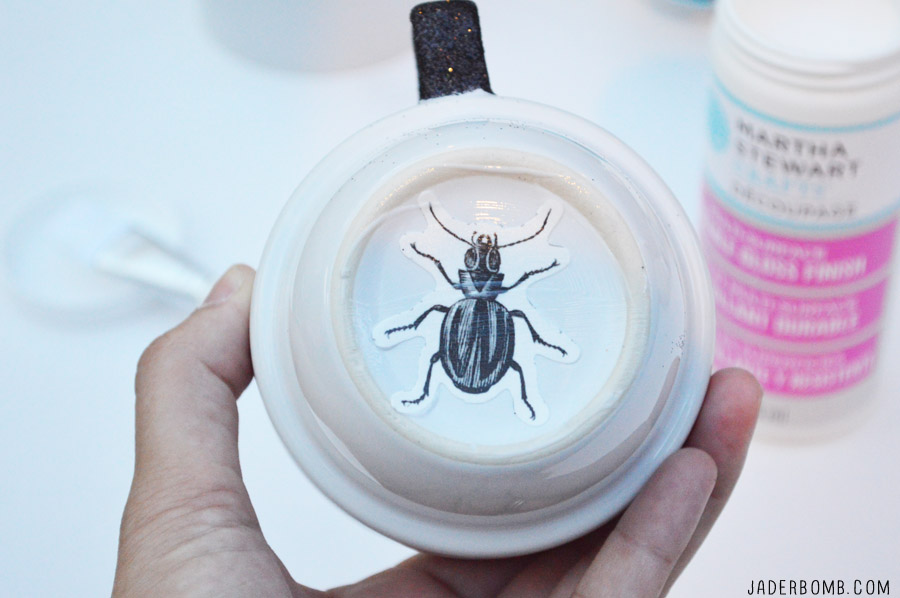
To add a little spark to the bottom of my mugs I decoupaged some insects to the bottom. When someone lifts their coffee mug a nice bug will be displayed on  the bottom! I think this is my favorite part of the party.

HALLOWEEN PARTY GLITTER MUGS DIY

HALLOWEEN PARTY DECOR

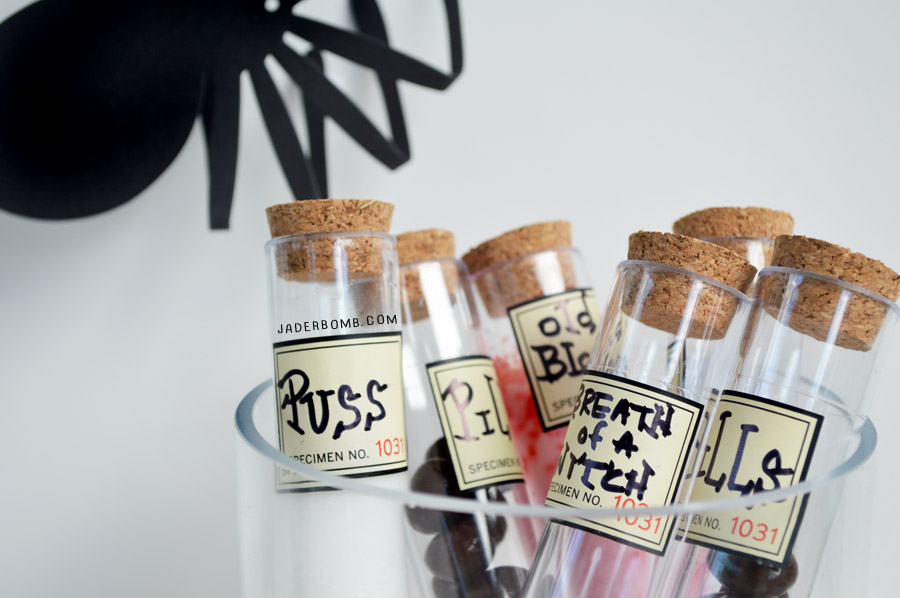
How clever are these test tubes! They come with sticky vintage labels that you can write on. I added a few different things inside of the tubes like chocolate covered coffee beans, strawberry milk and coffee cream. Anything that goes with a coffee party will work. HALLOWEEN PARTY DIY

ORANGE AND BLACK HALLOWEEN PARTY DECOR DIY

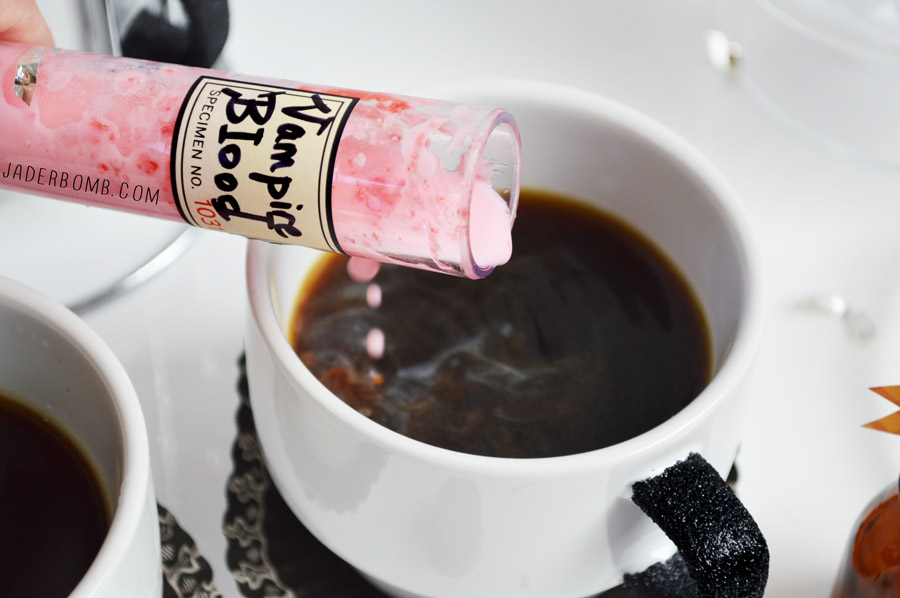
I used some halloween adhesive paper to make flags. I wrapped a piece around a toothpick then cut the paper on the end. These are what my guests’ will stir their coffee with.

SPOOKY HALLOWEEN PARTY

I used some cupcake liners  to put my sugar cubes in. Smart right!SCARY HALLOWEEN PARTY DECORATIONS DIY

To create a coaster for you super chic mugs take a cupcake liner and fold it inside out.

Easy and fun. HALLOWEEN PARTY FUN INVITATIONS

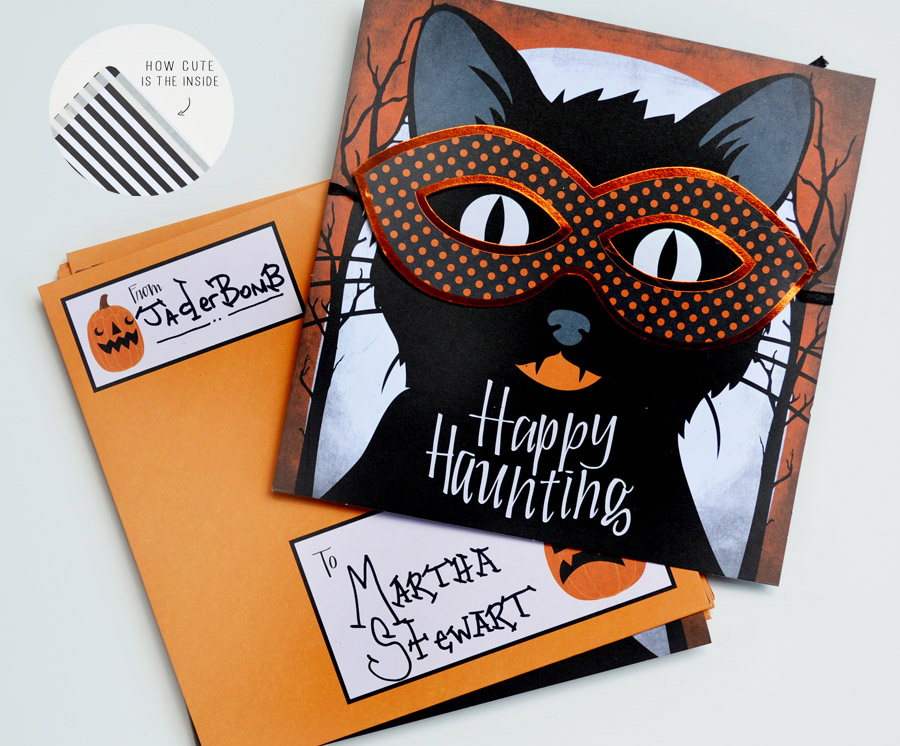
If you are like me then you send out invitations for everything. These animal masquerade invitations are the cutest thing since sliced bread.  Even the inside is decorated with black and white stripes. WITCH THEMED HALLOWEEN PARTY

EASY HALLOWEEN SCARY COFFEE PARTY

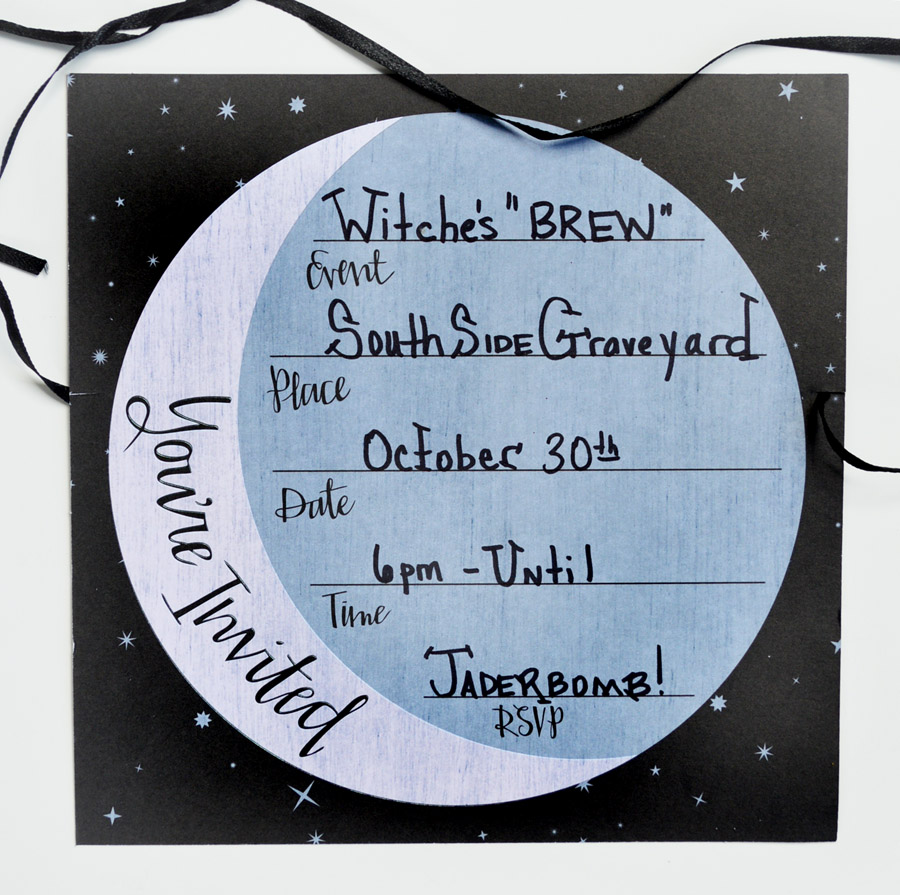
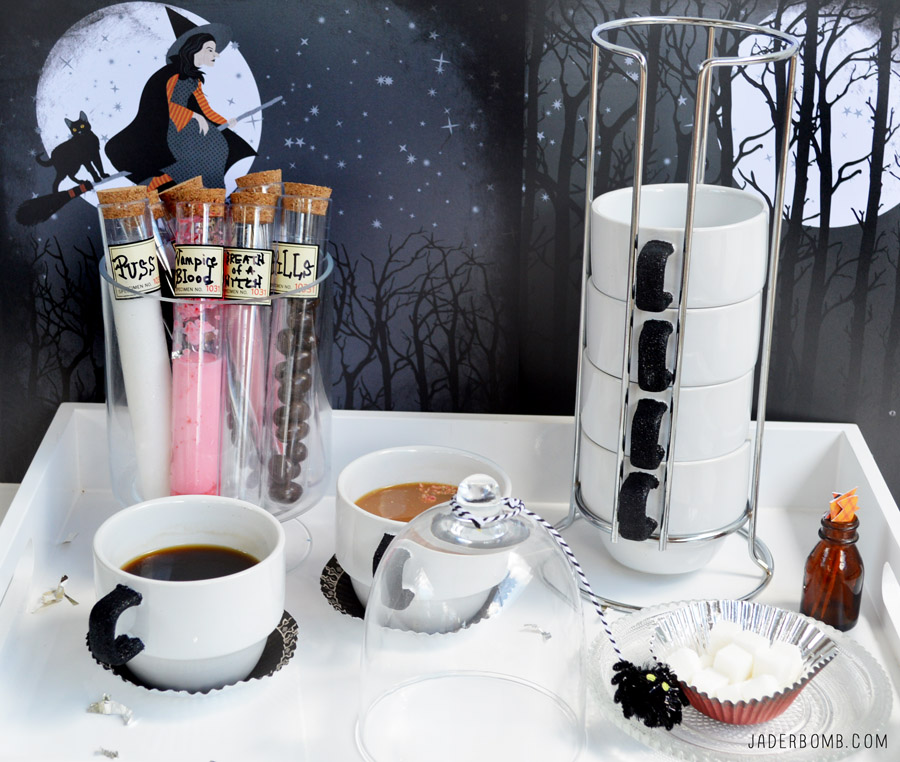
Pull out a few sheets of scrapbook paper to dress up your coffee platter background. I got these from the animal masquerade pack.
5 WAYS TO DECORATE FOR A HALLOWEN PARTY

I hope you enjoyed this post and it gives you a push to throw your own coffee party. Check out all of my 12 months of Martha posts’ here.

FYI: Please go vote for my friend Kelly HERE! Voting end Friday and we ALL WANT HER TO WIN!

Huge glittery hugs—See you in the next post! Visit me on FacebookTwitter,Pinterest, or Instagram!

ending

Today is a perfect example of my motto “Why buy when you can DIY”. It’a almost Halloween and I always dress up my house and studio with DIY Halloween Houses. I love today’s craft because you can keep it when the holiday is over or toss them to avoid clutter. I know you are prolly thinking I am crazy for saying I would toss them but I am pretty over the top like that. It’s one of those things that I wouldn’t want to stuff in the attic. After all it’s not like it’s a Glitterville collectible.  With that said, you can purchase these cardboard houses from Hobby Lobby and they are really inexpensive. I think the large house was around $5 and the other two were $2 and $3 dollars. I hope you enjoy them!

P.S. Check out today’s FREE Fall printable on Free Pretty Printables.

decorated cardboard boxes for halloween

diycardboardhouses

You can purchase these from Hobby Lobby!paintcardboardhouse

I started by painting the houses with acrylic paint. I lined the roof with baker’s twine and added tissue paper to the front of house. diy halloween house

I used glass beads for the windows. For the curtain I used a paper straw and a piece of tissue paper. I let my godchild help me and I am so happy I did. It’s a fun craft that any kid can do and trust me it will keep them busy! halloweenroof

For the roof I used a little wooden planter and stuffed it with a fluffy boa! You can get these from the craft store also. I say use any fun goodies you have at home and be creative. After all that is where the fun comes in. how to decorate cardboard house

For the fence I cut a strip of Martha Stewart craft paper then added glitter to it. Just have fun with your house! halloween diy houses easy halloween diy houses

I hope you enjoyed these and you create your own magical houses for the holidays. See you in the next post!

Huge glittery hugs—See you in the next post! Visit me on FacebookTwitter,Pinterest, or Instagram!

blog-love-jaderbomb.jpg

It’s Thursday and you know what that means! It’s all about BLOG LOVE today with my friends! Happens every thursday so come back next week♥ Today we have some fun fall crafts. I know you will enjoy them after all they are by the best bloggers in the CRAFTERVERSE. Ok, I just made that up.

Kathy Cano-Murillo the CraftyChica.com made this amazingly stylish purse from a Mexican embroidered blouse.

Cathie Filian made these stiffened FALL leaves. This will save me money, just wait till you see how easy they are.

Margot Potter made a chic screen printed Napoleon Dynamite T-shirt for www.ilovetocreate.com. This will be cute with a blue jean jacket over it!

Mark Montano flipping rocked my socks this week with his super stylish tuxedo pants. Good news they are for girls and boys!

Heather Mann for Dollar Store Crafts made a cute pumpkin candy dish. You can spruce up your pumpkin by painting it also! This is great for easy Fall decor.

We can’t forget my latest tutorial for the JADERBOMB blog. I made a cute decoupaged lace lamp, and it looks like a big candy corn!

I hope you get ton’s of inspiration from this post! Come back next thursday to see our round up again!

jade

It’s a wonderful day today because it’s all about “do it yourself “. Crafty peeps put on your glitterey seat belts because my friends Mark, Margo, Cathie, Heather and Kathy have some great tutorials for you! You can click on the links below each picture to get to their site. We have been doing this every week for almost 4 months now. I look forward to each week because it feels so good support other crafters like myself.

We are a tight bunch and if you mess with us we will pull out our glittery tools and bedazzle you. Don’t forget this is a linky party so link up your favorite DIY tutorials at the bottom. Every thursday this will take place!

Oh! If you have a minute check out their Facebook pages, blogs, you tube channels and whatever else you can find to give them to love.

do it yourself jaderbomb.jpg

1079662_584813768226963_879993483_n

Mark Montano poked my heart today with his crafty high tops. I need these in gold please. I can’t wait for you to see how easy they are to make.  I have this secret passion for spikes. Could you imagine if someone messed with you while wearing these? OUCH!

908218_10201379133776193_31795233_nKathy Cano-Murillo puffed up my heart with these fun fabric postcards. Can you imagine someone’s face if they got this in the mail. They could frame it after! How fun would it be to pick your fabric based off of your your trip.

1148269_10151532967895807_1750612897_n

Heather Mann transformed my heart from “trashy” to “wham bam thank ya ma’am” with this waste basket light fixture. It’s so easy to make and would look great in a kid’s room or a dorm room. Great idea!

1082231_10151839237102429_2134284179_n

Cathie Filian spooks out heart’s with this fabulous Halloween sweater. I need these in 3 different colors, thank you… Did I mention Halloween is my favorite holiday asides from Christmas. What is your favorite holiday?

1232468_10151871862972774_33786315_n

Margot Potter stamped my heart with this crystal embelloshed bangle bracelet for ImpressArt. Christmas is right around the corner, I’m just saying… I know a lot of people who would love this. 

chevron-pillows-jaderbomb

Last but not least if you did not see my latest tutorial for the I love to create blog. I am so happy with these chevron ombre pillow cases. 

Happy hugs on this spectacular Friday. Yippeee Halloween is near, well not really but YAY! See ya in the next post.

jade


Quote of the day:
Dear George: Remember no man is a failure who has friends.
Thanks for the wings!
-Letter to George Bailey from Clarence the angel, in It’s a Wonderful Life.

\I hope everyone had a great weekend! They have a huge “FRANKENSTORM” brewing on the East coast so all of my peeps there please be safe. I was really excited the other day when I thought about doing this tutorial. I have seen a lot of pumpkins decorated with yarn but I have not found any with a distinct design on them like this Thread Pumpkin

I mean doesn’t everyone need a thread pumpkin decorated with thread? It’s a must have, fa real.P.S. the good thing about this craft is you can decorate with ANY color thread and it will look good ALL YEAR LONG. Use Fall colors for your table decor, pure happiness there I tell ya!

Let’s get started!

INGREDIENTS:

Thread Pumpkin

Here is the first thing you will do. Notice the order of numbers, this part is very important. You want to start by making a ring around the top with the  pins. Then go down some and put another ring of push pins. However you will put the pins in the center of the ones above it. You want to start seeing a triangle from layer to layer.

When you are done with the pins, tie a little knot around the top of thread and put on a pin.

Start wrapping your thread around the pins! Once you get started you will figure our your pattern. You can go over the triangle a few times to make it look layered!

I hope everyone had a good weekend! Oh and btw: this yarn pumpkin is good for ANY time of the year.

I hope you enjoyed this tutorial, see ya in the next post! Make sure you come visit me in these places too! (look below this line, hehe)

Facebook Twitter Gplus Pinterest YouTube E-mail RSS

Get your DAILY dose of DIY delivered in your inbox! Just put your email address below!

Enter your email address:

Delivered by FeedBurner

Jaderbomb!

Quote of the day:
“It is the first duty of the citizen to be calm.

Won’t you take me to… FUNKY TOWN with FUNKY ROCKS… with FUNKY MAGNETS…

You get it, I am pretty excited about these babies. However I never even got to put them up because dad took them to Hawaii and already gave them away! He said all of his friends there would love them. I was hoping he would of “forgot” to give them away. Eh. He didn’t.

Good thing is it’s only rocks! I can make TON’S more Jaderbugs! Let’s get started on our halloween rock magnets

Halloween Rock Magnets

 INGREDIENTS: 

*Paint
*Glue Gun
*Craft Brush
*Baker’s Twine
*Rocks
*Magnets

Make sure you click on the links of ingredients to order these items!

The first thing you will do is paint your first coat of paint onto the rock. I like to do one half, let it dry then do the other half. Remember your first coat will be translucent to a certain degree.

I love taking pictures of my paint. It looks so pretty! NO. I don’t want to eat it, today.

Once your rocks are fully coated you can start painting your design on them. I really enjoy whimsical, organic designs.  Remember if you are putting different designs on your rocks to let each color dry thoroughly. I won’t show you the rocks that threw in a pile because I thought I had magical brushes that would not mix the paint together.

HAHA

To make the little designs with your baker’s twine I like to start by wrapping them around my finger like this. If you find an easier way please do that!

I know. I was lazy. I did NOT paint the  backs of my rocks. I mean, had I known they were taking a trip to Hawaii I would of.  But, once you are done painting and gluing you can place your magnet with an adhesive backing to the back of the rock. Where ever you choose to put your baker’s twine just hot glue it down.

This one kinda reminds me of Charlie Brown’s shirt. I love the way the black and white baker’s twine makes everything pop!

I am totally in LOVE with my little pumpkin. Guess I will make a new one!
(Insert shaking head here, haha)

I have this vintage serving plate in our kitchen and I use it to post important notes. These little magnet’s were cute on it.

I hope you enjoyed this tutorial, see ya in the next post! Make sure you come visit me in these places too! (look below this line, hehe)

Check what else I did  these Halloween earrings that look like these magnets here.