Tag Archives: martha stewart glitter

ST_12_months_of_Martha_Logo-1 GLITTERED SPIDERS

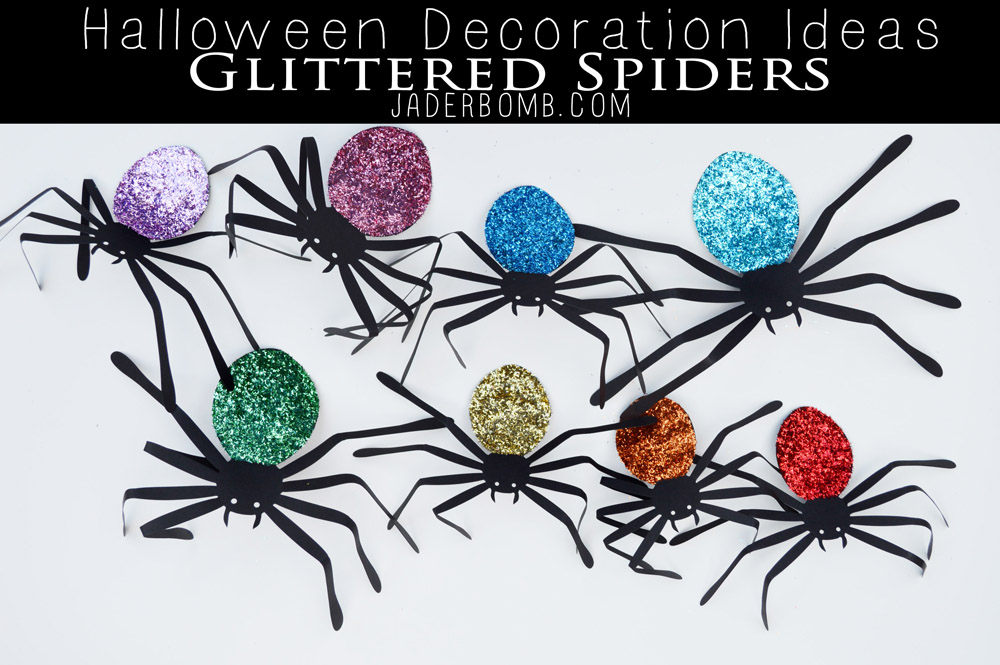
Howdy Hoo Jaderbugs! It’s Monday and I have a ton of glittery happiness for you. Well not technically a “ton” but you understand. It’s all about “Halloween Decoration Ideas” today on the blog. I don’t know if I ever told you just how much I love Halloween and fake spiders. Preferably black ones made of paper.

LOVE.

The one thing that is changing as I am getting older is my Halloween color theme! I do still love the original orange and black but…COLOR makes me happy and jittery inside.  I guess I am sorta like ROY G. BIV’S wife.

I mean if she existed (wink wink).

YOUWILLNEED

Martha Stewart Glitter * Craft Brush * Mod Podge * Paper Spiders

Glittered Spiders. Supplies

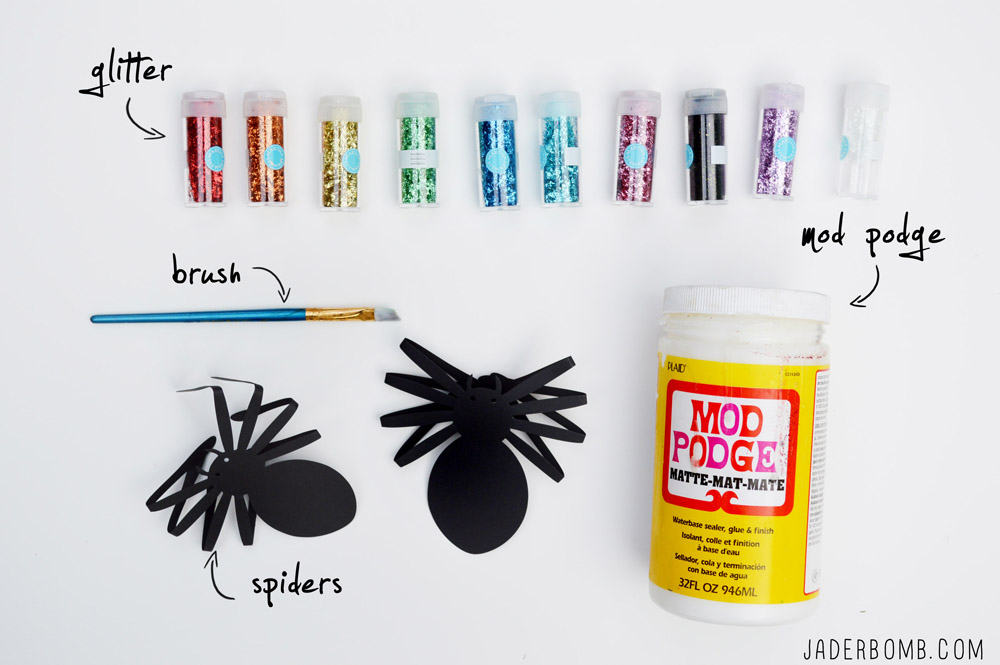
I am so in love with GLITTER. I am not speaking of a “normal” relationship with glitter. You will never find me without glitter. It’s either in my purse or in my hair. <—haha!

Halloween Decoration Ideas Martha Stewart Glitter

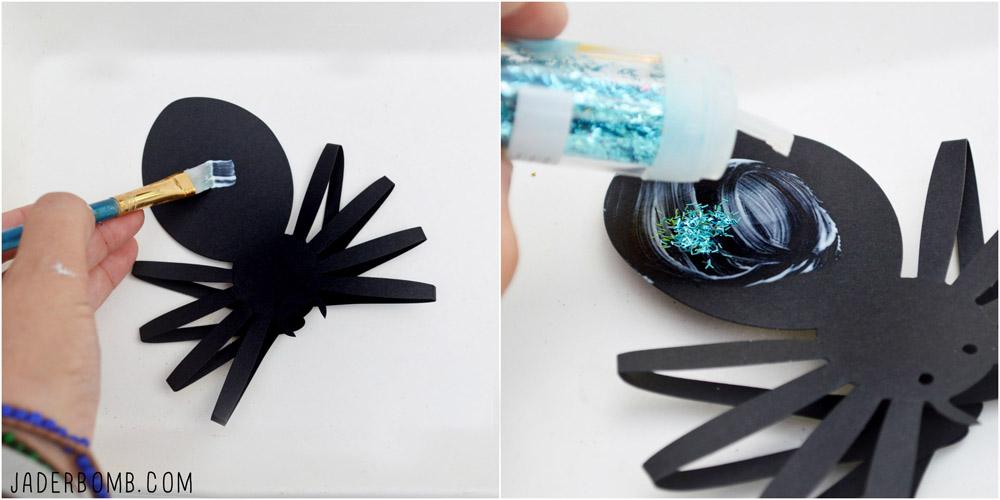
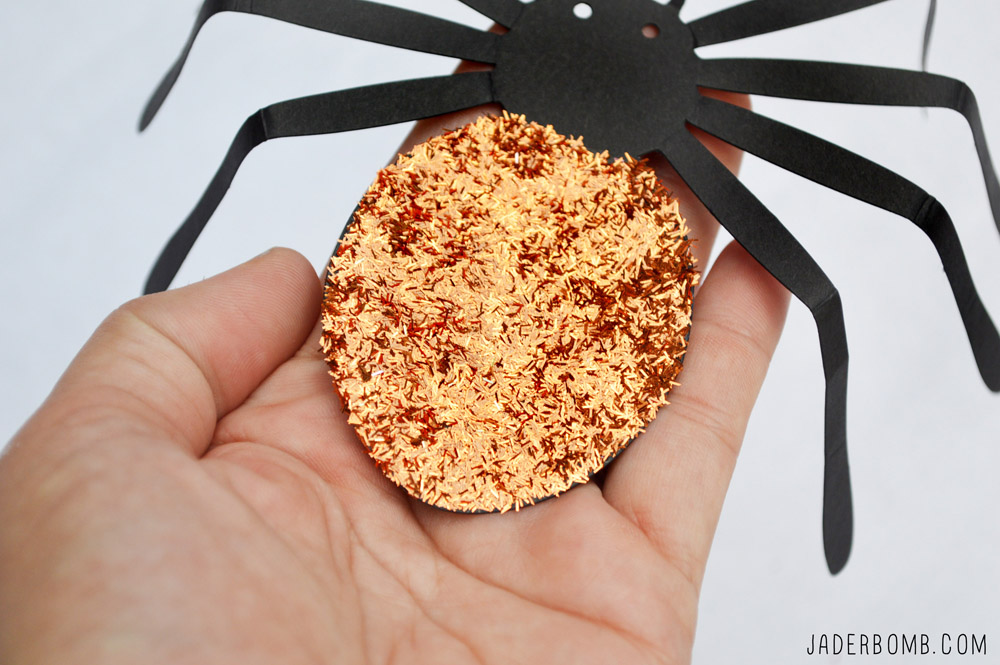
The first thing you will do is coat the bottom of your spider with Mod Podge. Quickly sprinkle the spider with glitter before the Mod Podge dries.

 mod podge glitter

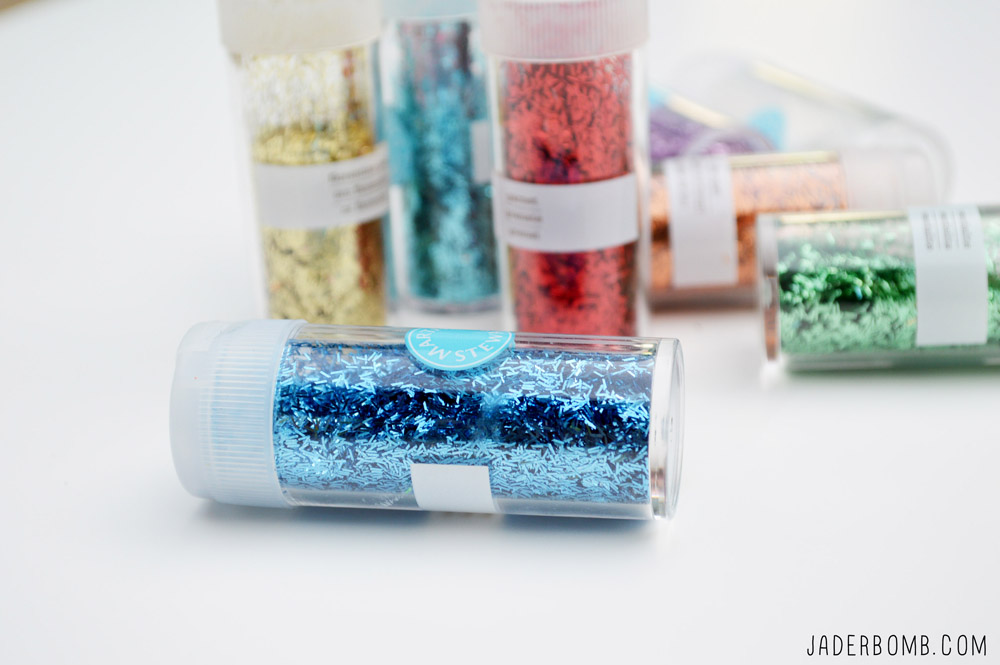
I used the tinsel glitter because in the end it almost looks hairy. I think the tinsel glitter is a great choice to add texture to our spiders. I usually use this glitter around the Christmas holiday’s but I figured I would bust it out a little early.

 Orange Glitter

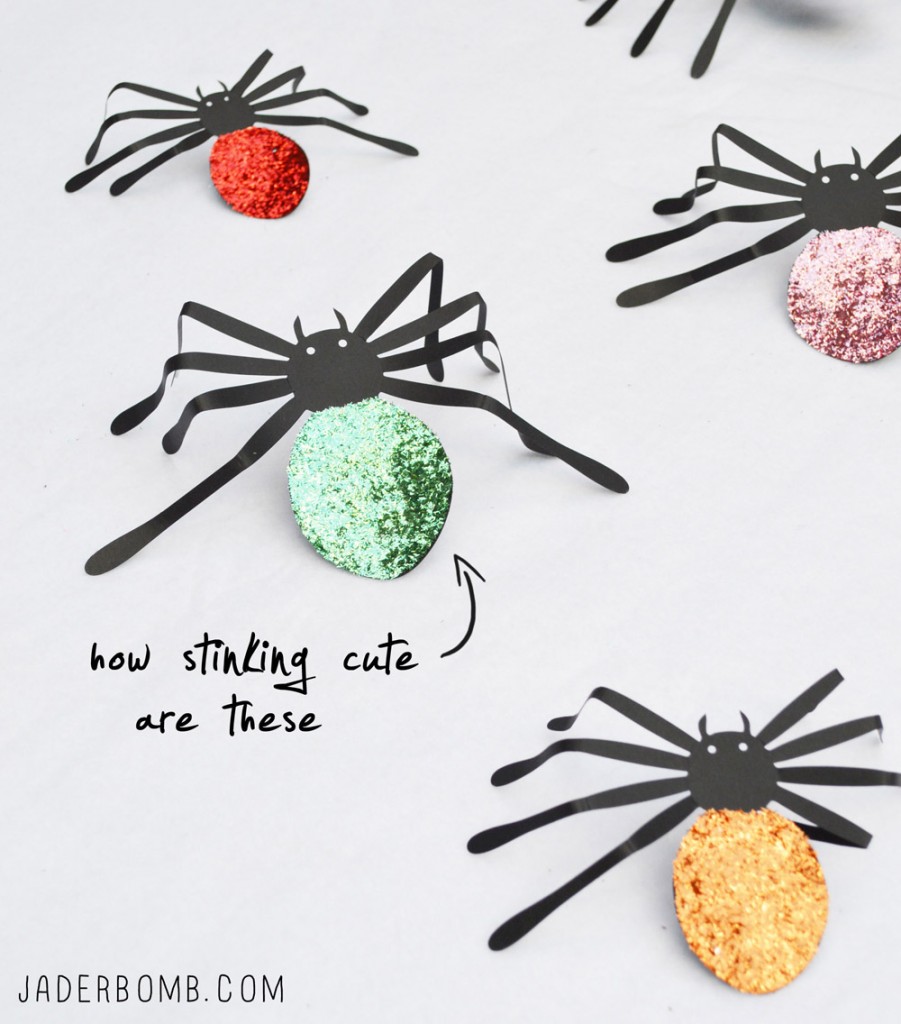
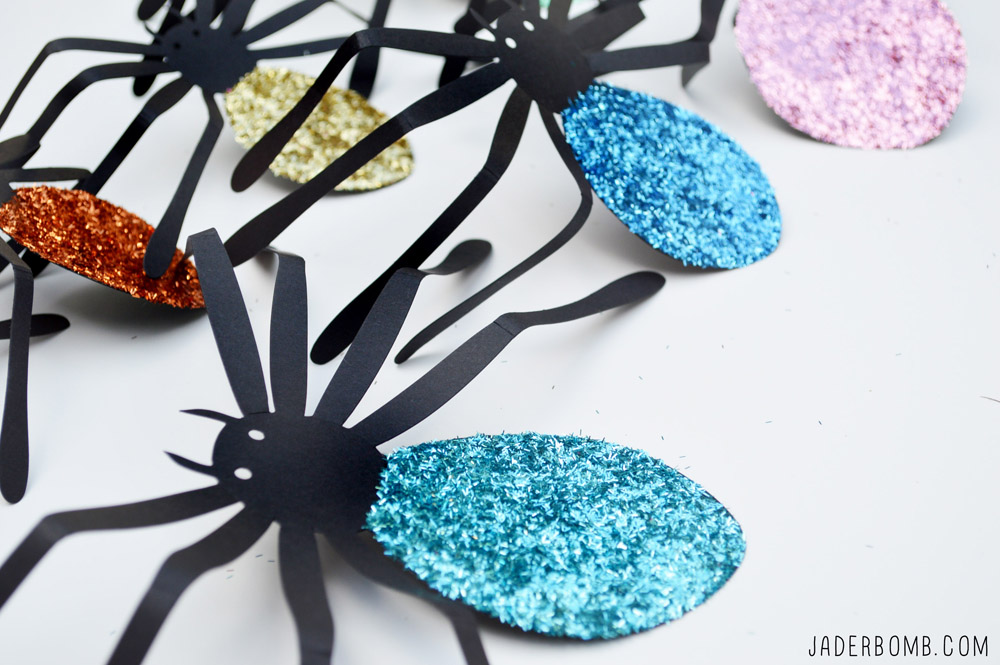
When you buy your paper spiders they come with little round double sided stickers. You will place them on the underneath and stick them on a wall. I absolutely love how they look full of color. PURE HAPPINESS.

 halloween spiders

 how to use glitter in decorations

I hope you enjoyed this bright and fun tutorial. I would say this is on the “EASY” level but you know what…Sometimes the cutest things just cross your mind and I am here to bring them back! See ya in the next post!

ending1

Quote of the day:
God, grant me he power to get out of the shower – Monica Sheehan

Happy Happy Thursday! I could of sworn I just said in a post I can’t wait till Friday. Who would’a thunk it would get here so fast? Surely not me.  I think you know by now I love glitter. I swear, I have inhaled so much in my lifetime I believe it’s running through my veins. How cool would that be if everyone had a different color of glitter inside of them!

I bought this tape dispenser at Target the other day because I truly needed one. I think that is the ONE thing I never bought in my entire life. Can you believe that? Of course it was kinda boring so I figured what better way to “dress” it up!

Have you seen my Mexican Folk art plates? Click HERE to check them out!

INGREDIENTS: 

Tape Dispenser
Martha Stewart glittering glue
Martha Stewart glitter
Martha Stewart craft brushes
Martha Stewart glittering tray
Mod Podge
*happy thoughts which will create happy designs
(at least that is what jaderbomb thinks) 

 What I did first was apply Mod Podge in certain sections with my craft brush then sprinkle glitter on top. I did this step to get my “background” glitter down. The background is the biggest sections on your tape dispenser. Let it dry. Once it is dry I used my glittering glue to draw my designs. The great thing about this glue is the tip. It is tapered so you can really “draw” things accurately with it. I like to do one color of glitter at a time, let it dry then move onto the next design. I did the pink first, then the purple and last my designs incase you were wondering. That’s it Jaderbugs!  I hope you enjoyed this tutorial and I can’t WAIT to see you in the next post!

p.s. I have some fun FALL things coming up so make sure and check back in with #teamjaderbomb

Yes. Today I will be showing you exactly how my brain thinks! It really funny because every single thing I look at  I think to myself, “I wonder how I could spice this up“. Is that normal? Does anyone else out there do this. Let me clarify it’s not every 10th object I do this to. It’s EVERY single thing my eyes land on Jaderbugs. {{For example I am thinking right now how to decorate my laptop}}. SEE.

I hope everyone out there had a great day SUN-day. A friend of mine sent me a HUGE box of “blue” bottles because she knows I collect them. They are SOOO PRETTY! I can’t wait to do fun crafts with them. They were SKYY Vodka bottles. I said “WOW, that was prolly lot’s of “FUN” nights”.

I told you it was ALOT

Let’s get started on the craft we are working on today!

INGREDIENTS

You can get these magnet sheets at Wal-Mart in the craft section. They are maybe 2 bucks! Of course I used Martha Stewart scissors and glitter. It is the BEST!

Start cutting out triangles. You can cut one and make a template if you want. I just eyeballed it because I wanted them to be different sizes!

SEE! Triangles!

After you cut out all of your triangles, peel the paper off of the sticky side and sprinkle glitter all over it!

Who woulda ever “thunk” to decorate a lil ole coffee pot!

Sorry if my “stainless” steel looks a little discolored, this sucker is worked to the BONE!

I think this is the cutest thing ever! Not sure many MEN will love this (haha) good luck ladies!!!!
I hope you enjoyed this craft and don’t forget to come back tomorrow for another fun craft! I will give you a hint {{gold}}!!!

Close your eyes and pretend we are sitting on a porch drinking glittered coffee,

Good day my little jaderbugs~!!!!
It is Sunday and I am super duper excited!!! I have had a great week and I have alot of crafts coming up that you will LOVE LOVE LOVE!!!! Fa Reel!!!
Can you believe WOMAN’S DAY magazine LIKED this craft on Pinterest!!! Check it our here!
This craft is SUPER fun and SURE to catch anyone’s eye!
For the warp, cut 1-inch-wide loops from the bodies of one or two tees removing the hem and stopping at the sleeves.
You’ll need a total of 11 loops (to start off with). For the weft, cut at least 50 loops from the remaining shirts. Save the unused sleeves for the basket project.
-Stretch one warp loop over the hula hoop, as shown above in the second picture. Add and secure a second loop, perpendicular to the first (above, third picture).  Repeat, filling in the spaces, until all 11 loops are in place (above, fourth picture)
-Push together two warp loops at the top of the hula hoop. This creates an odd number (10) of warp spokes in your wheel, which allows the over-under pattern of the weft to alternate with each new row.
-Now that you have 10 loops grab an extra t-shirt loop wrap it around the double spoke and loop it back through itself. Begin weaving the t-shirt loop over and under the warp spokes, forming a tight spiral.
 Treat both parts of each warp spoke as a single unit, weaving over or under the two together. As you work, push the weft material (t-shirt) loop toward the center of the hoop and keep it just snug. If you pull the weft tight, the rug will develop lumps or bends. When you reach the end of the piece of weft, add a new loop by threading it through the end of the first and back through itself.
Keep repeating this process till you are happy with the size.
It might take a little practice until you get comfortable with it.
Remember, in order to get this “cone” shape you will need to make it tight. So when you are weaving over and under your original 10 loops make sure it’s snug as a bug.
It’s really more important that you make it snug when you first start till about halfway. When you are about halfway through it start making it looser and looser. This will form our SHAPE.
When you are done you will ut the warp spokes off the hoop one at a time and then tie them into a know. This will prevent out cover from unraveling. GOOD LUCK!!!

Wanna visit me? Come on!!!

ETSY,PINTEREST,FACBOOK,

GOOGLE+,TWEET ME

Hey my little Jaderbugs!!!
I hope everyone is having a great weekend! This craft is so amazing because it’s practically “free”. Well sorta. If your like me then you ALWAYS “collect” paint samples. You just never know when you will need them {{winky eye}}.
Let’s get started!
There you have it JADERBUGS!
Don’t forget about my giveaway I am doing on my blog right now. It is open until Sunday! Click here to sign up for the FREE Mother’s Day BUD VASE!
Seriously. How cute is this.  I know you can’t see it but when the light is ON it lights up in the coolest way. It’s almost like a “cheap” tiffany lamp{{{heheheheh}}}
Sending you load’s of free time to go get “free” paint samples,

Wanna visit me? Come on!!!
ETSY,PINTEREST,FACBOOK,GOOGLE+,TWEET ME

Happy FRIDAY Jaderbugs! Such a long week! But I wouldn’t change a second of every second. So you know I am always looking for ways to save money! I will go to the end of the earth and find the cheapest way. Which is what I did today (except I didn’t go to the ends of the earth today)… I just went in my craft closet!!! Your gonna flip when you see this craft, ONLY because these suckers are so expensive in the stores!

I always have an excuse for buying things that SMELL good. For about 3 years now me and seester would always send pictures back and forth of the “new” glade sprays. One of us was always SURE the “OTHER” didn’t know about it yet. The “other” one had already bought it. ((womp womp wompppp))

Things have somewhat changed for me in the last  6 months. For some strange reason I am worried about breathing in all of the chemicals in the sprays. Right? It’s like hey, we know you don’t do drugs but why don’t you spray this spray in your house about… um 50 times in one day because you can’t help yourself and we know you are COMPULSIVE and we promise you will become SO high from the “chemicals” you won’t know what’s REALLY going on. OK. So it worked.

Then I thought… why don’t I just start buying REAL flowers and have a natural smell OR use essential oils (natural)…. I mean let me just say this.  I realize I will sometimes buy things that are not OH SO GOOD for me to inhale (like my addiction to Bath and Body Works, Statin and Co. candles) but I at least TRY my hardest now.

Wouldn’t it be so nice if this was my backyard!
We could just walk outside and pick whatever flowers we wanted and “VOILA”…..OH Natureeeellllllll is in the HOUSEEE

Check out more of these fabulous flowers here.

I thought is was smart to make my own Reed Diffuser. Whatcha think! Let’s get started!

You will need some bamboo skewers, a small glass vase, water and whatever oil you want.

Pour some water in your glass vase, you want to fill it about 3/4 full. Add ass many drop of your oil as you want. I like to put ALOT!! {{{go figure}}}

Put your bamboo skewers in your vase and there ya have it! Your very own REED DIFFUSER! How simple was that!
I added a strip of fabric to BRIGHTEN up my diffuser. It smells so good people! Dont’ forget to turn your skewers upside down so the “oil filled side” sticks up. Just flip flop the skewers when you place your eyes on it!

I hope you have fun making YOUR OWN scents and dont’ forget to “SMELL THE FLOWERS”

Don’t forget about my giveaway I am doing on my blog right now. It is open until Sunday! Click here to sign up for the FREE Mother’s Day BUD VASE!  

Wanna visit me? Come on!!!
ETSY, PINTEREST,FACBOOK,GOOGLE+,TWEET ME