Tag Archives: diy

Quote of the day:
Everything’s intentional. It’s just filling in the dots.
David Byrne

Did you know polka dot’s are coming back like they never left? Just thought I would share that with ya!

Do you ever walk in the stores just staring at all of the UH mazing frames for sale. Then you look at the price and realize they are kidding. There is NO way I will spend 30 bucks on a frame when I can enjoy making one on my own. Well I lied, if it’s a really fancy one from an estate sell or antique shop then yes… I just sat in my office a minute ago and realized how close Valentines Day is. Well I know it’s not right around the corner but WHOA where did Christmas go? I kinda love Valentines day because I get to shower my honey’s with ton’s of yummy things!
Did I mention that I love pink?

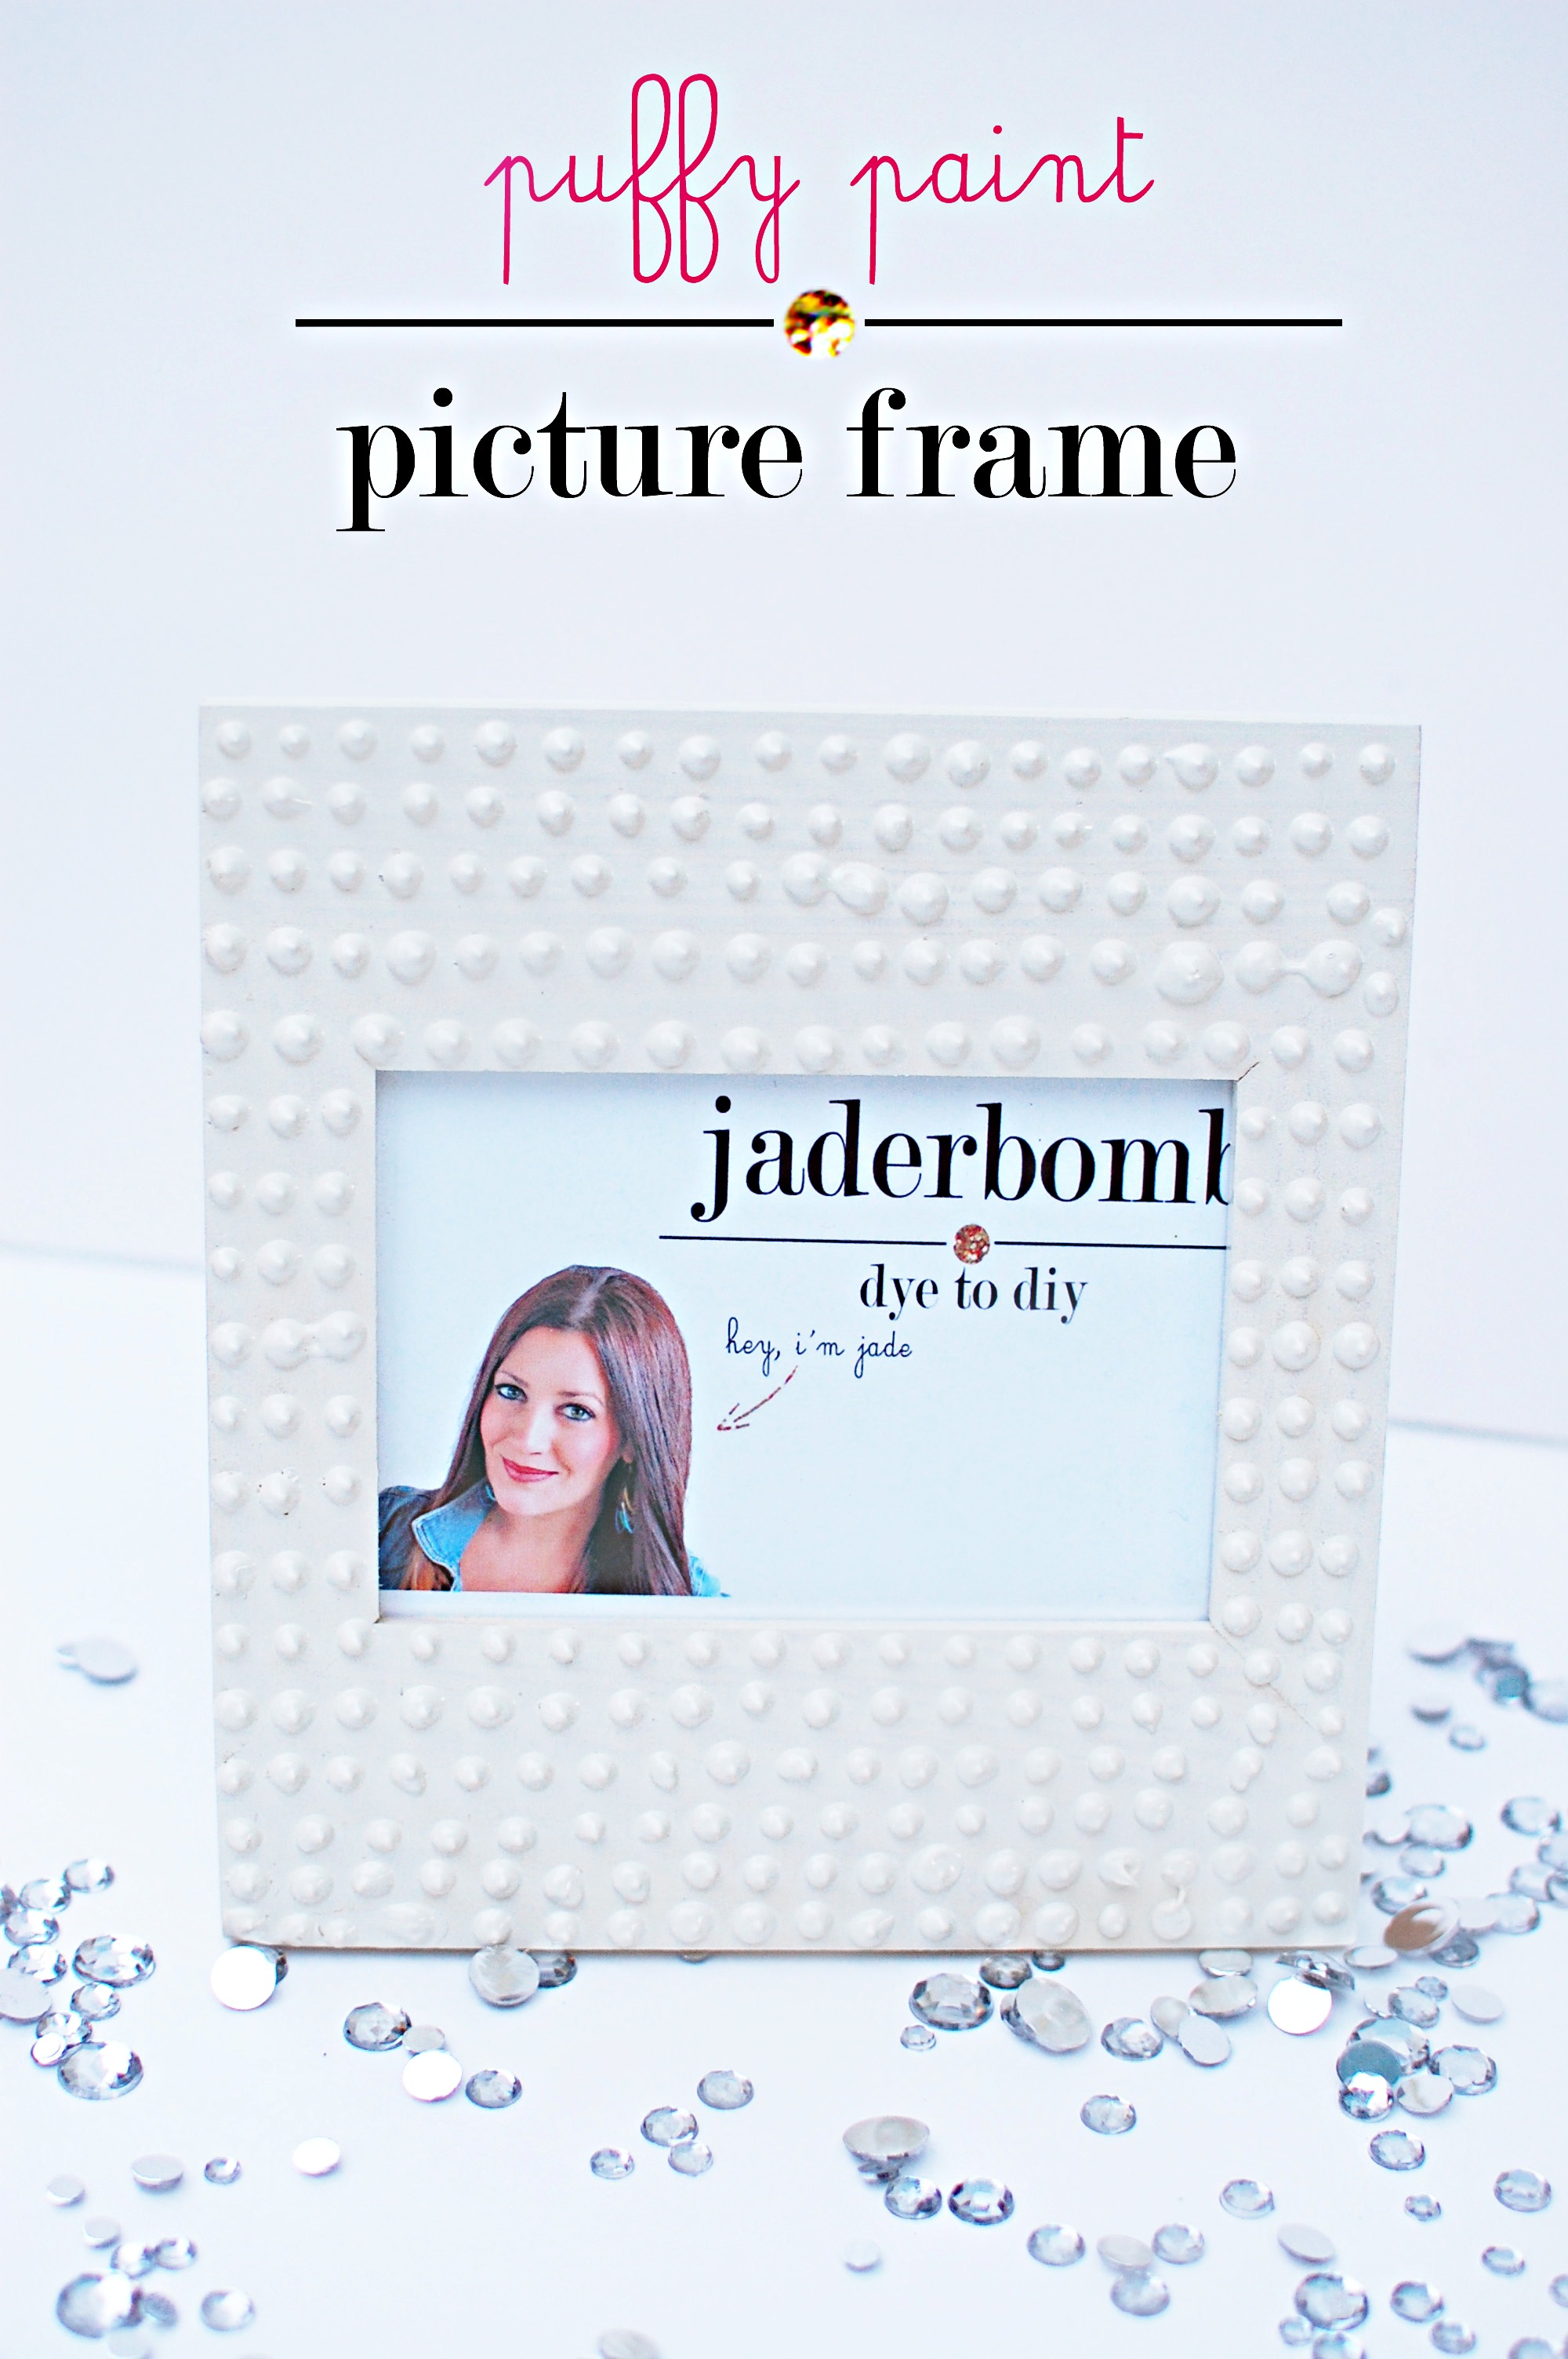
This tutorial is so much fun. You can design your frame any way you want which is so nice! It’s perfect for Valentines day also. It looks like little pearls when you finish it with a white or off white spray paint. Wanna see how I did it? Let’s check it out!

Puffy Paint Picture Frame

I think all of those jewels on the ground would look fab on a frame, what ya think?
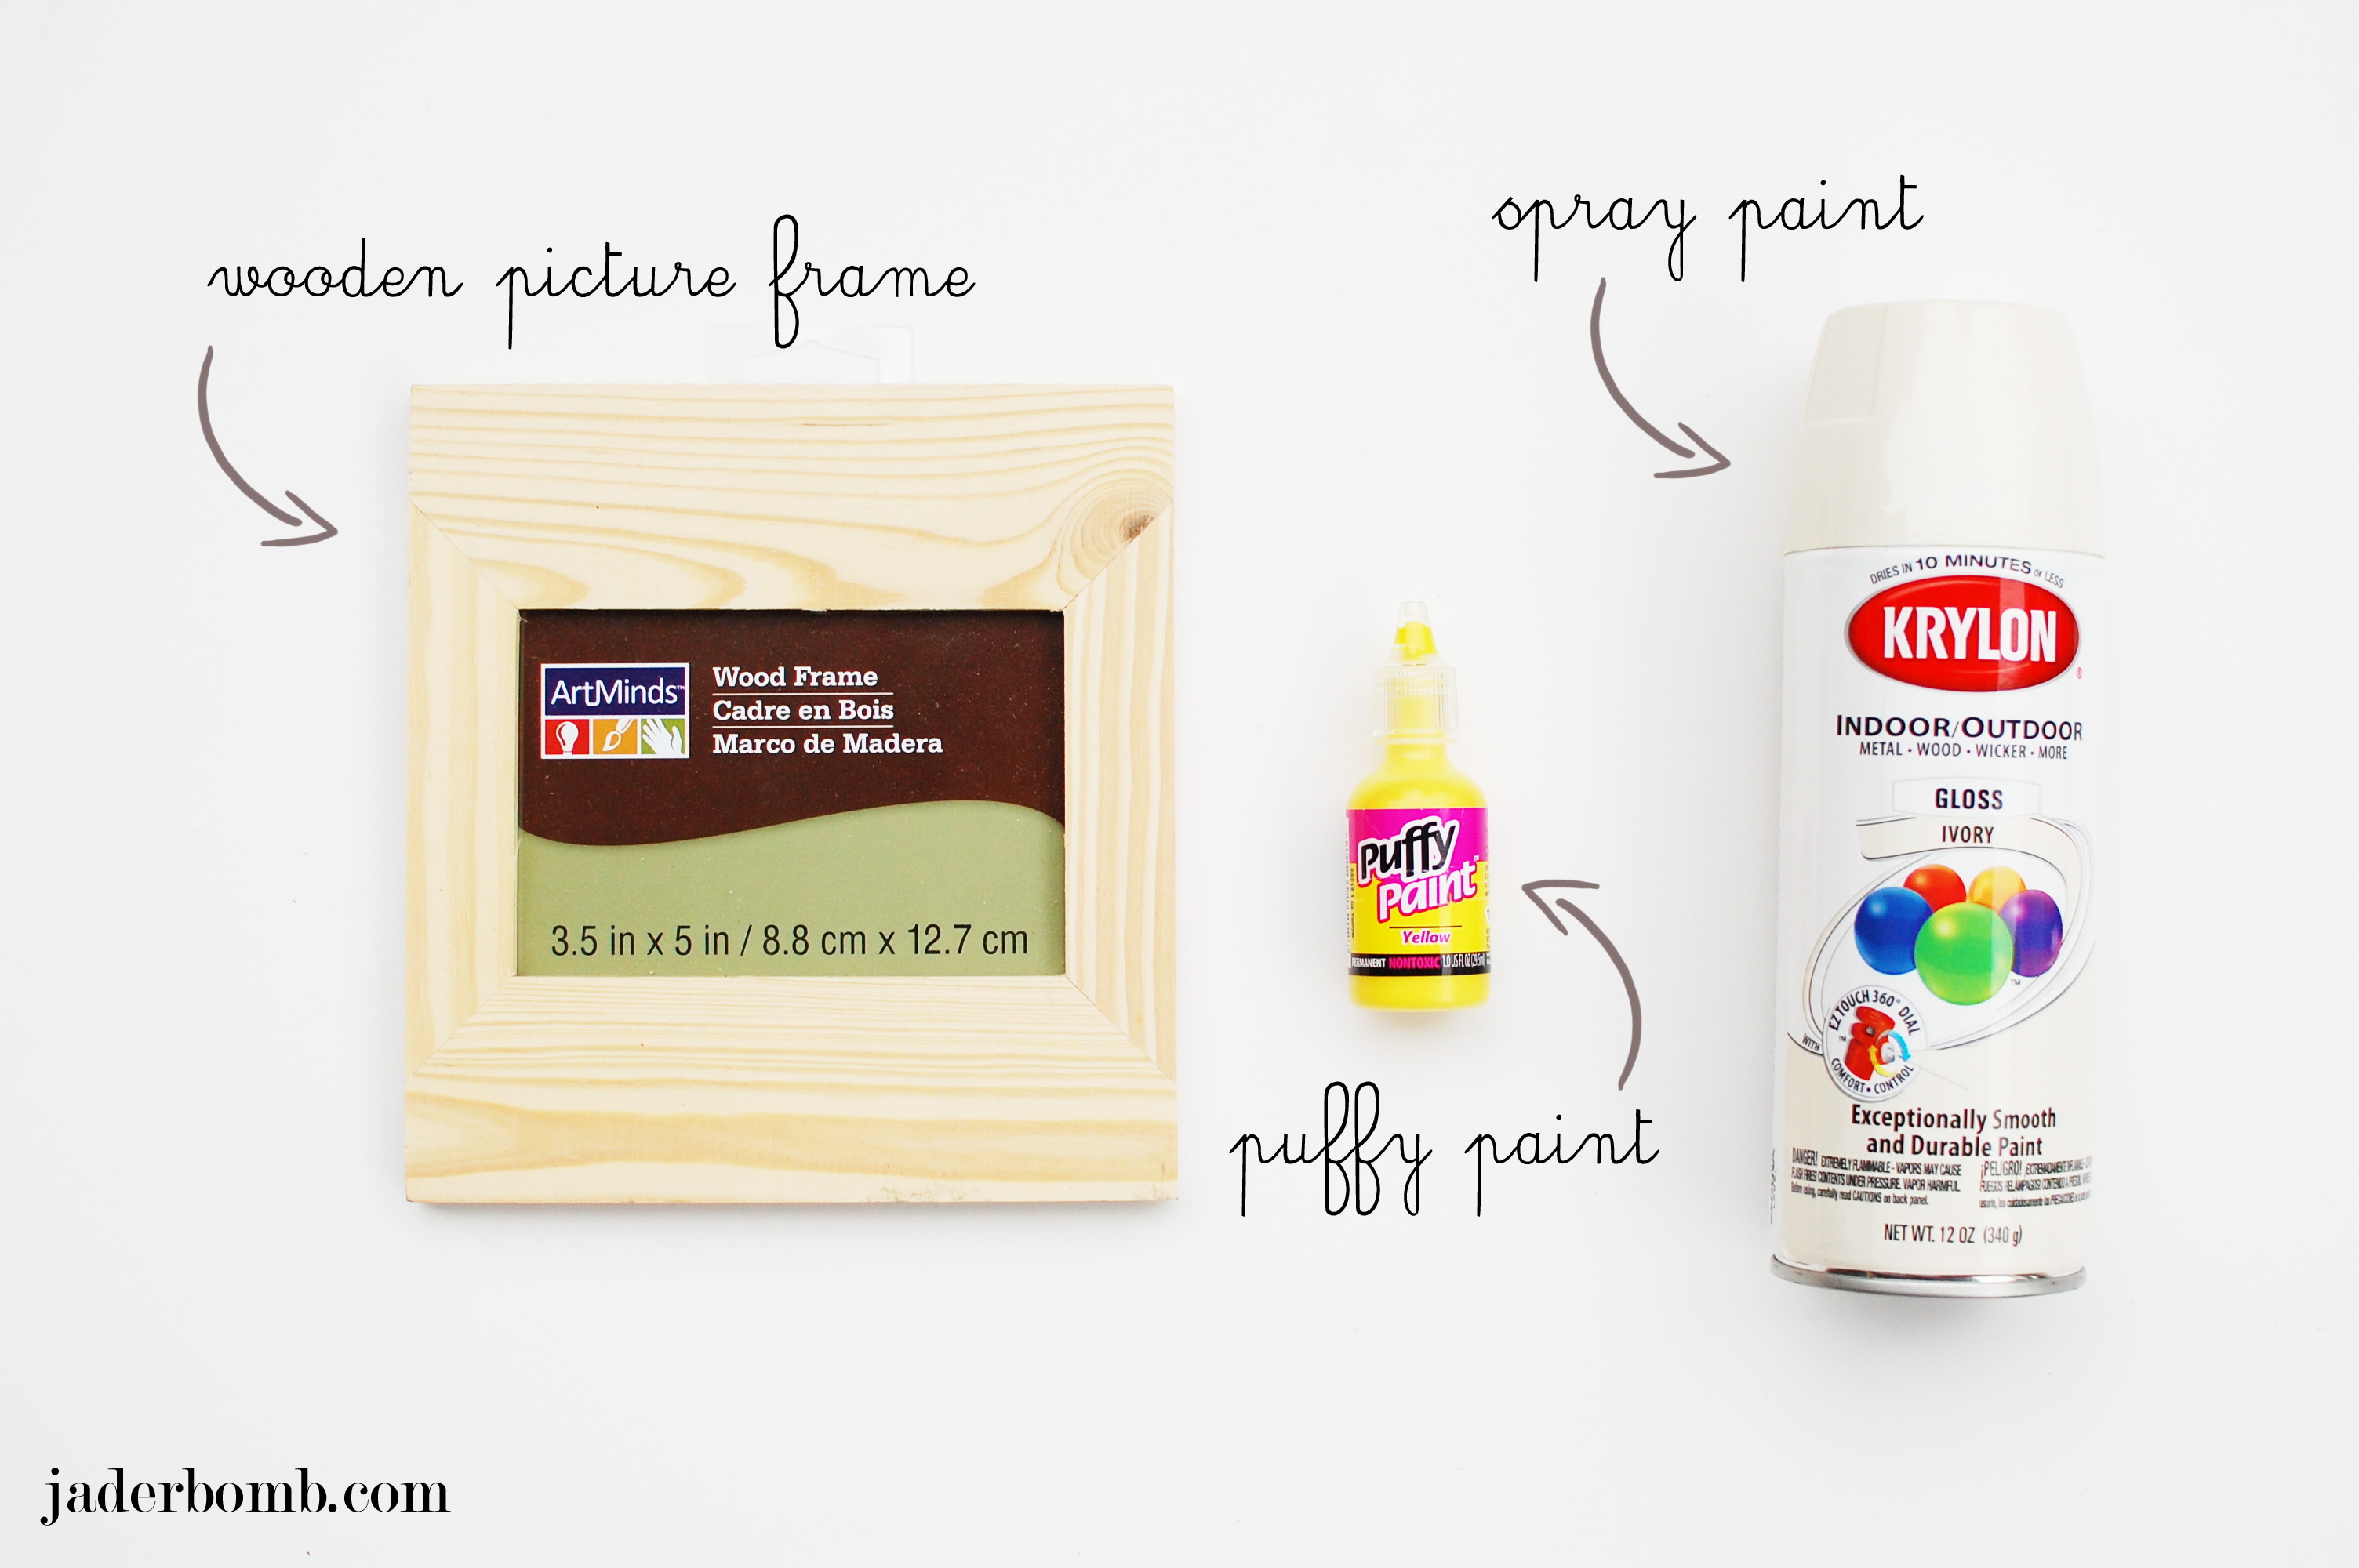
INGREDIENTS:

*Puffy Paint
 ( it does not matter what color you use because we will spray paint over it)
*Plain Wooden Frame
*
Spray Paint I used Ivory

BTW: you can click on any of the links above to order all the items in one spot.

Puffy_Paint_Picture_Frame_Jaderbomb

To start you will get grab a bottle of puffy paint, grab your hazmat suit and your ray bans.. JUST KIDDING!

You won’t need a suit but it’s gonna be so cool you might need some shades when you are done! If you use a smalle frame like I did you will only need one bottle. I actually had a little left over. Start by making dots all over your frame. When you are done let it dry completely.

Puffy_Paint_Picture_Frame_Jaderbomb

Before you spray paint it take the back and mirror out of the frame then you ready to ROLLLL!

Puffy_Paint_Picture_Frame_Jaderbomb

Dont’ they look like little pearls? Pearls always remind me of Valentines day. Just think if you paint them pink or red. What is your favorite way to decorate for Valentines Day? I’d love to know, you can go to the bottom and share in the comment section. I love comments!

In other news:
*I will be doing a giveaway next week
*I will be posting NEW Mardi Gras tutorials
*I will start doing a VIDEO tutorial every week starting NEXT week so stay tuned for these fun little suckers!

See you in the next post Jaderbugs!

Quote of the day:
No matter how many times you may spray paint, change wheels , clean , or customize a car to look different . It will always be the same. Same goes for people. Our appearances , actions and age may change .. But we will always be the same

Well what a day it has been already! Wait, it’s only 8:39 in the morning. Pfft. Does that ever happen to you? You wake up early and you have done more in the wee hours of the morning than a FULL day’s work. I actually love mornings like that because it makes for a great afternoon nap, hehe.

I couldn’t wait to show you this post because it was so much fun to make it. I love to spray paint EVERYTHING in my life. Depending in my “phase” I am going through. This is a little different than your normal spray painting. It’s “glass spray painting”. When I was sent this from Martha Stewart Crafts I was like… ERR MY GERRDDD, really! Just like your normal spray painting, it can leak and leave spots… only if you don’t practice before. It only took me about a minute before I figured out the pressure and how much comes out in one spray. I have not tried to OMBRE anything yet but I will, don’t cha worry.
Let’s get started!

You can click on the pictures to make them bigger if you like!

spray paint glass

Up above is what we will be making today!

INGREDIENTS:

*Vase
*Martha Stewart Spray Paint Kit
* Alcohol
*Cotton
*Adhesive stencils from Martha Stewart, I used the one called LEAVES
*Martha Stewart Pearl Paint

FYI: You can purchase all of the materials from one spot by clicking on the links in the ingredients.  

spray_painted_vase_jaderbomb

If you are painting on glass it’s important to use a gloss, metallic, or pearl paint. It works the best. Most of the other ingredients you may have floating around your house. Let’s get it started, y’all.

spray_painted_vase_jaderbomb

The first thing you will do is clean off your glass with alcohol and let it air dry. This will get off any oil residue that may be on the glass. Once it is completely dry stick your adhesive labels where you want them.

spray_painted_vase_jaderbomb

When you get your kit it will come with a few things. The first thing you will need to do is take the clear plastic tube and connect it to the bottom of the spray can. I put a picture above so you can visually see what I mean. Next we will mix our paint in the container. Notice on the back of the gloss spray medium it says to mix 1 part medium to 1 part gloss, metallic, or pearl paint. They have lines on the container so you can measure correctly. Lightly swirl the paint and medium (BEFORE) you attach but do NOT shake. You don’t want to create bubbles inside.

spray_painted_vase_jaderbomb

You will now just screw the container onto the spray can. The most IMPORTANT thing ever is to line up the  red nozzle with the little opening at the bottom of the can. If this is not lined up it will not spray.

spray_painted_vase_jaderbomb

Make sure you are in a well ventilated spot before you start spraying. You want to add a light coat and let it dry, repeat until you are happy with the look. I coated mine as much as I could. I didn’t want to see through the vase at all.  If you notice on my stencils they have the image that is cut out and around it it looks like a rectangle. The reason why I spray painted it this way is because I knew I wanted to see the water in some spots so I created a blocked print with the stencil.

spray_painted_vase_jaderbomb

When I was done I added water, then a little food coloring ( to spice up my water) then added some pretty tulips. You can add any color you want which makes it super fun. If you stick this baby in a window you will just stare at it for about 16 minutes strait. Fa REEL!
Remember these tulips?

Well, I hope you enjoy this tutorial as much as I did! Huge glitterbomb hugs from me to you!

jaderbomb.com

 
Quote of the day:
“We must go and see for ourselves.” -Jacques Cousteau
 
Wow! what an amazing year it has been. To start off the new year I have a cute last minute New Year’s treat for ya! I always love decorating around a holiday so New Year’s is full o’bling and I love that. Today I will show you how to turn a 3dollor wooden tray into pure bliss. Let’s get started!

How To Decoupage a Wooden Tray

Ingredients:

*Wooden Tray
*Mod Podge
*Brush
*Jewels
*Wrapping Paper
*Glue Gun

How To Decoupage a Wooden Tray

How To Decoupage a Wooden Tray

You will continue to Mod Podge until the entire tray is covered. Don’t worry if this is your first time using Mod Podge. It looks Matte when you paint it on but dries clear. Thanks goodness! This is why I use this on the “daily”.

How To Decoupage a Wooden Tray

Once you have it all covered with your material you are using and it’s dry you can start gluing on your jewels.

I just make a line of hot glue then place my jewels down. Don’t do a super long line because it dries pretty fast.

How To Decoupage a Wooden Tray

This is what it will look like when you are done. I think it’s gorgeous and the good thing is it’s super affordable! You can make these for someone and give it to them as a gift! 
How To Decoupage a Wooden Tray

Here are a few ornaments I put in my tray. I hope you enjoyed this tutorial. Can’t wait to see ya in the next post!

Don’t forget to make it a DIY kinda day!


DSC_00028

I am featured on the front page of Yahoo! Homes

Quote of the day:
“What you can’t do in one day you must do in two.”-East Anglian Proverb

Happy Friday Jaderbugs! I couldn’t wait to share this amazing thing that happened yesterday. It is pretty awesome, at least for me it is. When I started my blog 2 1/2 years ago I never imagined it would end up defining me as a person. This blog, sorta saved me. It all started as a way to “show” the things I love. I had NO intention of ever having a DIY-Craft blog. Guess the Universe showed me, hehe.  I have always been crafty I just never realized that others could possibly enjoy the things I create as much as I do. I never understood this thing that my brain does. I can look at something and the thoughts just come flooding in. Sometimes they are so overwhelming that I have to jot them down just to remember them. If I don’t jot it down I feel like I might not ever think of it again. This is mainly how I create all of my crafts that I post on Jaderbomb. Don’t get me wrong, I get ton’s of inspiration from everything I encounter daily but I can’t ever stop thinking of ways to “change” things or simplify them. I love showing ways to use every day items to decorate your home with. There is something special that happens to a person when they see something beautiful that they made. It’s something a store bought item can’t ever give to you.

A few weeks ago I got an email from a friend asking if I wanted to be in an article about hosting a crafting party. Of course I said YES, while I was JUMPING all over the place. I didn’t know exactly what it was for or where it was going to be but I am down with anything crafty. The best thing is that I was able to do this with a good friend of mine, Lenore. She was the producer of my show when I was on Martha Stewart. Click here to check it out.

So here is the picture of the front page of Yahoo!Homes! I am SOOO excited you just can’t imagine! If you click on the picture below it will take you there. They featured my
Cotton Ball Garland and my Candy Decorations

See that shiny gold candy picture!

I feel so blessed and can’t wait to share with you more amazing things happening in Jaderbomb land! Enjoy this good read.

Screen Shot 2012-12-13 at 2.01.47 PM

Continue reading

Happy Tuesday Jaderbugs! I am so excited to finally share with you how I make Washi tape. Washi tape is pretty popular these days but what’s not popular is how much they cost. Sometimes you can snag them for a good deal but most of the time they are a little over priced. Now let me warn you that the washi tape I make does not tear like the “paper” washi tape. Sometimes that bugs me BUT most of the time I remember how much money I saved and that I could make tape with any print I like then I feel much better.  Don’t ya see, it’s like personalizing something…In a way. I also made a you tube video while I made the tape. I hope it makes you feel all warm and cozy inside. Hehe

Below is a picture of the ones I just made. If you are wondering what the gold paper is click HERE to find out.

INGREDIENTS:

*Wax Paper
*Rotary Cutter
*Cutting Mat
*Double stick tape
*Wrapping Paper
*Flat Ruler
(for a cutting mat)
or use something with a flat surface to cut
*Scissors
(use this if you don’t have a rotary cutter)

First thing you will do is lay a sheet of wax paper down.

Put a strip of double stick tape on it.

I usually put a alot.

Tear some wrapping paper and lay it right on top of the tape. Now your tape is stuck to the wax paper on one side and the wrapping paper on the other.

Once you are sure your tape is secure on the paper flip everything over.

It’s hard to see in the paper but in person you can now see where your strips of tape are. Get your ruler out and line it up on one side of the tape.

Grab your rotary cutter. If you don’t have a rotary cutter or flat ruler you can just hand cut the strips of tape with scissors. I just think it goes faster with the rotary cutter which is why I use it.

Now you are ready to start cut cut cutttinggggg (I was just singing that btw).
Cut one side of the tape on the mat.

Then move to the other side of the tape. When you are finishing cutting you will notice it will be one long strip of paper. Trim the edges where there is NO tape and VOILA!

You can now start wrapping all of your tape into a roll like I did below. I cut a little strip of cardboard to wrap around the entire roll. This hold it all in place.

How precious are these babies. I can’t wait to use these on all of my Christmas presents. When you are ready to use them cut a piece, pull the wax paper off and stick it where you want. It’s that easy!!!

I hope you enjoyed this tutorial!

Don’t forget to make it a DIY kinda day
See ya in the next post

Quote of the day:
“Never doubt that a small group of committed people can change the world: Indeed, it is the only thing that ever has.” -Margaret Mead

Howdy Hoo Jaderbugs! I am super excited to share with you some super popular food posts from last years Holiday season. I can’t wait to show you the DIY projects I have been working on for this upcoming week because they are some great gift ideas also!

No.1

Today I will start off with this super moist delicious cake. Every time I make this my heart get’s excited. Did I mention that my family tears.it.up? Click HERE to see how I made the mini flag bunting for the cake.
{Click HERE to get this Devil’s cake recipe}


No.2

The next thing I will show you are my famous red velvet cake balls. Me and seester made these last year for Christmas and let me just tell you we had a blast. The thing I love the most about these cake balls is that you can get your kids involved. If you decide to make them, make like 100 of them because the person eating all of them will never feel like they ate “ALL” of them.

{{haha}}
{Click HERE to get these red velvet cake balls recipe}


No.3

Now these yummy suckers will turn you into a
Popcorn Snatcher Monster.”
I am serious. When you finish making these and let them sit for about 15 minutes…they have this warm, chewy, sweet goodness to them. It’s actually quite delicate in your mouth. I love that you control how “PEPPERMINTY” you want it!
{Click HERE for the Peppermint Puffs recipe}


No.4

Sometimes we spend so much time looking for “special” recipes that we pass up the really SIMPLE (awesome) ones!
This recipe is the perfect recipe to WHIP up in a JIFFY.
{Click HERE for the Peppermint Puffs recipe}


No.5

I am so proud of these because they totally happened by accident. Well I sorta was playing around but I locked this recipe in to “jaderbomb” because you “might” see this somewhere later on….
I made sure that is was very easy to make so enjoy!
{Click HERE for the Nutella Pankcake Balls recipe}


 Well Jaderbugs, I hope you enjoyed all of my great recipes from last year! Stay tuned for many new ones this month. The first “GOOEY” one will be up sometime tomorrow!

See ya in the next post!

Make it a DIY kinda day,