Tag Archives: home decor

After searching high and low through my attic looking for a VALENTINES day wreath I finally came to the conclusion that:

a) I never had one

b) I just can’t find it, or 

c) I threw it away

I really don’t feel like going to the store to buy any because, 

a) I am too lazy today

b) I have enough things around my house to make one AND

c) I like homemade things much much more than store bough.

I know, even though you buy it in the store “someoneeeee” made it but it’s way different when you make it with your own two hands!!! I started thinking of different things to make it with and then I opened up my HUGE closet full of FABRIC! It all came to me then!

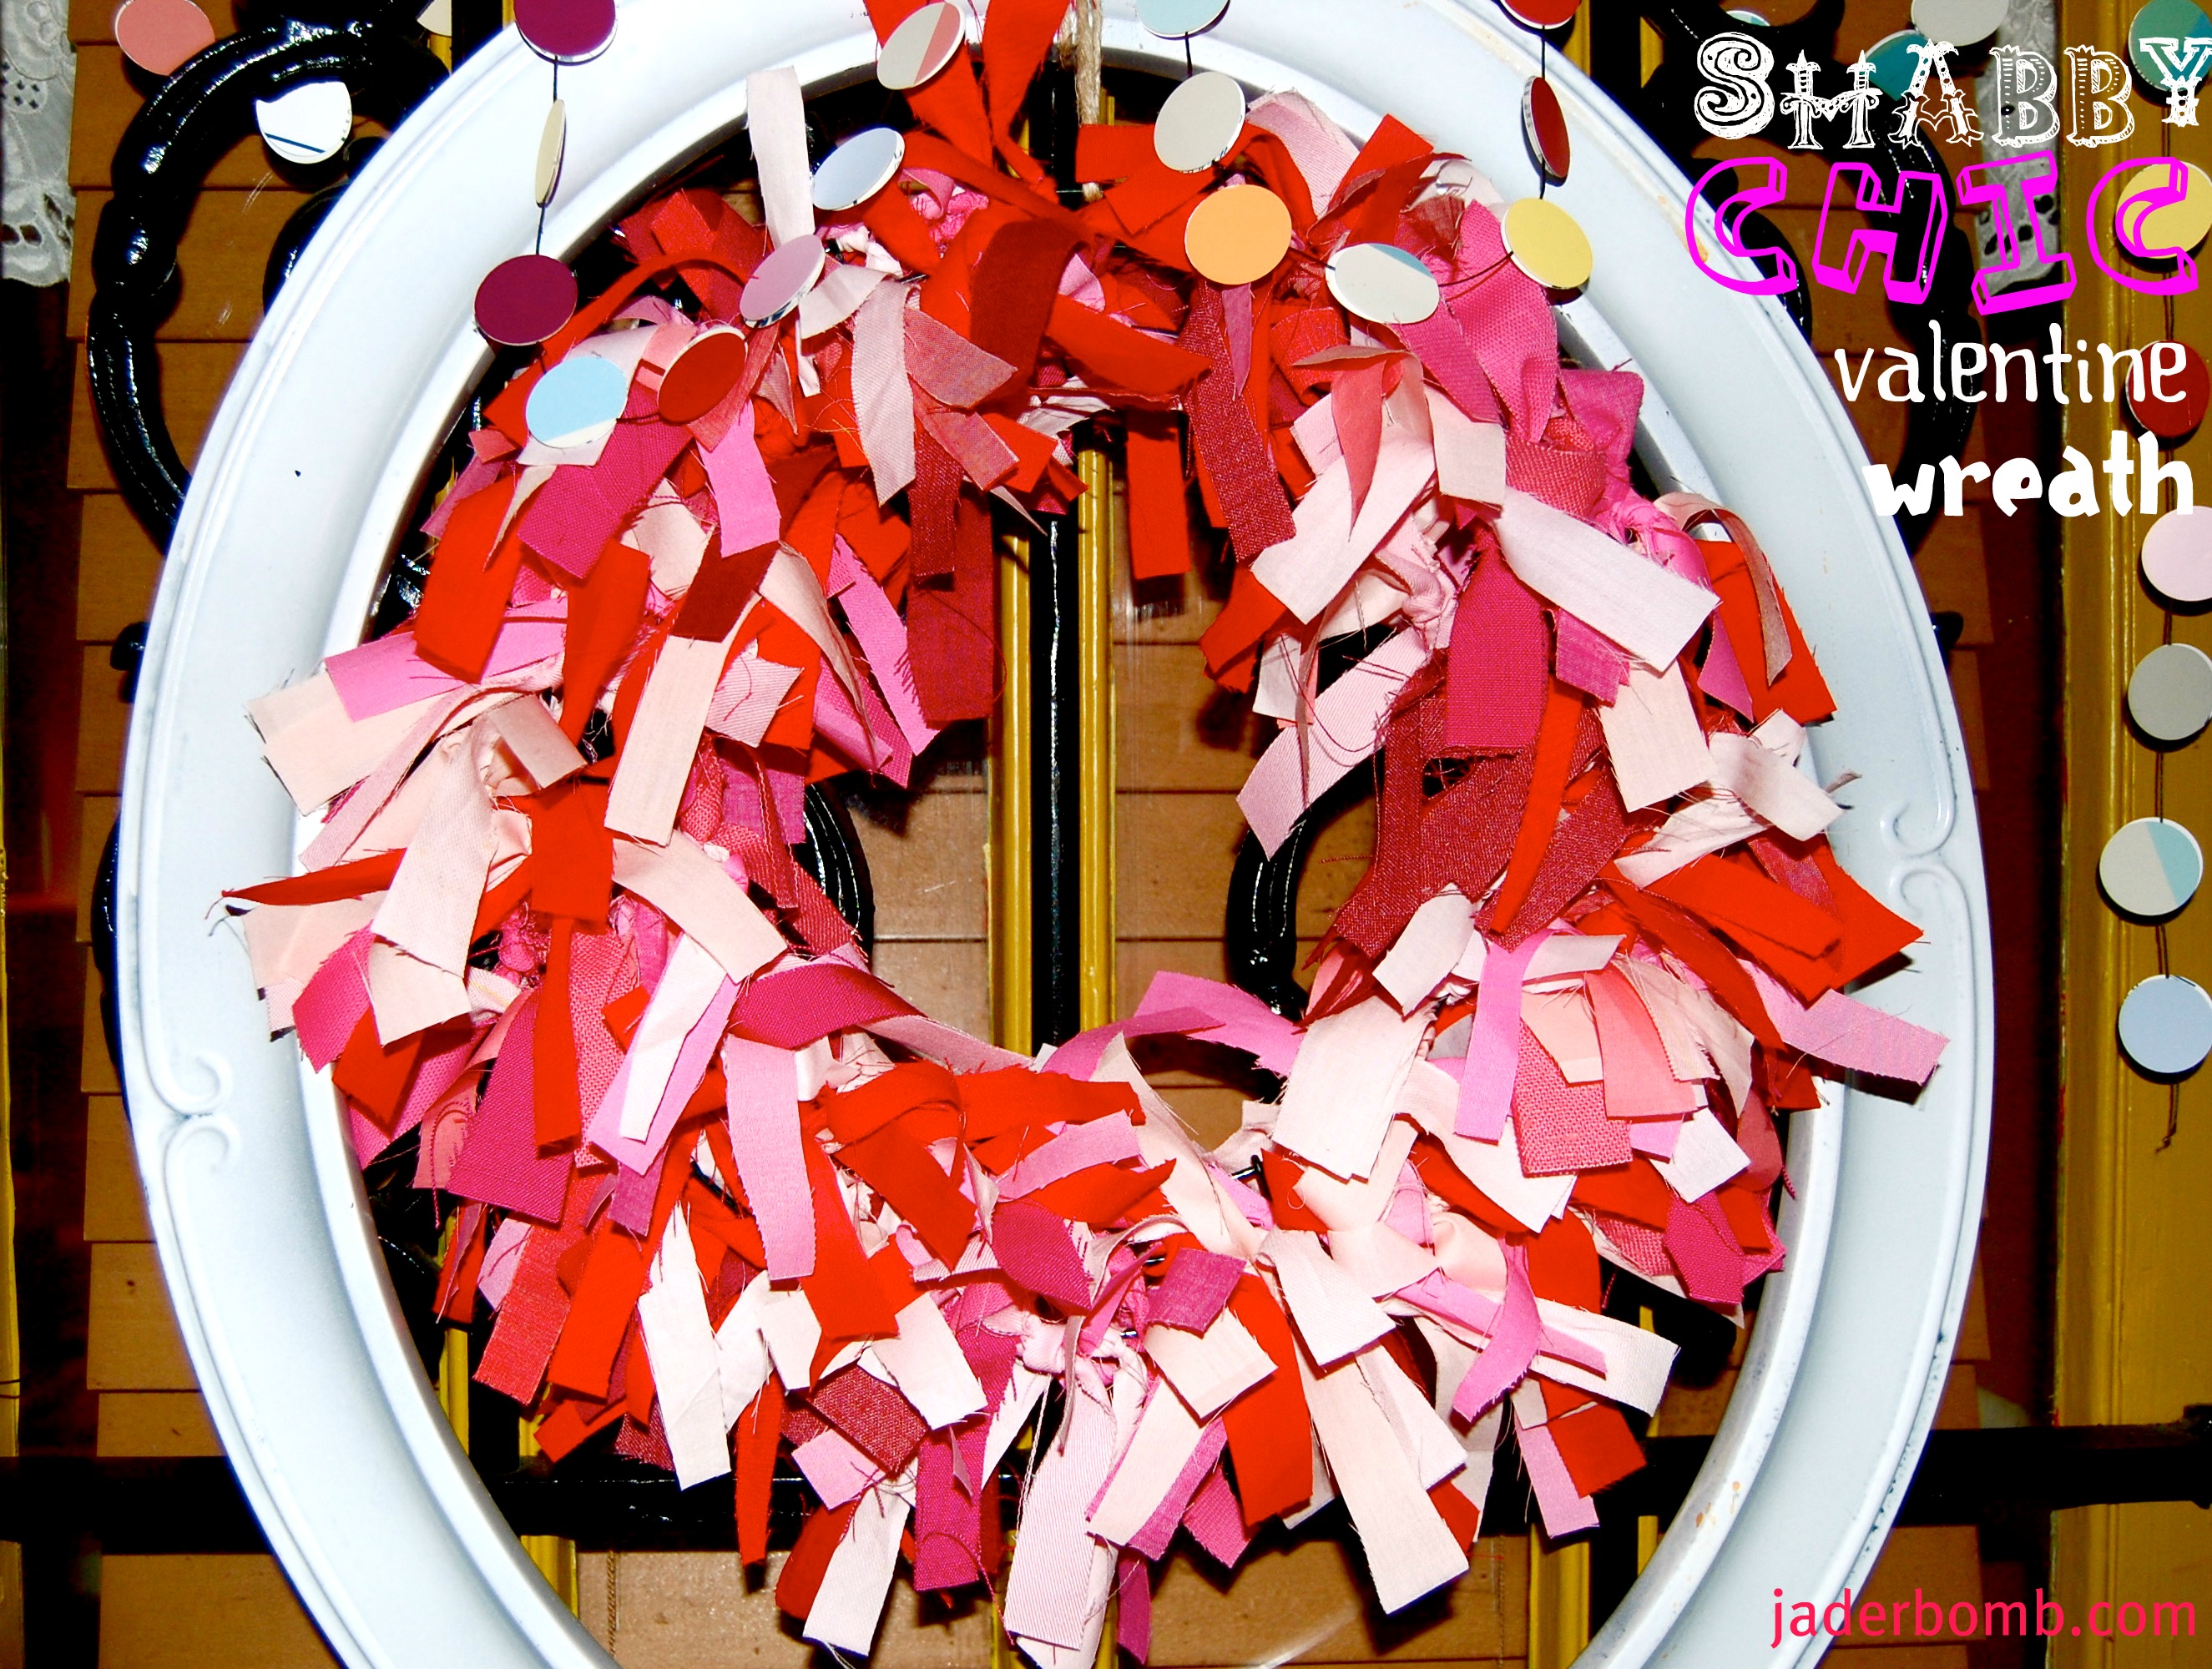
Strips of fabric tied to a wire wreath. I feel like it will be “homemade” enough and super cute! Not sure if you would consider it shabby chic valentiney or country chic! Let’s just say it’s “VALENTABBYCHIC“…. {{teehehe}}

I hope everyone is had a great weekend, don’t forget it’s almost SUPER BOWL time. Are you throwing a party? We are having a HUGE party and I can’t wait to show you all of my decorations! Ya know, I don’t even really like football (slap in the mouth right about nowwww). Can you believe that? I just like everything else that comes along with it!

Come on, let’s get to crafting!!!

Fabric Wreath Inspiration Board

 Grab some fabric that reminds you of  “valentine’s day”. You can use reds, pinks, whites and black too!!!

I got this metal round skeleton wreath at Michaels Arts and Crafts. It was in some crazy section but maybe someone just misplaced it and I came to save it!

Get your Martha Stewart scissors! These suckers seriously, CUT EVERYTHING. I am sure I shouldn’t be cutting all of the things I cut with them but hey….you live once 🙂 Plus they are from her. I want to use them 24-7

Cut your fabric into strips like this!!! I didn’t measure the strips I just cut! Some are thick and some are thin!!!

Start wrapping your strips around the wire. OVER AND OVER!!!! Until it’s fullllll!!!


I ABSOLUTELY LOVE THE WAY IT CAME OUT! Isn’t it so “valentabbychic“!!!! I hope you have fun making this craft and have fun cutting all of those strips!!!!! {{boy lemme tell you it get’s boringggg}}!  

Sending you RED, WHITE and PINK hugs, 


I absolutely KNOW it’s been quite some time since I really enjoyed a craft like I did this one! It was just so much fun! The process of watching the hot glue create hairy strands in the air just makes me smile from ear to ear. I love when a hot glue gun creates those little “strands” that are finer than the finest hair you could imagine.

I wanted to show you a way to take something as simple as a beaded necklace and turn it into a parade of gold pearls, in

NO TIME AT ALL!

Are you ready? Let’s go!

The most important tool you will need is this hot glue gun. It’s very important that you have a GOOD glue gun for this craft. Did you know that a high-temperature glue gun is best used with wood, plastic, metal, ceramics, magnets, leather, paper, fabric and other porous and non-porous materials? Cool to know huh!!!

* Martha Stewart Crafts Glue Gun And Sticks 

I don’t know about you but I love Mardi Gras! I love the colors, the activities and all of the yummy food! The next thing you will need is beads! It really does NOT matter if you use Mardi Gras colors because in the end we are going to be spray painting them. If you don’t have ANY access to beads I will put a link below if you need to order some.

* Order BEADS HERE

Grab some scissors! These are my Fav-O-Rit ones ever!

* Martha Stewart Scissor, All-Purpose

I had this really old shade that I decided would be PERFECT for this! I already had it painted gold with some beads on the bottom but you can use ANY lamp shade you have laying around!

Cut your bead in half with your scissors. If you don’t have the kind I am using ANY kind will do!

You will glue the beads completely around the lamp shade like this!!! Start on one end and add them one by one until you get to the top like the above picture!

This is what it will look like when you are done! How fun is this! I almost wanted to keep it like this in honor of Mardi Gras! If you are NOT familiar with Mardi Gras click the link below!

* Mardi Gras 2012 

Grab some Metallic gold spray paint! I purchased it from Home Depot!

This is ALMOST done!


This my Jaderbugs is the final look! I wanted to create a “simple” yet elegant lamp shade! Put a little tulle bow on the top and voila! I have TONS’S of different lamp shades to switch out as my mood’s switch! It’s pretty fun, you should try it! Let me know if you like this craft! Don’t forget to post pictures on my Facebook page of your results!

Full of gold paint and happy about it,

* Check out this Mardi Gras craft!!!   *Wanna PIN me? 

 *Facebook me-yuh!  *Tweet meeeee


Make a Paint Sample Lamp Shade

Hey my little Jaderbugs!!! I totally have been MIA lately and you can now slowly walk out of the closet and stop crying… why? Because I’m back you little suckers. I tell ya, life seems to get crazy hectic all at the same time. RIGHT!!!! The other day I was “mopping” (yes I am OCD) and I noticed a lamp that looked {{boring}}. I mean don’t get me wrong, it was super cute and prolly one of my favorite lamps at one time, but that “time” is long gone.  While mopping I was thinking of something I could do to dress it up but at the same time keep it cute and sassy. By the time I finished mopping I STILLLLLLLL didn’t think of what I could possibly do UNTIL I opened a drawer. I tell ya, I have never had a drawer sing to me like this one did! As I slowly opened it I saw a HUGE stack of paint samples and the universe answered me.  I hope you enjoy this craft and remember, it’s not stealing if you get 1000 paint samples 🙂 I promise because I had like 2000.  Also, remember that you can do a lampshade in one particular color but in different shades of it and I bet that would be cute as a button!!

Seriously. How cute is this.  I know you can’t see it but when the light is ON it lights up in the coolest way. It’s almost like a “cheap” tiffany lamp{{{heheheheh}}}
Until next time
peace. love. jaderbomb

Linked up HERE

Shabby Chic Lampshade

~First things you will need before you start this project are a pair of scissors, felt, lampshade (new or old) and a small hot glue gun. Are you excited yet!!! I AM~

Once you find the lampshade you want to work with then you can start to make it shabby chic~I like to use old dingy lampshades because it feels nice to bring it back to life, however you can use a new one if you choose to. You will be applying felt on the lampshade so you want to make sure you have enough felt before you start.

I just used the 9×12 sheets from Hobby Lobby, or you can get them at your local craft store. They are usually really cheap, I paid $.29 per sheet and used about 10 sheets. Before you start cutting the felt plug your hot glue gun in.

Below is the lampshade I am using today.

I cut squares approximately 1 1/2″ x 2 1/2″. All I did was fold the sheet in half then cut at the crease. As you can see below I have 4 different sizes all done by continuously folding in half and cutting.I continued this process until my squares were around that size. Remember, the smaller you go the fuller the lamp will look.

When you are ready for gluing you will need to get one of your squares and fold it in half. (thanks paige for being my hand model) LOL

Next you will gently take your hot glue gun and squeeze the glue onto the crease you just created.

Once you have your glue on the crease, quickly fold your square in half again. This will make it a lot smaller so do not worry if your square has shrunk a lot!

You will directly place the felt onto the lampshade without letting go of the fold you just made. Your first piece will take the most time because you need to hold it down with your fingers until the glue is completely dry. (please be careful, glue can really burn you 🙂

Once your first piece is glued on, you can now start adding the other pieces of felt using the same technique as the first. The only difference now is that you will not have to hold the piece of felt down as long. Don’t be discouraged after you put your first one on! I promise after you put your 3rd or 4th piece on you will start to see the way it’s supposed to look~

GOOD LUCK~~ Please post pictures when you are done and I will do a follow up blog with all the ones that were sent to me~~~ I can’t wait to see your magnificent lampshade~

MY VERY OWN SHABBY CHIC FELT LAMPSHADE~
P.S. This would be a great Christmas gift~