Author Archives: jaderbombllc

About jaderbombllc

I am a Southern DIY blogger and Designer known for fearlessly conquering anything and everything do-it-yourself. I aim to create unique designs by working through my thoughts, dreams, emotions, and tons of glitter! I believe in doing things that make my heart flutter and smile, and I live by my motto, “Life is simple and so should your style.” To learn more about me, visit jaderbomb.com or email me at [email protected]. You can also visit my Etsy shop at jaderbomb.etsy.com. Make sure to check out my FREE PRINTABLES site www.freeprettyprintables.com My biggest accomplishment thus far is being a guest on the Martha Stewart show, yes she smells good. I love my dog Ceaux Ceaux, pens,the smell of Christmas, GOLD, Dr. Pepper and blogging. BTW: I bleed glitter, all shades.

Welcome to the happiest place on earth, well besides Disneyland. Today I will show you the chevron pillow cases that I created for the I love to create blog. Incase you do not know already, I am a contributor for them and I post every two weeks. So that is something you can surely look forward to. Click here to get to the site.

First things first. I had a blast making these. I originally planned to make two rainbow ones but the Universe told me to make a more sophisticated one for anyone who is not fond of every color on earth.

chevron pillow cases

So I did. I am super giddy about the multi-colored one however I am very happy with the black, white and gold one. I hate to even say this because it’s going against my rainbow fairies’ orders but I like it better than the multi-colored one. I know you are shaking your head right now in disbelief. How could I like anything more than rainbow!

Could I use the excuse that I am from Louisiana and I love the Saints? Even if I can’t I am still going to go with that.

diy-chevron-pillows-jaderbomb

After looking at the darker pillow case I realized that it would be so easy to accessorize with a load of chevron pillows. A group of black and white would look so stinking chic. Sheet, I am shaking my head just thinking about it.  How-to-paint-on-fabric

Hopefully you are jumping like a jumping bean right about now. Have fun making these and make sure to send me pics of the ones you make!  I’d love to see what creative colors you choose to use. See you in the next post Jaderbugs!

jade

Howdy Jaderbugs! I am so excited to share this tutorial with you today. I will be showing you some of Fiskars’ amazing boarder punches which I already know will make you go “Ohhhh and Ahhh” over. I simply love the lace paper punches the most. Let’s get started!

LACE PAPER PUNCHES

Let’s get started.  The things you will need are:

1. Glass Bottles
2.  Tape
3.  Scrapbook paper
4. Fiskar’s Boarder Punches

I will be using the Lacy Doubles Interchangeable Border Punch Cartridge for this tutorial.

Fiskar's boarder punch-jaderbomb.com

Fiskar's boarder punch-jaderbomb.com

When you are ready to start using your punch you will notice there is a picture of the design on the front of the cartridge. Look at my arrows because this is where you want to start your paper. It’s pretty easy once you do it one or two times. Make sure when press down that you do it one good time to ensure the blades go completely through the paper.

Fiskar's boarder punch-jaderbomb.com

 I decided to do both sides to make it look really fancy. By the way, I just used different size strips of paper that I had for this project.

Fiskar's boarder punch-jaderbomb.com

This is how it will look when you complete both sides. I love the accuracy of this product. I simply wrapped my strips of laced paper around my bottles and secured them in the back with a piece of tape.

Fiskar's boarder punch-jaderbomb.com

 I hope you enjoyed this tutorial. I know once you do one you will  have a HUGE collection of interchangeable punches in your craft space. Be creative because you can do so much with these punches.

BIG HUGE GLITTERY HUGS!

jade

Vintage Apothecary

Wanna know what’s better than scouring old antique shops looking for vintage apothecary brown bottles? Making them with a good ole 6-pack of beer in 1 hour.

That is just how I like to roll, yo.

1. I don’t have the time to really dig through boxes of someones trash. Unless I am in GA at my sisters house.

2. I am not paying 20 bucks for a real “vintage” bottle.

you will need

how-to-etch-jaderbomb

See the ingredients are fairy simple.

– Beer bottles (and yes you will now start begging your friends to keep all of their trashy empty bottles now)

– Martha Stewart etching cream

– Martha Stewart oval stickers 

Did you see the glass dome I just made? I used this fabulous brown cream on it.

vintage-bottles-jaderbomb

This bottle is clean in the beginning but we are about to dirty this baby up, or just make it look dirty.

easy-etching-tutorial-jaderbomb

Make sure you lather this cream on the bottle. The thicker,the better. Don’t put a thin coat and expect it to work. Not gonna happen.

Since we are creating a vintage apothecary bottle we need to keep in mind that the “dirty” sections are spaced out. Don’t coat the entire bottle at once. We want to put the cream in different areas.

how-to-make-vintage-glass-jaderbomb

Let your etching cream chill on the bottle for about 15-20 minutes. Rinse it off, then repeat the same steps.

This time put your etching cream in different spots and start overlapping the cream on spots you previously did.

vintage-glass make-vintage-glass-jaderbomb

I had left over daisies from this post so I figured I would put them to use once more.

I’m so cheap.

vintage-bottle-craft-jaderbomb vintage-etched-glass-jaderbomb

make-old-bottles-jaderbomb

I hope you enjoyed this tutorial.
P.S. If your friends don’t drink then that means one thing. It’s time you start throwing some back! If you have not seen my 12 months of Martha make sure to check it out.

See you in the next post!

jade

Huge love to Martha Stewart Home Office with Avery for sponsoring today’s post on Organization – Back to school organization.

Getting Organized

Getting organized can sometimes seem like a major task especially when you have a thousand other things to do. I decided to organize a section in my office for a command center. I believe every house needs one of these. You will be surprised at how relaxed you will feel knowing everything has a spot and you don’t have to search for hours looking for that letter or note from school. Since I have three office spaces in my house things can sometimes get crazy. This main command center is working perfectly so far and I am excited to share with you how I accomplished this.

My best friend Martha Stewart sent me some great things from her home office line from Staples. I had so much fun getting organized and her products makes everything look crisp and clean, which is a huge plus in my book.

{{P.S. Don’t forget to scroll to the bottom, I am doing a GIVEAWAY}}

This is how my desk looks right now.
(Above)
Below is what it looked like just just hours before I got my package in the mail from Martha!
Amazeballs, right!

staying organized

Don’t judge.

getting any space organizedmartha stewart binders

The one thing I was super excited to get was this binder that you can fill with ton’s of great things. The yearly calendar has to be my favorite thing because without that I would not know which way is up and down. Check out some of the cool things you can buy separately for the binder.

*Zipper Pouch
*
Small-Format Paper Dividers
*Project Planner Filler Paper 

getting your notebook organizedDSC_0604

If you are not a binder fan you can get this super chic disk bound notebook  (yes I wrote binders in the picture, I’m human y’all and I made ton’s of mistakes). You can get the same items that go in the binder for this disc bound notebook also. You can also buy larger disks to enlarge your notebook.

*Discbound Expansion Discs, 12/Pack
*
 Discbound 2013 Calendar Insert
*
Discbound Notebook Dividers, Classic, 8-Tab Set
*
 Discbound Planner Pockets, 3/Pack

organize your life

Now we are getting into the pretty stuff! I love a good calendar but desk accessories are my favorite. All these are stack and fit and they all fit together. You can make a tier out of them or use them individually as single containers. Check them all out here. There is so much to choose from.

office supplies that work

I can’t do without a Task Pad. This particular one goes in the disc bound notebook but I like it loose on my desk. I put a magnet on the back so I can stick it on the fridge, which is great for a grocery list.

martha stewart office supplies

There is one thing that makes my family happy and that is when pens, pencils and highlighters are organized and not mixed together. These products really saved us.

martha stewart home office

All of the stack and fit look like this.

cute office supplies

This is a great example of how they fit together.

back to school organization

I love the  Stack+Fit™ Shagreen Inboxes like the one above. It serves as a base and you can stack ton’s of things above it like these trays.

being organized

It’s always good to have a nice candle to bring zen to your room. I love my little moss rock. I got this the last time I was on the show with Martha. I know it’s dead but it serves a purpose believe it or not. Just remember to put things in your space that bring happiness and make you smile. You want to create a space that makes everyone happy.

cute cork boards

 I saved my favorite for the end. I love my cork board and the fantastic shape it comes in. Just one more thing to tie all of your goodies together.

organize your supplies

I will be doing a post soon on my studio but I wanted to share with you a tip on how I store my paint bottles and glitter. This is nice and makes it easy to grab that perfect shade quickly.

martha stewart organize book

Something that could also help you stay organized is this book. I can’t wait to get my entire house organized like the pictures in here.

how to stay organized

Just remember you don’t have to change a whole room to get this. These products will change your whole perspective of getting organized.

a Rafflecopter giveaway


Big ole glittery hugs from my command center to yours,

jade

marthastewartdisclaimer

Huge love to Martha Stewart Home Office with Avery for sponsoring today’s post on Organization – Back to school organization.


I know what you are thinking, crazy it’s not Fall. I then come back and say “really, it’s not”.  You might even want to insert a crooked smile here. Someday’s I get that because of this unexpected career in blogging. I am a little ahead of my time when it comes to home decor and crafting. That is why I am sharing last year’s fall mantle crafts with you today.

fall mantle crafts

I have to be! I know this sounds cray cray but in August when you are doing back to school shopping and scouring Pinterest for ways to get organized I am trying to create new Fall and Halloween ideas for you, which you will then be seeing all over my Pinterest {click link to follow me} in September. Did I mention that in September I am already starting Christmas things?

Maybe that is why I always feel like I am in a time warp yo. Yesterday I was looking back at my Fall mantle last year and boy oh boy has things changed. For one I must have been in a Easter time warp with the turquoise walls. I mean sure, it fit’s my personality but I am still sitting here shaking my head. I will blame it on being in school full time and going nuts internally. There, I have a legit excuse. Moving on.

Aside from the “let’s pretend we are at a beach house but we are in musky Louisiana”  turquoise walls my mantle was exploding with some really fun unique crafts. Crafts in which I believe could be used for many of you and possibly in different ways. Be open and creative when you look at someone’s mantle. Don’t nit pick it because there might be ONE thing you can take away from it for your own house. For example the painted sticks could be used for Christmas, but you could spray paint them GOLD. See?

Good news! The walls are a different color now, the shelf is gone and there is no sign of fall yet. But no worries I will soon share with you my non fall mantle crafts. Just get ready because in a DIY blogger’s house things change quick! CLICK HERE TO SEE ALL OF THE CRAFTS IN ACTION.

Big huge glittery hugs from my ex mantle to yours,
jade


I am in love with this easy tutorial on how to paint on glass. I hope you get inspired and make 19 of them, seriously.

12monthsofmartha

HOW TO PAINT ON GLASS

What goes better with a beautiful cake or yummy cookies?
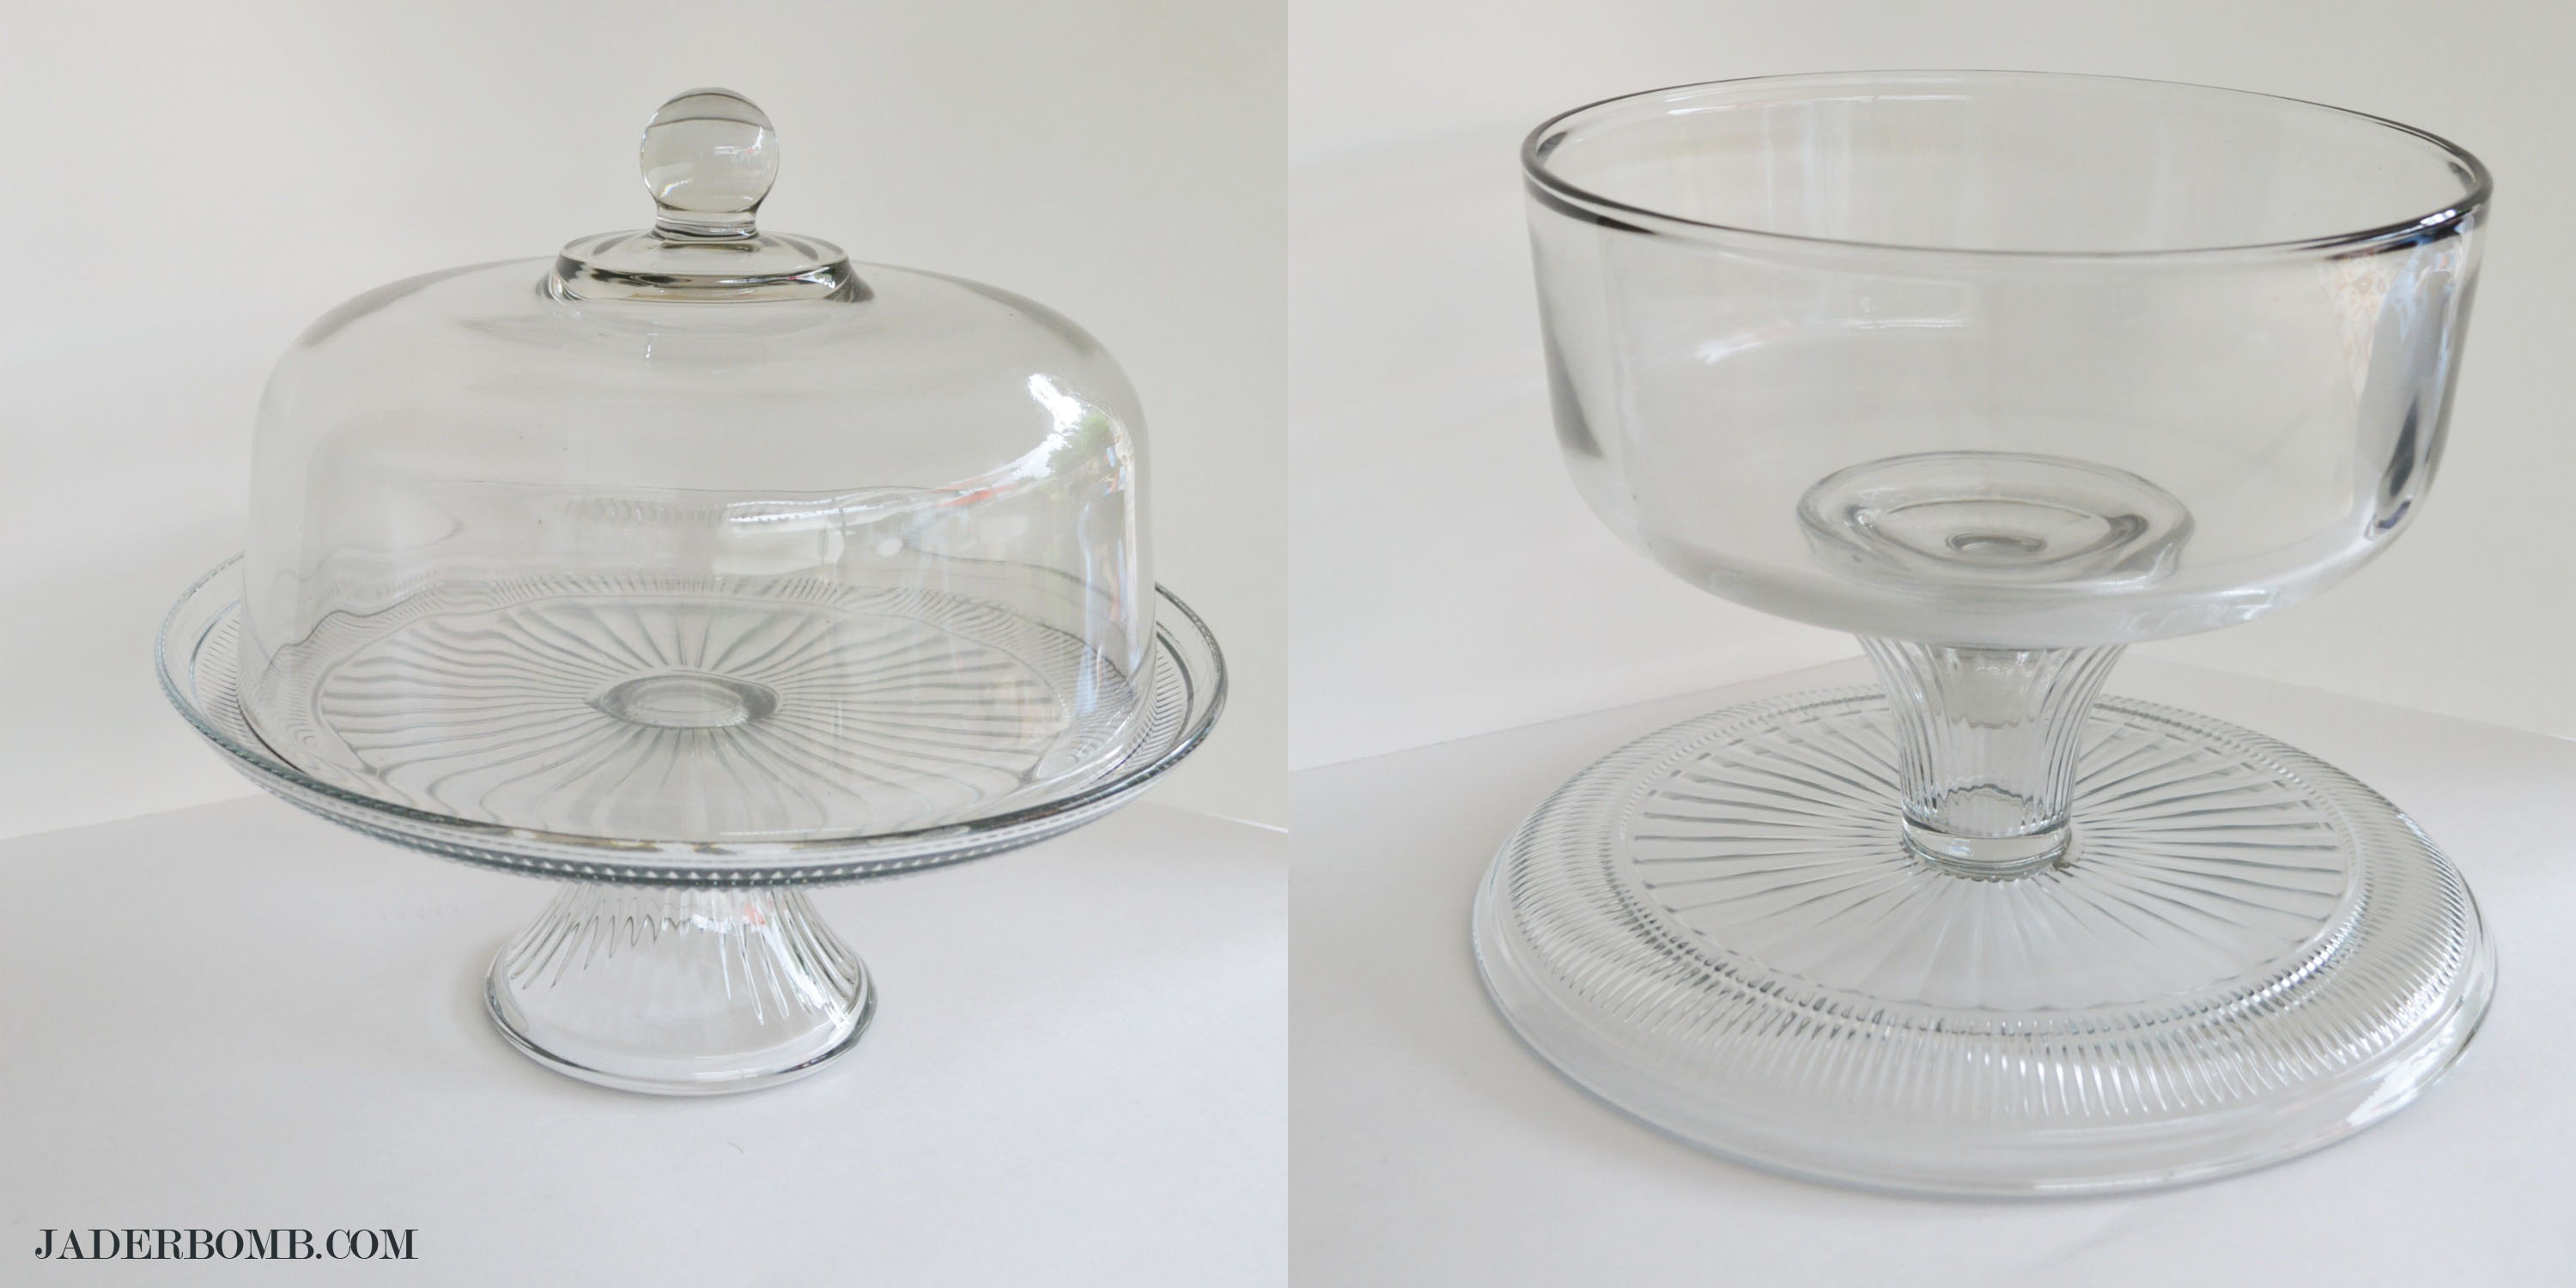
1) A glass dome
2) A etched and painted glass dome

{drum roll  and the sound of a roaring crowd yells)
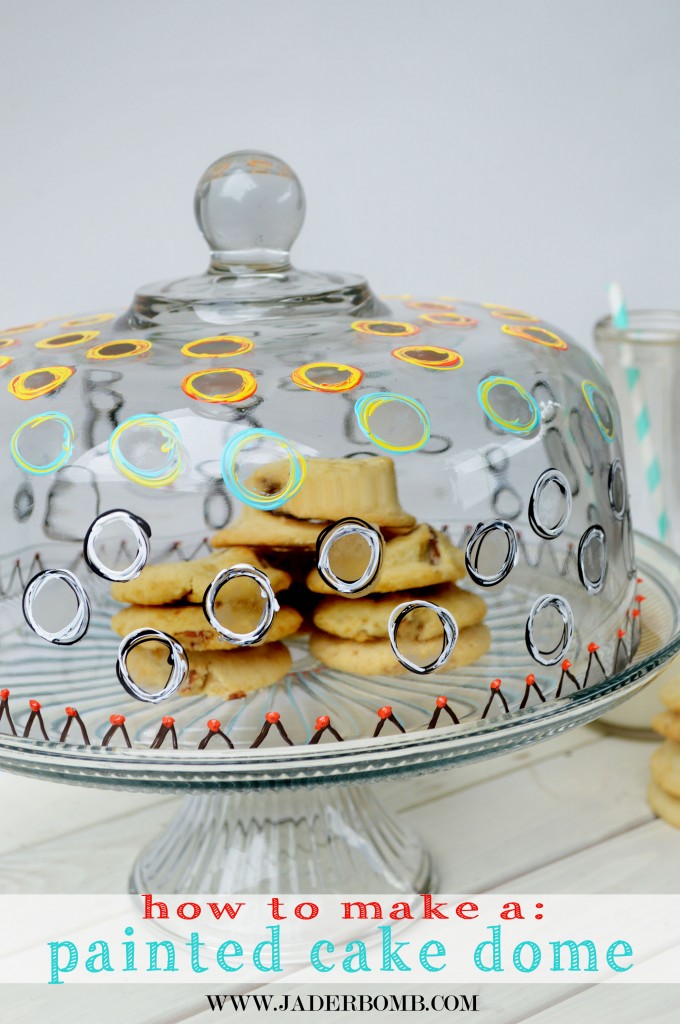
A painted glass dome!!!

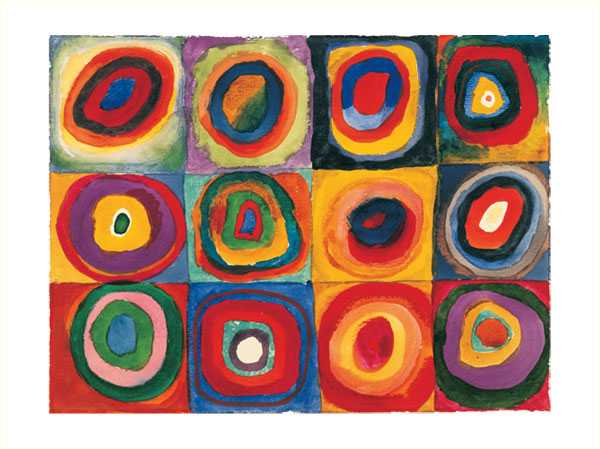
I love fine art but what I love more is making inspiration pieces that go with certain pieces. I love Kandinsky so I dedicated this piece to him and his abstract-ness. If you are not familiar with his work, check out the picture below.
kandinsky

you will needglass-paint-jaderbomb

how-to-paint-glass-jaderbomb.jpg
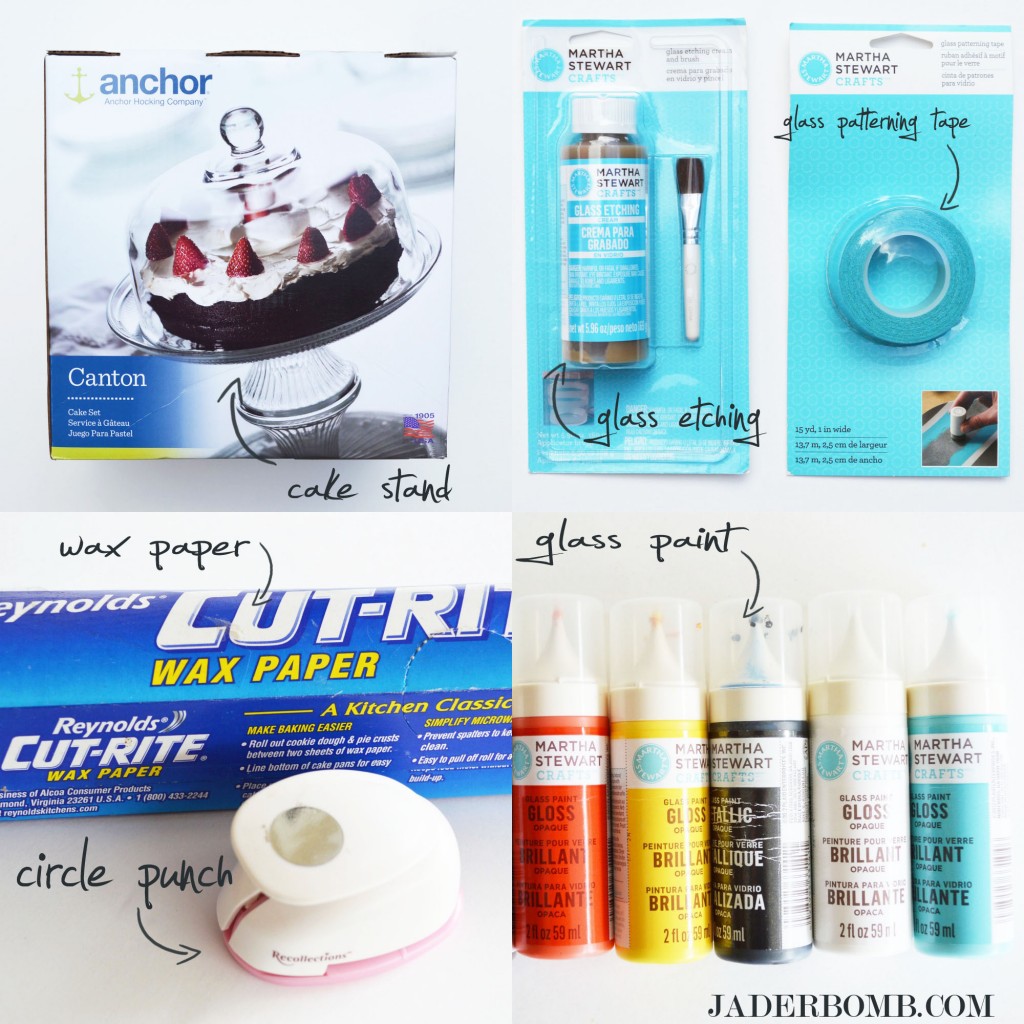
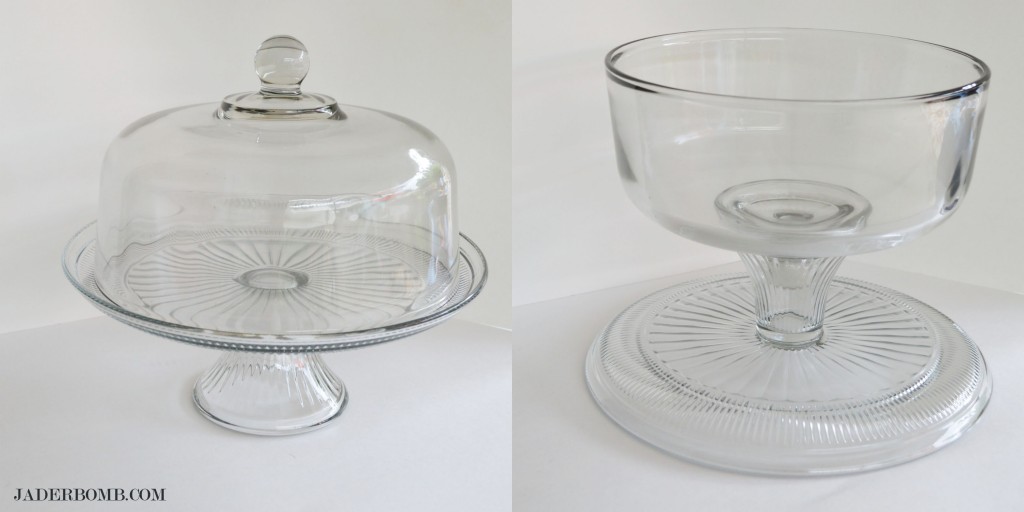
I purchased this glass dome/ punch dish from Wal-Mart. Seriously it was 11 bucks. That is so cheap I can make a new dome for each holiday. Oh lard.

how-to-paint-on-glass-jaderbomb

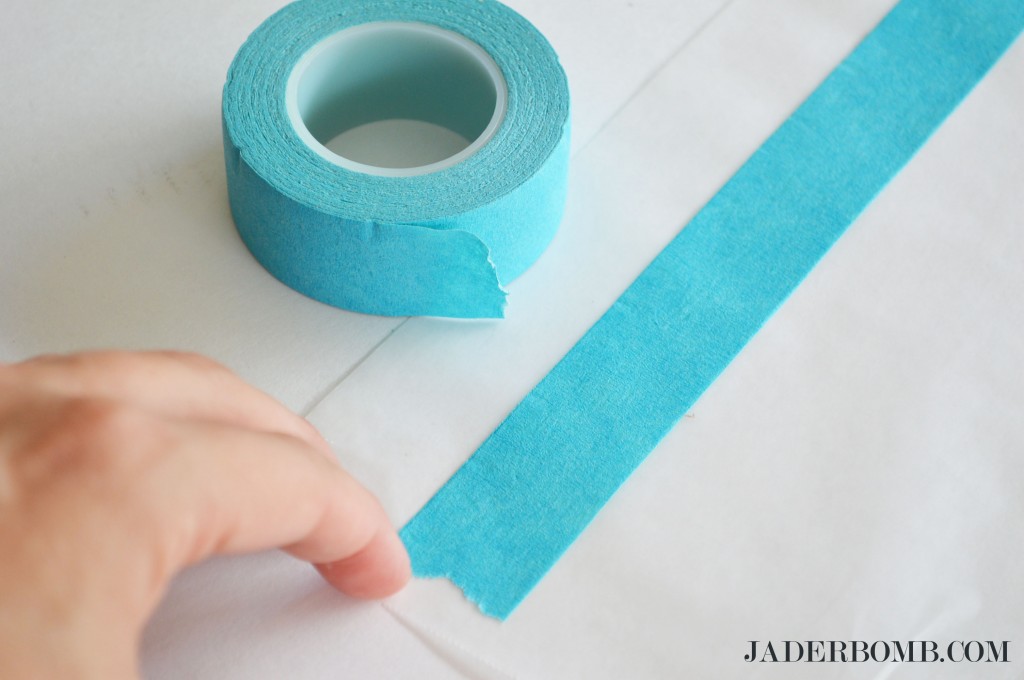
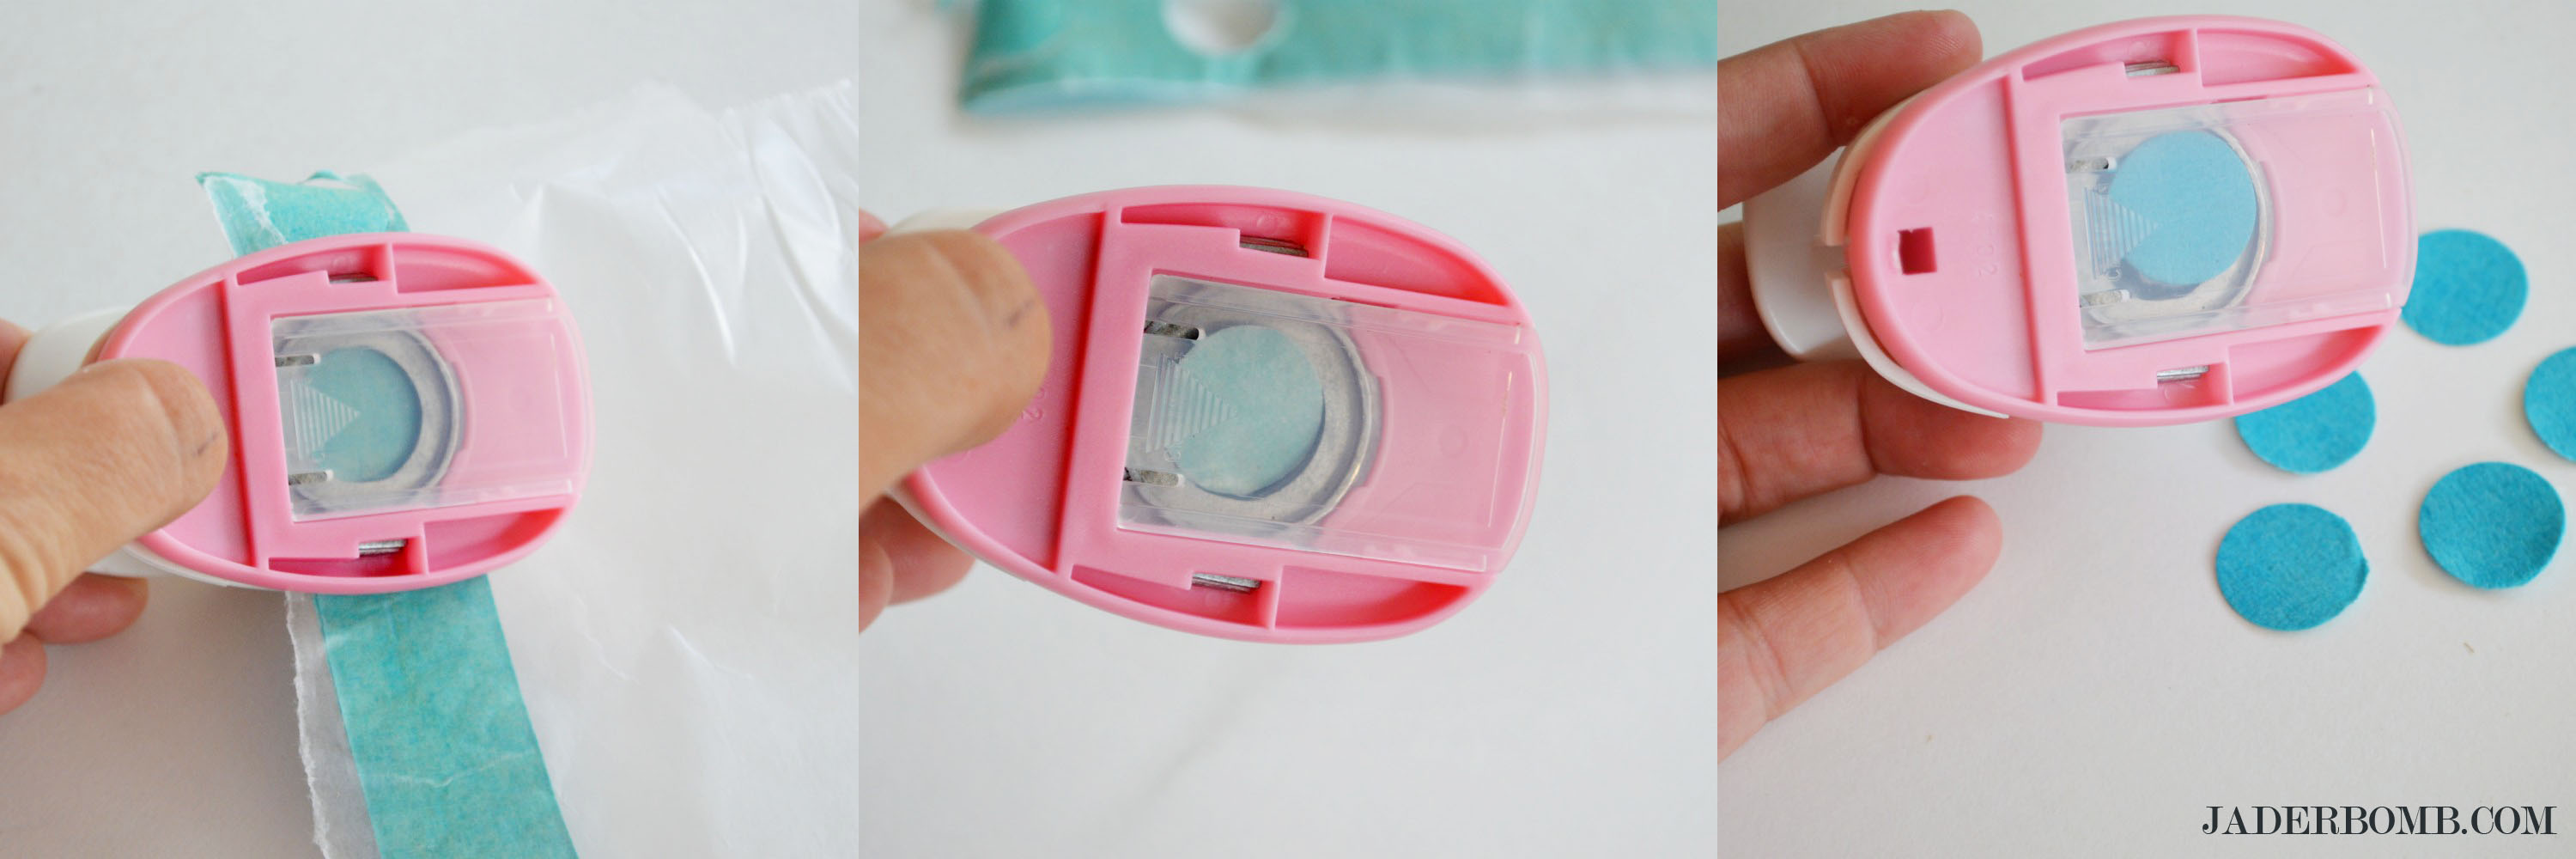
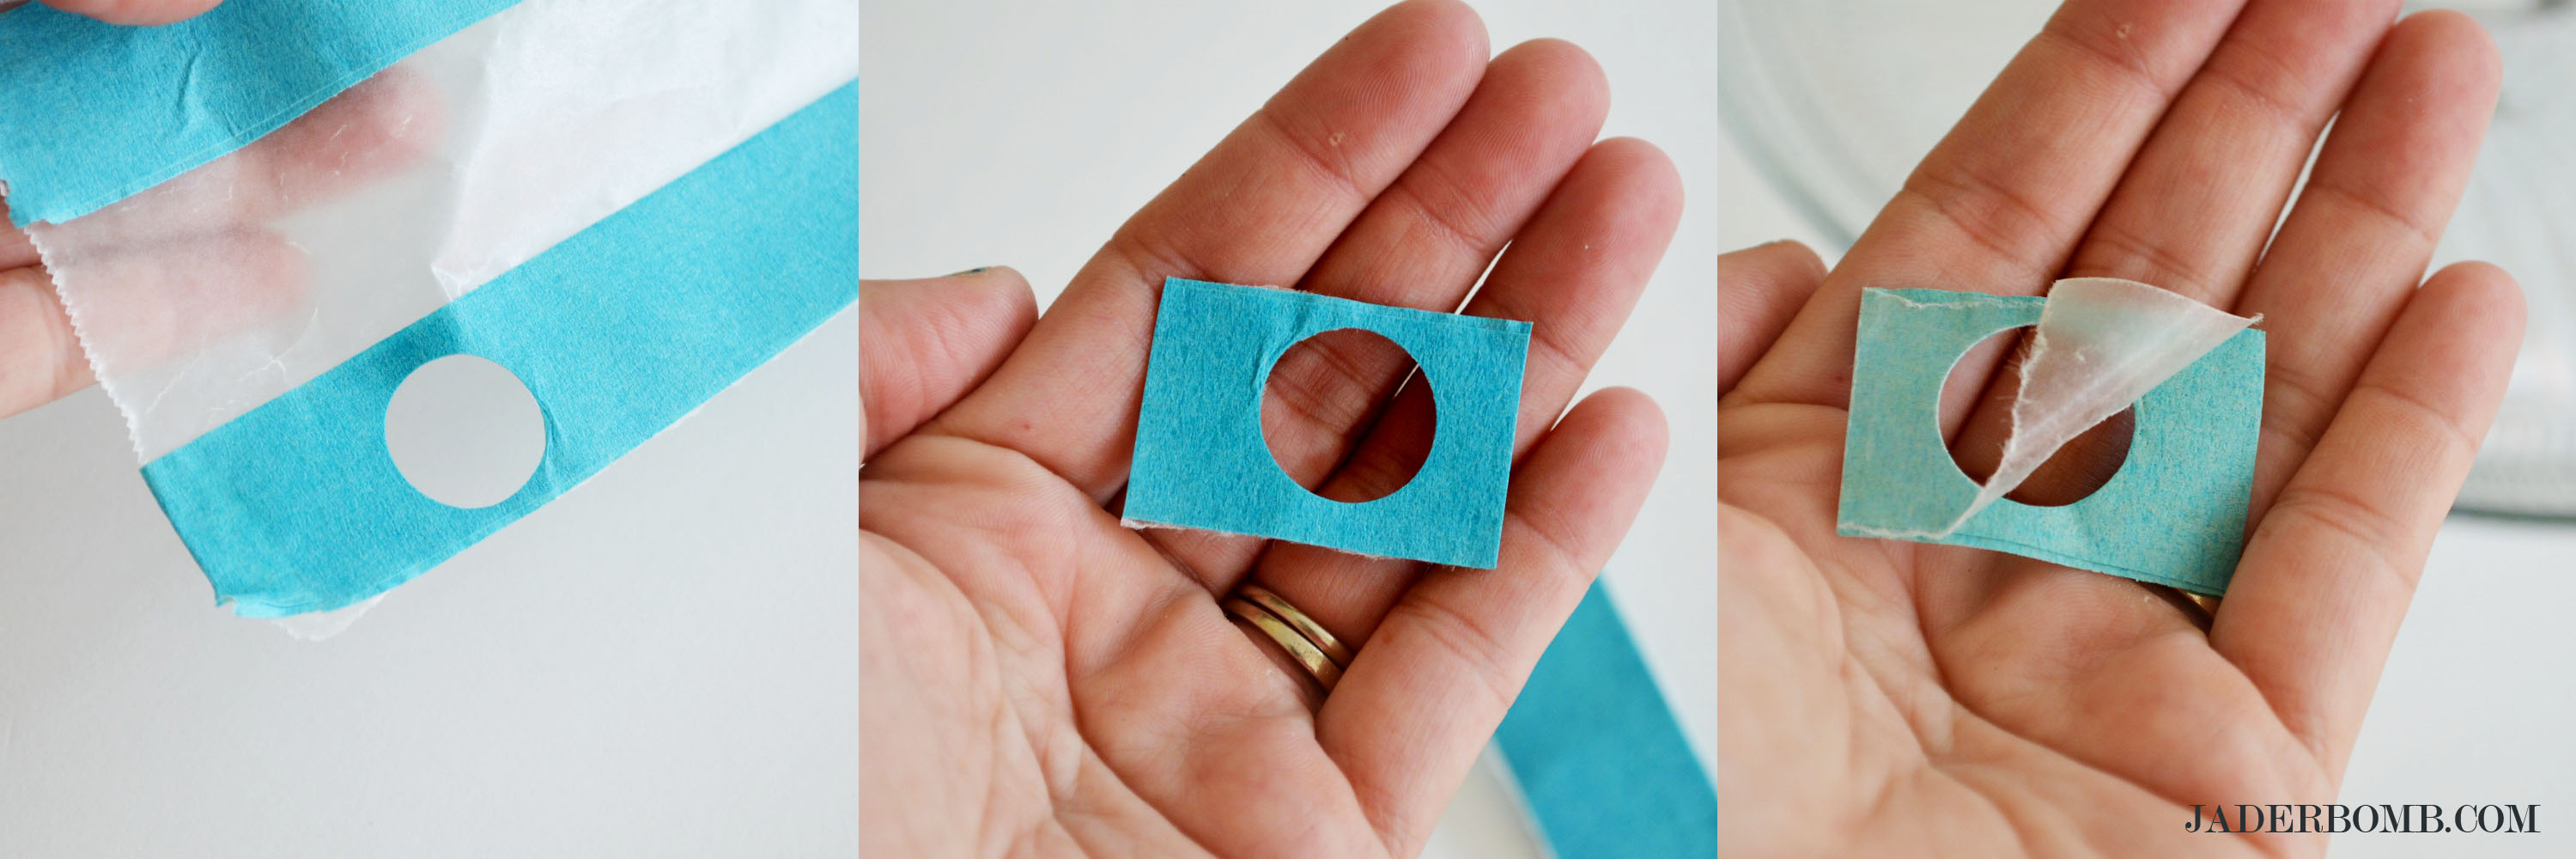
1) Get your Martha Stewart glass patterning tape and lay a strip down on wax paper. After you apply the first strip add another one right on top.

how-to-paint-on-glass-jaderbomb

The reason we are putting two pieces on top of each other is to make it sturdy enough to punch through. I am using a one inch circle punch. You can use any size you want but if it’s bigger than one inch you will have to make your strip of tape wider.

how-to-paint-on-glass-jaderbomb

2) Punch a hole right through your tape.
The reason we put wax paper under the tape is so we can peel it off when we are ready to use it. It’s like a homemade sticker.

how-to-paint-on-glass-jaderbomb

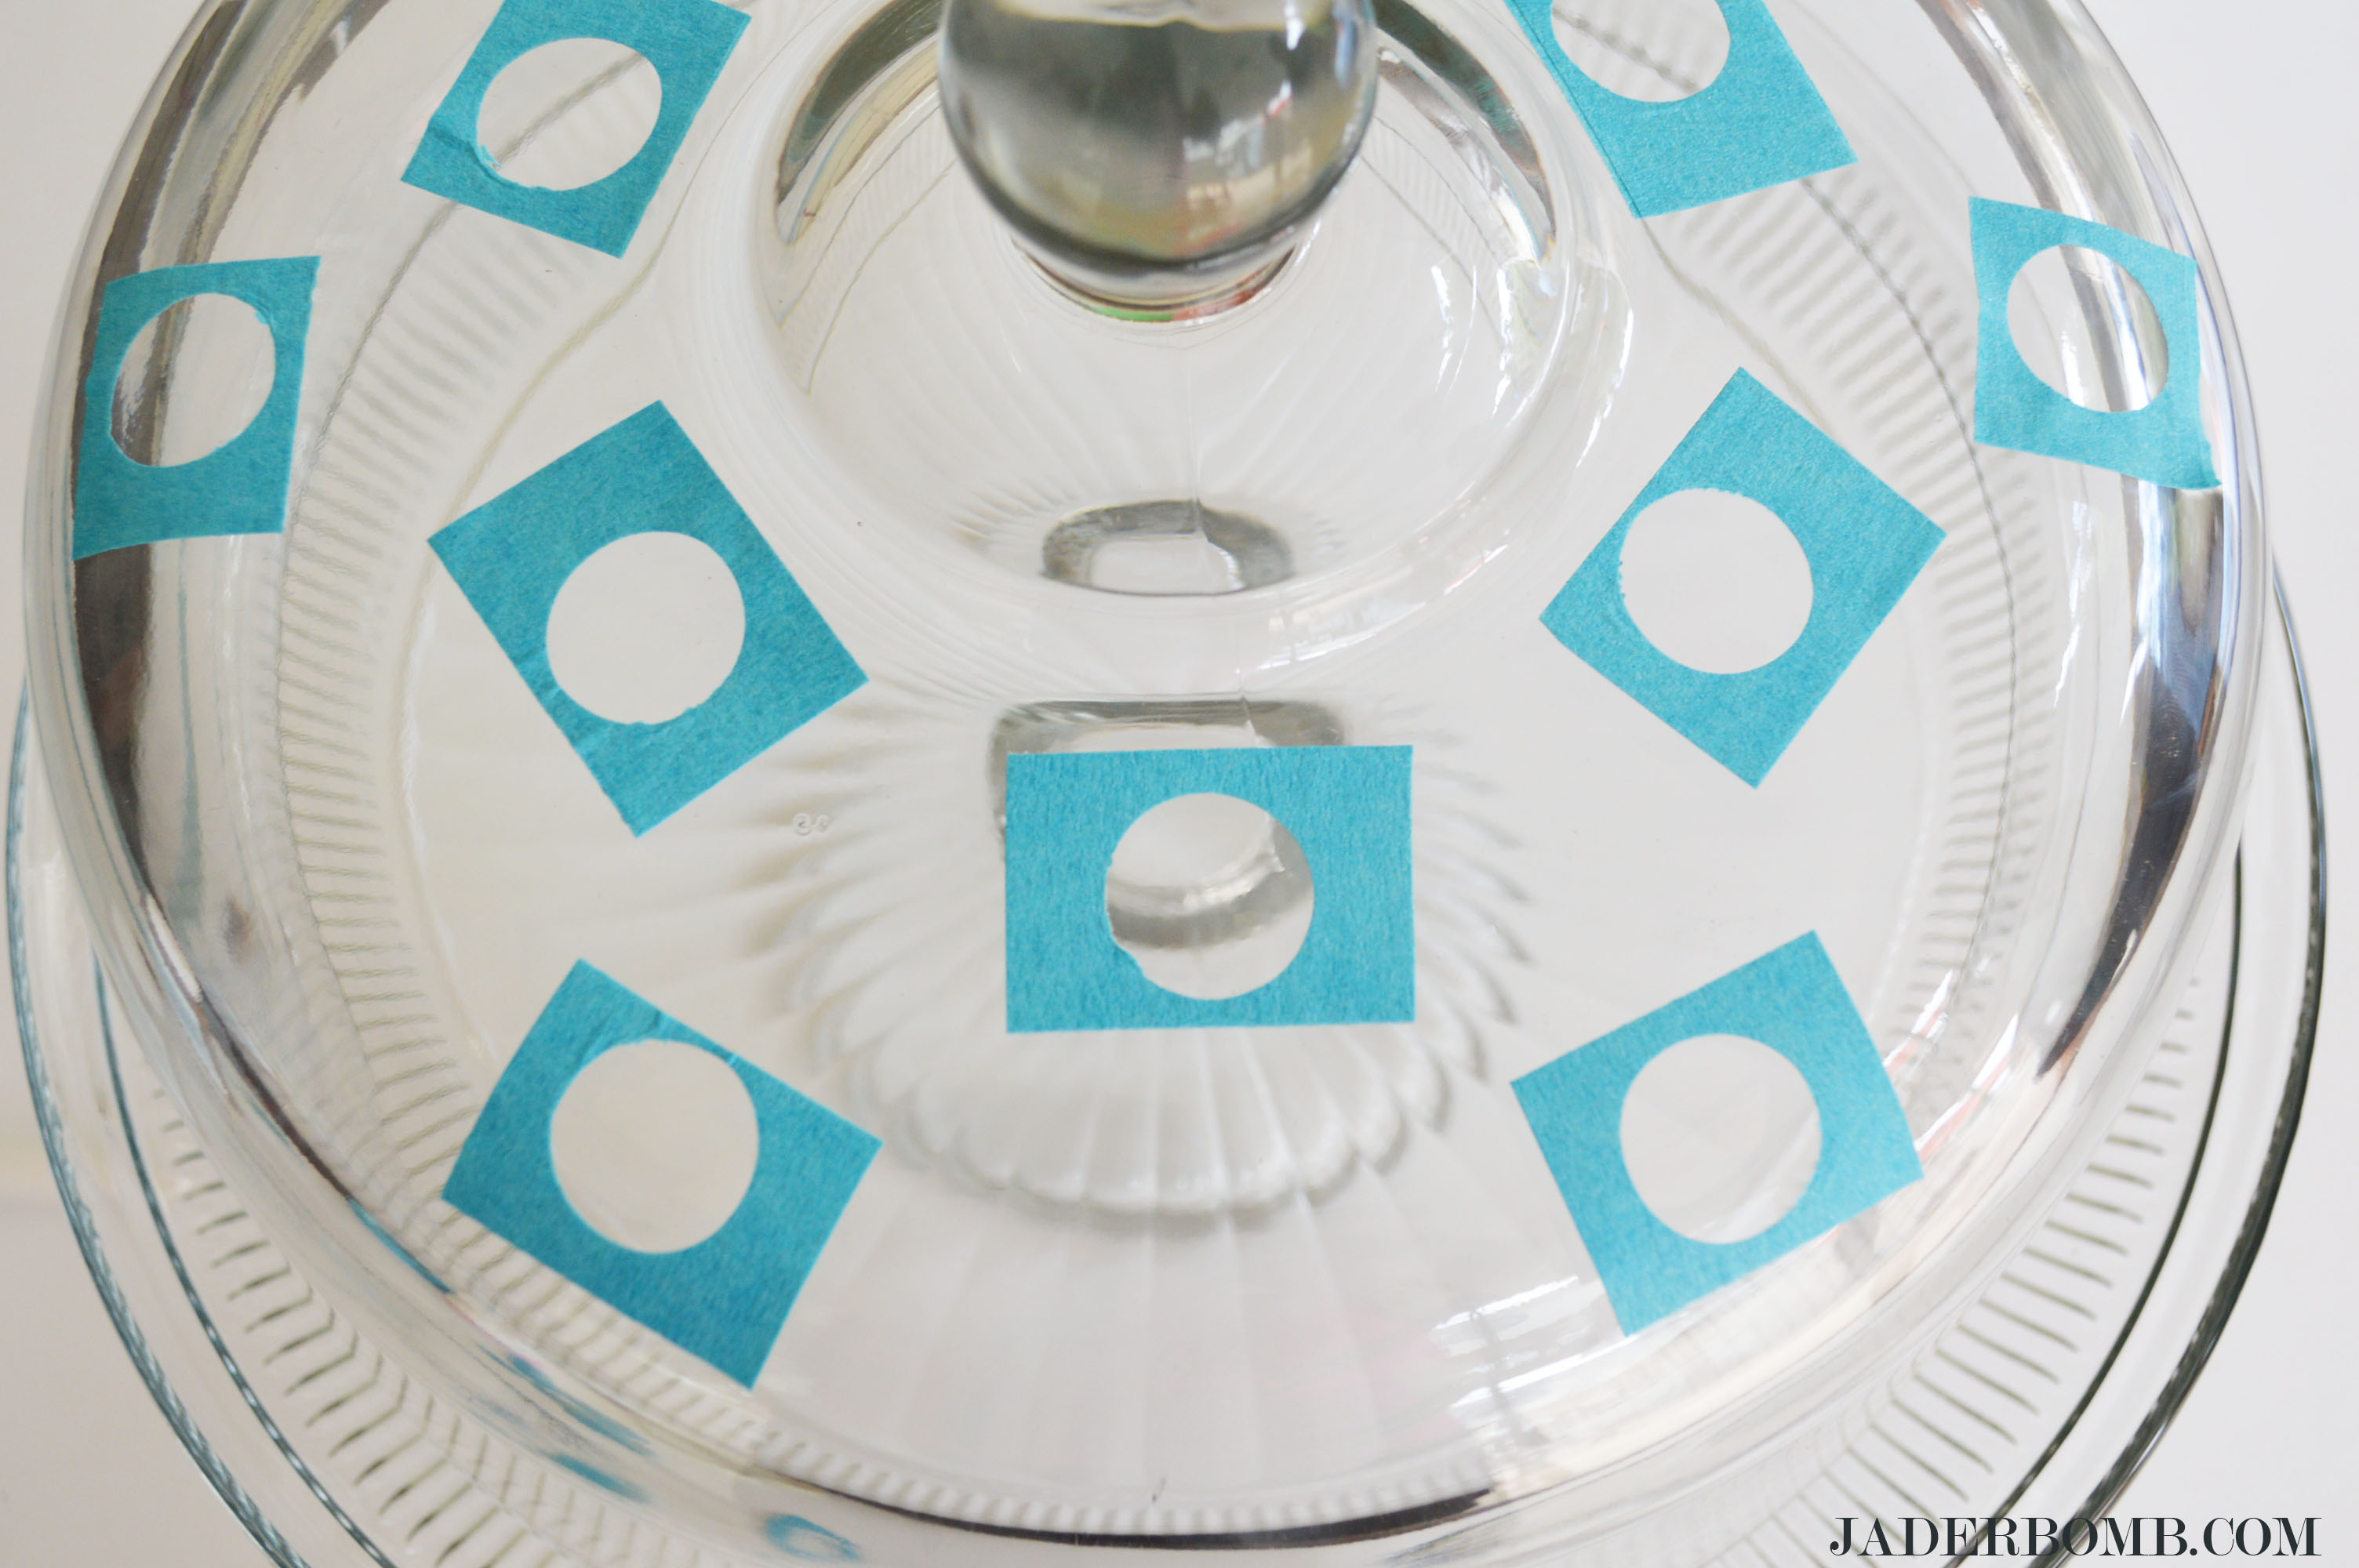
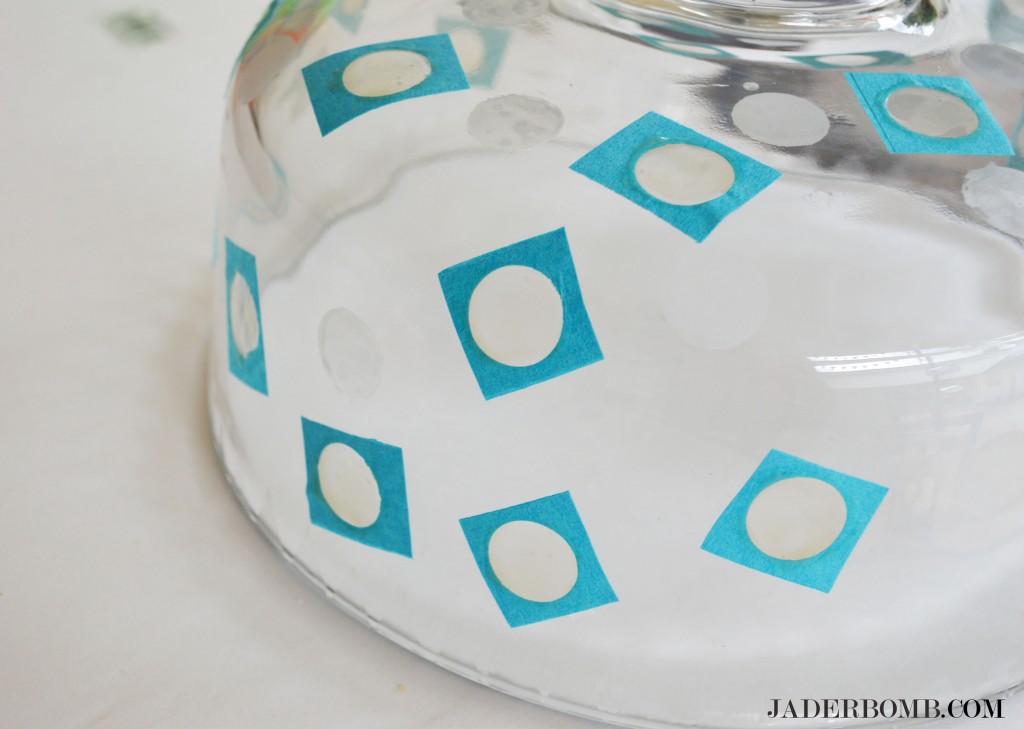
3) Take the wax paper off of each circle and placed them on the glass.
I only want to etch the circle shape which is why I am using this part of the punch.

how-to-paint-on-glass-jaderbomb

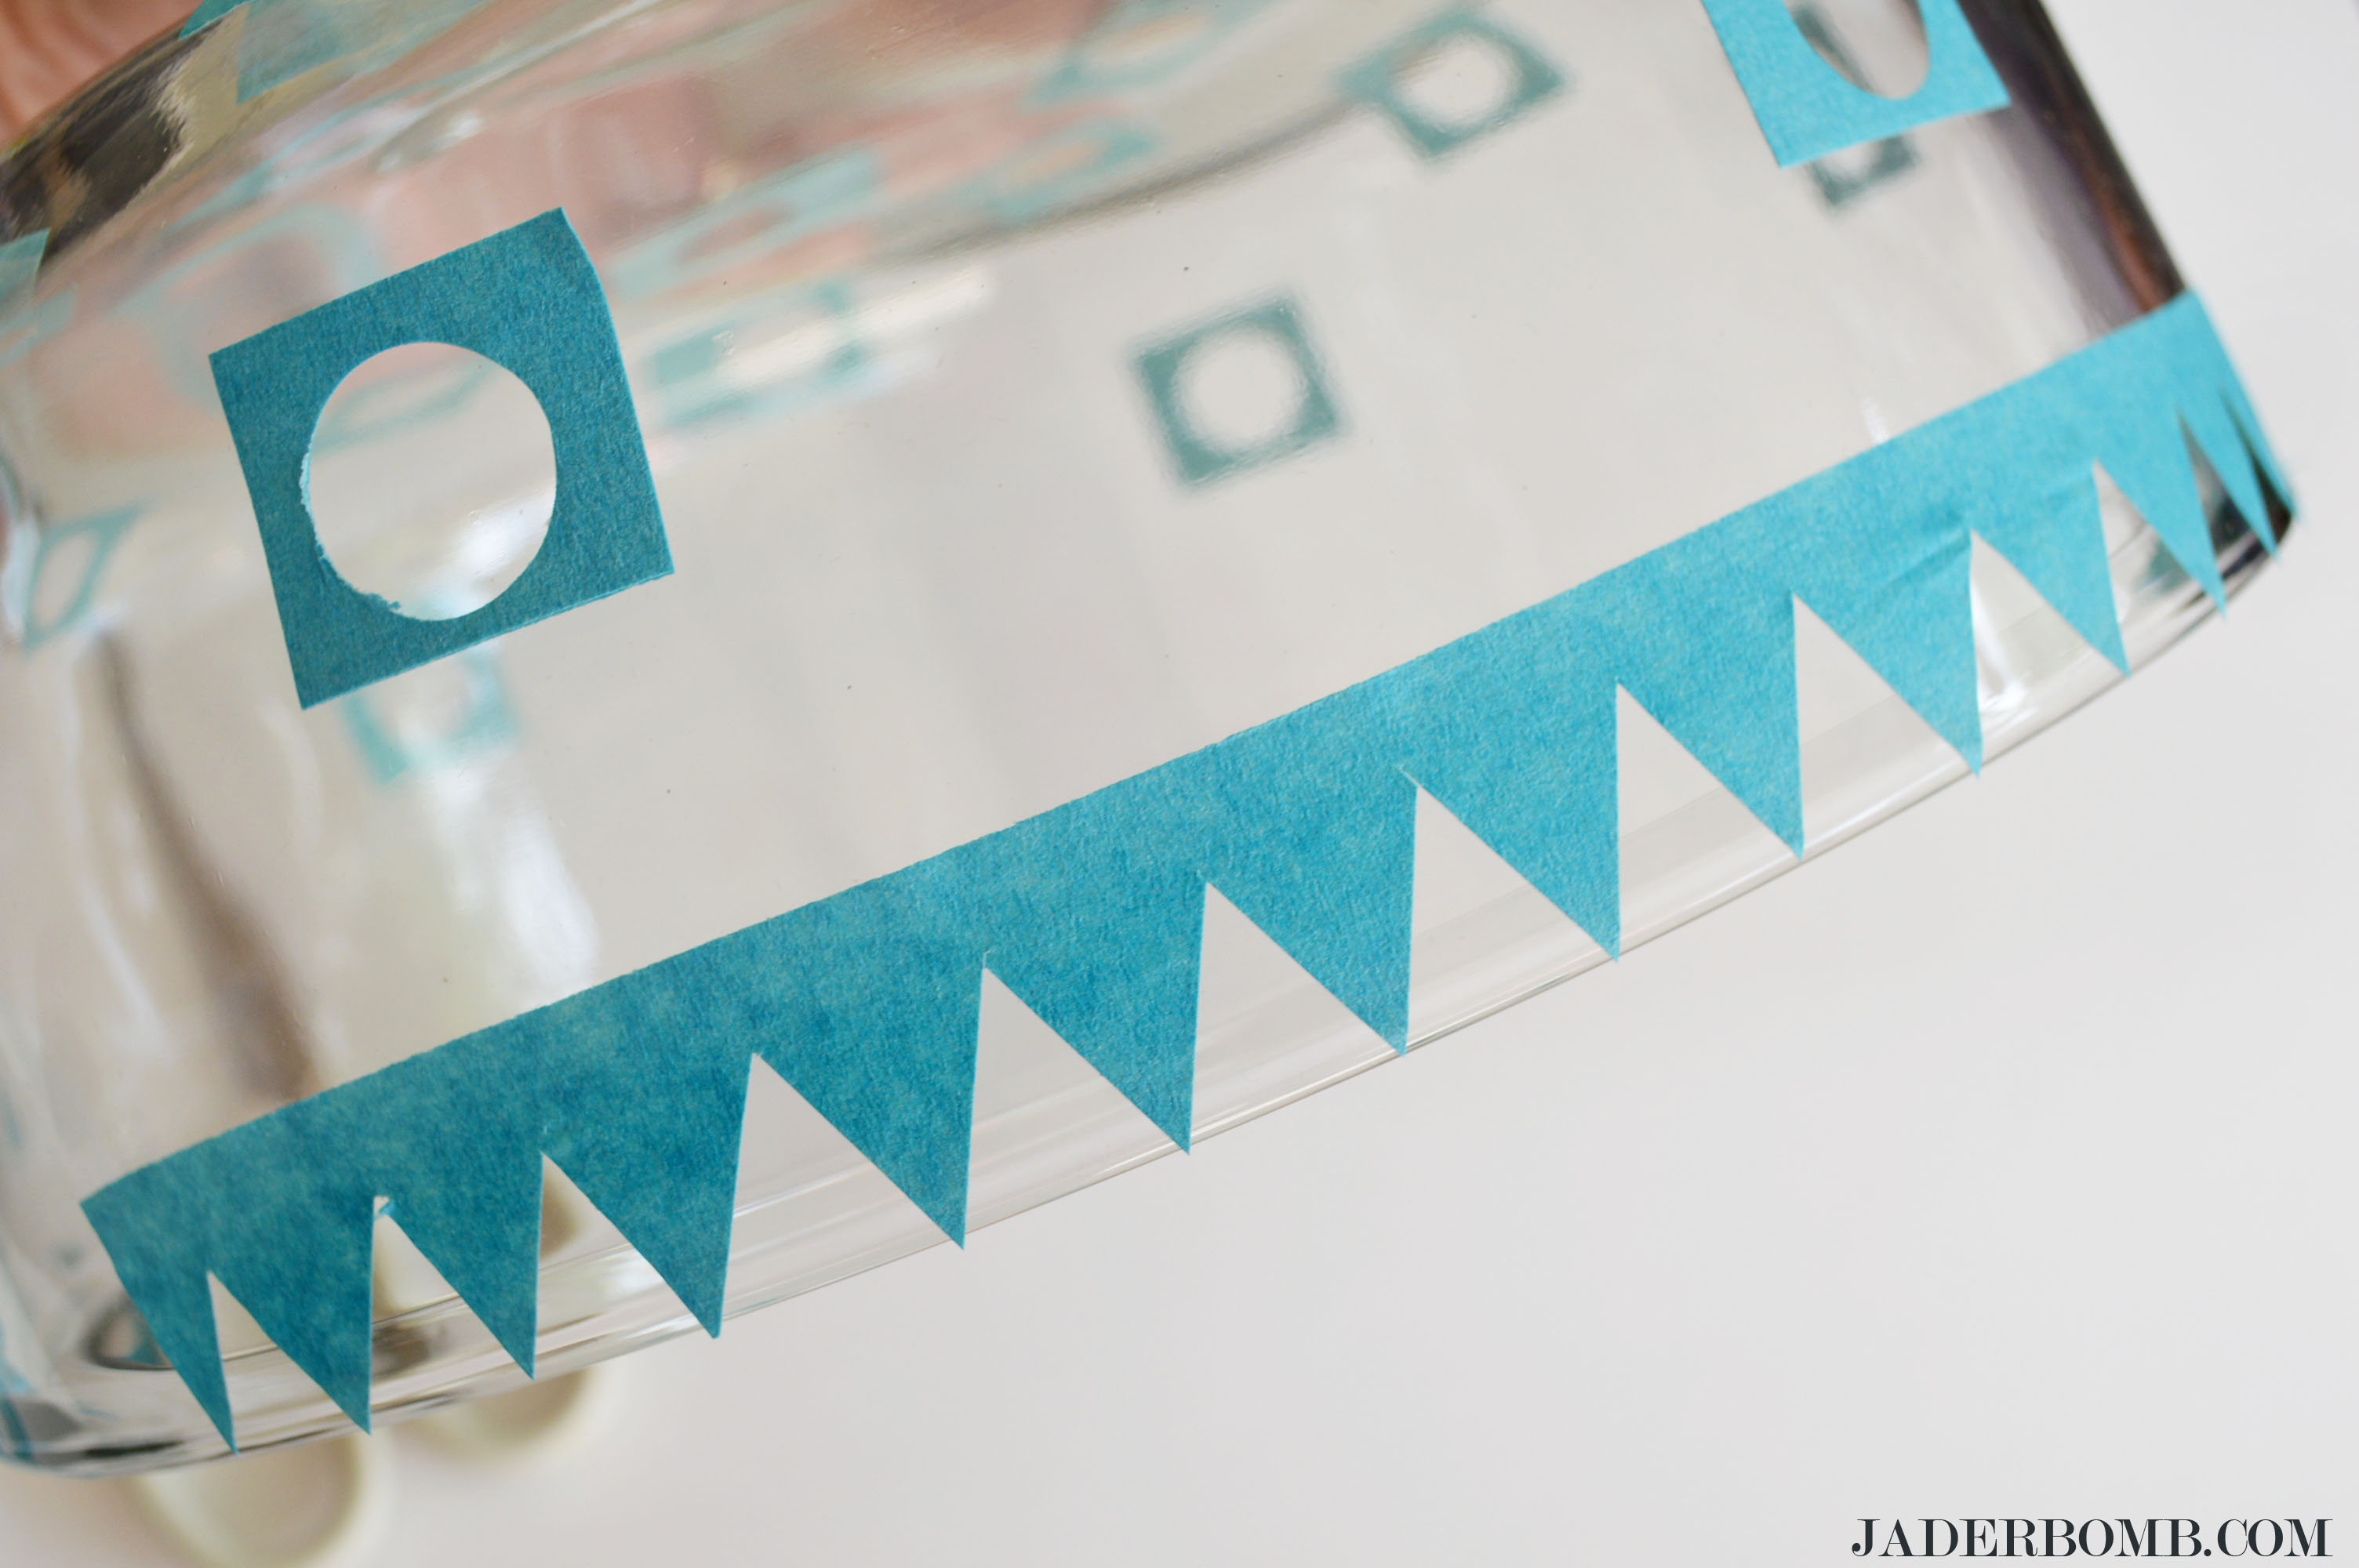
 4) To create the whimsical boarder around the bottom you will follow the same steps but cut out triangles.
Are you shaking your head at how easy this is so far?

how-to-paint-on-glass-jaderbomb

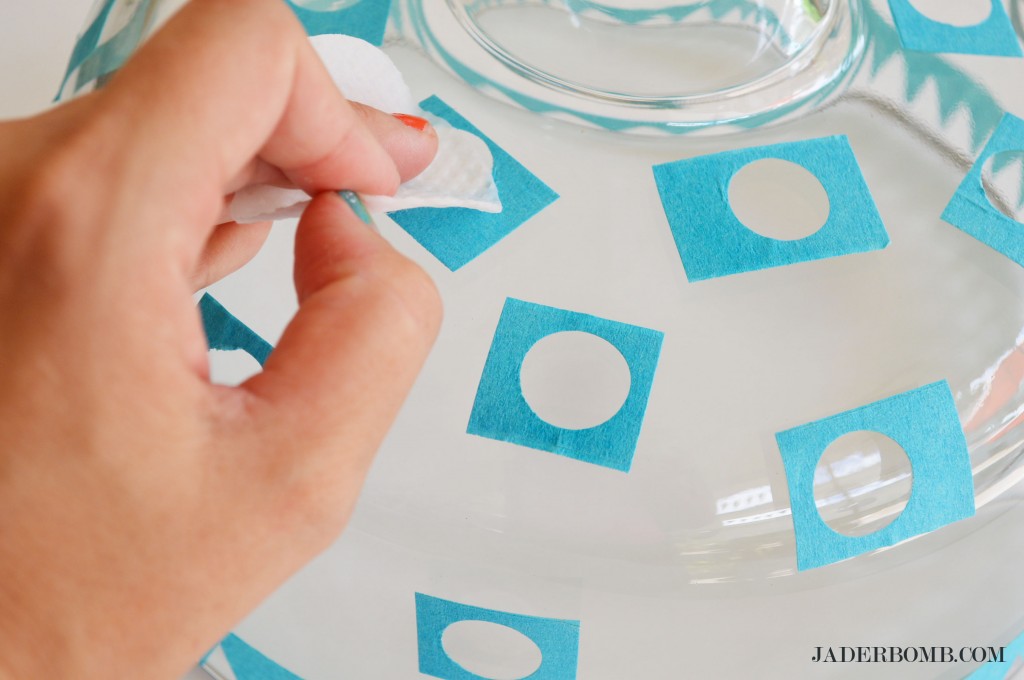
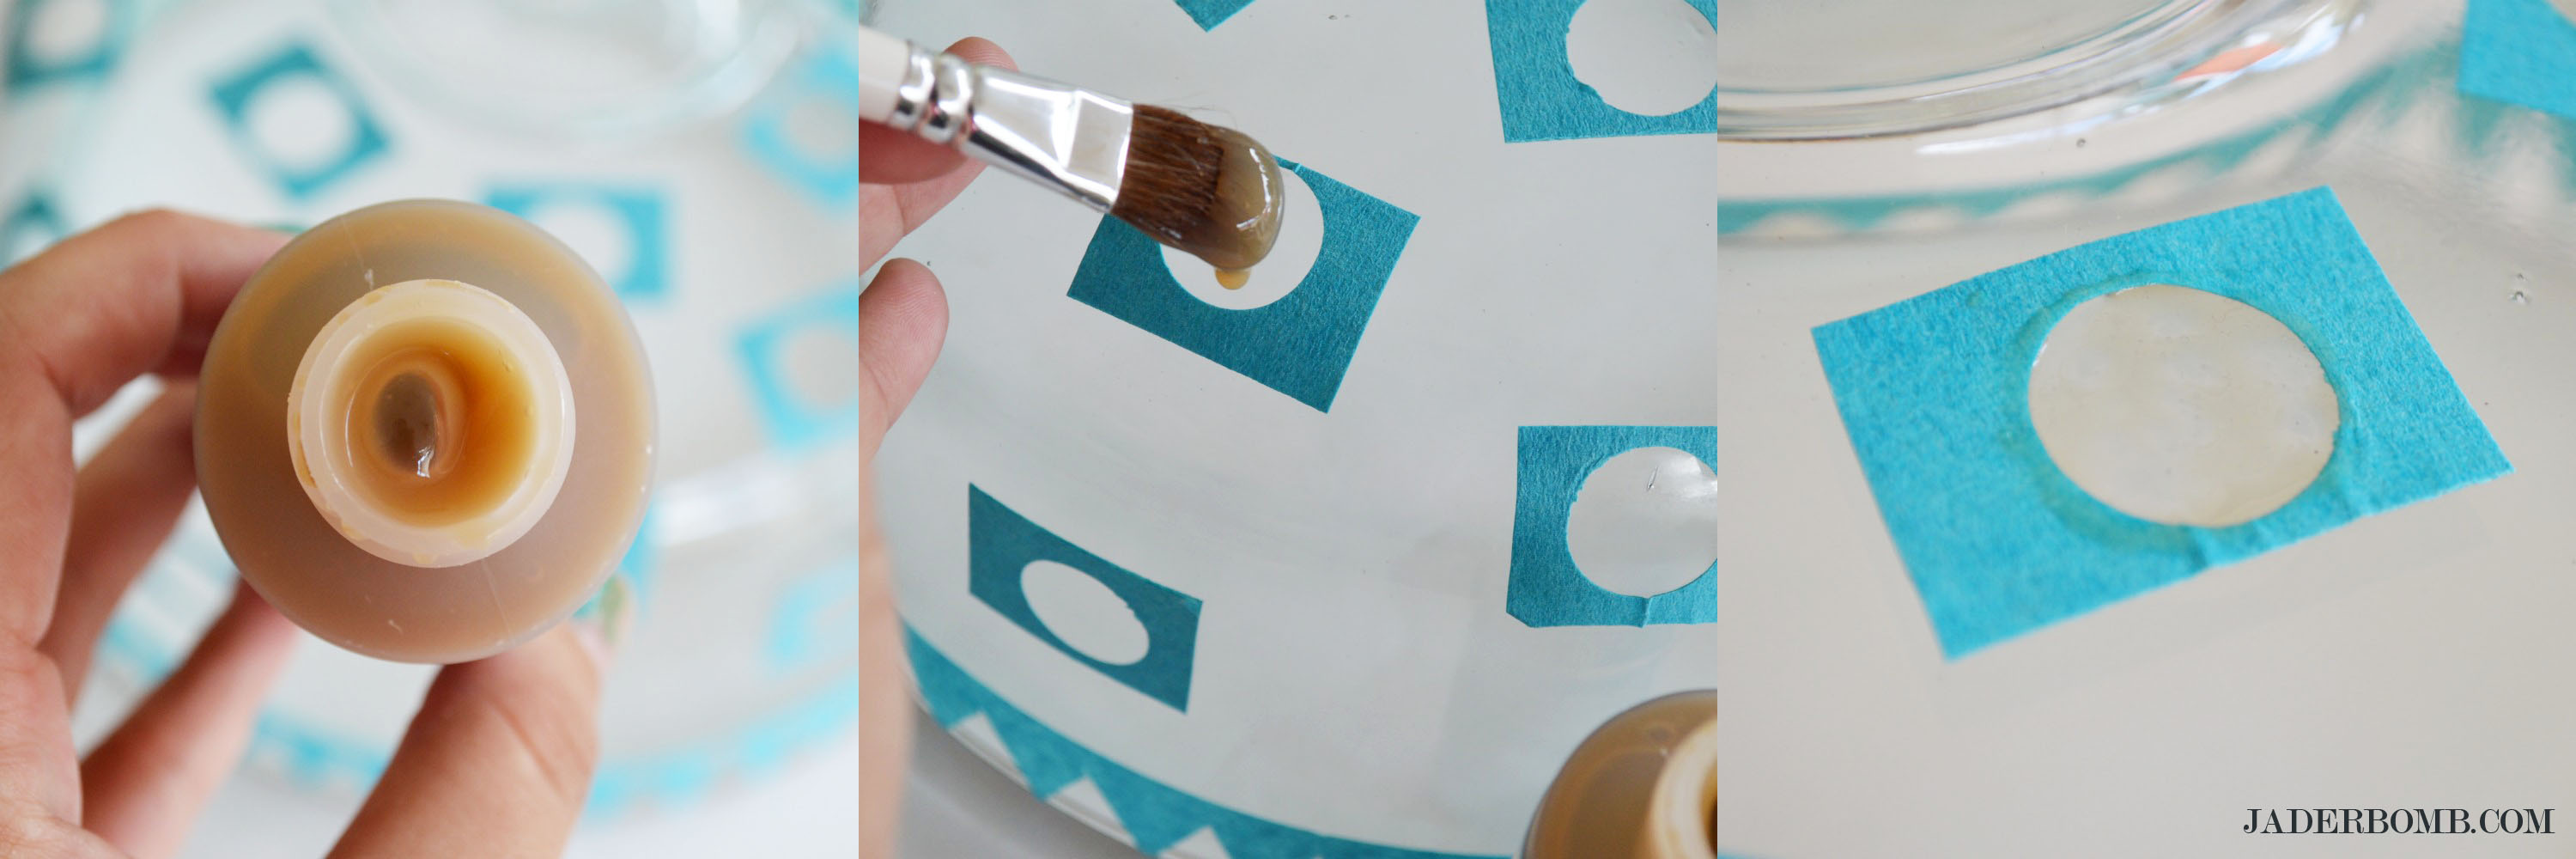
5) Get a small cotton ball with alcohol and clean the spots you will be etching.
This cleans the oil off of the glass.

how-to-paint-on-glass-jaderbomb.jpg

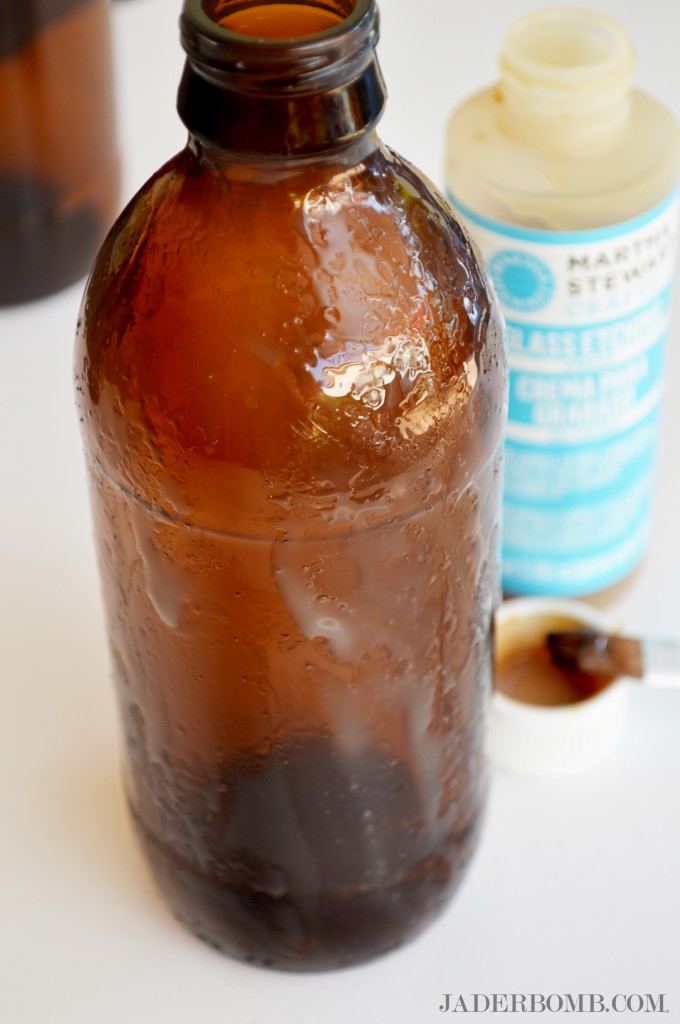
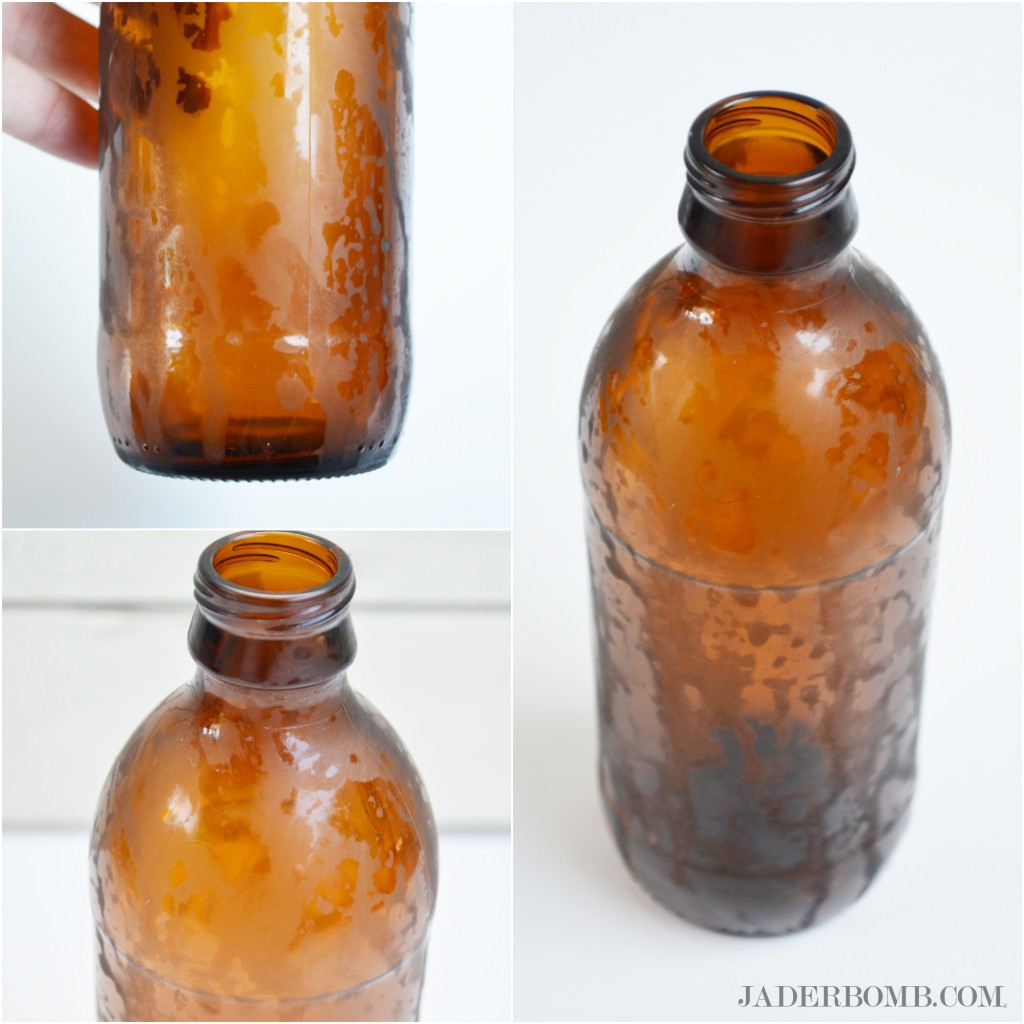
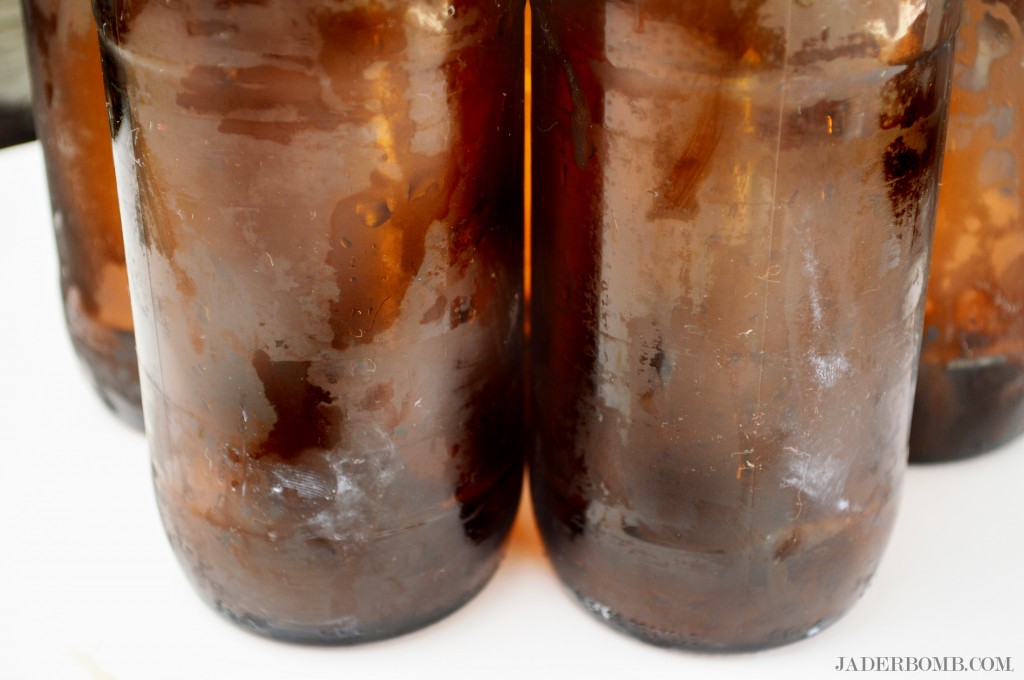
6)Apply an even coat over every thing then let it sit for 15 minutes, then rinse under running water.

This part is so much fun and did I mention easy! The etching cream comes with a brush that you will use. I dipped the brush into the cream and applied it directly to the glass surface. You want to put enough while making sure you blend it nicely.
P.S. Don’t lather the cream like I did. Epic fail.

HOW TO ETCH

7)I did one layer of dots, cleaned my glass then applied more dots.

how-to-paint-on-glass-jaderbomb

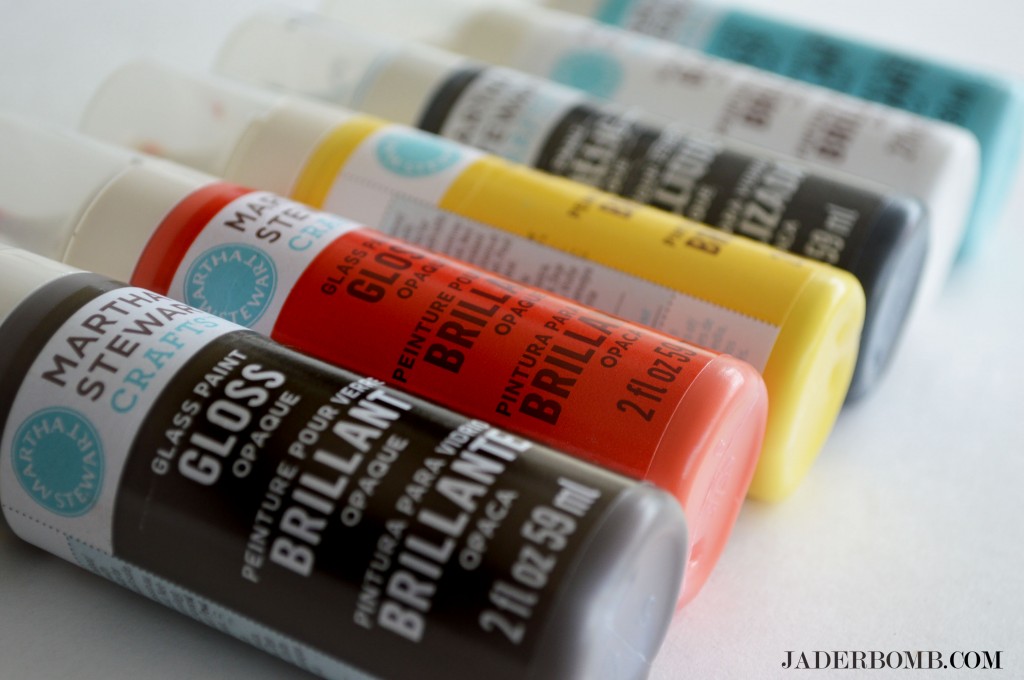
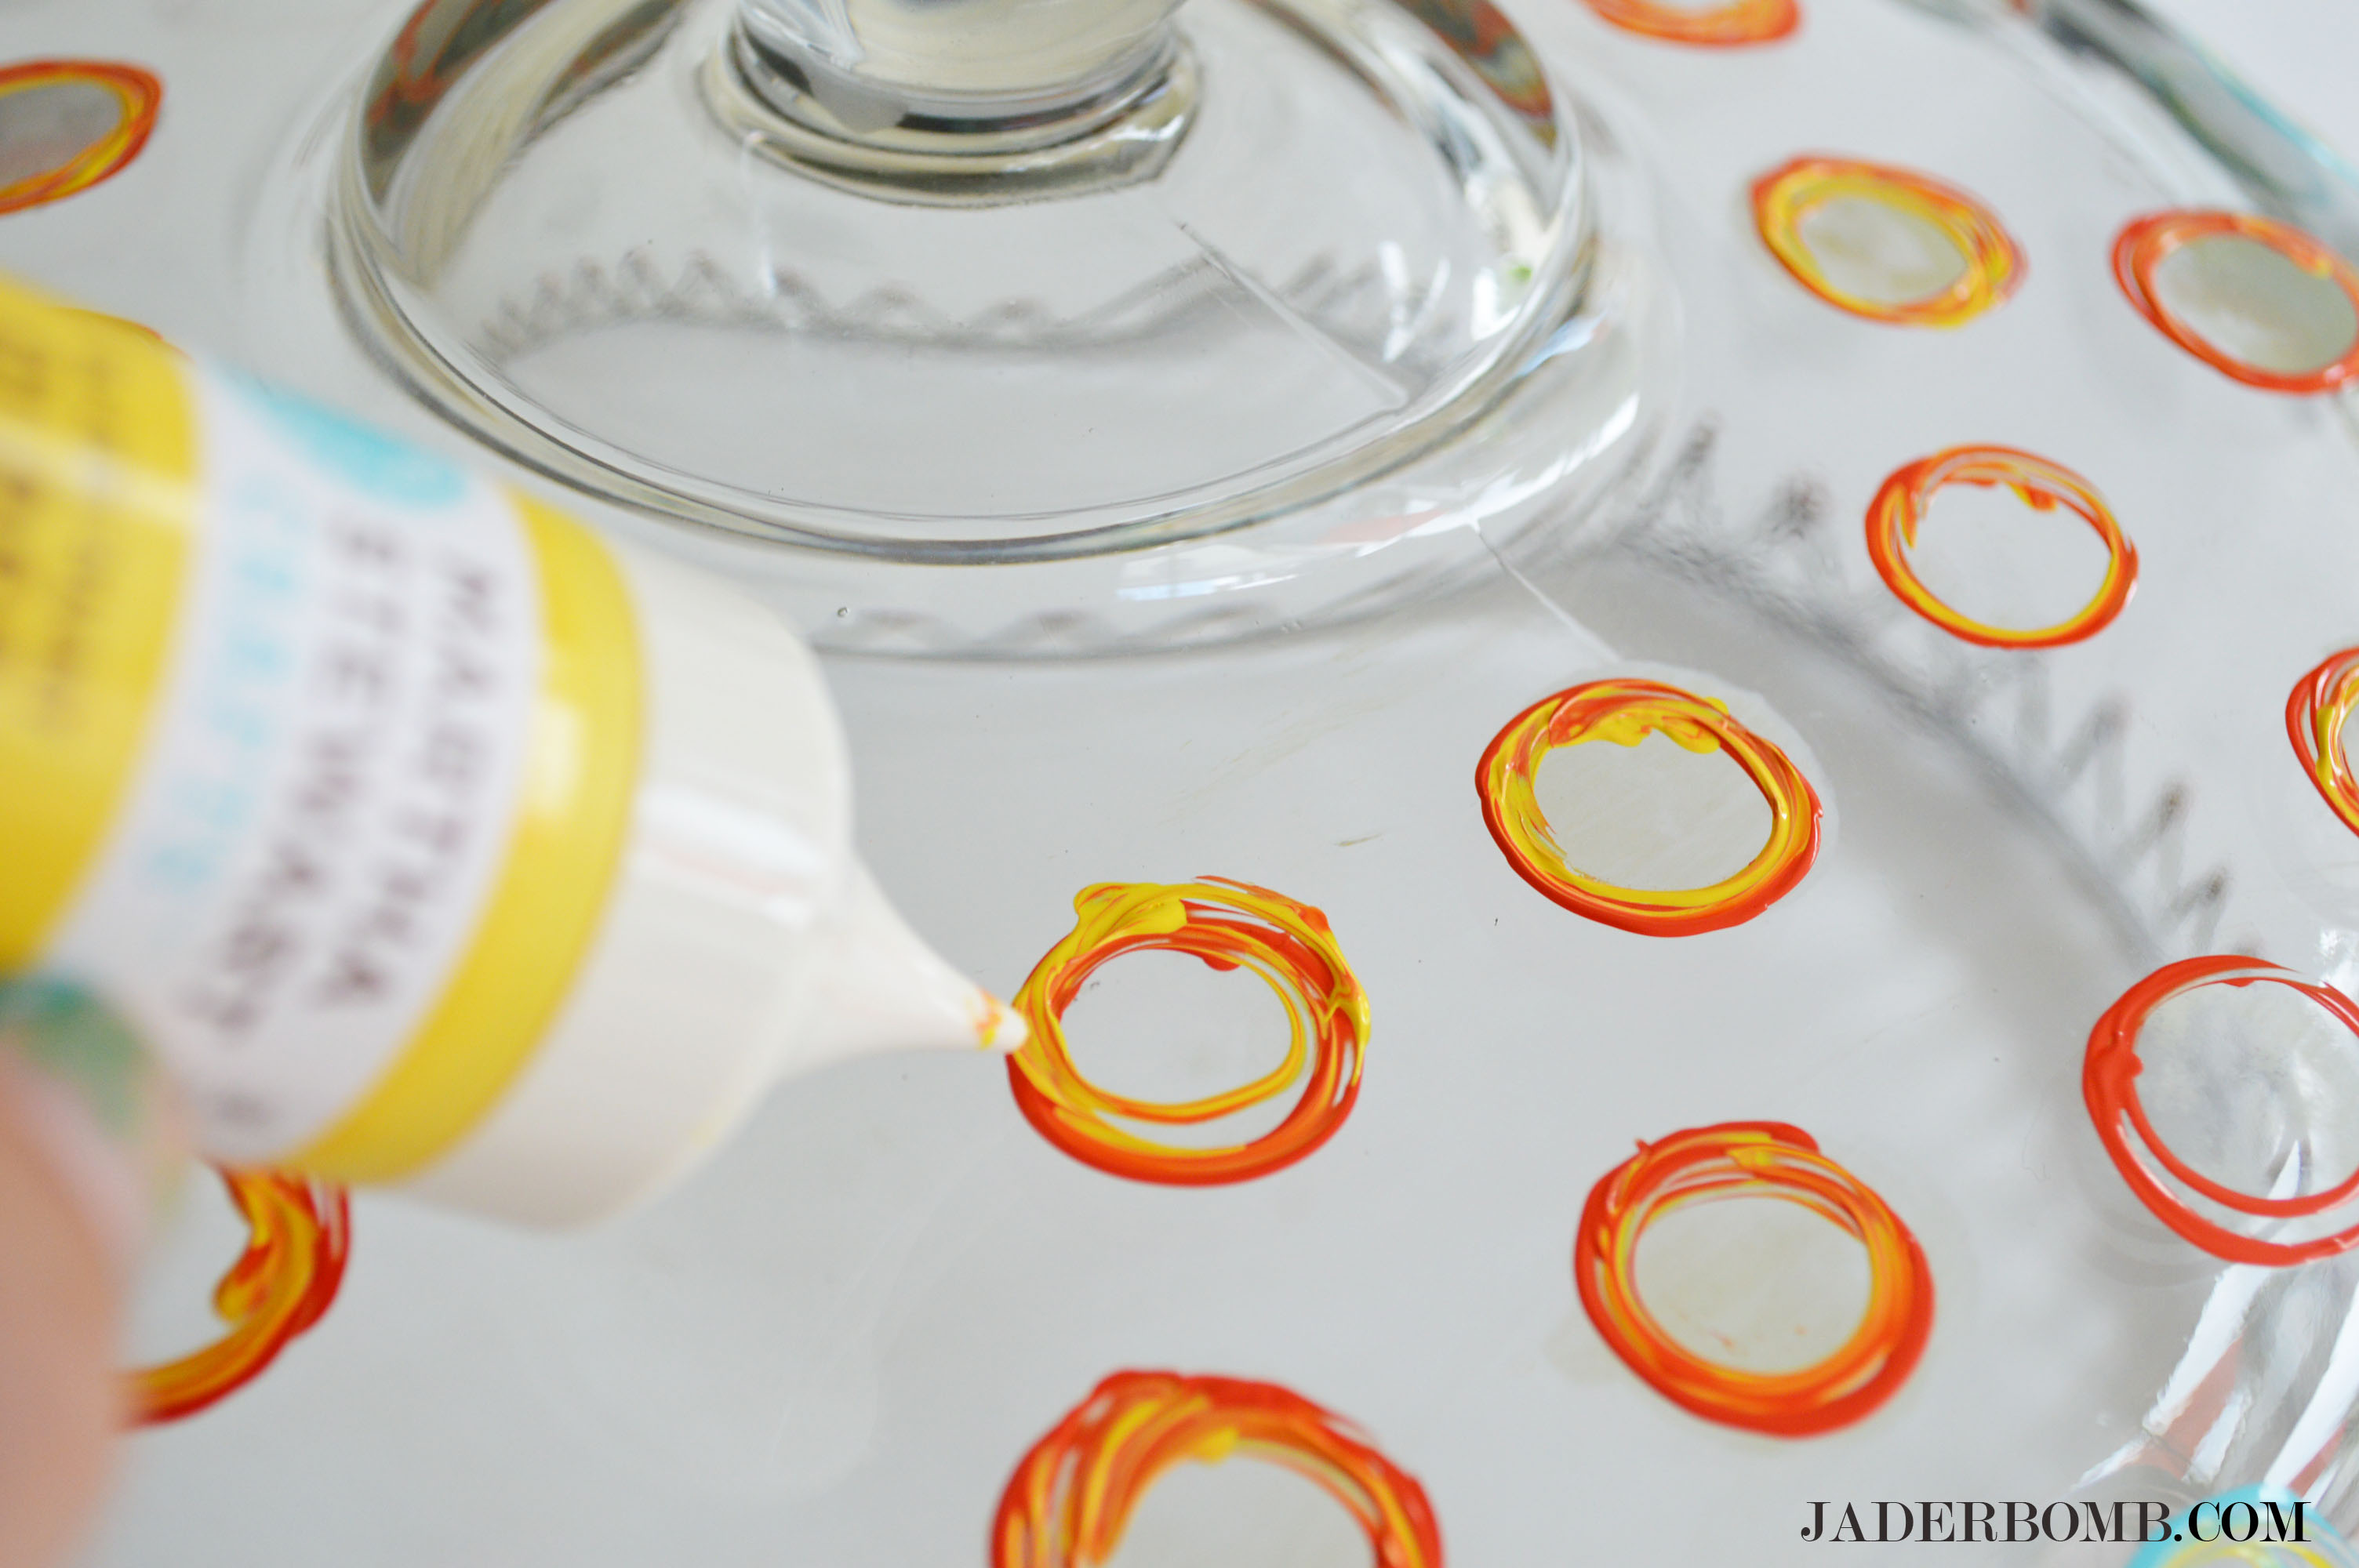
Once you are done grab your glass paint. I used Vanilla Bean, Yellow Jacket, Black Nickel, Geranium, Wedding Cake and Pool .

DIY ETCHED GLASS

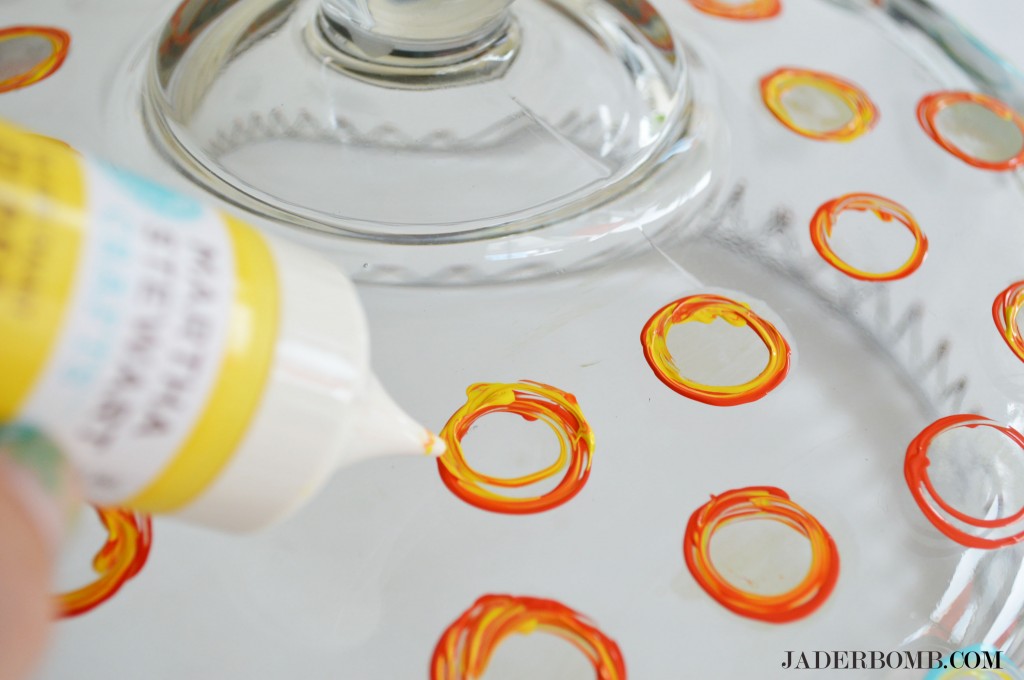
8) Start making circles with your glass paint.

LEARN TO PAINT

EASY GLASS PAINTING TUTORIAL

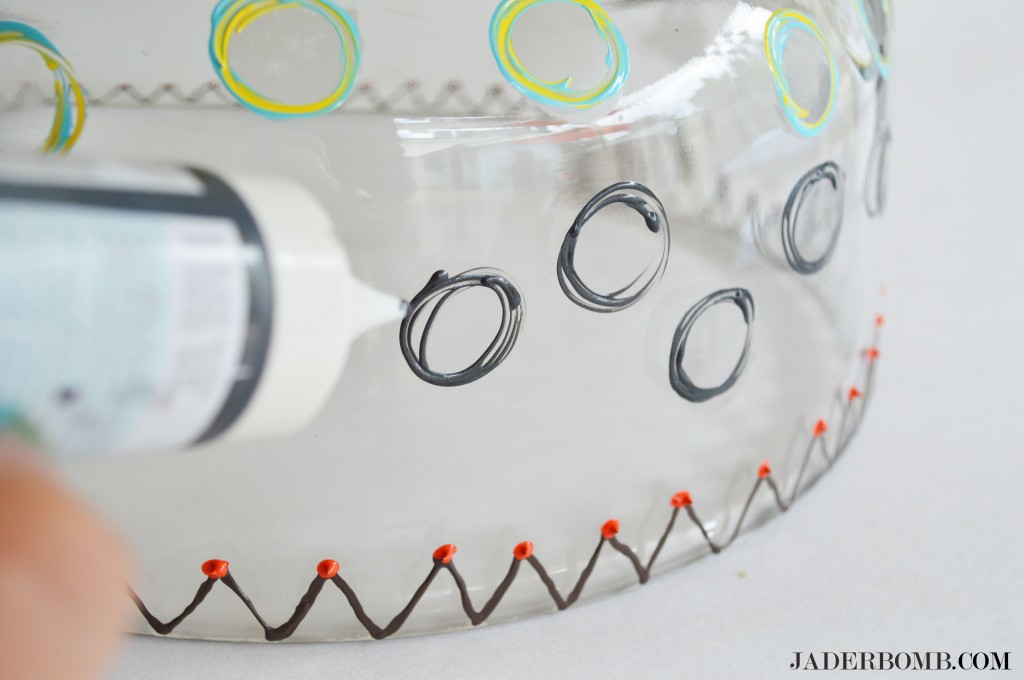
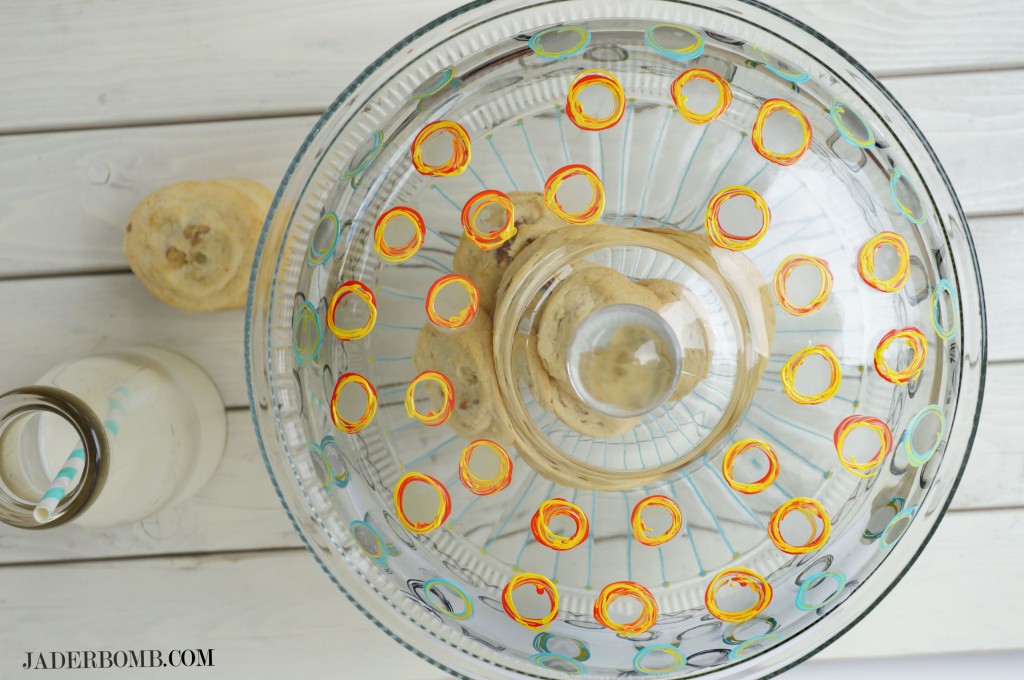
I like to mix one or two colors together while they are wet. Doesn’t everything work better when wet?!

ETCHED GLASS

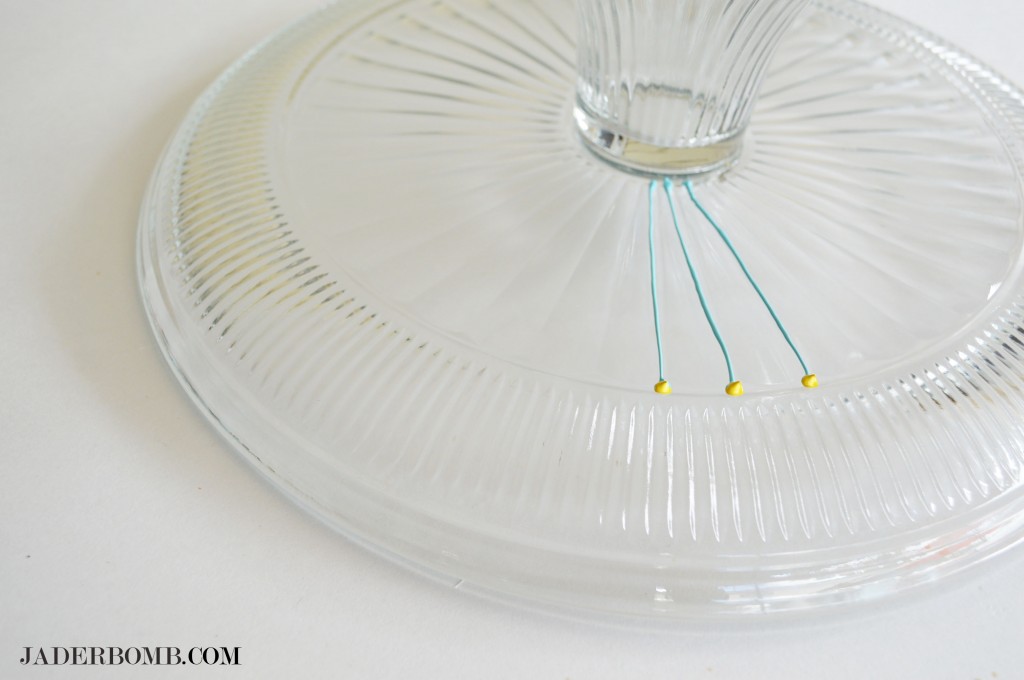
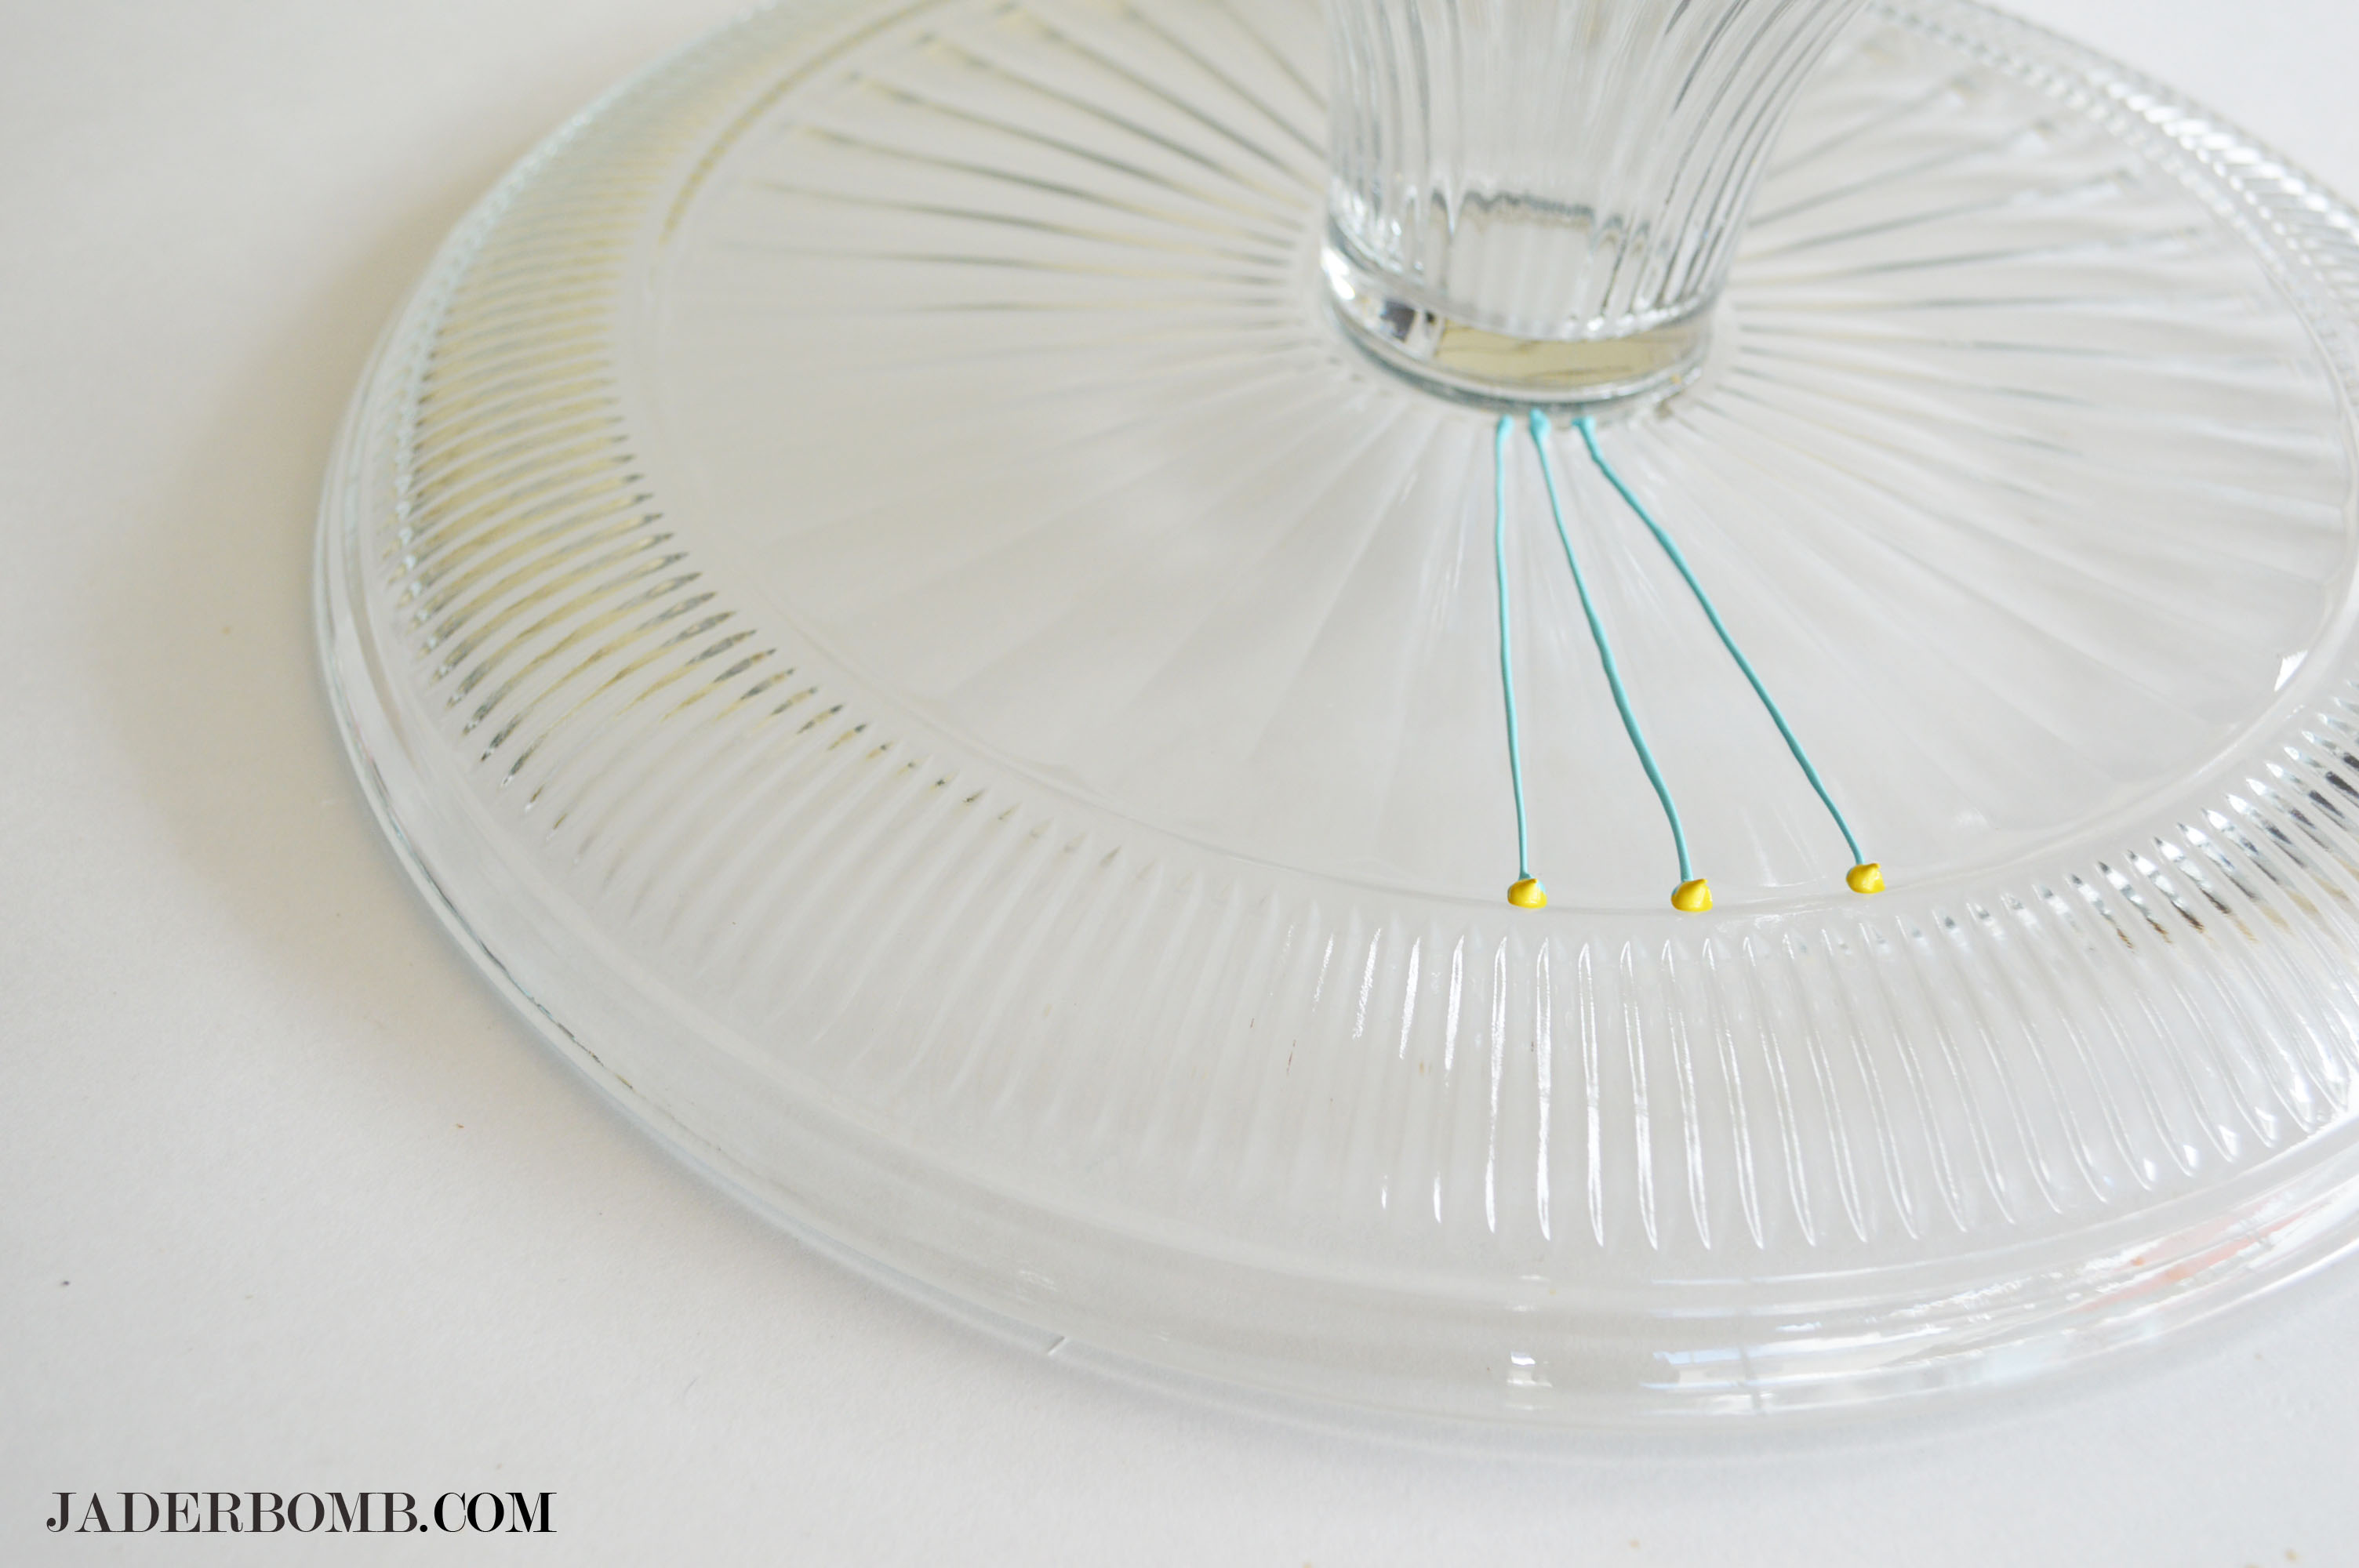
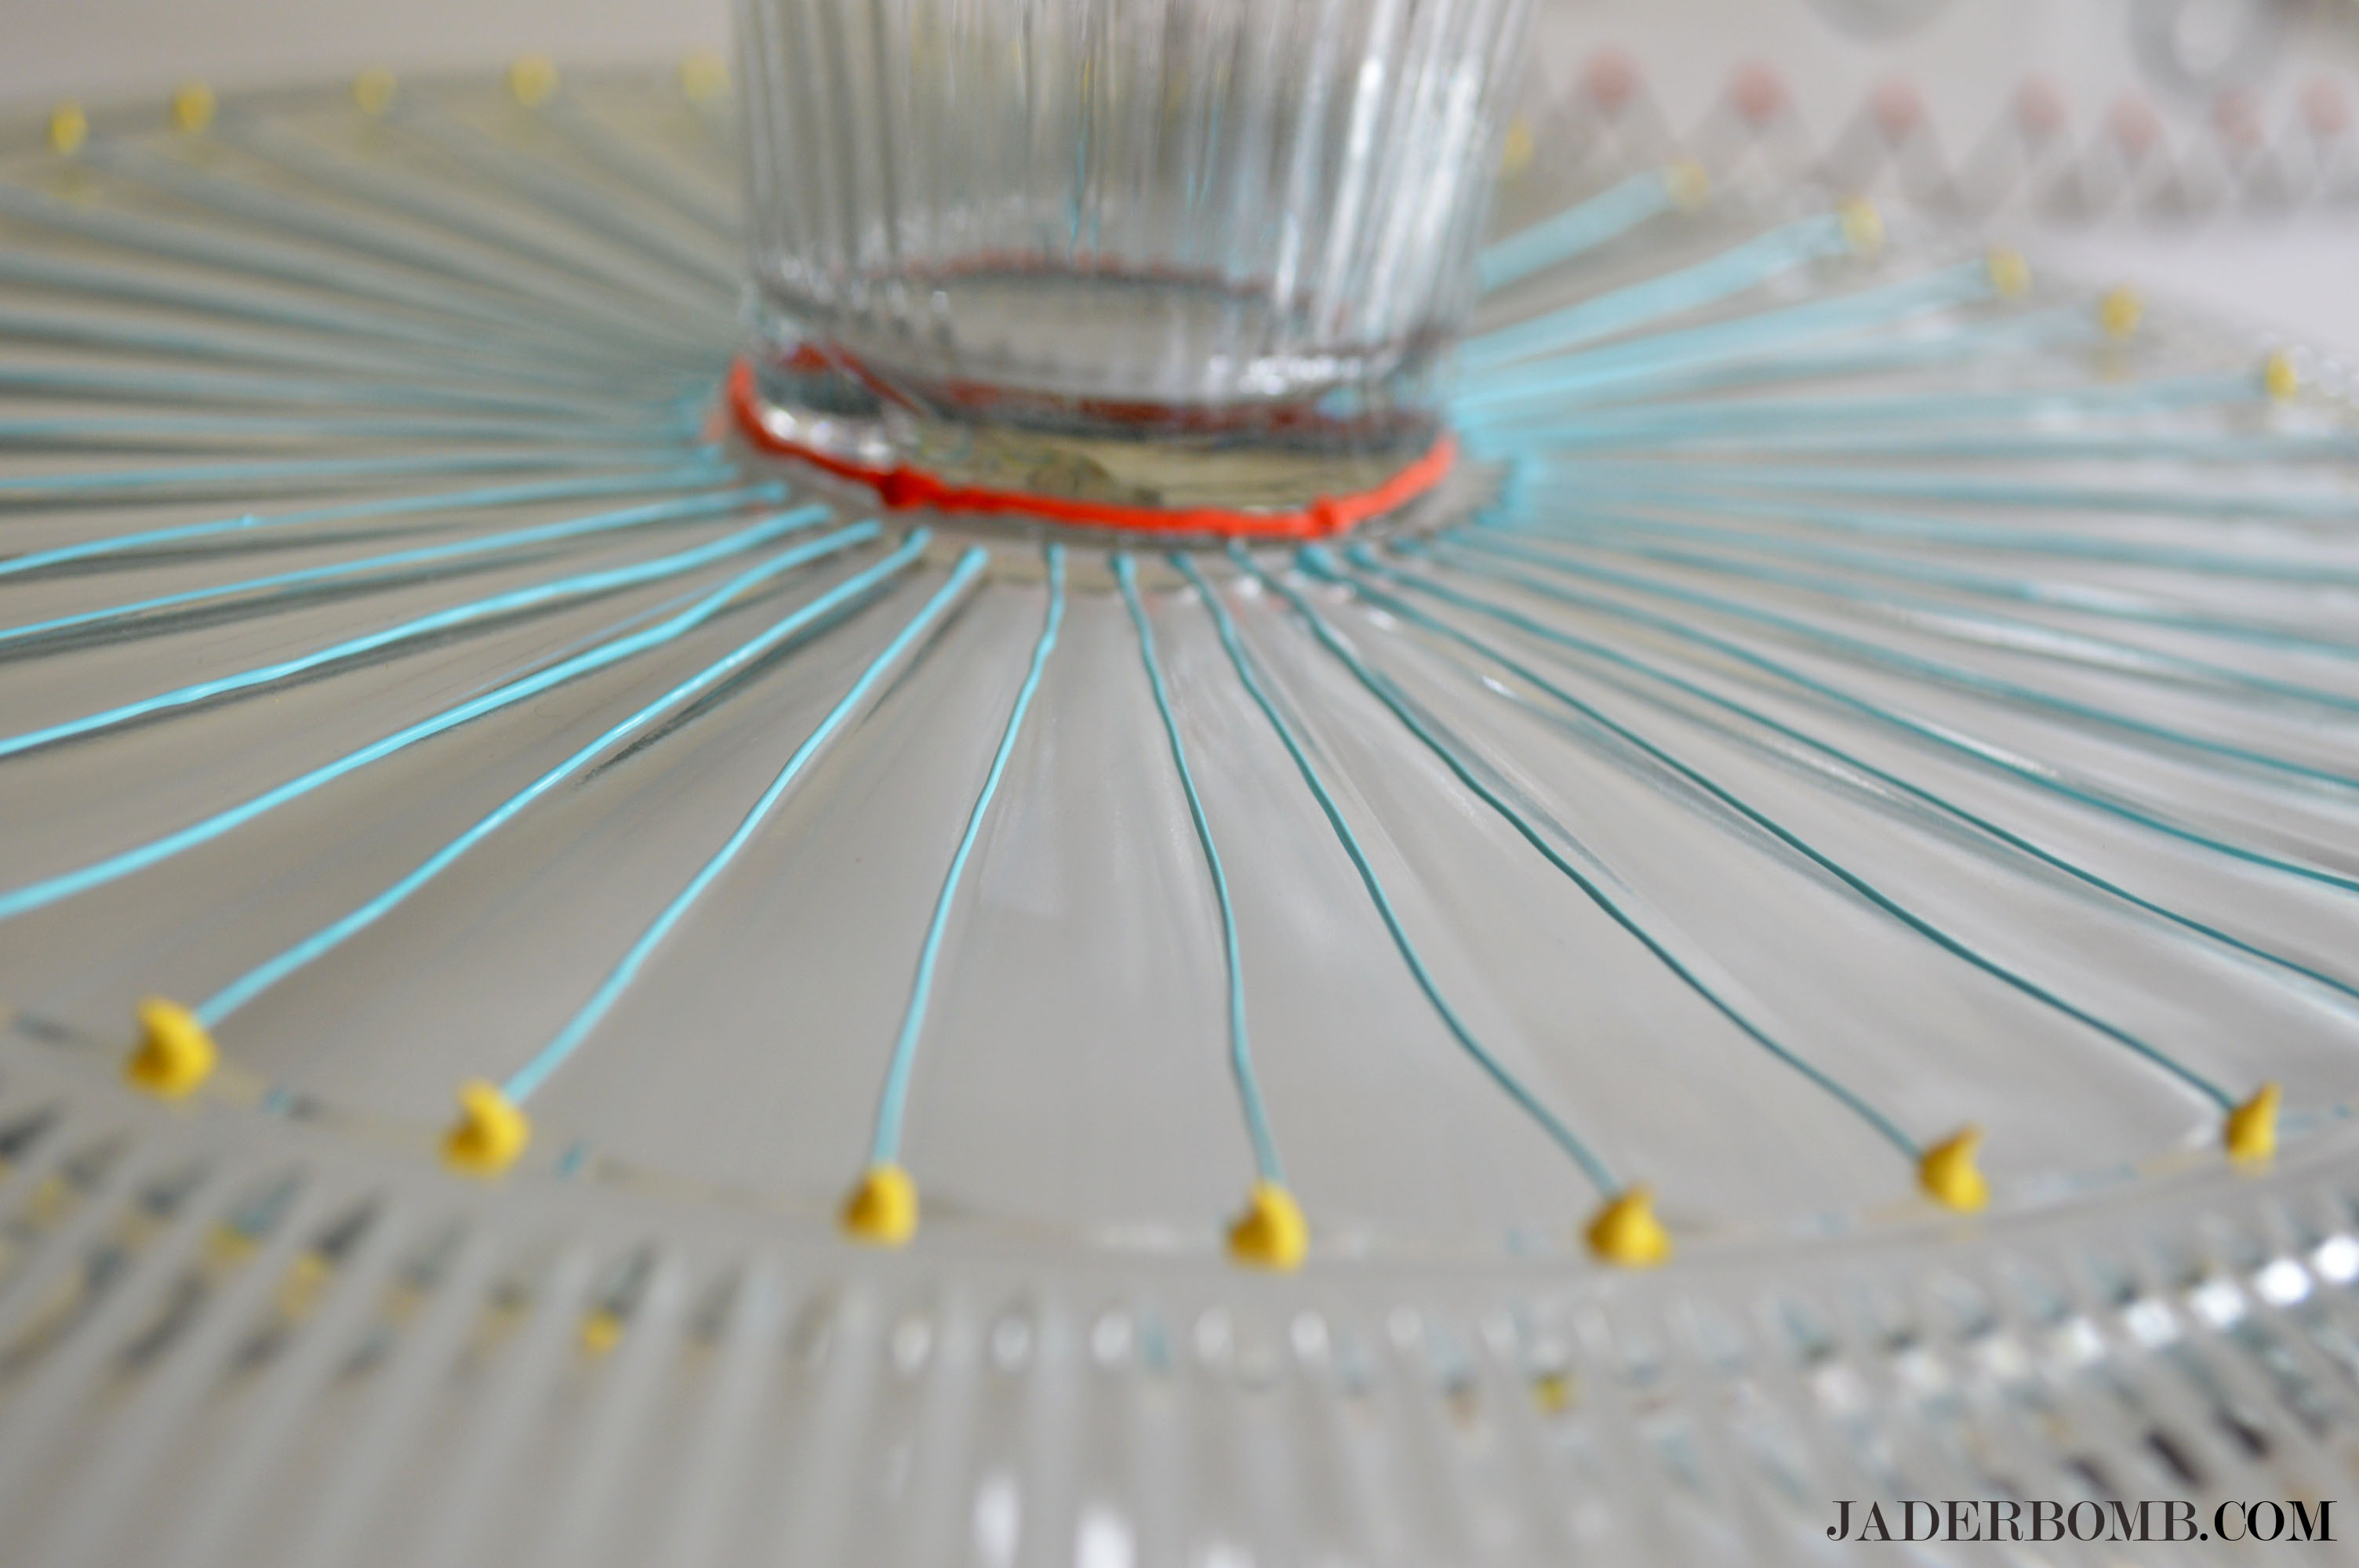
If you want to add that extra snazziness to your dome you can paint on the bottom.

WHIMSICAL CAKE DOME

I just painted the creases that were already there then topped them off with bright yellow dots.

PAINTED GLASS DISH

HOW TO ETCH GLASS

DIY PAINTED GLASS

DIY PAINTED AND ETCHED GLASS

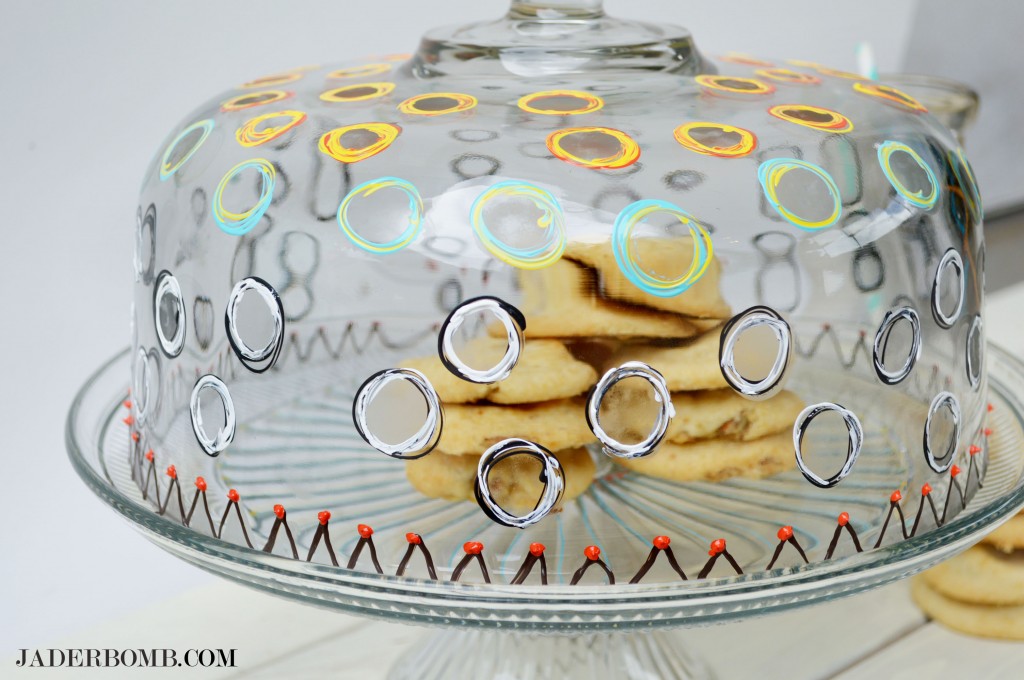
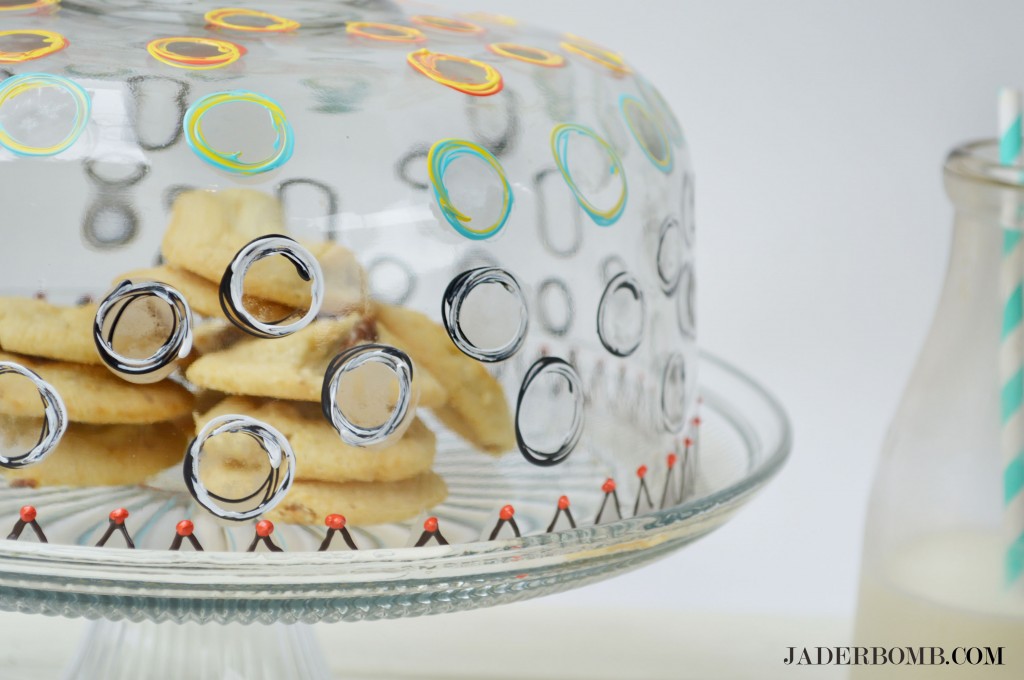
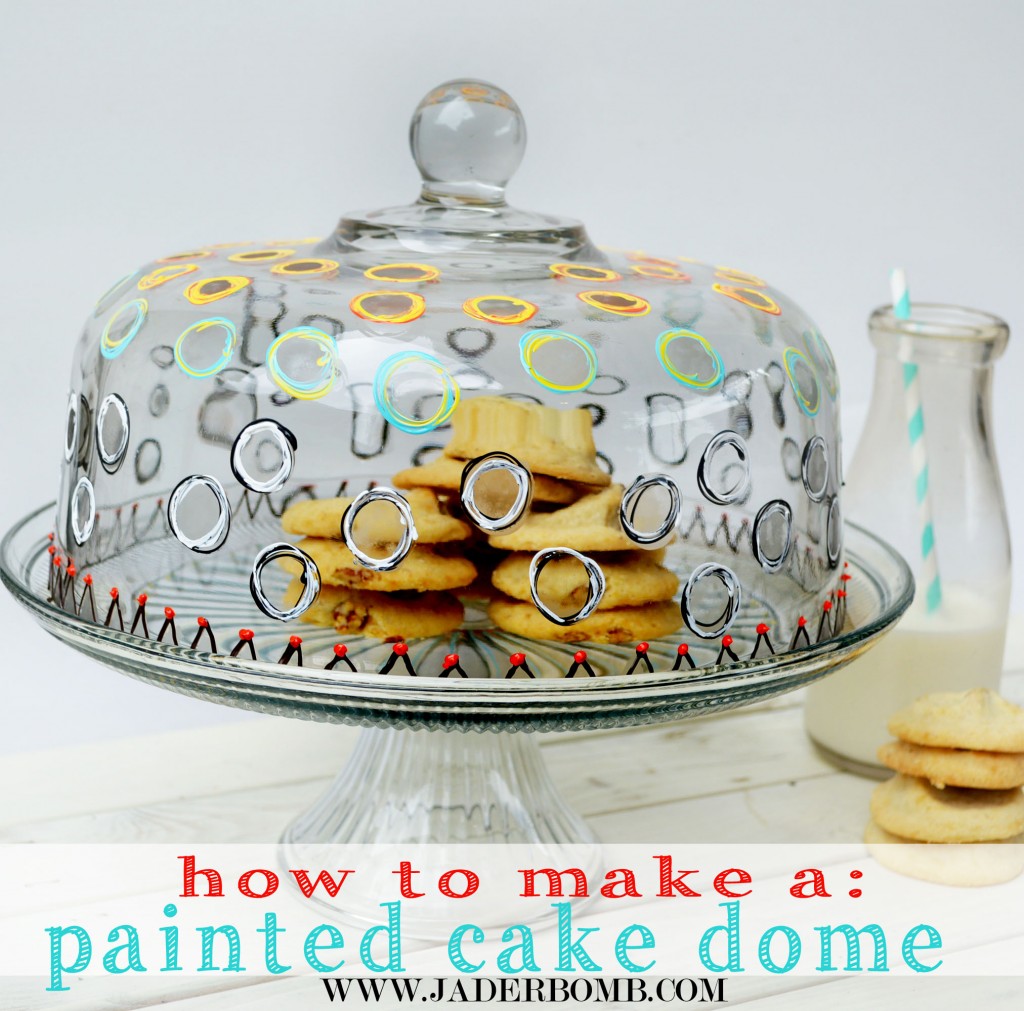
The one thing I love about this project is you can use whatever colors you want and anyone at any age can do this. It’s like rainbow lights instead of road lights. Good luck sticking things in this dome because I think the bright circus like print on the outside makes things on the inside look yummier.

If you want to check out all of my other posts that I have done for the 12 Months of Martha check them out here.

If you like crafting with glass then you want to check out my easy tutorial on cutting glass. Don’t forget to follow me on instagram, just search JADERBOMB. Also you can look up #12monthsofmartha to see what everyone else in the group is posting. Big huge glittery hugs!
Jade

This is a sponsored post but 100% is my opinion. Panky Promise!