Tag Archives: fall decor

I am not quite sure what I love more white pumpkins, fake pumpkins or a good ole milk glass pumpkin. If you have never heard of a fake milk glass pumpkin then you are in for a real treat. I created some today and they are on the I Love to Create blog. It’s sorta like a “white Fall” instead of a “white Christmas”.

Let’s be real ok. I try my best to think logically when I craft. In other words I think about YOU then ME. 

I know me and Martha are pretty much best friends and all but I am NOT her. With that said I can’t afford to buy 27 real pumpkins and embellish each and every one of them. I have to eat ya know. Which is why I craft with FAKE ones. The kind that you can decorate, store in a huge tupperware then take them out the next year to use all over again. Please tell me I am not the only one who does this. What’s funny is I went in my attic today to look for things I made last year and I couldn’t seem to find anything.

Maybe last year when I was about to put them up I realized it was more work to take down the ladder, walk up the stairs and store them nicely so I just threw them all away. I tend to do cray-cray stuff like that anyways. I will more than likely find what I was looking for when I take down Christams decor.

Milk Glass Pumpkin

All Photos by Jade Harrington / Jaderbomb

Wanna see everything I have created for the I Love to Create blog? Check it out here!

I hope you enjoy this tutorial. Big huge glittery hugs from my fake pumpkins to yours!

Visit me on FacebookTwitter,Pinterest, or Instagram!

jaderbomb love


ST_12_months_of_Martha_Logo-1

How to make a Decoupaged Candy Corn Lace Lamp

Decoupaged Lace Lamp

Happy Monday! It’s all about Martha Stewart Crafts decoupage supplies today

When I think of decoupage I always go back to that day in 1st grade when I coated my entire hand with Elmer’s glue. What was I thinking?

The only thing I was missing was painted lace which is why we are using some today for our lamp.

I mean, doesn’t anything look better with lace wrapped around it? Hopefully it won’t turn out like these tights I bought last year. Oh and incase you missed it check out this lace paper I made.

you will need jaderbomb

  Martha Stewart Crafts craft paint in JONQUIL, CARROT and CHESNUT BROWNMartha Stewart Crafts Decoupage White Floral Lace TrimMartha Stewart Crafts durable matte decoupage mediumPaint brush | Lamp | Decoupage brush 

See the entire decoupage line here. I don’t think I will have enough day’s in the week to use all of these awesome products.

lace-lamp-supplies

Today we will turn this boring lamp into an oversized lace candy corn. I know, I know that might seem hard but it’s easy with the materials we have.

You know I have not seen a lace candy corn inspired lamp floating around Pinterest lately so I figured I would give it a go.

lace-lamp-steps

The first thing you want to do is paint your lamp a light background color. Keep it simple because you want the lace to pop and not the lamp shade behind the lace.

how-to-paint-lace

Since a candy corn is bigger on the bottom I tried to mimic that with the lace size. This pack of decoupage lace trim worked perfectly since there were multiple sizes in it.

lamp-lace-painted

how-to-decoupage-lamps

Once your lace is dry it’s time to start applying it to the lamp shade with the decoupage glue. This glue is super smooth and creamy and it’s easy to create a thin even coat with the decoupage brush.

decoupaged-lace-lamp-tutorial

I hope you enjoyed this tutorial and it gives you a ton of inspiration.  I am certain this will look yummy with all of my Fall decor. Maybe I will try to glue lace to my hand later!

Wanna see what else I have done for the 12 months of Martha, check it out here.

jade

marthastewartdisclaimer

Well happy Monday Jaderbugs! I can’t believe it’s 11 pm and I am just getting to write this post.  I could not wait to post this tutorial because I think it’s super cute for this time of year.
The other day I went in the attic to get a “wreath” out and  I realized I had quite a few decorated wreaths. I guess I felt the need for the past 10 years to decorate a wreath and put it in the attic so I can “use” it again the next year. Ehh, no. I don’t think I ever re-used a wreath so I figured I would make a wreath that I can really RE-USE for each season.
Just in case you are wondering I gave the wreath’s to a good home! Let’s get to it.

INGREDIENTS:

*Craft Ring
*Bow
*Burlap
*Glue Gun
*Scissors
*Mini Clothespins
*Stickers 

You can click on the links in the “ingredients” to purchase all of the materials in one spot.

The first thing you want to do is cut out strips of burlap. Your craft ring I am using is wooden only because I wanted something that would be really sturdy. Once you are done cutting your strips then you are ready to glue. Slap a little dot of glue down and start wrapping your craft ring. Over lap the burlap just a little bit like below.

This is what is will look like once it is completely wrapped with burlap. If you don’t know how to make a bow you can always buy pre made ones from your local craft store. Hobby Lobby and Michaels always has nice bows. I bought this black and white one from Michael’s, isn’t it so cute.

The good thing about the burlap is you can add different things to it for different occasions without messing it up. All I did to dress mine up was take some stickers, add some hot glue to the back of it then attach it to a mini clothespin. Remember when we overlapped the burlap? This is why. So we can put the clothespins on each little strip of burlap.

Don’t forget you can do this with flowers and ton’s of other things. So awesome.

I love gnomes so I totally took advantage of Martha Stewart’s little gnome stickers.

I hope you enjoyed visiting with me and my gnomes. See you in the next post Jaderbugs.

P.S. I totally thing this needs to be in a magazine, :).

What will you put on your wreath?

There is nothing better than a fun fall mantle to dazzle up your home. I personally love taking advantage (badly) of every single holiday or special occasion. Check out what I made with things I already had laying around the house!

Happy FALL YALL! I am finally showing you my shelf that I decorated in the kitchen for the Fall holidays. I’ve been showing little tid bits of different projects on Facebook and Instagram so I am excited to be done with this shelf. Fun part will be getting in the attic and decorating the rest of our house!

Monday is almost over and guess what? That means we are are closer to the weekend! Sometimes I find myself counting down the day’s till the weekend. I mean what’s so bad about the week? I think it’s because of work. (haahaa)

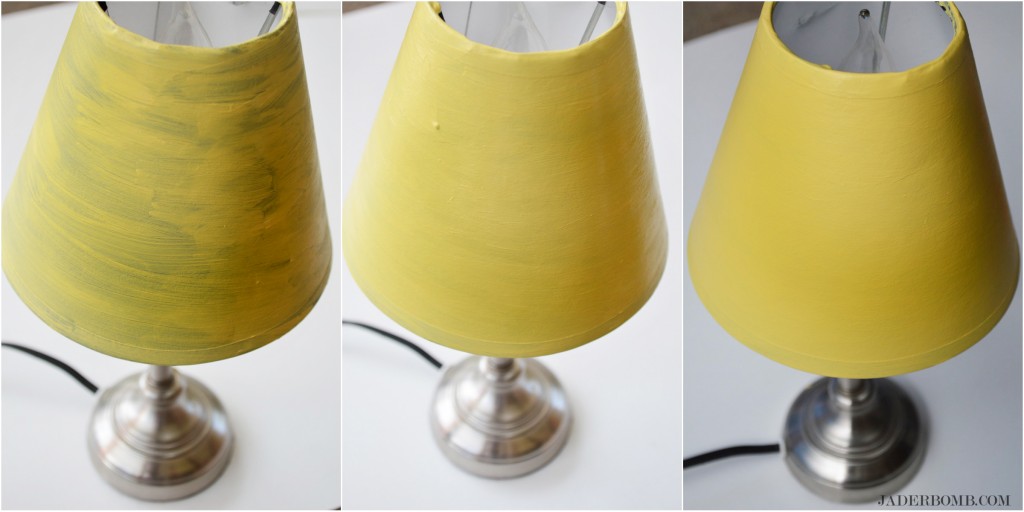
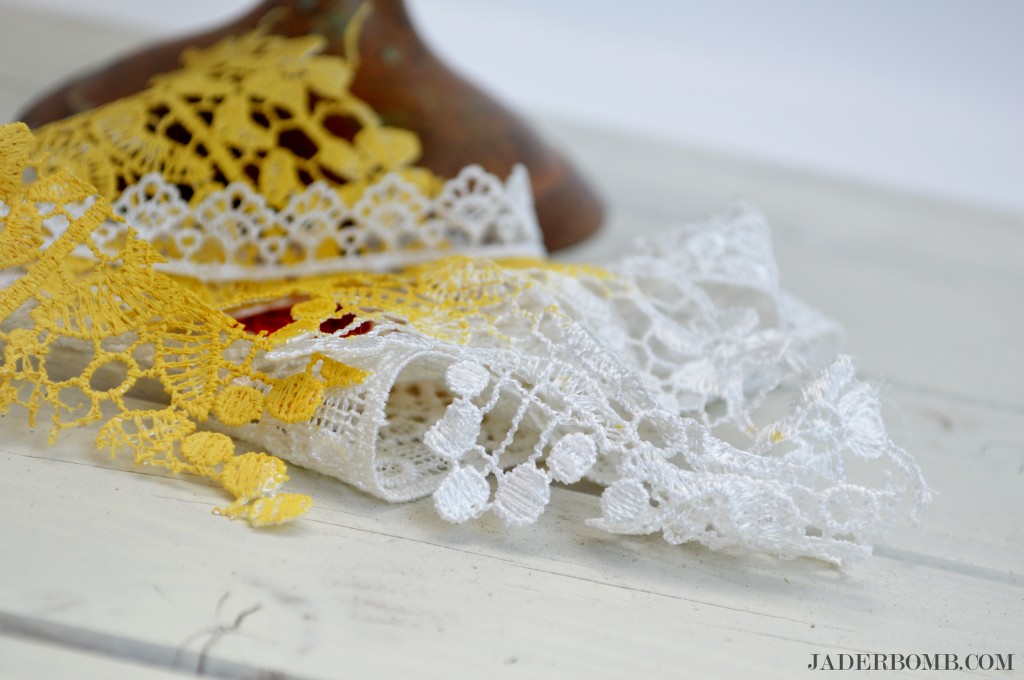
I’ve been seeing a lot of Fall decor lately so I figured I would follow the trend. I mean it is FALL YALL! There is only ONE problem with Fall. I am not a huge fan of all the “traditional” Fall colors. EEEK. Did I just say that? When I was growing up our house was always decorated, especially for the holidays. For some reason I only remember my mom decorating in the “traditional” Fall colors, which was really pretty but a little boring to a bright and whimsical girl like me. I swoon over FALL colors every time I see them but I just can’t do it. I mean, look at my kitchen wall color. It’s turquoise. I also added some rustic stars, vintage jars, a vintage “yellow” can and some vintage gas station numbers to my  kitchen decor.

Let take a look at what FALL look’s like in my head…

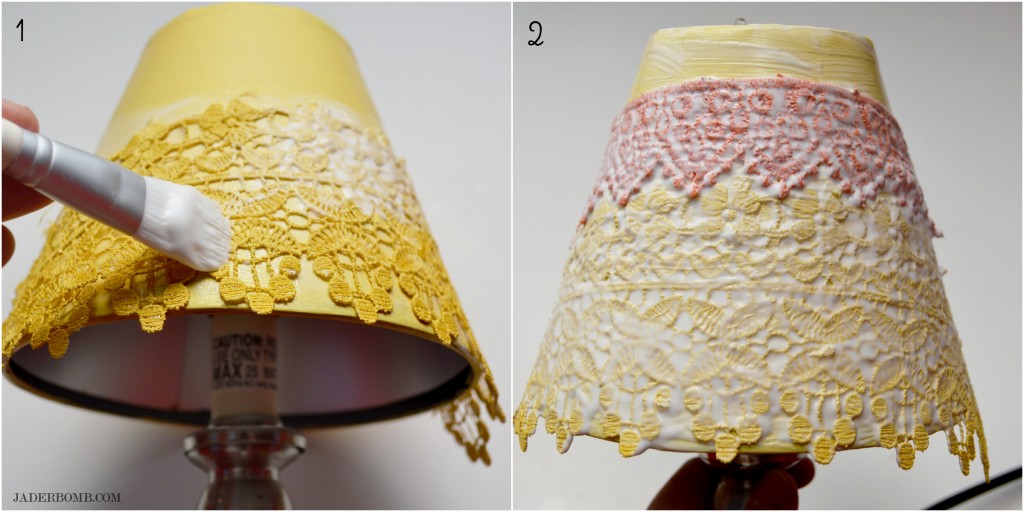
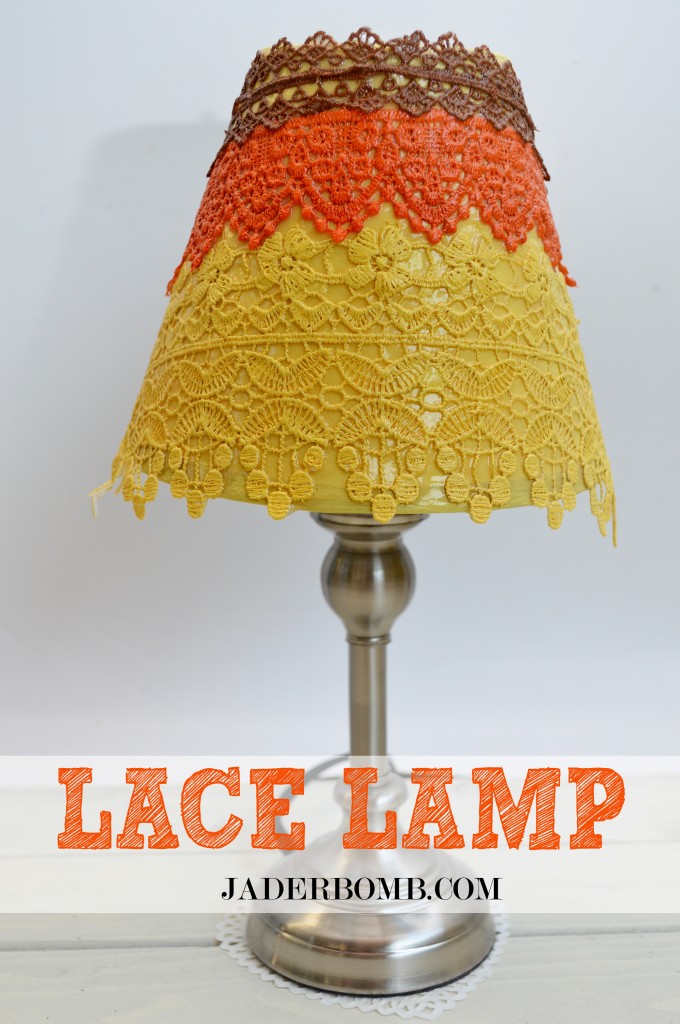
I am loving red and orange together lately! Check out the candle holder here.

I was totally inspired by my [friend] Stephen with this. Stephen is one of the judges on TLC’S craft wars and he does ton’s of this in his new book “Glitterville’s Handmade Halloween”. Trust me you NEED this book! Buy it here.  I think the black and white make everything else in my kitchen POP. I painted on real wood so it feels warm and cozy when I look at them. (tutorial coming this week)

I love my homemade vases because you can actually add water in them! I will be posting a tutorial this week on how I made them.  I can’t even express how inexpensive this craft is. When I think of Fall I think of natural things. Paper feels natural to me and that is why I used this on my shelf.

What else SCREAM’S FALL like mini flags with mini clothespins! Again I went with natural colors here since I have ton’s of other things bursting with color. I used black and white bakers twine to go along with my black and white FALL theme. You can order mini clothespins in my ETSY shop.

I am loving this print I made the other day. Yes it’s a silk screen. Yes I made it at my house. Yes you can too. Stay tuned for this tutorial because all I will say is you will be purchasing the machine I made it with!

This is a mirror I made a while back but I thought the black and white went with my theme. See the tutorial here.  If you follow my blog then you already know my LOVE for black and white. I think I love it because it allows me to add POP’S of color all over! Remember my bedroom walls and my napkin flags?

How could a live plant not feel like FALL! The fresh green just makes me smile plus it adds good energy in the house!

The rest of the week I will show you tutorial’s on everything I made for my kitchen decor so make sure and come back!

Huge Glittery Hugs, Jade

Pumpkin Pie Potpourri-Tutorial

Hey there all you little Jaderbugs! How is your week{end} going! I HOPE good because today is FRIDAY!!!!
I used to get excited about the weekends when they only consisted of getting up late in the mornings and watching cartoons. Drinking coffee milk and more coffee milk. 
I really meant to post this alot earlier but had some unexpected things take place and here I am finally home and making SURE I post for all of my jaderbugs! 
I hope you enjoy it because “lemme” tell you this baby smells GOOD! Let’s get started! 


p.s. I just used cloves and nutmeg.
p.s. just cut the lid of. put holes in pumkin.
p.s.  After cleaning the pumpkin add some ground nutmeg

sending you all cheese and doodads!!! jaderbomb


Check out Martha’s original craft HERE


(me on the show!)

Just in case you are not aware of my countdown I am doing right now you can click HERE to read all about it!!!
Make sure you click on the Martha countdown tab on my blog to see the crafts I have already done!
Thanks to Martha Stewart crafts for sponsoring me with craft supplies!