Tag Archives: jaderbomb.com

Martha Stewart Countdown #36 Cozy Travel Cushion for Pets

What’s upppp Jaderbugs! It’s such a pretty day outside! I could not wait to post this craft because I just knew everyone out there would be able to do it and it’s a perfect Christmas gift. Last week Martha’s dog’s tweeted me about this craft and I meant to post it earlier but due to a death in the family I kinda got sidetracked. {{so sorry Francesca and Sharkey}} Wanna meet them? OK!

Read more about Francesca HERE

Read more about Sharkey HERE

They really are the cutest things ever! Plus, they are totally into computers like Ceaux Ceaux.. If you don’t know who Ceaux Ceaux is you can read her blog HERE… She is my dog and FABULOUS!
There are a few things you will need to do this craft. A towel, batting and embroidery thread. OH! Plus lots of doggie love. Let’s get started!

I bought 2 towels thinking I would use one color on each side. Ya know, dark blue so you don’t see if it get’s dirty and light blue {{for show}}. Smart huh! HOWEVER. I only used 1 towel. I didn’t realize how big they were and my Co isn’t that big. But I still plan on making the light one so she looks pretty on it! Co is spoiled. Seriously.

 Since I used 1 towel I just folded it in half and sewed the 2 sides together. Leave one side open so you can slide the batting inside. See how I did it? Super easy. I doubled up my batting so it was really comfy for her.

 I used an off white embroidery thread. Make sure you get the right needle (embroidery needle) for this because it needs to be tough to go through all of the layers. You will push the needle through to the bottom and after just pass it back through to the top. Tie a knot to secure the thread. Your doing this to the batting does not move around inside of the towel. VOILA!

 So, I put it down and CO just went right on it. It’s like she knew it was for her. She does this “stretching thing” and she was totally doing it here.

Then all of a sudden she started doing her yoga. Yes. She does yoga. Did you know dog’s can do that? Click here to read more!

Last was the look. I don’t know how she does it. Maybe it’s the mixture of the eyes, moles and hair coming out all over her face. What cha think? CUTE or WHAT! I hope you enjoyed this craft because I did!

I hope you get loads and loads of puppy dog eyes today, your JADERBOMB

Check out Martha’s original craft HERE

(me on the show!)
Just in case you are not aware of my countdown I am doing right now you can click HERE to read all about it!!!
Make sure you click on the Martha countdown tab on my blog to see the crafts I have already done!
And I will put a link on my website which is www.jaderbomb.com!!!!
AND IF YOU DECIDE TO DO ANY OF THE CRAFTS, SHOOT ME AN EMAIL AND I WILL ATTACH  IT TO THE POST WITH A LINK THAT GOES STRAIT TO YOUR BLOG!  IF YOU DON’T HAVE A BLOG JUST EMAIL IT TO ME AND I WILL PUT IT UP!!!!
Thanks to Martha Stewart crafts for sponsoring me with craft supplies!

Martha Stewart Countdown #35 Astronomical Accent

Hey my JADERBUGS! How are y’all doing tonight! I am {{totally}} making like 100 more of these babies. I saw this craft in Martha’s December issue and I just could not pass it up! I have a feeling all of my jaderbugs are gonna be glittering it up this weekend! Let’s get started!

 You will need a couple of things to begin. {{drummm rolllll}}… Scissors, paint brush, paint, scrapbook paper, tinsel glitter, scoring board, hole puncher, template

Seriously. How pretty is this tinsel glitter! When they sent me these babies I could not craft fast enough! OH, and I am so amazed at how awesome this scoring board works. They have detailed measurements on it and a little compartment for you to store the bone folder tool in… SO MUCH FUN. I mean, who doesn’t like tons of compartments. I always seem to do that to everything in my life then I forget what compartment I put it in to begin with.

The instructions online may SEEM confusing but they really aren’t . I put a picture of each step to try and make it easier for you to follow. If you click on the picture it will enlarge and you can see it better!

Measure and cut the watercolor paper to make two 20-inch squares. Use a bone folder to fold 1 square as shown in this diagram; in the last step, measure four inches up from center and mark a line to each corner and cut along that line. Unfold shape; it will be a star. Repeat to create a second star.

 When you are ready to start glittering just grab a brush and coat with paint. You want to make sure your paint is wet when you sprinkle glitter so it sticks. I have to admit that using tinsel glitter is way different than using Martha’s regular glitter. If you want to use the tinsel glitter I suggest using Mod Podge instead of paint.

Let it dry over night! {{truh-rust-me}}. I tried to rush the project so I could get it up for you but eh eh…Once it is completely dry you will line the crease in each point with hot glue and hold together till it’s dry. This will give you that crisp point on top of the star. See! How cool is this! I never knew I could make a star but not I will be whipping these suckers out!

r

 I wanted to use some pretty ribbon then I remembered I had all of this pretty string. I love bright colors!

 WELL!!! Whaduyuh think!

  I am absolutely in love with it! I think I will make some with glow in the dark paint! I hope you enjoyed this craft and you make 4000 of them tonight!

Sending you stars hanging over you while you sleep, your JADERBOMB

Check out Martha’s original craft HERE

(me on the show!)


Just in case you are not aware of my countdown I am doing right now you can click HERE to read all about it!!!
Make sure you click on the Martha countdown tab on my blog to see the crafts I have already done!
And I will put a link on my website which is www.jaderbomb.com!!!!
AND IF YOU DECIDE TO DO ANY OF THE CRAFTS, SHOOT ME AN EMAIL AND I WILL ATTACH  IT TO THE POST WITH A LINK THAT GOES STRAIT TO YOUR BLOG! OR IF YOU DON’T HAVE A BLOG JUST EMAIL IT TO ME AND I WILL STILL PUT IT UP!!!!
Thanks to Martha Stewart crafts for sponsoring me with craft supplies!


Shabby Chic Lampshade

~First things you will need before you start this project are a pair of scissors, felt, lampshade (new or old) and a small hot glue gun. Are you excited yet!!! I AM~

Once you find the lampshade you want to work with then you can start to make it shabby chic~I like to use old dingy lampshades because it feels nice to bring it back to life, however you can use a new one if you choose to. You will be applying felt on the lampshade so you want to make sure you have enough felt before you start.

I just used the 9×12 sheets from Hobby Lobby, or you can get them at your local craft store. They are usually really cheap, I paid $.29 per sheet and used about 10 sheets. Before you start cutting the felt plug your hot glue gun in.
Below is the lampshade I am using today.

I cut squares approximately 1 1/2″ x 2 1/2″. All I did was fold the sheet in half then cut at the crease. As you can see below I have 4 different sizes all done by continuously folding in half and cutting.I continued this process until my squares were around that size. Remember, the smaller you go the fuller the lamp will look.

When you are ready for gluing you will need to get one of your squares and fold it in half. (thanks paige for being my hand model) LOL

Next you will gently take your hot glue gun and squeeze the glue onto the crease you just created.

Once you have your glue on the crease, quickly fold your square in half again. This will make it a lot smaller so do not worry if your square has shrunk a lot!

You will directly place the felt onto the lampshade without letting go of the fold you just made. Your first piece will take the most time because you need to hold it down with your fingers until the glue is completely dry. (please be careful, glue can really burn you :)

Once your first piece is glued on, you can now start adding the other pieces of felt using the same technique as the first. The only difference now is that you will not have to hold the piece of felt down as long. Don’t be discouraged after you put your first one on! I promise after you put your 3rd or 4th piece on you will start to see the way it’s supposed to look~

GOOD LUCK~~ Please post pictures when you are done and I will do a follow up blog with all the ones that were sent to me~~~ I can’t wait to see your magnificent lampshade~

MY VERY OWN SHABBY CHIC FELT LAMPSHADE~
P.S. This would be a great Christmas gift~

CLICK HERE TO WATCH VIDEO

(me on the show!)


 Just in case you are not aware of my countdown I am doing right now you can click HERE to read all about it!!!
 Make sure you click on the Martha countdown tab on my blog to see the crafts I have already done!
And I will put a link on my website which is www.jaderbomb.com!!!!
AND IF YOU DECIDE TO DO ANY OF THE CRAFTS, SHOOT ME AN EMAIL AND I WILL ATTACH  IT TO THE POST WITH A LINK THAT GOES STRAIT TO YOUR BLOG! OR IF YOU DON’T HAVE A BLOG JUST EMAIL IT TO ME AND I WILL STILL PUT IT UP!!!!
Thanks to Martha Stewart crafts for sponsoring me with craft supplies!

Wanna see how I decorated my craft booth

I totally had my first craft show this past weekend! It was AMAZING! I have been wanting to do a craft show for years and I never took the plunge. WHY? Well, it’s scary to think of people walking past your booth and not coming in or coming in and NEVER buying anything. Good news though, people DIDN’T walk past my booth because they came in AND, I sold a lot of things! I just wanted to share the layout of my tent because everyone online wanted to see the outcome. Can’t wait till the next show~
This is the front of the tent. You can see it’s not that big but big isn’t always good 🙂
Keep Calm and Carry ON!  
Ashy made these awesome wooden trees for me to hang all of my signs on. They came out so great!
This is the other wooden tree and it is FULL of my awesome scarves. You can find them in my ETSY shop HERE!
You remember my tutorial on my “stained glass curtains”…Well, these are them! Click HERE to see how I made them! Here are some other glass crafts
Stained Glass Frame
Stained Heart Mobile
I found these wire structures in my studio so I figured I would put them to good use. I THINK they are made for tomato’s  but  we all know I am not a gardner {{lol}} All of my wooden signs are made from wood that is SUPER DUPER old. They are really pretty when you can see them away from the rest. I will be updating my ETSY shop this weekend so keep an eye out for some of these babies in here! If you want to get to my ETSY shop click HERE.
These are my vintage fabric notecards and boy were they a hit. Not as much as a hit as I would have liked but I just wanted to show you how you can hang things but putting twine up and using baby clothespins. What did you say? Where can you get baby clothes pins? Well in my ETSY shop!!!
This was the fabulous chalkboard section. This was a HIT! Everyone loves {{especially ME}} being able to write different messages on things without it being permanent.  Remember my Chalk Board paint tutorials? You can purchase any of my chalkboard wine glass in my ETSY shop HERE. Here are some other crafts I did with Chalkboard Paint:
Chalkboard cabinets 
Homemade Bulletin Board
Chalkboard Bakers Rack
Puzzle Canister
OH and my DOOR!

Do you see a pattern?


We hope you enjoyed our tent! Have fun with your booth and if you don’t have a booth you can use all of these ideas in your house!!!
Sending you loads and loads of bright colored ideas,
your one and only jaderbomb

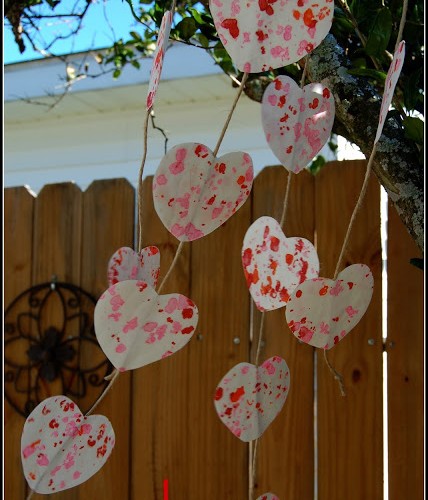
Crayon Stained-Glass Hearts

 I am full of LOVE today. Love for my life and LOVE for the Universe. I will be on Martha Stewart’s show today and I am kinda freaking out. I mean, it’s only in front of millions of people. NO pressure, right? What if I say the wrong thing? Will she think I’m silly? I just wanted to post this fun craft and share with you how thrilled I am and this feels like one big DREAM!
Don’t forget I will be covering the event LIVE on my blog so keep checking my blog out!
WISH ME LUCK!
I will be posting LOTS of pictures from the whole thing so stay tuned my little jaderbugs.


p.s. for the wooden sticks i used bamboo.  i had these for decoration and just broke one in half.  how easy is that!
p.s. shaving with scissors was the easiest way!
p.s. when you put your 2nd piece of wax paper on top of the shavings, it’s best to put a towel on top before you iron it.  personal experience, it works best 🙂
p.s. you can use any cookie cutter or you can free hand your design.
p.s. after cutting out the designs simply put one down, put hot glue on the side facing upward then place rope in the middle.  before the glue dries you need to put the other heart on top and press gently with your hand.
p.s. how cute is this!
p.s. if you put it outside, just remember it is made with paper and if it gets wet it will fall apart.
 
Just in case you are not aware of my countdown I am doing right now you can click HERE to read all about it!!!
Make sure you click on the Martha countdown tab on my blog to see the crafts I have already done!
And I will put a link on my website which is www.jaderbomb.com!!!!
AND IF YOU DECIDE TO DO ANY OF THE CRAFTS, SHOOT ME AN EMAIL AND I WILL ATTACH  IT TO THE POST WITH A LINK THAT GOES STRAIT TO YOUR BLOG! OR IF YOU DON’T HAVE A BLOG JUST EMAIL IT TO ME AND I WILL STILL PUT IT UP!!!!
[email protected]