Tag Archives: plaid

I am pleased to announce the winner of the Martha Stewart giveaway! I want to thank everyone who entered the giveaway. It was a fun one and I am sure Kelly will enjoy every single item.  So Kelly if you are reading this, I get your FIRST craft you make! (haha) Just kidding!

martha stewart giveaway jaderbomb


jaderbomb_news

*I am inside of the new May issue of Woman’s Day magazine…. It just hit the shelves and the cover has “taco’s” on it. Let me know if you find it.

*I am happy and ecstatic to say Martha Stewart mentioned me on her blog the other day! Super exciting, click HERE to see it.

Super fun and busy week ahead! See ya in the next post Jaderbugs,

jade-26

Dear Universe, thank you for sending me a huge box of Martha Stewart Crafts Glass Paint by Plaid. When I say there is a party going on in my head, believe that! I am always amazed by Martha Stewart’s products. They are consistent and dependable.  Martha Stewart has this new line of glass paint out and I was so honored to review the glass paint and glass accessories. I will tell you the one thing I could not wait to get my hands on the adhesive silk screens. Yep, you heard that right. Adhesive.

In today’s tutorial I will show you how to turn a boring plate into a phenomenal work of art, and all by using the  Martha Stewart Crafts Glass Paint.

These are all of the new glass tools. They work great with her Crafts Glass Paint.

Check out these whimsical colors! The groups matter in this case. Some of the frost colors look very pigmented but in actuality they are very translucent. I don’t mind that because when I think of glass paint I think of something that light can actually pass through.

These are some of the new stencils for the glass line. The great thing about all of the stencils are the adhesive backs. You can adhere them to anything, which in return will give you a perfect stencil.  No bleeding with these!

You can find the Martha Stewart Glass Paint from Plaid at all at Michaels stores.

 I made this “sample” so I could see what color I want to use. One reason I recommend doing this is because some of the colors change once they get on  the glass. I used some plastic knives, painted each color on the tip, wrote the name on the other end, drilled a hole in them and voila! I can always go back to this for reference. I know, it’s extra work but totally worth it in the end. (I actually think this is so pretty).

Ingredients: 

Martha Stewart Glass Paint
Glass Handled Squeegee
Glass Squeegee Set
Glass Tools & Accessories
Glass Silkscreen – Doily Lace
Glass Plate
Tea lights glass holders
Scissors
Alcohol
Cotton Balls
Paper towels
*Bright and Happy Thoughts
[this is the most important ingredient]

First thing you will do is clean your surface with soap and water. When it’s dry take off any residue by rubbing alcohol over the entire surface.

When you open your pack of silk screen stencils you will notice they are on one sheet. Get your scissors and cut along all of the lines. Your silk screens are separated and ready to use.

When your surface is ready you will gently peel the stencil off of the paper. Remember you have natural oils on your hands so try not to touch the adhesive backing too much. Place your stencil where you want it and lightly press the stencil down with your hand. I used a paper towel to rub it down onto my plate. Double check for any bubbles or lumps before you start applying the paint.

You do not need a ton of paint to do a silk screen. Put a line of paint at the top of your stencil and get your squeegee ready. If you wanted you could also use the dauber instead of the squeegee. I tried both of them and was pleased with how smooth the paint looked when I used the squeegee.

P.S. If you mess up and you need  to start over, put some alcohol on a cotton swab and rub your paint off of the surface. This can only happen when your paint is wet. If you notice a mistake when it’s dry, use your scraper for that. That baby works wonders.

Slowly start pulling the paint down over the stencil. Try to let the squeegee do all of the work, be gentle and you will get consistent results.

Make sure to take your stencil off while the paint is wet.  It’s very important after you put a coat of paint to take the stencil off immediately and put it in water. If you let it dry on your surface then pull it off, it will more than likely pull up some of your paint.  You do not want the paint to dry on the silk screen.
After you clean your silk screen let it dry and you can reuse it again. How awesome is this!

[Are you getting excited?}

This is what it will look like when it’s done. Make sure to let the paint dry before you do your next layer of paint. It’s not mandatory but you will see better results if you do this.

One thing that I am loving is the tip on the bottles. The tapered tip makes it really easy to free hand pretty much anything. I think it adds that whimsical pop to your project.
Mexican Folk Art is screaming all over this already, don’t you agree. I also made two tea light holders to go along with the plate. I used the exact same process as the plate.

Are you inspired yet?

When you are done it’s important you let your project air dry for about an hour. You can cure the paint by sticking in an oven for 30 minutes at 350°.  Get the complete glass baking instructions here.  FYI: The fine glitter paint can NOT go in the oven.

 I hope you enjoyed this tutorial because I had a blast making this craft. I already have ton’s of ideas going through my head so stay tuned for more crafts with Martha Stewart Crafts Glass Paint.

Check out Plaid on TwitterFacebook, and Pinterest!
#marthaglass


 Disclosure: This post was written as part of a paid campaign with Martha Stewart Glass Paints and Blueprint Social. However all of the opinions in this post are my own.


{seriously} These are so flippin cute!

Happy 2’s day Jaderbugs! I hope everyone is having a day full of love and laughter! If I haven’t told you lately, I am so glad you come visit me everyday. It really makes me so very happy, and if this is your first time visiting my “online home” WELCOME! If you know me then you know I have a very large stock in bottle caps and corks. Such an odd combo but yet they are two things that come in SO handy all of the time.

The other day I needed extra magnets on the fridge and there was no way I was going to go buy some! {go figure}

If you walked in my studio you would fuss at me if I ever bought ANYTHING!

INGREDIENTS:
{click the links below to order}

 Bottle Caps
(you can order the here or use ones that you have collected)
Seqins (get these from any craft store)
Mod Podge Dimensional Magic 
Magnetic Buttons

First thing you will do is lay your bottle caps down flat. Fill them with sequins and slowly squeeze in your Mod Podge.

FYI:
Don’t shake the bottle of Mod Podge Dimensional Magic. When you shake it, it causes bubbles and the last thing you want is bubbles. Once you are done check on them for about the first 15 min to pop any bubbles that float to the top. I use a needle to pop my bubbles. 

Once they are completely dry you will take a round magnet, peel of the sticky back and stick it on the bottle cap.  

 Tadahhhh! Oh, and you can get these magnets at Wal-Mart also!

 Are they so cute! Just think you can put any color sequins in them or any color glitter. They are the perfect gift also!

 I hope you all enjoyed this fun tutorial… See ya in the next post!


Hey y’all!! Happy GOOD FRIDAY!!!
I am not quite sure how I am actually typing right now because I ate SO much crawfish today my fingers are FULL….I could just feel my stomach expanding as I slowly swallowed each and every yummy crawfish!

It’s almost Easter time and you know my motto “it’s never too late to get it done”… If you want to spice up some plastic eggs for your Easter table then get this craft done ASAP! Just don’t accidentally EAT one!!! ((haha))

You want to start by getting some PERFECT PLASTIC  eggs. I think these babies are around 2 dollors a bag!

I used four main ingredients for this project.
1.Mod Podge  (I get this from Michael’s Arts and Crafts) I brush the Mod Podge on the egg then sprinkle glitter so it dries on there!
2. Martha Stewart Glitter  (Just incase you have NEVER used this glitter now is the time! You will fall in love)
3.  Martha Stewart glitter glue set
4.  Martha Stewart brushes

These nuggets are amazing!

 I tell ya, these look so good I just want to take a bite out of one!

I hope everyone is STILL enjoying this wonderful FRIDAY night! Enjoy your “EASTER” weekend and come back tomorrow for MORE EASTER fun!

Giving you a BIG hug through the computer,

This post is brought to you Plaid’s Martha Stewart line of paint and stencils. I received product for this post. All opinions expressed are 100% mine. You can check out Plaid’s full Martha Stewart product line here

Homemade Laundry Soap Detergent

Well. I finally did it. About a year ago I remember seeing a blogger friend try a “similar” recipe and I though, “What, that can’t clean like the nice expensive ones do”… Then I lived my life for the next year buying my nice expensive laundry detergent. Certain it WAS the best after all. Then about 3 months ago I saw a random pin on making some! Still didn’t convince me. I was certain my GAIN was the best.  ((plus I don’t love change))

Then about 4 days ago mother in law made me some. I hesitated at first because of fear. The fear of actually “LIKING” it and abandoning my good ole GAIN. I smelled it and it smelled SOO good (even though my brain tried to convince me it wasn’t GAIN)…. Crazy but I am a total texture girl. I LOVED the way it looked and the texture it presented to me. OK. I am buckling at this point… Am I really thinking about trying this stuff….. I had to. It just sat there saying:

I’m CHEAPERRR
I’m prettierrrrr
I’m HOMEMADEEEE

So I put a batch of clothes washing and “tested” this stuff that keeps popping up in front of my eyes. I went about my business doing other chores until my nose sniffed some ridiculously  awesome smell. “There’s no way”, I said. BUT WAY! I secretly got super duper excited and after taking out my first batch I scattered through the dirty clothes to gather ANOTHER load! I kid you not.

So I sit here. Ready to share with you an amazing way to save SOOO much money (don’t worry I will break it down) by making your own laundry detergent.

Ingredients:

I got my BORAX from Wal-Mart. I got lucky because someone must have known I was coming and put ALL of the ingredients I needed right next to each other. Thanks Wal-Mart for making my life amazing! This box was about 3 bucks. The Borax cleans, disinfects and softens the water.

These babies were only .99 cents each! Epic deal. The Fels Naptha Soap is a heavy duty laundry soap bar & stain remover.

This was around 3.49 for the box. Still liking this!!! Arm & Hammer Washing Soda works on grease and neutralizes odors.

Mother in law told me she added this to enhance the smell so I figured I would try a little bit of it. I think she used another ingredient but I can’t remember what. Our recipes are not exactly the same but I am pretty sure they do the same job!! This was around 4.60 but well worth it.

Get something you won’t use for cheese (((ever again))) hehe…I had an old grater so I figured I would add to everything else it has been through.

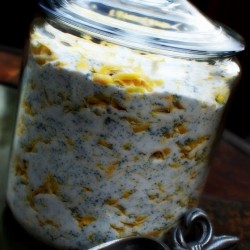
Start by grating your bars of soap. I will put the recipe at the bottom of this post but I grated 4 bars of soap and pouring in all of your ingredients  (recipe below) it will look like this!!!

So pretty right!!!

I made some for my dad and I had to think of something to put on it so he would ALWAYS know what it was!! (you know men, they never REALLY pay attention more than once)… So I grabbed some bright neon labels that I had.

I grabbed one of my Martha Stewart punches and punched out a little sucker!

Just bright enough for him to ALWAYS see! (and not too girly)

If you follow the recipe below you will have enough laundry soap to wash 110 or 200 bad loads of laundry.  Trust me, I scooped the whole batch to figure this out! Let me explain my numbers.
The recipe calls for 2 tablespoons per batch HOWEVER if you are washing a small load or if you don’t have a big washing machine I recommend using 1 tablespoon
So if you use 2 tables spoons for every batch then you will get 110 loads out of it!
If you use 1 table spoon then you will have 200 batches…. AMAZING RIGHT.
If you are like me then you will have some batches that are big and some small but either way it’s amazing how much you have here! Plus it’s all good for ya and full of natural ingredients!
Total price to purchase all the items to make my own detergent was around 14 bucks.
 Homemade detergents do not have alot of  suds.   Don’t worry, this is normal and your clothes will still come out redokulousley clean.

Large Batch Recipe 

4 – Bars Fels Naptha Laundry Soap
1 box of  – Cups Mule Team Borax
1 box Cups Arm & Hammer Washing Soda
1 bottle of Purex Crystals

Grate soap using cheese grater. Combine all ingredients in a bowl and stir well. Place in sealed container or tub and measure out two tablespoons (or 1/8 cup) for each load. I put a medicine cup for my dads batch. Two scoops from that is 2 tablespoons. I know everyone has tons of those suckers laying around!

Smaller Batch Recipe

2 – Cups Laundry Soap Shavings
(you can get this easily from one bar)
1 – Cup Mule Team Borax
1 – Cup Arm & Hammer Washing Soda

Follow instructions for above recipe.

I sure hope you enjoyed this post and let me know how yours comes out!!

Sending you all sortsa good energy to wash every single piece of clothing in your house (like I did),

This post is brought to you Plaid’s Martha Stewart line of paint and stencils. I received product for this post. All opinions expressed are 100% mine. You can check out Plaid’s full Martha Stewart product line here

DIY: Garden GNOMES

Happy SUPER BOWL SUNDAY!!!   I think my mouth is still OPEN from the halftime show. I can’t even get over the fact that MADONNA is still the hottest performer alive! There is nothing like her. Maybe that’s because I grew up with her and she was the most daring person I knew as a child. She has a new album coming out and if you click HERE you can pre-order it!!! I just did!!!

I wanted to squeeze in a fun little craft before my hectic week started. I LOVE gnomes. Maybe it’s that little “red” pointy hat that make me smile. I wanted to make some little plant stakes for some of my lonely plants. We had a really cold winter and my plants are coming alive again. Figured I could make some “friends” for them! 


It all came back when I got this book. I had a credit at a book store for sending in some old books and one day I went in the store and found it. I had this book when I was little and didn’t think I would ever see it again. When I was a little girl I used to watch “The world of David the Gnome”.  Do you remember it? It’s BASED off of this book!!!I will post a clip at the bottom of this post!!!!

The book is called “Gnomes” by Huygen and illustrated by Dutch artist Rien Poortvliet. You can order a copy HERE  if you are interested! I will share some fun facts that are in the book and maybe you will fall in love with garden gnomes like I have!

* The adult male weighs 300 grams and the female weights 250grams * You would typically only come in contact with the male because the females stay home *ONLY the males wears a peaked red cap *They are 7 times as strong as a man *When it’s really cold the male keeps his hands warm by placing them under his beard *They speak their own language, only animals can understand them.* Goodnight is “slitzweitz” and Thank You is ” te diews”.  

Let’s get started!!!

Grab some air dry clay. You can get this at walmart or any craft store. I order my stash from from the Crayola website!

Grab some  wooden skewers.

Of course you will need red paint and if you are a glitter fanatic like me you will need red glitter! Grab a small detailing brush also. If you follow me then you KNOW my commitment to anything “Martha Stewart”.  I absolutely swear by everything and it is by FAR the best quality of products I have ever worked with.

I used Habanero for my paint. You can get it at Michaels Art’s and Crafts or just order it here. I used red corundum for my glitter and you can get it here.

Start by shaping your air dry clay into the shapes you want. I did two separate pieces for each one then put them together after. Make sure you stick them onto the skewers before they dry. You want them to dry around the wood.

Put some paint on the hat then sprinkle glitter on top!

Don’t forget when you paint your mushroom to leave some little white circles. It will be cute with a couple of these on top.

This is what your mushroom should look like. BEWARE, if you sprinkle glitter while the clay is WET it will stick and you will NOT be able to get it off! ( haha, go figure I learned this the hard way)… But don’t worry, if this happens it will only give your mushroom
“character”.

Tadahhhhh!!! Here are my cute little creations. I just love them and I can’t wait to make a ton of them to put in ALL of my plants. I think I will make them ALL different! I hope you enjoyed this craft and create whatever makes you happy. This clay is super fun and very easy to work with.

Oh, before I forget…here is the video of the cartoon I used to watch.


Sending you lot’s of gnome love,

This post is brought to you Plaid’s Martha Stewart line of paint and stencils. I received product for this post. All opinions expressed are 100% mine. You can check out Plaid’s fullMartha Stewart product line here