Happy SUPER BOWL SUNDAY!!! I think my mouth is still OPEN from the halftime show. I can’t even get over the fact that MADONNA is still the hottest performer alive! There is nothing like her. Maybe that’s because I grew up with her and she was the most daring person I knew as a child. She has a new album coming out and if you click HERE you can pre-order it!!! I just did!!!
I wanted to squeeze in a fun little craft before my hectic week started. I LOVE gnomes. Maybe it’s that little “red” pointy hat that make me smile. I wanted to make some little plant stakes for some of my lonely plants. We had a really cold winter and my plants are coming alive again. Figured I could make some “friends” for them!
It all came back when I got this book. I had a credit at a book store for sending in some old books and one day I went in the store and found it. I had this book when I was little and didn’t think I would ever see it again. When I was a little girl I used to watch “The world of David the Gnome”. Do you remember it? It’s BASED off of this book!!!I will post a clip at the bottom of this post!!!!
The book is called “Gnomes” by Huygen and illustrated by Dutch artist Rien Poortvliet. You can order a copyHERE if you are interested! I will share some fun facts that are in the book and maybe you will fall in love with garden gnomes like I have!
*The adult male weighs 300 grams and the female weights 250grams * You would typically only come in contact with the male because the females stay home *ONLY the males wears a peaked red cap*They are 7 times as strong as a man*When it’s really cold the male keeps his hands warm by placing them under his beard*They speak their own language, only animals can understand them.* Goodnight is “slitzweitz” and Thank You is ” te diews”.
Let’s get started!!!
Grab some air dry clay. You can get this at walmart or any craft store. I order my stash from from the Crayola website!
Grab some wooden skewers.
Of course you will need red paint and if you are a glitter fanatic like me you will need red glitter! Grab a small detailing brush also. If you follow me then you KNOW my commitment to anything “Martha Stewart”. I absolutely swear by everything and it is by FAR the best quality of products I have ever worked with.
I used Habanero for my paint. You can get it at Michaels Art’s and Crafts or just order it here. I used red corundum for my glitter and you can get it here.
Start by shaping your air dry clay into the shapes you want. I did two separate pieces for each one then put them together after. Make sure you stick them onto the skewers before they dry. You want them to dry around the wood.
Put some paint on the hat then sprinkle glitter on top!
Don’t forget when you paint your mushroom to leave some little white circles. It will be cute with a couple of these on top.
This is what your mushroom should look like. BEWARE, if you sprinkle glitter while the clay is WET it will stick and you will NOT be able to get it off! ( haha, go figure I learned this the hard way)… But don’t worry, if this happens it will only give your mushroom
“character”.
Tadahhhhh!!! Here are my cute little creations. I just love them and I can’t wait to make a ton of them to put in ALL of my plants. I think I will make them ALL different! I hope you enjoyed this craft and create whatever makes you happy. This clay is super fun and very easy to work with.
Oh, before I forget…here is the video of the cartoon I used to watch.
Hey Jaderbugs!!! I can’t believe I forgot to click “publish” yesterday after I wrote this!
I wanted to make you something that is FUN and EXCITING for Valentine’s day. I am always drawn into paint samples at any store I go into. I can think of a MILLION things to do with them and I never seem to have enough time! Sometimes I find paint samples that I absolutely can’t choose from, because I love the entire thing. That is why I came up with this fun craft! Why not make your own LIFE SIZE paint samples. You know, the kind where you can “pick” your own colors and “pick” your own names! I had so much fun making this and it would be a great gift to anyone! It is a great and cheap way to add lot’s of decor to a space and you can have tons of them for different holidays!
The colors I used for this project are : Pink Carnation, Raspberry Ice, Fruit Punch, Turquoise, Surf and Sea Lavender. They are all from the Martha Stewart line.
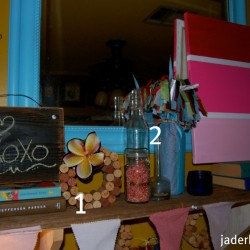
I hope you enjoyed the quick show I made you! If you want to see the tutorials on two of the crafts in the picture above here are the links!!! Enjoy!!!
Stay tuned I will be posting a tutorial on how to make a “head” to put on your wall. You will have to come back to see what kind of HEAD I am talking about!!!!
Deck the doorknobs with jolly kid-made bells. It’s a great activity for days when it’s too wet or chilly to play outside and — between your craft bin and the refrigerator — you probably have all the supplies on hand: an egg carton, paint, glitter, glue, and yarn.
(and you jaderbugs know how much I love GLITTERRR (singing) again)
NINETYYYYYYYY 99999999999999999999999999… (SINGING LOUD in a MANLY voice)
Get your egg carton. Paper works best!
Cut the cone-shape pieces that separate the eggs out of a cardboard carton (one egg carton will produce five bells).
Paint each divider, using acrylic or poster paint. Let dry; apply glue along the edge of the divider, all over the outside, or wherever you like, and sprinkle with glitter.
IF YOU DECIDE TO DO ANY OF THE CRAFTS, SHOOT ME AN EMAIL AND I WILL ATTACH IT TO THE POST WITH A LINK THAT GOES STRAIT TO YOUR BLOG! IF YOU DON’T HAVE A BLOG JUST EMAIL IT TO ME AND I WILL PUT IT UP!!!!


 Why buy confetti when you can MAKE it! Use your Martha Stewart craft punches to make your life easy!
 There is nothing like glass in a bright window! You know I love my BRIGHT glass! It just makes me happy. That simple.
 You know you would totally put this bad boy on your bed. the.best.quilt.eva.
 Everyone has TON’S of old magazines laying around. Roll up some pieces and glue them down on a frame.
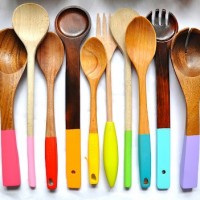
 Why keep your wooden spoons HIDDEN in a FONKY drawer! Dip them babies in your favorite color paint and cooking will never be the same!