Tag Archives: diy ornaments

Dot-Punched Stationery

Give everyday — and inexpensive — note cards and envelopes some flair by trimming the edges with a decorative rotary cutter or using Martha Stewart’s paper punches…(which by the way are MAGNIFICENT)…

Let’s get started Jaderbugs!

Get some note cards…

I am using Martha Stewart’s paper puncher...Did I tell you how these babies work? LIKE MAGIC!

The set I am using comes with 2 punches in a pack. One for he edges and one for the corners. This makes it so handy to use all around a page!

This is your outcome jaderbugs!

Nothing much dot love…

Secure them with a piece of ribbon and BAM!!I hope you enjoyed this Jaderbugs! Just think how you loved ones will feel getting this baby in the mail!

Getting in the holiday spirit by painting my nails red and pink,

Check out Martha’s original craft HERE and you can purchase Martha Stewart’s Encyclopedia of Crafts here!

CLICK HERE TO WATCH VIDEO

(me on the show!)

Click HERE to read all about it!!!
 IF YOU DECIDE TO DO ANY OF THE CRAFTS, SHOOT ME AN EMAIL AND I WILL ATTACH  IT TO THE POST WITH A LINK THAT GOES STRAIT TO YOUR BLOG!  IF YOU DON’T HAVE A BLOG JUST EMAIL IT TO ME AND I WILL PUT IT UP!!!!

JADE@JADERBOMB.COM
Thanks to Martha Stewart crafts for sponsoring me with craft supplies!


Champagne-Bottle Wrap

 If you are looking to give someone a bottle of wine but can’t quite find the right “bag” to put it in then you need to start scrolling down! This wine bottle cover is absolutely adorable! It has just enough “POP” to it and boy would I love to get this! I actually wrapped mine around an empty bottle and I love the way it looks just by itself on the shelf!

You will need a wine bottle, any size will work. You can even do this to glasses or any container!!!

Tissue Paper

Place a champagne bottle on 5 sheets of tissue with the cork 5 inches from one edge.

Tape tissue to the center of the bottle, roll up, and tape down the free edge of the tissue.

Just tuck in the bottom or tape it down.

Tie a cord around the bottle’s neck, and cut paper into strips above it. Add ribbon, and attach a card.

How different is this sucker!

I think the one thing I love the most about this craft is that you can do different colors and then the pom pom at the top turns out simply AMAZING!

Your tired friend, jaderbomb

Check out Martha’s original craft HERE and you can purchase Martha Stewart’s Encyclopedia of Crafts here!

CLICK HERE TO WATCH VIDEO

(me on the show!)
Click HERE to read all about it!!!
 IF YOU DECIDE TO DO ANY OF THE CRAFTS, SHOOT ME AN EMAIL AND I WILL ATTACH  IT TO THE POST WITH A LINK THAT GOES STRAIT TO YOUR BLOG!  IF YOU DON’T HAVE A BLOG JUST EMAIL IT TO ME AND I WILL PUT IT UP!!!!
JADE@JADERBOMB.COM
Thanks to Martha Stewart crafts for sponsoring me with craft supplies!

Martha Stewart Countdown #45 Card Garland

You all know I love garlands! I am still trying to figure out why I love them so much. It might be the fact that they dress up a room in NO time at all! Yeah I think that’s it. Maybe it’s because they are fun to do! Yeah that too! {{teehee}}…

This weekend flew by I tell ya! But I couldn’t help myself with this cute garland. I know everyone is starting to decorate for Christmas and I know someone out there will love this! Keep your mind open with this craft. You can use the same color or the same family of colors. You can make a garland for your Christmas tree or just hang it on something to add some flava flave to your space! Either way this will be a winner in your home and you can say YOU MADE IT!

Use craft punches (or trace a round object and cut out). Attach to heavy thread with stickers; rub with craft stick to secure.  If you really don’t want to do this craft from start to finish you could cheat a little and buy the dot’s!

How pretty is this garland!

So pretty! Remember my stained glass curtain tutorial? I hope you enjoyed this craft and can’t wait to see your pictures! Just email them to me!!

Going cook chicken and stare at my garland, jaderbomb

Check out Martha’s original craft HERE

(me on the show!)
Just in case you are not aware of my countdown I am doing right now you can click HERE to read all about it!!!
Make sure you click on the Martha countdown tab on my blog to see the crafts I have already done!
And I will put a link on my website which is www.jaderbomb.com!!!!
AND IF YOU DECIDE TO DO ANY OF THE CRAFTS, SHOOT ME AN EMAIL AND I WILL ATTACH  IT TO THE POST WITH A LINK THAT GOES STRAIT TO YOUR BLOG!  IF YOU DON’T HAVE A BLOG JUST EMAIL IT TO ME AND I WILL PUT IT UP!!!!
JADE@JADERBOMB.COM
Thanks to Martha Stewart crafts for sponsoring me with craft supplies!

Homemade Christmas Ornaments

I just thought I would start off by saying how sorry I am for making you wait so long for this DIY craft! I have been so busy lately, but that is NO excuse!!! I know that you wait by your computer every day for my next blog~~~ 🙂 And at 11:00 p.m. tonight I am prying my eyes open with Doritos just for YOU~~~
This craft is really easy and really fun. You can give these as gifts or you can make them for yourself (not at all saying that would make you selfish, to keep them ALL to yourself because they are that cute). You could give them to others for Christmas each year and start a nice little tradition ( or you can keep them ALL to yourself 🙂
INGREDIENTS:
~Spray Adhesive
~Glitter
~ Styrofoam Balls
~ Sequins
~Hooks (to hang them with)
~Strait Pins
~thanks P for being my hand model

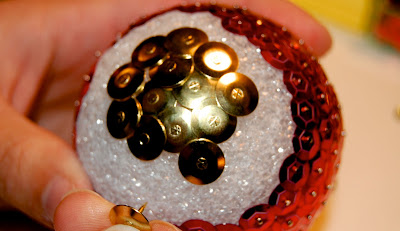
First thing you will do is arrange your sequins on the strait pin according to your taste. I decided to use red, green and gold!
I figured I would do the original Christmas colors, or at-least what makes me feel all warm and cozy inside~

After you attach your sequins, you will gently stick it into the styrofoam ball.
Remember, you do NOT have to stick them into the ball in a certain order, unless you want to.
When the ball is finished you will get out your hooks and stick it where you want. You might have to remove ONE sequined pin to give the hook it’s own special home!

See BELOW…I wish I had an arrow to put here…
You can either screw it in or just push it in, either way works. You just want to remember to be gentle because if you put it in the ball and you take it out to redo it, it will not stay. So I guess what I am saying is you have ONE and only ONE try with this.. or your gonna melt when you go into the sun….:)

See just how beautiful these little balls of fire are!!! I personally would LOVE to get some like this for Christmas! Wouldn’t you?!?!?!?!
(Maybe I will keep just this one)

You can also add other things that interest you. I LOVE gold!! I think it has never gone out of style and while others HATE it, I sport it~~~

As you can see below, I used some gold tacks to put the letter “j” in my ball.

I wanted to add this one in here to show you that you can also use JUST glitter if you want.
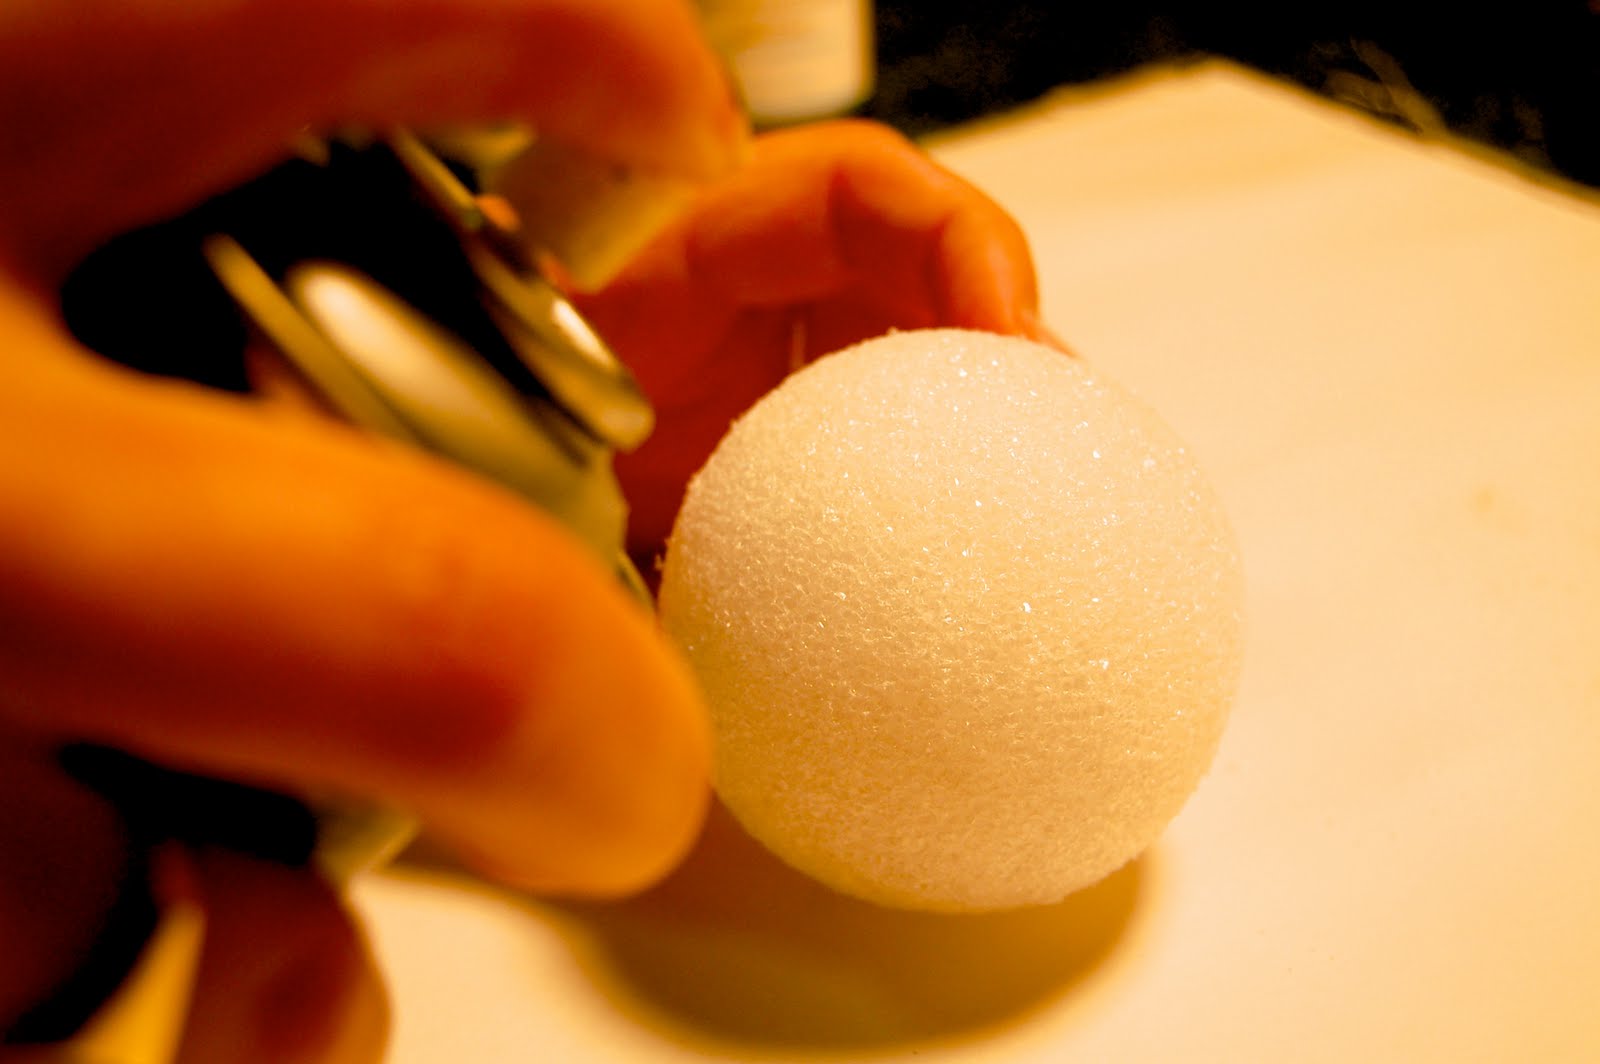
First thing you will do is spray the entire ball with spray adhesive.

Then just sprinkle whatever color glitter you like. I used baby blue and brown. When I was done I added a little splash by sticking pins with a yellow tip in it.
So are you already in your car going get your ingredients!!! I can’t wait to see what you create:)